
Defensive and
Arrest Tactics
A Training Guide For
Law Enforcement Officers
Wisconsin Department of Justice
Law Enforcement Standards Board
June 2017

ii
The Law Enforcement Standards Board approved
this textbook on June 7
th
, 2017.
Training Academy effective date is January 1, 2018.
All law enforcement basic preparatory training courses that
begin on or after January 1
st
, 2018, must incorporate this updated
textbook and any related updates to the curriculum. Academies
beginning before that date may elect to use these updated materials.
Copyright © 2017 by Wisconsin Department of Justice. All rights reserved.
iii
ACKNOWLEDGEMENTS
Many people contributed to the writing of this manual. The Wisconsin
Department of Justice Training and Standards Bureau gratefully acknowledges
the hard work and dedication of the Tactical Skills Advisory Committee, which
suggested and reviewed content for the present guide. The current members of
the Committee are:
Designated Representatives and Practitioners:
Glenn Rehberg, Training & Standards Bureau, Chair
Stephanie Pederson, Training & Standards Bureau
Bradley Hardel, Sheriff’s Representative
Russell Jack, Chief’s Representative
Andrew Kleppe, Wisconsin Technical College System
Kris Perales, Wisconsin State Patrol
Justin Sebestyen/James MacGillis/Al Groszczyk/Aimee Obregon,
Milwaukee PD
Dennis Konkel/Sarah Wronski, Milwaukee County Sheriff’s Office
Kimba Tieu/Chris Masterson, Madison Police Department
Dennis Angle, Waukesha Police Department
Mark Bauman, Eau Claire County Sheriff’s Office
Steve Harlow, Milwaukee Area Technical College
Mike Jaszczak, Superior Police Department
Lisa Wilson, Division of Criminal Investigation
Raymond Merlin, Kenosha County Sheriff’s Office
Benjamin Poller, Division of Criminal Investigation / Madison College
Mike Kuspa/Bill Skurzewski, Waukesha County Technical College
Emeritus (non-voting) Members:
Bob Willis
Randy Revling
Kelly Rehwoldt
Darrel Bauman
Bob Defrang
Mike Valencia
The ground defense working group included Dennis Angle, Steve Harlow, Kimba
Tieu, Bob Willis, and Ben Poller.
iv
COMPETENCIES AND LEARNING
OBJECTIVES
In this course, students will learn the legal basis and limitations on the use of
force, the incident response and disturbance resolution models, approach
considerations, intervention options, and follow-through considerations. Included
in the discussion on the disturbance resolution model is a discussion on
protocols for off-duty actions. Students will learn the recommendations and
protocols for off-duty response and guidelines for interaction between on-duty
and off-duty, retired, and plainclothes officers.
PHASE ONE COMPETENCIES AND LEARNING OBJECTIVES
1. Examine the basis for use of force by officers and the limits on that
use of force, including constitutional, statutory, administrative rule
and policy.
1.1. Identify the situations in which use of force is legitimate.
1.2. Identify the limits that the constitution, Wisconsin law, agency policies
and your own training place on the use of force.
2. Examine the fundamentals of movement and control.
2.1. Explain the importance of control of distance, danger zones, and
relative positioning to single and multiple subjects.
2.2. Explain the fundamentals of movement and control including the open
stance, ready stance, defensive stance, and movement.
2.3. Explain the importance of safely initiating physical contact including
blanket, escort, and the compliance hold (front and rear).
PHASE TWO COMPETENCIES AND LEARNING OBJECTIVES
1. Examine the basis for use of force by officers and the limits on that
use of force, including constitutional, statutory, administrative rule
and policy.
1.1. Identify the situations in which use of force is legitimate.
1.2. Identify the limits that the constitution, Wisconsin law, agency policies
and your own training place on the use of force.
1.3. Prepare a report on an officer-involved use of non-deadly force
scenario.
v
2. Apply the concepts contained within the Incident Response and
Disturbance Resolution models.
2.1. Identify and describe the Incident Response concept and its
application to law enforcement.
2.2. Identify and describe the Disturbance Resolution concept and its
application to law enforcement.
2.3. Identify the protocols to follow when off-duty and encountering a
situation that requires a law enforcement response.
2.4. Describe the issues that an on-duty officer is likely to face when
encountering an off-duty or retired officer who is taking official action.
3. Explain the Intervention Option modes, the circumstances under
which each mode is justified and appropriate, and apply the DAAT
techniques within each mode.
3.1. Identify the circumstances under which “presence” is appropriate, and
apply it in a simulated environment.
3.2. Identify the circumstances under which “dialog” is appropriate, and
apply it in a simulated environment.
3.3. Identify the circumstances under which “control alternatives” is
appropriate, and apply it in a simulated environment.
3.4. Identify the circumstances under which “protective alternatives” is
appropriate, and apply it in a simulated environment.
3.5. Identify the circumstances under which “deadly force” is appropriate,
and apply deadly force decision making in a simulated environment.
3.6. Demonstrate weapon control techniques in a simulated environment.
3.7. Identify and apply the follow-through considerations in a simulated
environment.
3.8. Handcuff and remove handcuffs from subjects in a simulated
environment.
3.9. Frisk and search subjects in a simulated environment.
4. Apply basic ground defense concepts and escapes.
4.1. Defend against a tackle or takedown.
4.2. Fall safely with and without a subject in contact with an officer.
4.3. Defend self within a ground defense position
4.4. Transition from a ground position to a standing position.
4.5. Move properly and escape from various ground positions.
4.6. Use focused strikes from various ground positions.
4.7. Articulate the use of deadly force from ground defense positions.
vi
5. Explain the Use of Force Concepts that frame electronic control
devices (ECD's) and the circumstances under which they are justified
and appropriate.
5.1. Identify the concept of "control alternatives" and the circumstances
under which they are appropriate.
5.2. Identify the electronic control device tools that fall under "control
devices" and the circumstances under which they are appropriate.
5.3. Describe symptoms of medically significant behavior.
5.4. Describe the opportunities within Disturbance Resolution that medically
significant behavior could be observed.
5.5. Manage medically significant behavior with options.
5.6. Identify the steps to follow for distance deployment of an electronic
control device.
5.7. Identify the precautions to follow when assisting an officer who is
deploying an electronic control device.
5.8. Demonstrate the ability to use "cuffing under power" in a simulated
environment.
5.9. Demonstrate the ability to use multiple officer ground handcuffing or
multiple officer ground stabilization to facilitate the application of
chemical restraints in a simulated environment.
5.10. Successfully complete a manufacturer’s ECD course.
vii
TABLE OF CONTENTS
ACKNOWLEDGEMENTS ..............................................................................................III
COMPETENCIES AND LEARNING OBJECTIVES ............................................................. IV
PHASE ONE COMPETENCIES AND LEARNING OBJECTIVES .............................................................. IV
PHASE TWO COMPETENCIES AND LEARNING OBJECTIVES ............................................................. IV
TABLE OF CONTENTS ................................................................................................ VII
INTRODUCTION .......................................................................................................... 1
WHEN CAN OFFICERS USE FORCE? .................................................................................. 1
WHAT ARE THE LIMITS ON USE OF FORCE? ..................................................................... 2
The U.S. Constitution ................................................................................................... 2
Wisconsin Law ............................................................................................................. 2
Agency Policy .............................................................................................................. 3
Officer Training ........................................................................................................... 3
CONCEPTUAL BASIS OF THE DAAT SYSTEM .................................................................. 5
INCIDENT RESPONSE ............................................................................................................. 5
INCIDENT RESPONSE - RESPOND MODEL ................................................................................ 6
Report .......................................................................................................................... 7
Evaluate ...................................................................................................................... 7
Stabilize ....................................................................................................................... 7
Preserve ....................................................................................................................... 7
Organize ...................................................................................................................... 7
Normalize .................................................................................................................... 8
Document/Debrief ...................................................................................................... 8
DISTURBANCE RESOLUTION .................................................................................................... 8
DISTURBANCE RESOLUTION .................................................................................................... 9
APPROACH CONSIDERATIONS ............................................................................................... 10
Decision Making ........................................................................................................ 10
Tactical Deployment ................................................................................................. 10
Tactical Evaluation .................................................................................................... 10
INTERVENTION OPTIONS ...................................................................................................... 11
Safety Priorities ......................................................................................................... 12
Modes Within Intervention Options .......................................................................... 13
FOLLOW-THROUGH CONSIDERATIONS .................................................................................... 14
Stabilize ..................................................................................................................... 15
Search ........................................................................................................................ 15
Escort ......................................................................................................................... 15
Transport ................................................................................................................... 16
Turnover/Release ...................................................................................................... 16
viii
APPROACH CONSIDERATIONS ................................................................................... 17
DECISION MAKING ............................................................................................................. 17
Legal Justification ...................................................................................................... 18
Desirability ................................................................................................................ 18
TACTICAL DEPLOYMENT ....................................................................................................... 20
Control of Distance .................................................................................................... 20
Relative Positioning ................................................................................................... 21
Relative Positioning with Multiple Subjects .............................................................. 22
Team Tactics ............................................................................................................. 22
TACTICAL EVALUATION ........................................................................................................ 24
Threat Assessment Opportunities ............................................................................. 24
Officer/Subject Factors ............................................................................................. 26
Special Circumstances ............................................................................................... 27
Level/Stage/Degree of Stabilization ......................................................................... 29
SUMMARY ........................................................................................................................ 29
INTERVENTION OPTIONS ........................................................................................... 31
PRESENCE ......................................................................................................................... 32
Tactical Stance .......................................................................................................... 32
DIALOGUE ........................................................................................................................ 34
Search Talk ................................................................................................................ 35
Persuasion ................................................................................................................. 35
Light Control Talk ...................................................................................................... 36
Heavy Control Talk .................................................................................................... 36
CONTROL ALTERNATIVES ...................................................................................................... 37
Escort Holds ............................................................................................................... 38
Compliance Holds ...................................................................................................... 39
Control Devices.......................................................................................................... 41
Oleoresin Capsicum (OC) Spray ................................................................................. 44
Electronic Control Devices ......................................................................................... 47
Passive Countermeasures ......................................................................................... 59
PROTECTIVE ALTERNATIVES .................................................................................................. 62
Active Countermeasures ........................................................................................... 63
Incapacitating Techniques ........................................................................................ 69
Intermediate Weapon ............................................................................................... 70
DEADLY FORCE ................................................................................................................... 74
Use of Deadly Force .................................................................................................. 74
DEADLY FORCE DECISION-MAKING ........................................................................................ 75
When Is Deadly Force Reasonable? .......................................................................... 75
Defense of Self or Others .......................................................................................... 75
Preclusion .................................................................................................................. 77
Target Requirements................................................................................................. 77
Defense of Society at Large ....................................................................................... 79
WEAPON CONTROL ............................................................................................................ 80
ix
Weapon Retention .................................................................................................... 80
Facing an Armed Subject .......................................................................................... 82
DYNAMIC SITUATIONS .............................................................................................. 85
MEDICALLY SIGNIFICANT BEHAVIOR ....................................................................................... 85
What is Medically Significant Behavior? ................................................................... 85
Recognizing Medically Significant Behavior ............................................................. 86
GROUND DEFENSE AND ESCAPES ........................................................................................... 89
Ground Positions ....................................................................................................... 90
Ground Defense Position ........................................................................................... 91
Table Top Concept ..................................................................................................... 91
Defenses and Escapes ............................................................................................... 92
FOLLOW-THROUGH CONSIDERATIONS ...................................................................... 99
STABILIZE .......................................................................................................................... 99
Ground Stabilization ................................................................................................. 99
Handcuffing ............................................................................................................. 101
MONITOR/DEBRIEF........................................................................................................... 105
SEARCH .......................................................................................................................... 107
Frisk ......................................................................................................................... 108
Search ...................................................................................................................... 109
ESCORT .......................................................................................................................... 111
TRANSPORT..................................................................................................................... 111
TURNOVER/RELEASE ......................................................................................................... 112
Compliant Subject Handcuff Removal .................................................................... 112
Multiple Officer Handcuff Removal ........................................................................ 112
DOCUMENTATION ............................................................................................................ 113
PROTOCOLS FOR OFF-DUTY ACTIONS ...................................................................... 125
POLICY CONSIDERATIONS ................................................................................................... 125
Off-Duty Assistance Outside of an Officer’s Jurisdiction ......................................... 125
Liability for Off-Duty Officers Outside of the Officer’s Jurisdiction ......................... 126
CONSIDERATIONS FOR OFF-DUTY CARRY ................................................................................ 126
CONSIDERATIONS FOR INTERVENTION ................................................................................... 127
Potential Pitfalls to Physical Intervention ............................................................... 128
ON-DUTY OFFICER CONSIDERATIONS ................................................................................... 128
Tactical Evaluation .................................................................................................. 129
Appropriate Responses to Persons Who Indicate They are Off-Duty Officers ........ 129
PROCEDURAL GUIDELINES FOR OFF-DUTY OFFICERS ............................................................... 129
Intervention Considerations or Protocols................................................................ 130
Post-Intervention Actions ........................................................................................ 131
APPENDIX A: CASE LAW ......................................................................................... 133
TERRY V. OHIO ................................................................................................................ 134
x
GRAHAM V. CONNOR......................................................................................................... 145
TENNESSEE V. GARNER ....................................................................................................... 152
APPENDIX B: INCIDENT RESPONSE .......................................................................... 161
INCIDENT RESPONSE - RESPOND MODEL ............................................................................ 161
APPENDIX C: DISTURBANCE RESOLUTION ................................................................ 163
APPENDIX D: GLOSSARY .......................................................................................... 165
APPENDIX E – LAW ENFORCEMENT CODE OF ETHICS ............................................... 187
END NOTES ............................................................................................................. 188

1
INTRODUCTION
As a law enforcement officer, you will come in contact with people in a wide
variety of contexts. Some encounters are much like ordinary social or business
contacts. In some situations, however, your duties may require you to exert
control over people by giving them orders, directing their movement, or even
taking them into custody. Your goal always is to get subjects to comply
voluntarily. If they do, you will have achieved your objective without making the
encounter unnecessarily adversarial and without any risk of injury to officer or
subject.
Unfortunately, even the best efforts of the most skilled officer to gain voluntary
compliance do not always work. Sometimes you will have to use physical force
to achieve control and accomplish your legitimate law enforcement objective. In
Defensive and Arrest Tactics (DAAT), you will learn when and how to use
physical force to control people. DAAT techniques are psychomotor skills, which
mean that they involve both the brain and the muscles. For that reason, you will
spend much of your time in DAAT actually practicing the techniques—learning
the skills first in isolation, and then eventually applying them in simulations. But
before you learn how to use force, you must learn when it is appropriate to use
force.
WHEN CAN OFFICERS USE FORCE?
Law enforcement officers may use force legitimately when it is needed to achieve
control in five specific situations:
To achieve and maintain control of resistive subjects
To detain persons reasonably suspected of criminal behavior
To make lawful arrests
To defend themselves or others
To prevent escape
You cannot use force to punish someone for something he or she has said or
done. You cannot use force to retaliate against someone who has offended or
angered you. You cannot use force to show
someone who’s boss. You cannot use force to
teach someone a lesson. The purpose of a law
enforcement officer’s use of force is to control.
Control is a perception
based on an officer's
training, experience,
and the fact situation.

2
WHAT ARE THE LIMITS ON USE OF FORCE?
As a Wisconsin law enforcement officer, your legitimate use of force is limited by
a hierarchy of laws and standards. These include the following:
1. The U.S. Constitution
2. Wisconsin law
3. Agency policy
4. Officer training
Each of these sets limits on what force you can legitimately use.
The U.S. Constitution
The 4
th
Amendment to the Constitution prohibits “unreasonable search and
seizure.” In 1989, the United States Supreme Court found that law enforcement
officers’ use of force against subjects was a type of seizure, and therefore, under
the Constitution had to be “objectively reasonable.” The case was Graham v.
Connor, and it is one of the landmark cases in law enforcement use of force. In
its decision, the Court laid out the issues to consider when deciding if a particular
use of force is reasonable. These include:
The severity of the alleged crime at issue
Whether the suspect poses an imminent threat to the safety of officers
and/or others
Whether the suspect is actively resisting or attempting to evade arrest by
flight
The Supreme Court stated that reasonableness should be judged under the
totality of the circumstances from the perspective of a reasonable officer at the
scene with similar training and experience. The Court also noted that officers
must frequently make split-second decisions. By saying that the use of force had
to be “objectively reasonable,” the Court specifically excluded consideration of
the officer’s intentions and motivations.
The 7
th
Circuit U.S. Court of Appeals also rules on use of force cases,
interpreting U.S. Supreme Court decisions for Wisconsin law enforcement
agencies. Applicable court cases are cited within this text.
Wisconsin Law
Wisconsin has several specific statutes governing use of force by law
enforcement officers. One that is particularly important is Wis. Stat. §939.45,
which describes the concept of privilege. Here it is in part:
§939.45 Privilege
“The fact that an actor’s conduct is privileged, although otherwise criminal, is a
defense to prosecution for any crime based on that conduct. The defense of
privilege can be claimed under any of the following circumstances:

3
1. When the actor’s conduct occurs under circumstances of coercion or
necessity so as to be privileged under §939.46 or §939.47; or
2. When the actor’s conduct is in defense of persons or property under any of
the circumstances described in §939.48 or §939.49; or
3. When the actor’s conduct is in good faith and is an apparently authorized
and reasonable fulfillment of any duties of a public office; or
4. When the actor’s conduct is a reasonable accomplishment of a lawful
arrest.”
6. When for any other reason the actor’s conduct is privileged by the statutory
or common law of this state.
The concept of privilege is very important. What it means is that as a law
enforcement officer, if you are acting in good faith and seeking to achieve
legitimate law enforcement objectives (including making arrests), you can legally
use force that could otherwise be considered a criminal act. Naturally, if you use
force for some unauthorized purpose—such as to retaliate against someone—
your use of force is not privileged, and you may be subject to criminal charges.
Agency Policy
Your employing agency has a set of policies and procedures that describe how
officers are expected to carry out their duties. Under §66.0511(2) of the
Wisconsin Statutes, the agency must have a policy on use of force by law
enforcement officers in the performance of their duties. This policy may be more
restrictive than Wisconsin law. You need to know your agency’s policies on use
of force and act within them. If you are acting within the scope of your
employment, you are indemnified against individual liability in the performance of
your duties.
1
This means that if someone brings a lawsuit against you for a use-
of-force incident, the governmental unit that you work for (such as a county or
municipality) will face the liability—your individual assets won’t be at risk.
On the other hand, if you act outside the scope of your employment—which is, in
part, defined by policy, you could face individual civil liability. If someone brings
a lawsuit and you lose, you (or your insurance company) could have to pay the
judgment.
Officer Training
In DAAT you will learn a number of effective physical techniques to gain
compliance from a subject. You may have been trained in other methods (such as
one of the martial arts) as well. When you use force as part of your law
enforcement duties, your use of force must fit into one of these categories:
1. A trained technique
2. A dynamic application of a trained technique (i.e., not quite the classroom
model, but as close to it as possible under the circumstances)
3. A technique not trained, but justifiable under the circumstances
4
THIS PAGE INTENTIONALLY LEFT BLANK

5
CONCEPTUAL BASIS OF THE DAAT
SYSTEM
Wisconsin’s system of Defensive and Arrest Tactics is defined as a system of
verbalization skills coupled with physical alternatives. This definition reflects the
goal of gaining voluntary compliance. Achieving your objective by verbal
persuasion is always preferable to having to use physical intervention. You will
learn about verbalization techniques in another of the Unified Tactical subjects—
Professional Communication Skills.
The DAAT system is backed by two important
concepts that guide Wisconsin law enforcement.
These are:
Incident Response
Disturbance Resolution
The first of these is a general framework for how officers should respond to calls.
The second provides a model for how officers should deal with situations in
which they must intervene to resolve a disturbance.
INCIDENT RESPONSE
Law enforcement officers must respond to a bewildering variety of calls—
everything from traffic accidents to bar fights to burglaries. This guideline offers
a basic “road map” to handling all sorts of situations, whether they are calls to
which you are dispatched, situations you come upon on your own, or instances in
which you are backing up another officer. The model has seven steps, built
around the acronym RESPOND:
DAAT is a system of
verbalization skills
coupled with physical
alternatives.
6
INCIDENT RESPONSE - RESPOND MODEL
R Report
Become aware
Plan response
Arrive/Assess
Alarm/Inform
E Evaluate
Look for Dangers
Determine backup needs
Enter when appropriate/tactically sound
S Stabilize
Subject(s)
Scene
P Preserve
Life
o Conduct an initial medical assessment (as trained)
o Treat to level of training
o Continue to monitor the subject(s)
Evidence
O Organize
Coordinate additional responding units (if necessary)
Communicate with dispatch and others
Organize the collection of evidence (if appropriate)
N Normalize
Provide long-term monitoring (as appropriate)
Restore scene to normal
Return radio communications to normal
D Document/Debrief
Debrief self, other responding personnel, subject(s), other persons
Document incident appropriately
7
Here is a closer look at each of these steps:
Report
One of the most important aspects of law enforcement is communication—with
subjects, with other officers, and with dispatch. Whenever you become aware of
an emergency situation, whether you are dispatched to it or observe it
happening, you need to communicate with dispatch. While enroute, plan how
you will approach the situation, both from a tactical standpoint and from an
investigatory one. Let dispatch know when you have arrived on the scene, what
your initial assessment of the situation is, and what additional resources you
might need. These could include EMS, the fire department, backup units, or
specialized teams such as a SWAT team or a Hazardous Materials unit.
Evaluate
Once on scene, you need to evaluate (as best you can) the nature of the
situation and whether and how you should proceed to intervene. Pay particular
attention to evaluating the safety issues. You will learn in the next section some
of the aspects to consider in your “tactical” evaluation. Just remember to take
the time to do it. Officers tend to be action-oriented people—the temptation is to
rush in without taking the time to evaluate the situation. You could be walking
into an ambush. If your evaluation leads you to a decision to enter the scene, do
so as safely as possible. For example, instead of parking your squad right in
front of the scene of a disturbance, you may want to park at a distance and walk
in, using cover and concealment to your advantage.
Stabilize
Your first job on the scene is to stabilize the situation and the people involved, so
as to prevent further escalation or deterioration. This step might involve securing
a weapon, separating two disputants, establishing a perimeter around an area
where a suspect is hiding, positioning squads with emergency lights at an
accident scene to alert oncoming traffic, etc.
Preserve
As soon as the scene is stable, your next priority is to preserve life and preserve
evidence—in that order. You will assess those involved for injuries or other
medical emergencies and treat them to the level of your training, requesting EMS
to respond if needed. When any medical emergencies are managed, you must
take steps to protect any evidence for later collection. This might involve putting
up crime scene tape to keep unauthorized people out of the area, marking the
location of spent shell casings, securing clothing torn in a fight, and so on.
Organize
Law enforcement is a team activity. As the first responding officer, part of your
job is organizing the team to perform all the functions needed. You may direct
incoming units to particular locations coordinate with other responding agencies,
such as Fire or EMS, and organize the collection of evidence. You may be
8
replaced in this organizing role by a sergeant or other supervisor if one arrives, or
it may remain your job throughout.
Normalize
Just as part of your responsibility is to control the scene of an emergency and
keep unauthorized people out, part of your responsibility is also to get things
back to normal. If you have subjects who require long-term monitoring, you will
make sure someone is assigned to that task. As soon as is consistent with good
police practice, you should help restore the scene to its normal condition. This
may mean making sure that debris from an accident is removed from a roadway
and traffic flow is restored, or that all witnesses have been interviewed and sent
on their way, or that crowds have been dispersed, etc. If you have used a
dedicated radio channel for the emergency, you will clear it for other use.
Document/Debrief
One of the most important steps in managing any emergency is documenting it.
Very often, the only lasting record of an event is the officer’s report. It is critical
that you document, initially with field notes, and later with your report, all the
important aspects of the situation. You will learn how to do this in Report Writing.
If you collect evidence, you must properly package, tag, and store it, and
document that in your report as well.
Debriefing involves helping subjects, other responding personnel and other
persons involved to calm down and begin to get back to normal. Don’t forget to
get yourself back to normal as well—in Professional Communication you will
learn techniques for debriefing yourself and your partners after an emergency.
DISTURBANCE RESOLUTION
The outline shown presents a more specific model of how to proceed when
responding to any sort of disturbance or potential disturbance (i.e., serving an
arrest warrant on someone).
9
DISTURBANCE RESOLUTION
APPROACH CONSIDERATIONS
Decision-Making
Justification
Desirability
Tactical Deployment
Control of Distance
Relative Positioning
Relative Positioning with Multiple Subjects
Team Tactics
Tactical Evaluation
Threat Assessment Opportunities
Officer/Subject Factors
Special Circumstances
Level/Stage/Degree of Stabilization
INTERVENTION OPTIONS
MODE PURPOSE
A. Presence To present a visible display of authority
B. Dialog To verbally persuade
C. Control Alternatives To overcome passive resistance, active
resistance, or their threats
D. Protective Alternatives To overcome continued resistance,
assaultive behavior, or their threats
E. Deadly Force To stop the threat
FOLLOW-THROUGH CONSIDERATIONS
A. Stabilize Application of restraints, if necessary
B. Monitor/Debrief
C. Search If appropriate
D. Escort If necessary
E. Transport If necessary
F. Turn-Over/Release Removal of restraints, if necessary
10
While much of DAAT is concerned with learning the Intervention Option
techniques, Approach Considerations and Follow-Through Considerations are
just as important. A great many officer injuries and complaints against officers
for excessive force result from the failure to give proper attention to the first and
last phases. The next section discusses each of the three phases in detail.
APPROACH CONSIDERATIONS
In your initial approach to a disturbance, you need to do three things:
Make a contact decision
Deploy your resources
Evaluate the threat level
Decision Making
Decision making considers whether the officer can legally contact the subject(s),
and whether making contact is desirable. If the contact is not voluntary, and the
officer does not have legal standing to initiate contact, the officer should not
initiate an encounter. If intervention would be tactically foolhardy without
additional resources, it would not be desirable to intervene until those resources
arrive.
Tactical Deployment
Tactical deployment is concerned with making decisions about locating yourself
and your partners in relation to the subject or situation. For example, if you have
an unarmed subject who is making verbal threats to fight with you, you will want
to stay far enough away that you are out of reach of the subject's hands and feet.
If instead, the subject has a knife, you will need to stay even farther away. How
you position yourself in relation to the subject(s), and how you and your
partner(s) work together come under the heading of tactical deployment.
Tactical Evaluation
In your tactical evaluation you assess the potential hazards in the contact, and
decide how best to minimize them. If your tactical evaluation leads you to
conclude that a situation is too dangerous to try to manage alone—in other
words, you would be unlikely to succeed in controlling it—then in most cases,
you will simply position yourself tactically and wait until you have sufficient
backup. It’s not about courage—it’s about control. You may be brave enough to
face the danger alone, but the goal is to accomplish your law enforcement
objective, and that requires that you be able to control the situation.
During tactical evaluation you will assess whether the person presents a threat to
the safety of yourself or others, and if so, to what degree. You should consider
many different factors to evaluate the degree of threat posed by the person,
including threat assessment opportunities, officer/subject factors, special

11
circumstances, and level/stage/degree of stabilization. Each of these will be
examined in more detail in the next chapter.
Tactical evaluation is not a one-time thing. You must continually reassess the
level of threat throughout your encounter. Situations are not static—they can
change in an instant. You need to remain flexible and able to adapt to changing
circumstances. Stay alert for any indications that the situation has changed, and
be ready to respond appropriately.
INTERVENTION OPTIONS
If initial approach leads you to decide to intervene, you have a range of
responses open to you. These are outlined in the Intervention Options, which
identify the various tactics available to you as an officer. Much of your time in
DAAT will be devoted to learning these techniques.
Intervention Options are divided into five modes, each reflecting the need for an
increased level of force to gain control. Although the Intervention Options are
divided into five modes, you can begin with any mode and move from one mode
to any other mode as appropriate—Intervention Options are not necessarily a
sequential progression. You are authorized to use the amount and level of force
that is reasonably necessary to control a subject. If dialog—talking with a
person—is enough to control him or her, then you need not use more force. On
the other hand, some situations may be so
extreme that you need to use deadly force. At
any time, if a different level of force is
appropriate, you can use it.
Here are five key rules for use of force:
1. The purpose for use of force is to gain control in pursuit of a
legitimate law enforcement objective. If verbalization is effective in
gaining control, it is always preferable to physical force.
2. You may initially use the level and degree of force that is reasonably
necessary to achieve control. You need not escalate step-by-step
through the Intervention Options.
3. At any time, if the level of force you are using is not effective to gain
control, you may disengage and/or escalate to a higher level of
force. This involves transitioning to a different level of force or
different tactics based on the totality of circumstances.
4. Once you have gained control of a subject, you must reduce the
level of force to that needed to maintain control.
5. You must always maintain a position of advantage.
The suspect determines the
level of force officers must
use to establish control.
12
The below concepts reinforce the key rules in use of force encounters. These
concepts assist officers in understanding the different mindset they may have
during an incident.
What is Control?
Control is a perception based on an officer's training, experience, and the fact
situation. It involves the management of a subject and can be achieved through
several different means that are available to an officer. The officer can control a
subject with presence and dialogue by showing up and speaking to the subject.
Control could also be achieved by applying a vertical stun to a combative suspect
and directing him to the ground for ground stabilization. The below concepts
assist an officer in understanding control:
Control is a perception based on an officer’s training, experience, and the
fact situation.
Control is not a 50/50 proposition
Proper police action balances safety and efficiency
Fighting Rules
These rules assist an officer in understanding the appropriate mindset when a
suspect forces an officer to apply force. These concepts can assist the officer in
developing a response that will maximize on his/her personal safety and bring
the encounter to a quick resolution.
1. Be effective from the beginning.
2. Never spar with anyone.
3. Hit as hard as you can.
4. Attempt to create dysfunction.
5. Get the confrontation over quickly.
Three additional principles to remember:
1. No officers are injured
2. No subjects are injured needlessly.
3. No one is accepted /detained or released improperly.
Safety Priorities
Safety priorities are used to assist officers in making intervention and use of force
decisions. This concept recognizes that law enforcement officers must protect
themselves, or else they cannot protect others. It also recognizes that law
enforcement officers will take appropriate tactical risks to protect innocent
persons. Finally, the safety of law enforcement officers and innocent victims is a
higher priority than the safety of the perpetrator who is putting others at risk of
injury or death.

13
Levels of Awareness
The levels of awareness assist officers in understanding situational awareness
and being mentally prepared to use force when necessary. A widely-used color
code system assists officers in staying mentally ready for action. The four
colors—white, yellow, orange, and red—label the mental readiness of the officer.
Color
Description
Officer Response
White
Unaware
Total relaxation in a safe place
Yellow
Relaxed but alert
Scanning for possible threats
Orange
Ready to act
Focusing on possible threats
Red
Action state
Responding to threats: disengaging and /
or escalating
Black
Blind panic
Indecisive and / or excessive response to
threat
“Before a person can defend themselves against a threat, the threat must be
recognized. [This] color-code system…describes the appropriate mental state of a
defender in different environments. In condition “White,” the defender is oblivious to
their surroundings or any potential danger. If the defender were attacked while in
White, they are at such a disadvantage they will likely be annihilated. In condition
“Yellow” the defender is aware of their environment and on the look-out for potential
danger, although there is no identification of any specific threat. In Yellow the
defender is aware that a threat may exist and is observing their environment to
locate any such threat. In condition “Orange” the defender has identified a specific
potential threat, and is presumed to be taking action in response to that threat—
avoidance, distraction, verbalization, drawing a handgun or pepper spray, or
whatever their risk assessment deems appropriate. Finally, in condition “Red” the
defender has realized the specific, immediate danger of death or great bodily harm
and is only concerned with winning the ongoing lethal encounter.
If a person is not in a completely secure environment they should be in Yellow.
Yellow is neither paranoia nor fear of everyone around you. Instead, it
acknowledges the world is not an inherently safe place. Yellow is a calm, even
placid outlook, while remaining aware of surroundings and environment.”
2
Modes Within Intervention Options
The five modes each serve a different purpose and include different tactics and
techniques.
Presence
The first mode, Presence, reflects the fact that sometimes all that is needed to
control a situation is the presence of an officer. The purpose of this mode is to
"present a visible display of authority." Much as drivers are careful not to exceed
the speed limit when they share the road with a marked squad, the simple
presence of an officer in uniform or otherwise identified is enough to prevent
14
people from starting or continuing to behave aggressively or otherwise create a
disturbance.
Dialogue
The second mode, Dialogue, covers the range of tactical communication from
very low-level questioning to very directive commands. The purpose of dialogue
is to persuade subjects to comply with an officer's lawful directives. The specific
techniques used are covered extensively in Professional Communication Skills.
Control Alternatives
The third mode, Control Alternatives, includes a wide range of tactics and tools
for controlling subjects. These are divided into four groups: escort holds,
compliance holds, control devices, and passive countermeasures. This mode
includes both empty-hand techniques such as applying an escort hold or
directing a subject to the ground and tools such as Oleoresin Capsicum (OC)
spray, commonly called “pepper spray,” and electronic control devices (ECDs).
The common thread is that all these tactics and tools are used to control subjects
who are resisting or threatening to resist.
Protective Alternatives
The fourth mode, Protective Alternatives, include tactics and tools to protect an
officer while also overcoming continuing resistance. The tactics include focused
strikes that temporarily disrupt a subject’s ability to continue to resist or assault, a
diffused strike that can cause an immediate—though temporary—cessation of a
subject’s violent behavior and the use of baton strikes to impede a subject. The
difference between Protective Alternatives and the Control Alternatives category
just discussed is that with Protective Alternatives the purpose is not only to
control the subject, but also to protect the officer.
Deadly Force
The fifth mode, Deadly Force, represents the highest level of force available to
law enforcement officers. The power to use deadly force is the most awesome
responsibility given to law enforcement officers. In this course and in Firearms,
you will learn to make appropriate deadly-force decisions.
FOLLOW-THROUGH CONSIDERATIONS
The third part of Disturbance Resolution is Follow-Through Considerations, which
refers to the actions an officer takes after a use of force. These are critical.
Once you have taken the step of putting someone in custody, you are
responsible for that person’s well-being. Even if you have to use force to subdue
him or her, once you achieve control, you must mentally and physically shift
gears to follow-through procedures. These fall naturally into six phases:
15
Stabilize
Monitor/Debrief
Search
Escort
Transport
Turnover/Release
Within each of these phases, you will need to do specific things.
Stabilize
Stabilizing a subject means ensuring that the person is under control and does
not pose an imminent threat to you or other officers or civilians. Sometimes this
is a simple matter of verbally calming someone, but certainly if you have had to
use physical force (and often even if you haven’t), stabilizing may mean applying
handcuffs or other restraints. You will learn verbal and physical techniques to
stabilize subjects prior to handcuffing them.
Monitor/Debrief
Monitoring means simply that you remain aware and watchful throughout your
contact with a subject, until that person is no longer under your control.
Debriefing serves to bring the level of your contact to a more normal status. If
you have been actively fighting with someone, debriefing allows the two of you to
“come down” from the fight to a calmer status and to re-establish verbal
interaction. It gives you a chance to do an initial medical assessment and gauge
the need for medical care for the subject. Finally, it allows the subject to regain
some sense of dignity and control—despite the fact that he or she may be in
custody.
Because threats can change rapidly, you will be friendly, professional, and caring
while still being tactically sound.
Search
You will learn in your legal training when you can search a person. One such
time is when a person has been arrested. A thorough search "incident to arrest"
is crucial to ensure that the arrested person does not have any weapons
concealed on his or her person. You will learn how to search properly in your
DAAT training. Be sure that your search is professional, systematic, and—
especially—thorough. Your own life and the lives of other officers may depend
on it.
Escort
If needed, you will escort a subject to another location—to a vehicle for transport,
or from a holding cell to jail, for example. You must remember your custodial
responsibility and stay alert, continuing your threat assessment.
16
Transport
Similarly, you may need to transport a subject in a vehicle—to a hospital, to
detox, to jail, or somewhere else.
Turnover/Release
Turnover/Release covers the process of removing a subject from your control.
This takes place when you turn the subject over to jailers, when you release a
child to the custody of the parents, or when you take someone in protective
custody to a detoxification facility. It also takes place when you release a subject
on his or her own—as you might, for example, after having an out-of-state driver
post bond on a traffic citation.
The next sections present an in-depth look at each of these parts of Disturbance
Resolution.

17
APPROACH CONSIDERATIONS
As noted earlier, in the first stage of Disturbance Resolution, you have three
tasks:
Tasks
A. Decision-Making
Justification
Desirability
B. Tactical Deployment
Control of Distance
Relative Positioning
Relative Positioning with Multiple Subjects
Team Tactics
C. Tactical Evaluation
Threat Assessment Opportunities
Officer/Subject Factors
Special Circumstances
Level/Stage/Degree of Stabilization
This section describes how to accomplish these tasks as thoroughly and safely
as possible.
DECISION MAKING
Before intervening in a disturbance or even making contact with a subject, you
must answer two fundamental questions:
Is it legal for me to take the action that I am considering?
Is it wise for me to do so at this time?
If your intervention is not within the scope of your authority, any action you take
may be excessive—however reasonable it seems on its face.
18
Legal Justification
As an officer, you can make voluntary contact with anyone at any time, providing
that you have a legal basis to be in that place and that the contact is indeed
voluntary. With reasonable suspicion, you may detain someone to investigate
the situation.
You do not, for example, have an automatic right to enter private property, just
because you're an officer. Nor do you have the automatic right to detain
someone. Your Constitutional Law training is devoted in part to helping ensure
that your decision-making is sound with respect to the legal justification for your
action.
Desirability
You may be legally justified in making contact or taking action, but you still need
to assess whether it is desirable to do so. The key question to ask yourself is
"Do I think I can control the situation?" If the answer is no, then you should
consider disengaging until you have sufficient backup or until the circumstances
change in your favor. This does not mean that you are free to ignore emergency
situations unless you feel absolutely safe intervening—as a law enforcement
officer, you have a duty to act in some circumstances. And law enforcement
activities frequently involve a degree of hazard. The issue is not risk per se, but
your ability to control the situation. If you believe you can control it, even at some
risk to yourself, then it may be appropriate for you to act. On the other hand, if
you are sure you cannot control it, it may be foolhardy for you to act.
Remember your initial objective when you contact someone. Is it a criminal
violation, or a check welfare? Courts are less likely to find force reasonable
when there is no criminal action and no threat to others.
3
Furthermore, your
tactics preceding any use of force may come under inspection in any subsequent
civil trial, especially when deadly force was a predictable outcome of the event.
For example, it is legal for an officer to force entry into a suicidal person’s room,
even when that person is armed with a knife. However, under what
circumstances would such an entry be desirable? Your conduct is relevant
because the reasonableness of your use of force is evaluated in light of the
totality of the circumstances.
4
Safety Priorities
The safety priority principle recognizes that the safety of law enforcement officers
and innocent persons is a higher priority than the safety of the subject who is
putting others at risk of injury or death. This assists in decision making when you
must prioritize the safety of everyone involved in a situation. Safety priorities are
closely intertwined with desirability.
The safety of officers must be the top priority. As an officer, you must maintain
your ability to function effectively—to do your job—within every situation. By
looking out for your own safety, you maintain your ability to act. In other words,
19
you must protect yourself in order to protect others. For example, exchanging
yourself for a hostage, or charging headlong into a suicidal or unwinnable
situation, would violate this safety priority concept. Such foolhardy behavior
eliminates your ability to protect yourself, your partners, or innocent persons.
This would worsen the situation by increasing the number of victims, and would
reduce the number of officers available to appropriately intervene.
However, officers have a great deal of training and equipment that can be used
to perform their duties. You can protect innocent persons by taking reasonable
and appropriate tactical risks. This is similar to the pursuit decision-making
process in EVOC, where you constantly weigh the risks of vehicle pursuit versus
the harm of allowing a suspect to escape.
Finally, the subject’s safety is a priority—although a priority ranked below that of
officers and innocents because the subject is responsible for causing the
danger.
5
To the extent that the subject’s behavior allows you to do so, act with
the well-being of the subject in mind. Even when the subject’s behavior requires
you to use deadly force, you will still perform follow-through considerations,
including the provision of emergency medical care when appropriate.
Thus, safety priorities are described as follows:
1. You
2. Fellow Officer(s)/Staff Members
3. Civilian(s)
4. Suspects(s)
Desirability and Safety Priorities
In situations where higher-ranked priorities – officers and innocents – are
endangered, officers should take appropriate actions and appropriate risks to
protect the persons under threat.
In situations where neither officers nor innocents are in imminent danger, officers
may have discretionary time. There may be lesser need to immediately act or
physically intervene, allowing officers to “slow down” the scene. This allows
more time to communicate with the suspect and may permit options that may
result in less force being necessary.
6
Thus, officers can use safety priorities to assist in the evaluation of desirability.
The more danger that officers and/or innocents face, the more desirable
intervention may be, even at greater risk. If there is little or no immediate danger
to officers or innocents, officers might be able to slow down the scene to support
the subject’s safety.

20
TACTICAL DEPLOYMENT
Tactical deployment has to do with where you and any other officers are
positioned with respect to the subject. In particular, tactical deployment involves:
Control of distance
Relative positioning
Relative positioning with multiple subjects
Team tactics
The following explains these in greater detail.
Control of Distance
You've probably had the experience, in a conversational setting, of someone
standing either too close to you or too far away. It may have been only a few
inches "off," but it just didn't feel right. What is an appropriate distance between
two people varies with the setting and culture. In the United States, our typical
"social" distance (interactions with strangers or "nodding acquaintances") is from
4 to 12 feet. If a person stands closer than that, it usually makes us
uncomfortable, unless it is someone we know fairly well.
The following table presents some typical distances for normal social interactions
and interactions in an institutional setting, such as a jail, where space is usually
more restricted.
Type of Contact
Normal Social Setting
Institutional Setting
Public
> 12 feet
> 6 feet
Social
4 - 12 feet
3 - 6 feet
Personal
1½ - 4 feet
1 - 3 feet
Intimate
0 – 1½ feet
0 - 2 feet
These are rough guides only—many factors can alter the perception of a
comfortable distance. For example, if someone is emotionally disturbed, that
person may feel his or her "intimate zone" extends much farther out than one or
two feet.
For officers, social norms are not the only issue in what constitutes an
appropriate distance—the additional concern is safety. Because in your role as
an officer, you represent authority and may have to take enforcement action,
including arresting people, you must always be aware of the possibility that
someone might attack you. If you are within normal social distance of a hostile
subject, you could be punched or kicked. Naturally, if someone is armed, the
"safe" distance increases. Here is a rough guide to the danger zones associated
with unarmed and armed subjects:
21
Subject’s Arms
Danger Zone
Unarmed
Less than 10 feet.
2
Club or edged
weapon
Any distance where the officer reasonably
perceives an imminent threat of death or great
bodily harm.
Firearm
In the line of sight unbroken by cover (something
that would stop the bullet).
As with the table, these are rough guides. In general, the more distance the
better (within reason), because more distance gives you more time to react
appropriately to a sudden assault or other hostile action by the subject.
Relative Positioning
Your position in relation to a subject may put you at an advantage—or a
disadvantage. For example, if you are behind a person, you are less likely to be
punched or kicked than if you are in front, simply because hands and feet are
designed to work more effectively forward than backward. As an officer, you
always want to be in a position of advantage relative to the subject. With a single
subject, direction and height are the relevant variables.
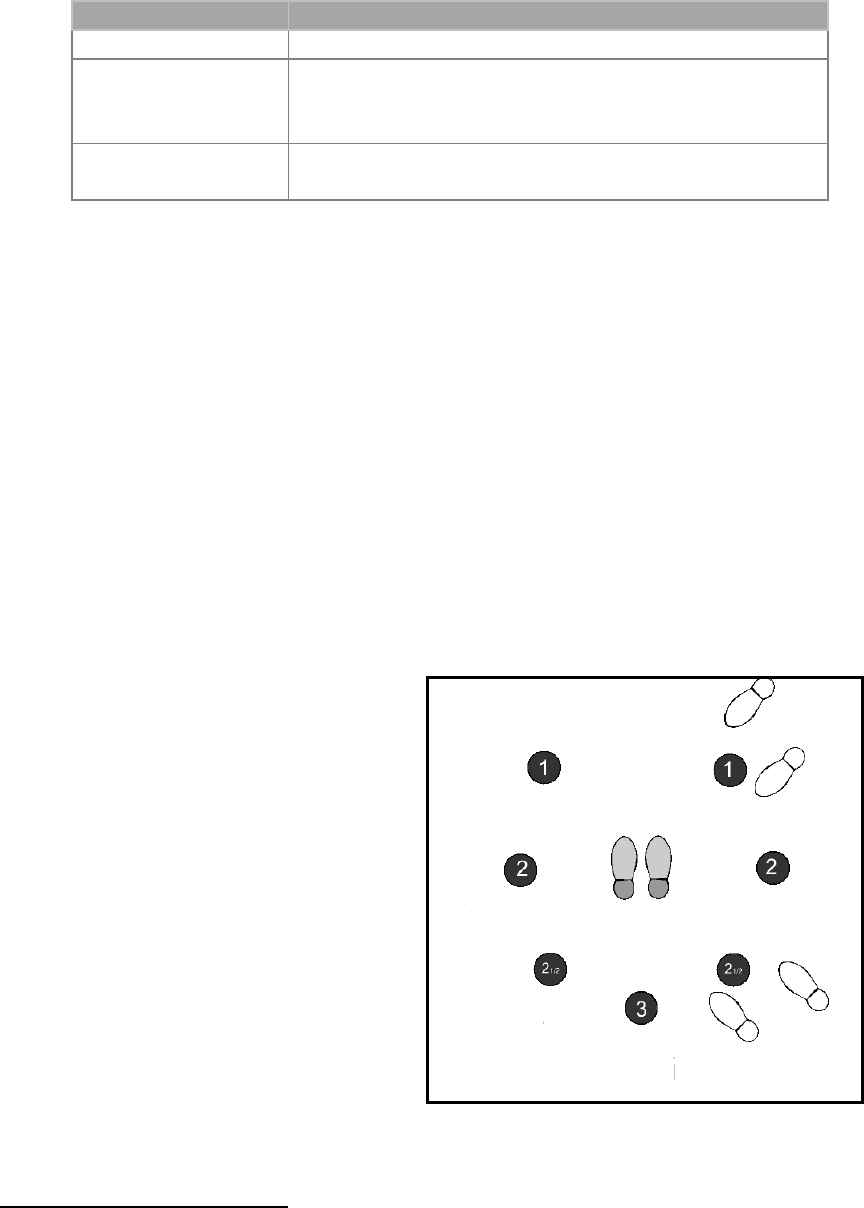
Direction
A convenient way to visualize relative positioning is to use a numbering system,
as illustrated below. In this system, an officer is placed as follows:
Level 1: 45-degree angle from
the front of the subject
Level 2: Directly beside the
subject
Level 2½: 45-degree angle to the
rear of the subject
Level 3: Directly behind the
subject
Each of these provides the officer with
a tactical advantage over standing
directly in front of the subject (the
"inside" position). How do you decide
what position to use? As you will see,
you will use Levels 1, 2½, and 3 most
often. Level 1 is best when you are
approaching a subject from the front,
2
This can be characterized as “two steps and a punch.”
Figure 1: Officer Position Relative to a Subject.
Officers bracketing a subject at Levels 1 and 2½.
22
and is used frequently when you are simply talking to a subject, interviewing a
witness, or otherwise interacting verbally with a subject. Level 2½ is the best
position for escorting a subject. It is also the position you will use to make
contact with a driver in an approach vehicle contact. Level 3 is most commonly
used for certain decentralizations (taking someone to the ground). Level 2 is
rarely used, simply because the subject will usually reposition if you approach
from the side.
Height
Generally, being at a greater height than the subject is to your advantage,
because you are more easily mobile and because you are not working against
gravity to exert control. For example, if you are standing and the subject is
kneeling, you are likely to be at an advantage. Avoid being lower than the
subject—that puts you at a disadvantage.
Regardless of the height at which you and the subject are operating, relative
positioning is the same—for example, you can stand at Level 2½ with respect to
a subject who is kneeling.
Relative Positioning with Multiple Subjects
If you are facing more than one adversary, you could be in three different
configurations. In order from most desirable to least desirable, these are:
1. Subjects "stacked" or lined up, one behind the other in front of the officer
(multi-level)
2. Subjects lined up, one next to the other in front of the officer (linear)
3. Subjects encircling the officer (surround)
If the subjects are stacked, then only the one in front can engage with the officer;
the others are blocked by the first one. If the subjects are lined up next to one
another, all can simultaneously attack, but all assaults are at least in the officer's
line of vision. If the subjects encircle the officer, they can attack simultaneously,
and the officer cannot watch them all at the same time. Encirclement is a very
dangerous position that could, in some circumstances, put the officer in imminent
threat of great bodily harm or death.
If you find yourself facing multiple adversaries, move as needed to maintain as
much advantage as you can. Your best course of action, depending on the
circumstances, may be to disengage and/or escalate.
Team Tactics
If more than one officer is available, you must coordinate your activities. You and
your partner must communicate before and during the contact so that you can
23
act as a team and manage the subject smoothly. Two tactics are commonly
used when two or more officers interact with a subject:
Contact/cover
Bracketing
Here is how they work.
Contact/Cover
The contact/cover principle is a way of defining officer roles. One officer is the
contact officer. That officer makes contact with the subject and generally does
the talking. He or she makes the decision whether and when to take the subject
into custody or otherwise detains or restrains him or her. The other officer is the
cover officer. The cover officer's job is to provide assistance if needed, to watch
the subject and surrounding area for potential threats or other interference, and
in general, make it possible for the contact officer to focus attention on the
subject. In some circumstances, the cover officer may literally be providing
"cover" for the contact officer with a weapon.
The contact/cover principle provides a number of advantages. The contact
officer is free to focus on the subject, although he or she must always remain
aware of the surroundings. The subject has just one officer to listen to, so the
interaction will be less confusing—particularly important if the subject is
intoxicated, mentally ill, or emotionally disturbed. Only one officer is making the
decisions about managing the call, making it more likely to go smoothly. In rare
circumstances, the cover officer may override the contact officer, as described in
Professional Communication, but ordinarily, the cover officer is there primarily to
offer protection and assistance to the contact officer.
Bracketing
How you and your partner position yourselves with respect to the subject
depends on the situation. In some situations, you may feel comfortable with the
contact officer at Level 1 on one side of the subject, and the cover officer at Level
1 on the other side (perhaps back a step, to focus the subject's attention on the
contact officer). In other situations, where you are in close quarters or you wish
to have the potential for immediate control, you may choose to bracket the
subject. In this arrangement, the contact officer is at Level 1, as before, but the
cover officer is at the subject's Level 2½. Officers should be aware of crossfire
considerations as they position themselves. The cover officer is in effect
concealed from the subject because of being positioned out of his or her view.
As you will see, from this position, the cover officer can quickly move into an
escort position if needed.
24
TACTICAL EVALUATION
The purpose of a tactical evaluation is to provide you with as much information
as possible as to whether the subject poses a threat to you, and if so, how much
of a threat. Accordingly, this section focuses on the subject and your interaction
with him or her. However, in any law enforcement setting, you should always be
aware of your environment and the conditions around you. Do not let your
contact with a subject cause you to ignore your surroundings. Make a habit of
always asking yourself, questions such as these:
What is the physical environment like?
Am I familiar with the area?
How soon would backup be available if needed?
Where is cover if I need it?
Do I have an “escape route” if I suddenly need to disengage?
Remember that your tactical evaluation must be ongoing—it is not something you
do once and you're done. Situations change, and interactions with subjects are
fluid and dynamic. You must continually reassess the situation and mentally
update your tactical evaluation.
The factors you should consider in conducting your tactical evaluation fall into
four categories:
Threat assessment opportunities
Officer/subject factors
Special circumstances
Level/stage/degree of stabilization
We'll look at each of these.
Threat Assessment Opportunities
Threat assessment opportunities are behaviors by the subject that can give you
information about the threat potential he or she poses. In every contact with a
subject you have opportunities to assess whether that person presents a threat
to your safety or others, and if so, to what degree. You should consider these
indicators: the level of resistive tension; early warning signs; pre-attack postures;
indications of mental illness, emotional disturbance, or medically significant
behavior; and weapon control factors.
These behaviors can be clues that help you predict resistive behavior or a
possible assault. If you see any of them, you should certainly raise your threat
assessment and/or take action.
Level of Resistive Tension
Simply noticing whether a subject appears tense or agitated will give you some
information about that person's state of mind. In other words, are the subject’s
25
muscles tensed? Is the subject physically tense or agitated, even if his or her
words are calm? Resistive tension is not just a visual observation--it may be felt
during physical contact with the subject. The more tension or agitation, the more
threat potential.
Early Warning Signs
Early warning signs are signals or certain behaviors provided by the subject that
are often associated with a high level of danger to officers. Some of the early
warning signs that should increase your level of perceived threat are if a subject:
1. Conspicuously ignores you
2. Gives you excessive emotional attention
3. Moves in an exaggerated way
4. Ceases all movement
5. Has a known violent history
If you have dealt with this person before, has he or she been cooperative or
violent? While anyone can become violent, a history of violent behavior dictates
a more cautious approach. Even if you have not personally dealt with the
subject, you may have information from other sources, such as dispatch, other
officers, briefing information, etc. that raises your threat level.
Pre-Attack Postures
Pre-attack postures are behaviors which may indicate an imminent threat of
physical assault. Is the person showing signs of being ready to fight, or
preparing to fight? Is the person’s body tense? Is the person focusing visually
on a target or gazing in an unfocused way? These are physical postures that
may indicate the subject is about to attack you:
1. Boxer stance
2. Hand set/clenched fists
3. Shoulder shift, or rolling the shoulders forward as if preparing to attack
4. Target glance – looking at a potential target (such as your gun)
5. The “thousand-yard stare” – a direct, continuing, but unfocused stare
Indications of Mental Illness, Emotional Disturbance, or Medically
Significant Behavior
Is the person showing signs of mental or emotional disturbance? Are his or her
reactions to you appropriate and normal, or odd? Look for behaviors that
indicate that the subject is mentally ill, in crisis, or under the influence of alcohol
or drugs. You will often be called upon to deal with those who are mentally ill or
emotionally disturbed. You will learn more about these conditions in Crisis
Management and will learn techniques in Professional Communication to help
you manage such subjects.
26
While assessing a subject’s mental state, you must also try to determine if that
state is coupled with medically significant behavior. In some cases, mental
illness, stimulant drug use, or underlying medical conditions can cause a
chemical imbalance in the body that produces characteristic violent and
delusional behavior. You are not expected to diagnose and treat medical or
psychiatric conditions, and you are not expected to jeopardize your safety or the
safety of others when a subject’s behavior poses a danger. However, you should
be aware of the behaviors that may indicate a serious medical condition exists
and take steps to ensure that the subject receives appropriate medical care as
soon as practical. Some of the indicators that a subject requires immediate
medical assistance:
Abrupt onset – bystanders say, “he suddenly just started acting strange”
Agitation or excitement
Confusion and impaired thinking and perception
Bizarre, often violent behavior directed at objects, especially glass
Superhuman strength and insensitivity to pain
Profuse sweating and clothing removal caused by extremely high body
temperature
One condition characterized by this behavior is called Excited Delirium. Many of
the deaths that occur in police custody are thought to be a result of Excited
Delirium. An early request for medical assistance when observing this type of
behavior is very desirable.
Medically significant behavior and excited delirium are discussed in-depth under
“Dynamic Situations,” p. 85.
Weapon Control Factors
Circumstances that indicate the subject may intend to use a weapon against you,
including these:
The subject’s hands (especially the palms) are out of sight
The subject's access to weapons (you can see they are armed, they have
access to a weapon, or you have information to that effect)
The subject is in a position to control one of your weapons
If you see any of these indicators, your assessment of the potential threat posed
by the subject should increase.
Officer/Subject Factors
Differences between the officer(s) and subject(s) also have a bearing on threat
assessment. The same subject behaviors may pose more or less of a threat
depending on these differences.
When you conduct your threat assessment, you should take into account these
factors:
27
Numbers – The most obvious difference is the number of participants on
each side of the equation. One officer facing three subjects is in a much
different position than the same officer and two partners, facing a lone
subject. In general, having greater numbers gives you an advantage—
and conversely, being outnumbered puts you at a disadvantage.
Age – a significant age difference between you and the subject may affect
your threat assessment. A 25-year-old officer facing a 9-year-old child
would probably assess the threat differently than if he or she were facing
another adult. On the other hand, the same age difference twenty years
later might change the equation—when the officer is 45 and the subject
29.
Size – often related to strength is size. Dealing with a subject who is
much bigger or smaller than you are will change your threat assessment.
However, do not be lulled into a false sense of security if the subject is
relatively small. Certain drugs, mental conditions, adrenaline, or simply
strong motivation may make even a small person extremely strong and
difficult to control.
Strength – relative strength is another factor. If you are facing a subject
who is much stronger or weaker than you, you would assess threat
differently than if you were faced with a subject matching your strength.
Skill level – if the subject is a skilled fighter, either trained in martial arts or
boxing or simply a skilled street fighter, that fact may change your threat
assessment (if you are aware of it). On the other hand, if you are highly
skilled, that will also affect your threat assessment.
A word about gender: while it is true that men generally are bigger than women
and have more upper body strength that is not true of every individual. Do not
assume that just because a subject is female, she will necessarily be weaker—
and vice versa. Male officers may need to use force against females, something
which is contrary to the socialization many men receive. What constitutes an
appropriate use of force depends on an officer's reasonable perception of the
threat (discussed in the next section). You need to conduct a tactical evaluation
based on all the facts and observations available to you—don't make
assumptions based on gender.
Special Circumstances
Special circumstances are factors or situations which may justify a rapid
escalation of force, or selection of higher force options.
A number of other factors affect your threat assessment. Some of these include:
Reasonable perception of threat. Is the person armed? Do you have any
information to suggest that he or she is armed—bulges in the clothing,
information from another source, past experience? Can you see the
subject’s hands, especially the palms? If not, consider that the person
might be holding a weapon. The actions you take must be based on your
28
reasonable perception of the threat. Your perception—that a subject was
armed with a gun, for example—may turn out to be incorrect (e.g., the
"gun" was a toy pistol), but if your perception was reasonable, your action
in response to that perceived threat may well be justified nonetheless.
Special knowledge of the subject. If you have information, either from
your own contacts or from other reliable sources (dispatch, other officers,
citizens, etc…) that a subject has a history of violent behavior or is a
member of a gang known for violent behavior, you may assess threat
differently than you would without that knowledge.
Sudden assaults. Naturally, if the subject assaults you, another officer, or
someone else, your assessment of the threat posed by that subject should
increase.
Subject’s ability to escalate force rapidly. Even if the subject does not
actually assault you, his or her ability to do so should affect your threat
assessment. Examples of factors to consider include ready access to
weapons (actual or improvised), physical abilities, and relative positioning.
Are there items nearby that could be used as improvised weapons, such
as rocks, bottles, bricks, etc.?
Your physical positioning. How you are positioned relative to the subject
may affect your threat assessment. If you are indoors, are you in tight
quarters that make it difficult to move freely or require you to be closer to
the subject than you would like? If you are at a tactical disadvantage, your
threat assessment would be higher than if you were in a better position.
Injury or exhaustion. If you are injured or very fatigued, you are likely to
be less able to use force effectively against a subject than if you were in
better condition. How tired are you? Are you fighting off a cold, or
recovering from an injury? Are you taking medication that might affect
your ability to fight? If you don’t achieve control in the first 20 seconds of
a fight, you are likely to quickly run out of energy.
Equipment or training. If you do not have the equipment or training
needed to manage a particular situation safely, your threat assessment
may be higher than it otherwise would.
Availability of backup. If backup is far away or not available, your threat
assessment may be higher than if you could count on immediate help if
needed.
Other special circumstances. Many other issues may enter into your
threat assessment, such as the presence of other people, special
knowledge of the subject or circumstances, etc. What is available for
cover and concealment? Do you have escape routes if you need them?
Are there environmental hazards such as uneven ground, icy sidewalks,
steep banks, water, etc. that could be a problem? Are there obstacles
such as furniture, bicycles, children’s toys or other objects that would
make it difficult to move or disengage?
If, for whatever reason, you don’t think you can control the situation alone, wait
for backup. In some situations you may even decide to tactically disengage.
29
Don’t let your ego get in the way of a good decision—the purpose of tactically
disengaging is to give the officer a better position, time to regroup, time for
resources to arrive, or any other reason that assists the officer in managing the
situation. If you “go it alone” and can’t manage the situation, you may
inadvertently make things worse—and you’ll need backup anyway.
Level/Stage/Degree of Stabilization
Stabilization refers to the subject's ability to use force. The less ability a suspect
has to fight or flee, the more they are stabilized. An officer might verbally
stabilize a compliant subject by ordering him to place his hands on his head,
palms up. But the officer achieves higher stabilization with the subject kneeling,
facing away with ankles crossed and arms outstretched, palms to the rear. An
example of a high degree of stabilization would be a proned subject, handcuffed
behind his back. An unrestrained, standing subject is in a much better position to
be able to deliver force against you than a subject who is prone on the ground
and in handcuffs. Never assume that just because a subject is restrained that he
or she no longer poses a threat—but in general, the less stabilization, the greater
the threat.
SUMMARY
Your initial approach in any law enforcement context is critical. The first two
steps of Incident Response—Report and Evaluate—are very much concerned
with approach considerations. Before intervening, you need to decide what
actions you can legally take and whether you can control the situation at that
time. Remember, at any time, you have the option to disengage if you cannot
control the situation.
If you decide to enter the scene, you must deploy your resources in a way that
maximizes your tactical advantage. Controlling your distance from the subject,
so that you stay out of the danger zone is a primary concern. You want to
position yourself in a way that gives you a tactical advantage if you can. If you
have another officer (or more than one) with you, you want to use team tactics to
your advantage. Using the contact/cover tactic is a good way to make best use
of more than one officer.
Throughout your contact, you will be conducting an ongoing tactical evaluation, in
which you take full advantage of threat assessment opportunities the subject
presents to help you gauge the degree of threat the subject poses to you and
others. Officer/subject factors, special circumstances, and whether the subject is
stabilized also affect your evaluation.
When you approach people in a law enforcement context, remember that your
goal is to get people to cooperate willingly if you can. If voluntary compliance is
30
not possible, you may need to use force, but only that amount that is objectively
reasonable to gain control. Once control is established, you must reduce your
level of force to that level needed to maintain control. This requires considerable
self-control—which is part of being a professional law enforcement officer. Your
role is neither to be passive nor to be aggressive. You must instead be
assertive: the techniques you learn in DAAT are designed to enable you to
achieve control of disruptive subjects and to defend yourself. Careful attention to
approach considerations each time you enter a situation will help you achieve
these goals.

31
INTERVENTION OPTIONS
If after going through the steps described in Approach Considerations, you have
decided that it is appropriate for you to intervene in a situation; you need to
decide how you will intervene. As described in Disturbance Resolution, your
Intervention Options fall into five categories, or modes, each covering tactics with
a different purpose:
Mode
Purpose
A. Presence
To present a visible display of authority
B. Dialog
To verbally persuade
C. Control Alternatives
To overcome passive resistance, active
resistance, or their threats
D. Protective Alternatives
To overcome continued resistance, assaultive
behavior, or their threats
E. Deadly Force
To stop the threat
Which mode you choose in a given situation depends on your tactical evaluation
and threat assessment. Note that the same tactic may, depending on the
circumstances and the purpose for which it is used, fall into more than one mode.
The criterion (as articulated in Graham v. Connor) is whether the level and
degree of force is objectively reasonable. Five fundamental principles apply:
1. The purpose for use of force is to gain control in pursuit of a legitimate
law enforcement objective. If verbalization is effective in gaining
control, it is always preferable to physical force.
2. You may initially use the level and degree of force that is reasonably
necessary to achieve control. You need not escalate step-by-step
through the Intervention Options.
3. At any time, if the level of force you are using is not effective to
gain control, you may disengage and/or escalate to a higher level
of force. This involves transitioning to a different level of force or
different tactics based on the totality of circumstances.
4. Once you have gained control of a subject, you must reduce the level
of force to that needed to maintain control.
5. You must always maintain a position of advantage.
In the remainder of this section, we will look at how to perform the various
techniques that are part of the DAAT system. The DAAT system is a group of
32
tactics and techniques that are dynamic and reactive—that is, they can be
applied quickly and effectively to control subject’s, and they are used in response
to the subject's behavior. You may learn additional tactics and techniques in
further training, but those that make up the DAAT system provide a range of
options that are the foundation for Wisconsin officers' use of force.
PRESENCE
The purpose of presence is "to provide a visible display of authority." Sometimes
the mere physical presence of an officer is enough to achieve control—just as
people are more likely to drive at or below the speed limit when a marked squad
is nearby, people are more likely to behave appropriately when an officer is
nearby. A good example is when officers are called to "preserve the peace"—to
stand by while one party to a domestic dispute removes belongings from an
apartment, for example. The officer may not need to do anything more than be
present in uniform—a visible display of authority. Other times, an officer may use
presence in conjunction with dialogue (covered next) to achieve control without
the use of physical force.
Tactical Stance
For an officer's presence to be effective, however, it must convey authority and
readiness to act. Slouching against a wall with your feet crossed and your hands
in your pockets conveys neither. A good stance must be comfortable, so that
you can easily maintain it, and provide both stability and mobility, so that you are
balanced, but also able to move if needed. The basic stance for law enforcement
activities is the tactical stance. In this stance, your feet are at least shoulder
width apart, your hands are at or above your waist, your strong side (firearm
side) is at least slightly back, and your knees are not locked. Your weight should
be over the balls of your feet.
This stance is easy to maintain, because it is a natural stance, and your weight is
supported primarily by bone, not muscle. It also offers mobility—with your weight
over the balls of your feet, you can move quickly in any direction.
The tactical stance has three variations:
Open Stance
Ready Stance
Defensive Stance
Here is the procedure for each one.
Open Stance
You will use an open stance when initially approaching a subject and your intent
is to convey a supportive, non-threatening presence. Of course, your decision to
use the open stance depends on your tactical evaluation and threat assessment.
33
To achieve the open stance:
1. Place your feet approximately shoulder width apart
2. Turn or "blade" your body slightly, so that your strong side is slightly
back from your reaction (non-firearm) side
3. Keep your knees unlocked, slightly bent, and your weight on the balls
of your feet
4. Put your hands, open, approximately at waist level, open, with palms
up. (You may be holding a notebook and pen in this stance)
Be sure that you are at an appropriate distance from the subject, based on your
tactical evaluation—normally this will be a public distance (12 feet or more).
Your use of dialogue with the open stance would be at the level of least control—
search talk (see next section for details).
Ready Stance
If the subject does not quickly cooperate, or your tactical evaluation dictates it,
you will use a ready stance. You will also shift to this stance if you need to move
closer to a subject, into the potentially more dangerous social distance (4-12
feet). The ready stance makes it easier to respond quickly to unexpected actions
by the subject. To achieve the ready stance:
1. Place your feet a little wider than shoulder width
2. Blade your body more (strong side back)
3. Bend your knees slightly
4. Move your hands up to mid-chest level
The ready stance conveys an alert, assertive presence. By placing your hands
at your mid-chest level, you are prepared to quickly react to an assault or utilize
active countermeasures, while not exciting the subject. Note: You should not use
clenched fists in the ready stance. Examples of appropriate ready stance hand
positions include positioning one hand on the side of the chin while resting the
other beneath the elbow; resting the hands on the inside collar of the vest;
placing the inside of the fingers on themselves; or placing the hands palms-out.
Raising your hands allows you to block an assault or launch a strike if needed.
Widening and deepening your stance helps protect your weapon and increases
your stability, while still allowing for movement. The ready stance is the
appropriate stance to use with persuasion and light control talk, as discussed in
the next section.
Defensive Stance
If the subject refuses to cooperate with your requests using persuasion and light
control talk, or if the distance between you decreases further, you will move to a
defensive stance. The defensive stance puts you in a good position to defend
yourself if a physical confrontation occurs. To achieve the defensive stance:
34
1. Widen and deepen your stance even more than in the ready stance.
Keep your center of gravity low
2. Raise your hands to the "high guard" position: hands, either open or
fisted, protect the head, elbows are held close to the body, protecting
the ribs and torso
To maintain maximum stability and balance, from this position, you will move
using either pivoting or a step-slide movement, in which only one foot moves at a
time.
To begin with, these stances may seem awkward or forced. With practice, you
will be able to move fluidly between these variations of the basic tactical stance
as needed. As you move closer to a subject, for example, you will automatically
raise your hands above waist level without thinking about it. Initially, you will
need to remind yourself to do this. Practice these stances in front of a mirror, so
that you can see the impression that you convey. Make it a habit to use the open
stance routinely in public and semi-public settings, such as academy classes.
The more you practice, the more natural it will seem—both to you and to those
around you.
DIALOGUE
As you will recall, Wisconsin's DAAT system is defined as "a system of
verbalization skills coupled with physical alternatives." Verbalization is described
under Dialogue in the Intervention Options, but as noted, you will use
verbalization throughout your interaction with subjects, even at very high levels of
force. As you have learned in Professional Communication, your goal is to get
subjects to comply voluntarily without the need to use physical force. In some
cases, you will have to use the physical techniques taught in DAAT. In
Professional Communication you learned the "DONE" concept as aid to deciding
when physical intervention was needed:
Danger
Overriding Concern
No progress
Escape
When any of these four conditions exist, you must disengage or escalate to
physical intervention—but you will still continue to verbalize.
Remember that your physical presence must be consistent with the verbal tactic
you use. As you learned in Professional Communication, the non-verbal
message you send (with facial expression, posture, voice and gestures) must
match the content of the verbal message. If the two are not congruent, the
35
listener is likely to respond to your non-verbal message more than to the verbal
one.
Your vocal cues—your tone of voice, the words you choose, how softly or loudly
you speak, and how rapidly you speak—are particularly important. In general,
soft, steady, speech at a normal pace will reduce anxiety and agitation, while
louder speech, using varying tone and faster pace will increase tension. Even at
a high level of dialogue, keep your tone controlled and your pace relatively slow.
You will convey that you are in charge and you will make it easier for the subject
to understand your words.
The more emotional a situation, the more difficult it will be for subjects to
concentrate on your words. Keep your words clear and neutral. In particular, as
you learned in Professional Communication, avoid police jargon; do not indulge
in "POP" actions likely to provoke other people, such as profanity or derogatory
remarks; and do not respond to a subject's attempts to "push your buttons."
Remember, you are a professional, and your job is to gain and maintain control
of the situation.
Within the mode of Dialogue are four verbal tactics:
Search Talk
Persuasion
Light Control Talk
Heavy Control Talk
Search Talk
Search talk is the least directive of the tactics in Dialogue. When you use search
talk, you should project a non-threatening presence and speak in a normal
conversational tone. Your goal is to gather information, either specific
information, such as a subject's name and address, or a more general sense of
the subject's state of mind. To use search talk:
1. Approach the subject at normal walking speed, hands held at waist level
2. Maintain a safe distance from the subject (usually at least 12 feet)
3. Use an open stance
4. Speak in a non-threatening, conversational tone of voice
Examples of search talk:
"Hi, I'm Officer Smith, what's your name?"
"Do you live around here?"
"Can I help you find something?"
Persuasion
Persuasion is intended to gain compliance from a subject while still maintaining a
relatively non-threatening tone. Your message is more assertive and directive
36
than with search talk, but it still falls short of ordering the subject. To use
persuasion:
1. Move closer to the subject, raising your hands to mid-chest level.
2. Maintain at least 4 feet of distance from the subject.
3. Use a ready stance.
4. Use a normal or soothing tone of voice.
Examples of persuasion:
"Sir, would you mind stepping over here?"
"Ma'am, please come over here and talk to me."
"Sir, it would be best if you went on your way now."
Light Control Talk
If persuasion fails to get the subject to comply, or if the situation dictates a more
pressing need for compliance, you will need to escalate to light control talk. Light
control talk is more directive - indeed, you are giving orders. Still, it is assertive
rather than aggressive. To use light control talk:
1. Remain in a ready stance
2. Use a somewhat louder, more insistent tone of voice
3. Issue commands
Examples of light control talk:
"Stop right where you are."
"Show me your hands."
"Step out of the car."
Heavy Control Talk
If light control talk fails to get the subject to cooperate or the situation requires
immediate compliance, you will use heavy control talk, the highest technique
within Dialogue. Your physical presence, your tone of voice, and your words all
must convey intensity and commitment. You may issue ultimatums, in which you
clearly indicate that the subject must comply or certain consequences will follow.
Naturally, you must not promise a consequence you are not prepared to enforce.
To use heavy control talk:
1. Move to a defensive stance
2. Use a loud, firm, intense tone of voice
3. Issue clear, concise commands, speaking slowly and clearly
4. Be prepared to use physical intervention techniques
Examples of heavy control talk:
"Drop the knife! Drop the knife or I'll shoot!"
"Leave now. If you do not leave, you will be arrested."
37
Controlling a subject by verbal techniques alone is not always possible.
Sometimes physical intervention is required. Nevertheless, whenever possible,
you must integrate verbalization with your use of physical intervention options.
Doing so will help you to communicate effectively with the subject, your partners,
others involved, and witnesses observing your actions.
CONTROL ALTERNATIVES
Control Alternatives are designed to control subjects who are resisting or
threatening to resist your lawful orders. As always, the overall purpose is to
achieve compliance from a non-compliant subject, but these techniques are
specifically geared toward overcoming both passive and active resistance or their
threats.
Passive resistance is defined as "non-compliant and non-threatening behavior."
An example would be a person staging a “sit-in” who refuses to leave when
ordered to do so. The person is not fighting with you—he or she is simply not
complying with your orders. Protestors often use passive resistance as a political
tactic to advance their agendas.
Active resistance is defined as "behavior which physically counteracts an officer’s
control efforts and which creates a risk of bodily harm to the officer, subject,
and/or other persons." Examples of active resistance include attempting to pull
away from the officer’s grasp, running away, getting up after being directed to the
ground, and so on.
As you learn these techniques, remember to incorporate verbalization with them.
When you physically intervene to gain control of a subject, you are using force to
require the subject to comply with your orders—you must always make
reasonable efforts to be sure that the subject understands what it is you want him
or her to do. In addition, you can use verbalization to help calm the subject once
he or she is stabilized.
The mode of Control Alternatives includes four tactics/tools:
Escort Holds
Compliance Holds
Control Devices (OC spray, ECD’s)
Passive Countermeasures
Each of these is appropriate in different circumstances, as they provide different
amounts of control: in general, they are arranged in increasing order of level of
force and propensity for injury to the subject. As always, the appropriate choice
of tactic depends on your tactical evaluation: your use of force must always be
objectively reasonable.
38
Escort Holds
The goal of escort holds is to safely initiate physical contact. If a subject does
not comply with your verbal directions, you can use an escort hold to gain control
of the subject, preventing a physical confrontation. An escort hold also enables
you to move the subject in a controlled way—out of a dangerous location, for
example.
Two techniques are used sequentially in this tactic:
1. Blanket the arm
2. Escort position
Blanket the Arm
To blanket the arm, follow this procedure:
1. From a defensive stance, hands held high and open, protecting the face,
move both hands directly to the subject's arm just above the elbow,
verbalizing appropriately. (Example: "Police officer. Just relax.") Note:
the technique may be applied to either arm, but you should seek to control
the dominant arm, which would most likely be used to access weapons or
to strike. Most people are right-handed, so if the right arm is accessible,
apply the technique to that arm.
2. Using both hands, "blanket" the subject's arm, encircling it with your
hands.
3. As you blanket the arm, move to the side, toward the 2½ position.
4. Using touch pressure, establish a gentle but firm "pincer" grip just above
the elbow with the thumb and middle finger of your inside hand (the one
nearest the subject when you are both facing the same way). When the
pincer grip is properly applied, your hand will be near the subject's triceps,
with your thumb and middle finger pointing forward.
5. Continue to talk to the subject in a reassuring, calming way.
Escort Position
With the arm blanketed, move fluidly into the escort position, as follows:
1. If you are not yet there, move to a position at the subject's 2½.
2. With your inside hand maintaining a firm pincer grip just above the
subject's elbow, slide your outside hand down the forearm to the subject's
wrist. Maintain contact with the arm as you slide your hand.
3. With your outside hand, establish a pincer grip on the subject's wrist, just
above the hand. Your hand should be against the back of the wrist, and
your thumb and middle finger encircling the wrist. The subject's arm
should be straight.
39
4. Bring the subject's hand (palm facing the officer's body) to your center,
and move slightly to the side away from the subject. This will pull the
subject slightly off center, and put you at a position of advantage.
5. Direct the subject to place the other (uncontrolled) hand on his or her
head, palm up. Alternatively, have another officer place an escort hold on
the other arm.
6. From this position, you can move the subject by stabilizing the elbow with
your inside hand (keeping the arm straight), and directing the subject
forward, while pushing on the arm and wrist as needed to guide him or
her.
7. Continue to talk to the subject in calm, reassuring tones. If another officer
is involved, be sure to communicate with him or her so that you can
operate as a team. Remain aware of your surroundings, scanning the
area and remembering to breathe.
Compliance Holds
The goal of compliance holds is to overcome passive resistance. As noted
earlier, passive resistance occurs when a subject refuses to comply with a lawful
directive from a law enforcement officer, but does not engage in physical action
likely to cause harm to the officer or another person. The tactic of compliance
holds includes two techniques:
Come-along
Pressure Points
Both of these techniques work by creating a temporary sensory overload on the
subject, which allows you to establish control.
Come-Along
From the escort position, you can establish a come-along (using wrist
compression) as follows:
1. From the escort position, maintaining your pincer grip on the subject's
wrist, begin to elevate your outside arm.
2. Using your inside hand, with its pincer grip on the subject's arm, pull the
subject's elbow down and toward you to a point in or below your armpit.
Note: These two movements, if done correctly, will already begin to
compress the subject's bent wrist.
3. With your inside hand, release the pincer grip on the subject's elbow, and
slide your hand up along the subject's forearm to the top of the hand.
Establish compression by "taking the slack out" of the wrist, pressing the
hand down. The subject's fingers should be pointing forward.
4. Fully establish two-handed compression by aligning your inside hand
middle finger along the knuckles of the subject's hand, and placing your
outside hand on top, middle finger directly over middle finger. Important:
Be sure both your thumbs are on top of the subject's wrist.
40
5. At the same time, direct the subject's elbow to the center of your lower
abdomen. The subject's forearm should be at approximately a 45º angle,
with the hand above the elbow. Hold your elbows close on either side of
the subject's arm to prevent it from sliding out of position.
6. Give a simple, loud, verbal direction: "Sir, STOP RESISTING!" Repeat if
needed. If needed, use a verbal stun: a short, shouted command
intended to stun the subject into complying: "STOP!"
7. If the verbal stun is not effective in achieving compliance, repeat it while
applying compression by pulling the subject's knuckles downward, so that
the subject's palm moves toward his or her forearm, until compliance is
achieved. Note: If the subject attempts to defeat your compliance hold by
making a fist, you may grasp his/her thumb and pull it downward to cause
the hand to open so that compliance may be re-established.
8. Once compliance is achieved, decrease the pressure on the subject's
wrist to a level where control can be maintained.
9. Unless another officer is securing the other hand, direct the subject to
place the other hand on top of his/her head, palm up. If the subject does
not comply, consider that unsecured hand to represent an extreme
danger—disengage and/or escalate.
To disengage from a come-along, use one of these techniques:
Technique A:
1. Step forward, nudging the subject with your shoulder as you release your
grip.
2. Direct the subject with a specific command (Examples: "Stay back!" or
"Move forward!").
3. Return to an open-hand defensive stance.
Technique B:
1. Place your outside hand on the subject's shoulder or upper arm.
2. Step forward slightly, lower the inside hand, while directing the subject
forward with a specific command.
3. Return to an open-hand defensive stance.
Pressure Point
Similar to the come-along, pressure points work by creating sensory overload by
compressing nerve clusters. In cases where the subject's arm and wrist is not
accessible or inconveniently positioned for a come-along (for example, subject's
arms hugged close to the body or subject seated on the ground), pressure points
present an alternative.
The DAAT program includes two primary pressure points:
Mandibular angle (corner of the jaw below the ear)
Hypoglossal (beneath the jaw)
Regardless of which location is used, the following guidelines apply:

41
1. You must blanket and stabilize the subject's head for proper application of
the pressure point and to protect yourself from being bitten or head-butted.
2. Use only touch pressure, using the tips of the thumb or fingers to apply the
technique. The use of any object or weapon to apply the technique is
specifically prohibited.
3. Recognize that not all subjects will respond to pressure point techniques.
Subjects who are impaired by alcohol or drugs, mentally ill, or emotionally
disturbed may not respond. Because of variations in anatomy, the
technique may not be effective on others, even if properly applied. If the
technique is not immediately effective, disengage and/or escalate.
4. As with the come-along, once control is established, reduce the pressure
to a level that maintains control. Continued application of intense
pressure may cause subjects to become highly combative.
To apply pressure points:
1. From a defensive stance, using a high guard position, blanket the
subject's head (not neck or throat) by grasping it firmly with both hands.
Take care not to let the subject bite you.
2. Stabilize the subject's head by pulling it against your body, or using
another stabilization surface, such as the ground or a wall. If you are
positioned behind the subject, use your reaction hand to cup the front of
the subject's chin. Be sure to remain balanced and in a good stance.
Note: You must progress rapidly from Step 2 to Step 3, because you do
not control the subject's hands.
3. While stabilizing the head, locate the specific pressure point you wish to
use—either the mandibular angle or the hypoglossal area—and properly
index your thumb or fingertips.
4. Issue a simple, loud verbal command (such as "Stop resisting!"), followed
by a verbal stun ("STOP!") as you simultaneously apply pressure in the
proper direction.
5. Once control is established, reduce the amount of pressure to a level that
maintains control.
6. Stabilize and handcuff the subject.
7. Initiate follow-through procedures, including monitoring the subject for
injuries.
Control Devices
The goal of control devices (OC spray and ECD’s) is to overcome active
resistance or its threat. Active resistance, unlike passive resistance, involves a
subject who is physically counteracting an officer’s control efforts—under
circumstances in which the behavior itself, the environment in which the behavior
occurs, or officer/subject factors create a risk of bodily harm.
3
3
Bodily harm is defined in § 939.22(4) Wis. Stats as “…physical pain or injury, illness, or any
impairment of physical condition.”
42
The criterion of active resistance or its threat means that in general, control
devices would not be appropriate to use against verbal aggression, against
people who are running away, against children and older persons, and against
persons engaged in peaceful civil disobedience—unless reasonably justified by
the circumstances covered in Approach Considerations.
Let’s look at each of these situations and consider how an officer might analyze
them to determine whether a control device would be an appropriate intervention
option. Note: Agencies differ in their policies with regard to the use of control
devices by law enforcement officers. Be sure to know and follow your agency’s
policy.
Verbal Aggression
Verbal aggression occurs when a suspect is being argumentative, and/or
confrontational with an officer. While this behavior alone can be difficult for an
officer to deal with, Professional Communication skills are the preferred method.
However, if arbitration is unsuccessful (REACT), and an officer/subject factor
comparison dictates lesser levels of force would be ineffective, then a control
device could be a viable alternative.
People who are running away
The use of OC or an ECD is not automatically justified because a person is
running away. Before deploying a control device (in this case, an ECD would be
a better choice than OC spray) during a foot pursuit, ask yourself, “What will the
suspect force me to do when I catch him?” If the subject would force you to
decentralize him or her during initial physical contact, using an ECD might be a
better choice, as the risk of injury to the officer and subject would be less with an
ECD as opposed to a passive countermeasure. On the other hand, if you don’t
think the subject would require you to immediately take him or her to the ground,
then an ECD would probably not be the best choice. In that case you could
safely respond with a lower level of force.
Another way to think about the situation is to apply the three criteria from Graham
v. Connor to determine whether using a control device would be reasonable:
The severity of the alleged crime at issue: Is it a retail theft or a
substantial battery?
Whether the suspect poses an imminent threat to the safety of officers
and/or others: What is the suspect doing when you decide to use force?
Whether the suspect is actively resisting or attempting to evade arrest by
flight. Is the suspect able to offer active resistance and/or flee?
Children or Older Person
Officers making use of force decisions involving children and older persons
should ask themselves the following question when deciding if a control device is
a viable alternative: What is my alternative force option and does it increase the
43
propensity of injury? If the alternative creates a higher risk of injury, then a
control device is a very viable alternative.
For example, suppose you are faced with a 90-year-old suicidal dementia patient
armed with a small edged weapon. Your initial assessment indicates that the
infirmities of age have greatly decreased the patient’s ability to use his weapon.
One option for controlling the situation and disarming the man could be for an
officer (with deadly-force back-up) to strike the patient’s weapon arm with a
descending baton strike. Even if this tactic were successful in disarming the
patient, there would be a high probability of injury to the patient’s arm and an
increased risk of harm to the officer because the officer would have to get close
to the patient to deliver the strike. In this situation, an ECD deployed from a
distance would decrease the likelihood of injury to both patient and officer.
Persons engaged in peaceful civil disobedience
Often times in these situations, officers must remove demonstrators from an
area. If the protestors actively resist officers’ attempts to remove them, a control
device may be appropriate. One alternative would be for officers to attempt to
carry or drag protestors out, resulting in a high probability of injury to both officers
and protestors. In the case of civil disobedience, be sure to distinguish between
passive and active resistance. If the subjects are displaying passive resistance
only, compliance holds or pressure points would normally be the preferred
choice.
Pregnancy
This issue is important because officers sometimes encounter females who are
not obviously pregnant. There is no proof ECD use on pregnant females is
unsafe or detrimental. However, the muscle contractions, risks from falling, and
other unforeseen risks associated with pregnant females make it advisable to
avoid deployment of an ECD on pregnant female where practicable, although
there may be certain scenarios where the use of an ECD is justified in the overall
context of the situation. Refer to your agency policy.
Individuals in an elevated position
A person who is at the top of the stairs, at the edge of a building rooftop, up a
tree, or standing on a bar are exposed to the possibility of a life threatening injury
if they fall from one of these locations. For this reason, an officer needs to factor
the location of an individual and where they are likely to fall into the assessment
when deciding whether to use an ECD or an OC spray.
Holding a small child
An individual who is holding an infant or small child will drop the child if they are
at the receiving end of an ECD deployment. An OC spray directed at the subject
will most likely also expose the child to the effects of the OC. For this reason,
ECDs and OC spray are normally going to be poor choices in this situation.
44
Bystanders
The presence of bystanders in close proximity to the subject will make using an
ECD or OC spray more difficult. An officer needs a clear line of sight to the
subject in order to deploy an ECD and cross-contamination is likely with OC. If
feasible, an ECD is probably a better choice in this situation because the cross-
contamination issues with the OC are likely to cause more problems.
Oleoresin Capsicum (OC) Spray
The goal for using OC spray is to overcome active resistance or its threat. OC
spray (also called "pepper spray") works by creating in the subject a variety of
physical effects that may result in confusion and disorientation, thus disrupting
the subject's ability to resist or continue to resist.
What is it and what does it do?
Oleoresin Capsicum is an inflammatory agent that is a mixture of an oily resin
and a naturally occurring essential oil derived from varieties of the red pepper
plant. It is generally prepared in aerosol form, in various concentrations. OC
affects people in several ways, including these effects:
Pain and tearing in the eyes, causing an involuntary closing or rapid
blinking
Reddening of affected skin (usually the face), combined with a feeling of
intense heat
Inflammation of the mucous membranes of the nose, eyes, mouth, and
throat
If inhaled, coughing, gagging, and gasping for breath
Because of the effects on the eyes and breathing, subjects may panic, fearing
that they are being blinded and/or suffocated. Typically the hands will go to the
face, the upper body will bend forward, and the person may go to his/her knees
for increased stability. Other subjects may run.
The subject's attention may be so focused on the unpleasant effects he or she is
experiencing that he or she may have difficulty hearing your commands (auditory
exclusion) or understanding them.
Although the effects can be very intense, they generally subside relatively
quickly. There has never been a substantiated instance of injury or death
attributed to OC.
Generally, fairer-complexioned people are more susceptible to the effects of OC
than darker-complexioned people. Some people, including those who are
impaired by alcohol or drugs, mentally ill, emotionally disturbed, or highly
motivated, may not be affected at all. Even those who experience the physical
effects may have the mental toughness to fight through them. If your use of OC
45
is not effective in assisting you to gain control, you must be ready to disengage
and/or escalate.
How is it dispersed
OC spray can be dispersed through a variety of aerosol nozzles – cone, stream,
foam, etc. Wide patterns like “mist” or “fog” spread the spray widely, resulting in
the potential for others besides the intended subject to be affected (including
other officers). The OC dispersed by these methods is also subject to wind
effects. These patterns typically empty the container rather quickly, because of
the force with which it is expelled.
Foam and stream patterns project the OC spray in a liquid stream, which then
takes effect as the vapors volatilize. It is easier to direct to a specific target, with
less potential for cross-contamination of others. On the other hand, if sprayed in
a steady stream rather than in short bursts, it tends to remain liquid, and run out
of the eyes before it has a chance to volatilize.
You should become familiar with the dispersion method used in your agency's
product.
Caring for your OC spray
Follow the manufacturer's guidelines for storage and shelf life. If there is no
manufacturer's information available, follow these general guidelines:
Store at room temperature, away from heat or open flame, direct sunlight,
and temperatures over 120 º F
Do not puncture or incinerate the container, even if empty
Shake the container regularly, to keep the contents evenly mixed
How to use OC spray
To use OC spray against a subject, follow this procedure:
1. From a defensive stance, issue verbal commands and verbal stuns as
needed to attempt to get the subject to comply.
2. If the subject refuses to comply, draw your OC spray, holding it in your
strong hand. (If you carry your OC on your reaction side, draw it with your
reaction hand, then transfer it to your strong hand.)
3. Holding the container upright, shake it while you warn other officers that
you are about to use OC by shouting, "Spray!"
4. If the subject does not comply, continue to hold the container upright, and
spray one or more short bursts directed at his or her eyes and face from
the proper distance, as stated by the manufacturer. (If there is no
manufacturer's recommendation available, stay at least four feet away
from the subject.) Move to a different location after each burst. Note: Be
careful not to spray in long bursts or too often—too much liquid will delay
the effects by preventing evaporation.

46
5. If the subject complies, cease spraying, and stabilize him or her. Provide
appropriate after-care.
6. If the subject does not comply, cease spraying and disengage and/or
escalate. When the subject is controlled and stabilized, provide
appropriate after-care.
What is appropriate after-care?
Follow the manufacturer's recommendations for proper after-care and
decontamination once the subject is under control and stabilized. If no
manufacturer's guidelines are available, here are some general guidelines:
Use Professional Communication skills to calm and reassure the subject,
who may feel quite panicked. Tell the subject that the effects will wear off
in 30-45 minutes
Ask the subject if he/she is wearing contact lenses, and if so, allow
him/her to remove them
If the subject is wet with OC, dry him or her before transporting
Encourage the subject to open his or her eyes and blink. This will
encourage tearing, which will help wash out the OC
If possible, remove the subject to fresh air, and face him or her into the
wind.
Rinse the subject's face and eyes with cool water, preferably from a
running tap or hose. Dipping the face into standing water will contaminate
the water and result in re-exposure. Advise the subject not to rub his or
her eyes.
If available, use (non-lotion) soap and water to remove the resin from the
skin, but do not use salves, creams, or lotions. These will trap the OC
against the skin.
Get medical assistance under any of these circumstances:
- If the subject requests it
- If symptoms do not visibly improve after 45 minutes
- If you observe any other problem or feel that medical assistance is
warranted
What if a Subject Threatens to Spray Me with OC?
When discussing possible options in such a situation, remember that your force
is examined under the totality of the circumstances known to you at the time. An
incomplete discussion about options could go like this: “If the suspect pepper
sprayed you, you could have been incapacitated. While incapacitated, you might
have more difficulty defending yourself against a gun grab. While you suffer the
effects of the spray, the suspect could take your gun and kill you.”
The above information is not necessarily inaccurate. It is, however, an
incomplete analysis, and is insufficient on its own to justify a deadly force
response to the threat of being pepper sprayed. Remember, pepper spray itself
is not a deadly weapon. It doesn’t cause great bodily harm or death, so its use
does not automatically justify a deadly force response. Given only the
47
information in the previous paragraph, death due to a disarming is a possible
outcome, but it is not a likely outcome without other supporting factors. What
specific factors led you to believe you were going to be the subject of a disarming
attempt? Before an officer can use deadly force, there must be a reasonable
expectation of suffering death or great bodily harm – not merely a possibility of
that happening.
It is important to note that there are any number of factors that, when combined
with the above situation, could make a deadly force response reasonable. For
example, you are aware that pepper spray will likely impact your vision, thereby
reducing your ability to see and counter an assault. Furthermore, if the suspect
shows intent to cause death or great bodily harm, and uses a weapon (OC spray)
to aid in that attempt, deadly force might be appropriate. If the suspect is
imminently threatening to take your handgun, that justifies deadly force. (A
subject attempting to disarm an officer is presumed to be attempting to use that
weapon against the officer.) But a mere possibility, without other supporting
factors, would not satisfy the deadly force criteria. As always, maintain a tactical
advantage, continuously evaluate the suspect’s threat level, and thoroughly
explain the suspect’s behavior, your observations, and your forced actions in
your report.
As always, if you are faced with a subject threatening you with OC spray, you
have the options to disengage or escalate. If you choose to disengage, you
should have two goals:
Immediately attempt to avoid being incapacitated by the spray by closing
one or both eyes, blocking the spray with your hand, turning your head
away, or holding your breath to avoid breathing the spray
Seek to create distance-enough that you are out of range of the spray
While accomplishing those goals, you consider your next option. Here are some
possibilities:
Attempt to defuse the situation using Professional Communication skills
Attempt to disarm the subject
Escalate to a higher level of force
The appropriate level of force depends on the totality of the circumstances,
including your own response to OC. If you have previous experience with OC,
you may know for example, that you can fight through its effects. Or you may
know that you become instantly incapacitated by it. Conduct a tactical evaluation
to determine an appropriate level of force.
Electronic Control Devices
Law enforcement officers may be called upon to use an electronic control device
(ECD) in the course of performing their duties, and you will complete a
manufacturer’s ECD course during recruit academy. Because of the nature and
48
visibility of the use of ECDs, it is important to clearly identify the criteria and
procedures for use, limitations on their use, and appropriate follow-up care.
What is an ECD and what does it do?
Electronic Control Devices are instruments in which a safe amount of electricity is
used to affect the sensory and/or motor nervous system of the body. Here’s how
it works. The ECD generates an electrical current that is transmitted to the
subject’s body through probes, either directly attached to the ECD (contact
deployment) or attached to wires that are shot at the subject (distance
deployment). Two points of contact on the body are required to complete the
electrical circuit. The electrical current then follows the circuit, including the
portion of the body between the probes, causing sensory and/or motor nervous
system overload.
What are the different nervous systems?
The human nervous system communicates using simple electrical impulses. The
human nervous system is the command, control, and communication system of
the human body. The nervous system is comprised of three elements.
The central nervous system is the command center including the brain
and spinal cord. All information processing and decision making
processes occur in the central nervous system.
The sensory nervous system includes the nerves that carry information to
the brain. These are the “intelligence gathering” nerves which carry
information about the environment (hot, cold, wet, etc.) and the state of
the body (pain, body positioning, etc.) to the brain. These nerves tend to
sit near the surface of the body in the skin, where they can interface with
the skin and the environment around the body to gather information. The
location of these nerves near the skin makes them easier to stimulate than
deeper nerves. Hence, some ECDs affect only these nerves.
The motor nervous system includes the nerves that carry command
signals from the brain to the muscles controlling all movement. These
nerves are located deeper in the body, protected within and beneath the
muscle tissue. It takes a greater amount of ECD power or specialized
electronic technology to penetrate deep enough to control these motor
nerves.
It is the control of the motor nerves in conjunction with the stimulation of the
sensory nerves that can cause temporary incapacitation.
7
Why is this important?
Officers come in contact with a myriad of suspects displaying different levels of
resistance and different types of assaultive behavior. These suspects respond
differently to the selected use of force an officer is forced to use. Below is a
profile of two suspects.
49
Suspect #1
Offense: Warrant for Disorderly Conduct
Height/Weight: 6’/200lbs.
Behavior upon contact: Agitated with officer contact and does not want
to be taken into custody
Suspect #2
Offense: Criminal Damage to Property (smashing car
windows in the street at random)
Height/weight: 5’09”/165lbs.
Behavior upon contact: Has between 7 and 10 three inch cuts
throughout both arms and doesn’t
acknowledge officers’ presence upon contact.
The profiles are very oversimplified, as there are many other factors that will
determine an officer’s use of force. However, they show the importance of
knowing the difference between the two systems. Suspect #1 has a higher
probability of responding to techniques/tools that affect the sensory nervous
system because he still feels pain. Suspect #2 obviously does not feel pain
based on his observable condition, so officers need to affect his motor nervous
system to achieve control. This can be accomplished through team tactics (using
weight and strength), impeding his ability to resist, or using an ECD that affects
both systems. Not all ECDs affect both systems.
What is the difference between contact deployment and distance deployment?
In contact deployment, the fixed probes of the ECD directly touch a part of the
body. Examples of ECD’s that can be used in contact deployment include the
following:
Stun Gun – hand-held device directed into a specific body part.
Stun Belt – belt worn by suspect and activated by a remote control. These
are most commonly used in court room settings and custodial transports.
Stun Shield – shield designed both to protect an officer from projectiles
and to deliver a current. These are most commonly used in crown control
settings.
In distance deployment, the probes are attached to wires and shot from the ECD
into the subject’s skin. The current then runs from the ECD through the wires
and into the body. Examples of ECD’s that can be deployed at a distance include
these:
TASER® X26, C2, X2, etc.
Phazzer® Enforcer
Some ECDs can be used in both ways—as contact and distance devices. Dual-
purpose ECDs are the best option for street officers, because duty situations are
often fluid and dynamic and require versatile tools and tactics.

50
Caring for ECDs
As there are many different ECD’s on the market, you will need to refer to the
manufacturer’s guidelines about care and maintenance of the ECD’s used by
your agency. Some general guidelines are:
ECDs are electrical devices, so you should routinely check the batteries in
accordance with manufacturer’s recommendations.
Unless otherwise specified by the manufacturer, keep your ECD dry.
Electrical instruments can malfunction when exposed to water.
Carrying an ECD
Refer to your agency’s policy when determining where to carry an ECD. If given
the option, here are some pros and cons when making your determination.
Reaction Side Carry
Strong Side Carry
(Pro) Lower Risk of Drawing Wrong Weapon
Under Stress
4
(Pro) Hip Cross draw = Faster Engagement on
Target.
(Pro) Easier ID as a Non-Lethal Weapon By
Other Officers.
(Con) Higher risk of weapon
confusion
(Con) Can be a weapon retention issues,
depending on Defensive Tactic training.
(Con) Incidents of accidental
shootings by mistaken weapon
How to use ECDs
The particular method of use for an ECD depends on whether it is designed for
contact or distance deployment and on the particular manufacturer’s instructions.
Here are some general guidelines for common devices.
Stun belts are usually secured around the suspect’s waist. If the suspect
displays active resistance or its threat, the belt is activated via remote control.
While activating the belt you should use heavy control talk and give loud specific
commands, such as “Stop Resisting!” and/or “Put your hands behind your back!”
Cover officers, if available, should use the deployment time to move into
positions for emergency handcuffing and/or ground stabilization.
8
4
There have been at least 11 instances of “weapon confusion” nationwide, where an officer
mistakenly drew and fired their handgun instead of the intended ECD.
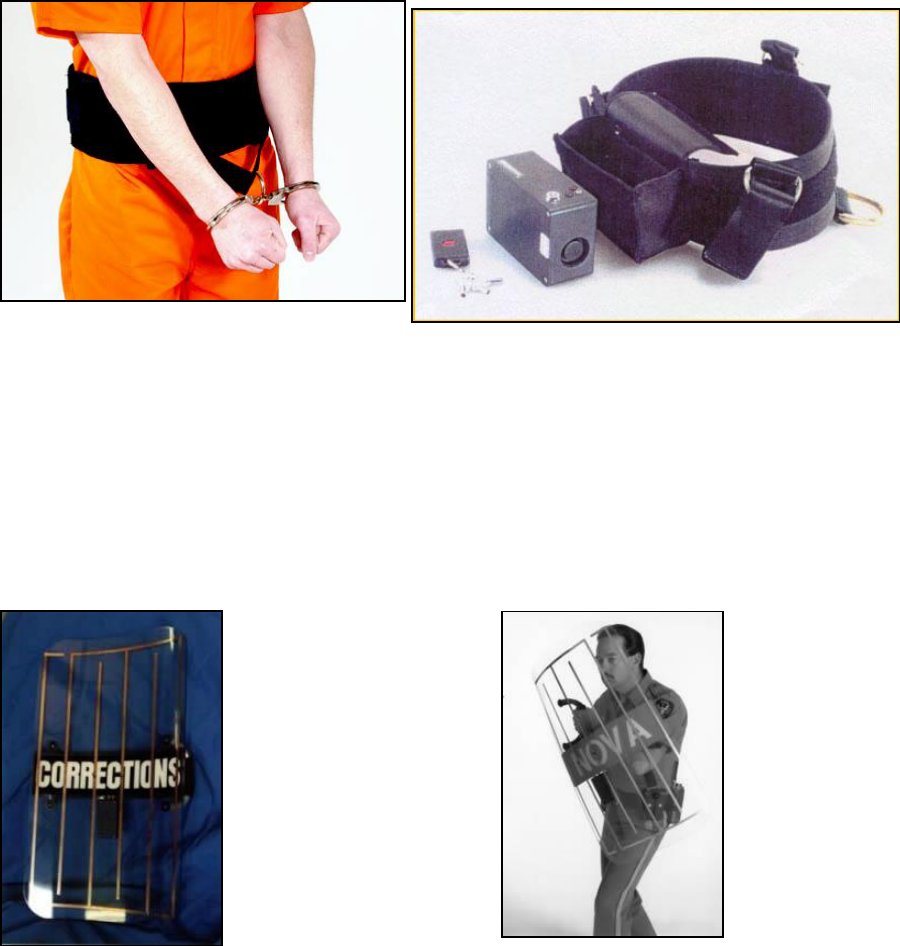
51
A stun shield is usually held in front of an officer who is involved in either a
crowd-control situation or a cell extraction. Before activating a stun shield, you
should be in a defensive stance. As with the stun belt, while activating the shield
you should use heavy control talk and give loud specific commands, such as
“Get Back!,” “Stop Resisting!” and/or “Put your hands behind your back!” And
cover officers, if available, should use the deployment time to move into positions
for emergency handcuffing and/or ground stabilization. A stun shield can also be
used to drive back members of an aggressive crowd.
Stun guns are usually contact deployed when the officer is within arms’ reach of
the suspect. The ECD is then directed onto a specific part of the body of the
suspect. This kind of deployment has also been referred to as a “drive stun.” To
perform a contact deployment, direct the ECD into the chosen spot on the body
while activating it before or during contact. Always be aware of how much force
you are using when applying a contact deployment into the suspect. Remember,
the ECD in this mode is not an impact tool. The more force you use when
making contact, the greater the risk of injury, particularly if that area of the body
is fragile. For example, a forceful contact deployment to the trachea could crush
it, compromising the airway. The same force directed against the large muscles
of the trunk would be less likely to cause serious injury.
9
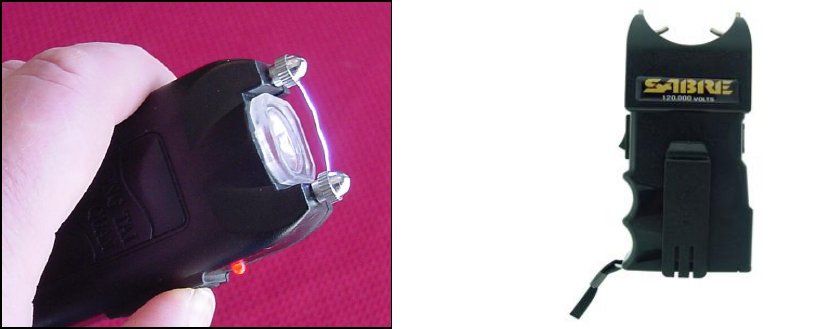
52
The contact deployment will generate temporary sensory overload wherever it is
applied. You can maximize the temporary sensory overload effect by focusing
on clusters of nerves within the body. There are several throughout the body,
including:
Brachial/Carotid Plexus (sides of neck)
Brachial Plexus tie-in (upper chest)
Radial Nerve (forearm)
Pelvic Triangle (area outside of the immediate groin area)
Common Peroneal Nerve (behind knee extending to the outside of the
thigh)
Femoral Nerve (top outside of thigh)
Tibial Nerve (calf muscle)
*It is recommended that the Brachial Plexus and Pelvic Triangle be used as a
secondary target area as the areas are more sensitive to blunt trauma from the
process of directing the ECD into that area.
Below is an example of how to use a stun gun on a subject facing away from
you:
1. Start in a defensive stance with stun gun in your strong side hand and
your reaction hand positioned in front of you (Close Combat Draw
position).
2. Move forward and use your reaction hand to stabilize the upper back of
the suspect. While activating the stun gun use heavy control talk, giving
loud specific commands, such as “Stop Resisting!” and/or “Get Down!”
3. Direct the ECD into the suspect’s lower back while maintaining contact
and if possible, directing him to the ground.
4. Assess whether to disengage and/or escalate.
5. Cover officers, if available, should use the deployment time to move into
position for emergency handcuffing and/or ground stabilization.
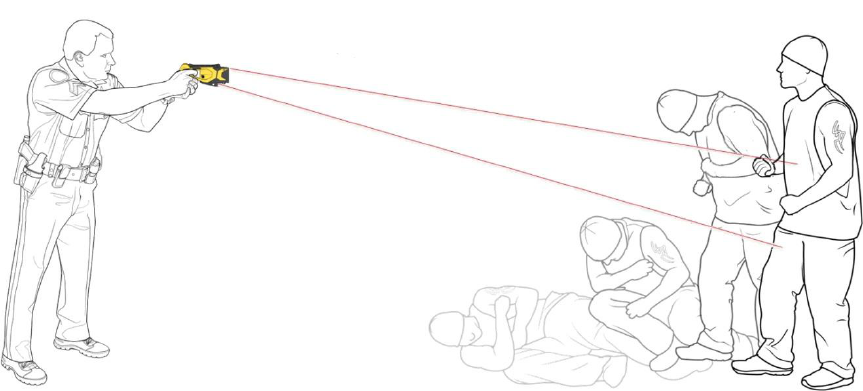
53
As always in any situation in which you are close to a suspect, be aware of the
possibility that the suspect may strike you. When an ECD is deployed, a strike
may result from strong muscle contractions caused by the sensory/motor nerve
overload rather than the suspect’s intent to hit you—but you still need to protect
against it by securing the suspect’s extremities.
ECDs deployed from a distance often involve 2 to 4 points of contact from the
unit. The unit has projectiles that are directed from the device and onto the
suspect and electricity is transferred by signal or wires into the body.
10
To maximize on your distance deployment, attempt to apply some of the
following principles:
Greater probe spread increases effectiveness
If possible, minimum 4 inch spread
Hold vertical unless subject is laying down or at an angle
If practicable, deploy at suspect’s back (large overlapping muscle mass)
If the back is not practicable, follow manufacturer recommendations
regarding target areas
If possible, utilize surprise factor with back-up officer deploying
Stronger muscles = even more overwhelming
Aim where clothing fits more tightly; clothing tends to fit tighter in rear
Skin penetration of the probes is not always required. Some ECDs
electrical arc can “jump” through clothing
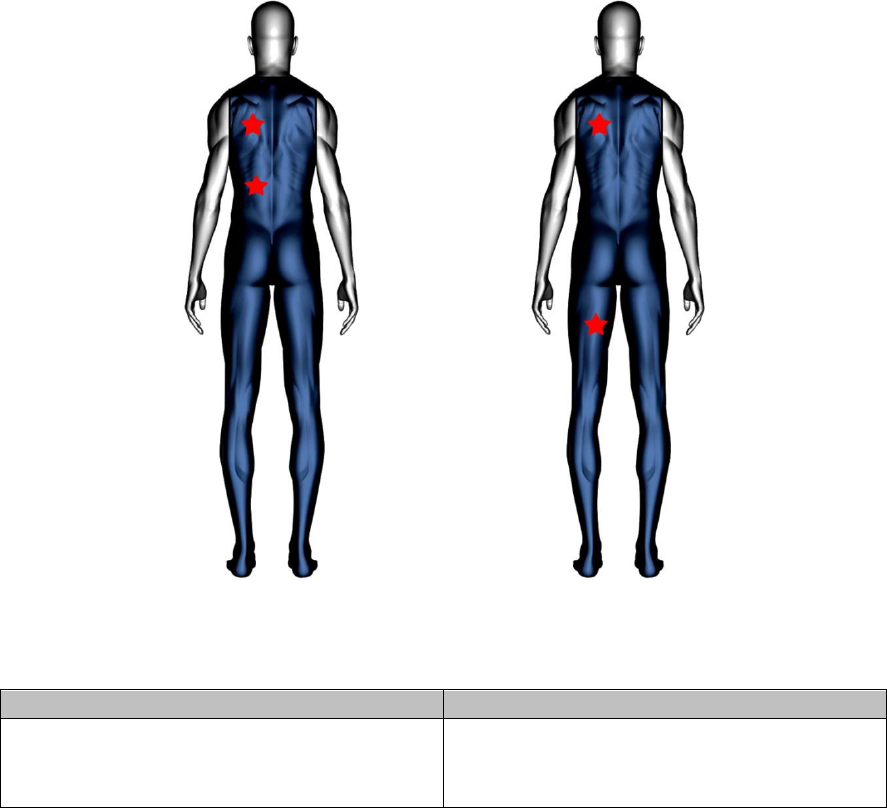
54
In the above diagrams the stars represent probe contacts. During a distance
deployment the following areas will be affected.
11
Left Photo
Right Photo
Left upper and middle back
Left upper, middle, and lower back
Left gluteal muscles
Left thigh/hamstring
It is obvious that the probe spread on the right would have a greater effect on the
body as more muscle groups and nerve areas are included between the probes.
Here is an example of how to deploy an ECD at a distance:
1. Start in a defensive stance with the ECD held in position number 4 of the
draw. (Alternatively, if the suspect is close enough to attempt to disarm
you, use the Close Combat Draw position.)
2. If practical and feasible, use heavy control talk and give loud specific
commands, such as “Stop Resisting!” and/or “Get Down!”
3. Deploy the ECD, and continue to give commands, such as “Stay Down!”
or “Hands behind your Back!”
4. Assess whether to disengage and/or escalate each time you deliver an
additional cycle.
5. Cover officers, if available, should use the deployment time to move into
positions for emergency handcuffing and/or ground stabilization.
55
Cuffing Under Power
A successful ECD deployment may provide a ‘window of opportunity’ to secure a
resistive subject. When cover officers are available, they should use the
deployment time to perform ground stabilization and/or emergency handcuffing,
depending on their Tactical Evaluation
12
of the situation. Whether a solo officer
should attempt this must be based on the officer’s training, experience, and
Tactical Evaluation of the situation. A solo officer may decide to wait for
additional officers before attempting to handcuff a resistive subject.
Cuffing under power is similar to “Multiple Officer Ground Handcuffing…” (p.
103). If the suspect yields to the ECD deployment, the first cover officer controls
the subject’s right arm and a second cover officer, if available, controls the
subject’s left arm. If the subject is still standing when officers make initial
physical contact, officers can control the subject’s rate of descent. Depending on
circumstances, cover officers might achieve ground stabilization of the subject
under power and use any window of opportunity immediately after the electricity
ceases to complete handcuffing.
The officer deploying an ECD might briefly prolong the deployment if cover
officers needed an extra moment to finish handcuffing a resistive subject who
could not otherwise be controlled. (Caution: lengthening the deployment time
must balance the possibility of subject injury versus the benefit of controlling the
resistive subject’s actions. See “Multiple Deployments of an ECD…” on p. 57.)
As with any use of force, once you have gained control of a subject, you must
reduce the level of force to that needed to maintain control.
Will I be affected when I touch a suspect who is being affected by an ECD?
In order to prevent from being affected while moving in to assist in stabilizing a
suspect an officer needs to keep his body parts out from between the probes or
points of contact. Electrical settings in modern law enforcement ECDs are so low
that the electricity only passes between the two points of contact. An example
would be if the suspect has two probes in his back area. There is one probe
near the shoulder and the second probe just above the hip. Then an officer need
only to avoid the area between the probes to successfully stabilize the suspect
and avoid being affected by the ECD.
Some Electricity Rules that apply to ECDs
13
Electricity must be able to flow between the probes or the electrodes
Electricity follows the path of least resistance between the probes
The greater the spread between the probes on the target, the greater the
effectiveness
Electricity will not pass to others in contact with the subject unless contact
is made directly between or on the probes
Electricity can arc through clothing, even some bullet resistant materials
56
Exposure to water will not cause electrocution or increase the power to the
subject (the electrical charge is fixed inside the X26 TASER device, and
will not increase significantly even with environmental changes)
High voltage won’t injure you if the current is low
Low voltage CAN injure you if the current is high enough
Malfunctions
ECDs deployed from a distance are not always 100% effective. This may be
based on one or several factors:
A small probe spread in which often only a few smaller muscles or limited
nerves are affected by the ECD
Only one probe has made contact and due to the other probe(s) not
contacting the body there is no completion of the electrical circuit
During the initial deployment, or between cycles, the electrical circuit (2 or
more probe(s) making contact) loses contact and there is no effect
Target is completely missed
Wires are broken
If ineffective, an officer is always permitted to disengage and/or escalate. One
option is to follow-up with a contact deployment. Some ECDs will complete the
circuit if one probe is in contact with the suspect. This will then cause the area
between the probe and contact deployment to be effected. Knowing this,
whenever possible try and increase the area spread.
Here is an example to manage an ineffective distance deployment that is
followed-up with a contact deployment.
1. Start in a defensive stance with the ECD held in position number 4 of
the draw. (Alternatively, if the suspect is close enough to attempt to
disarm you, use the Close Combat Draw position.)
2. If practical and feasible, use heavy control talk and give loud specific
commands, such as “Stop Resisting!” and/or “Get Down!”
3. Deploy the ECD, and continue to give commands, such as “Stay
Down!” or “Hands behind your Back!” Upon realizing that the ECD is
not effective, the officer moves in for a contact deployment leaving the
cartridge attached to the ECD.
4. The officer sees that a probe is still in contact with the suspect’s
shoulder area.
5. In order to maximize the ECD effect the contact deployment should be
directed away from the probe to an area of the body such as the
suspect’s thigh. The officer should keep their reaction hand in a
position to defend from a possible strike.
6. Upon successful completion of the circuit, and/or successful suspect
reaction (i.e. suspect begins to go to the ground) remember that
continual contact is required to maintain success.
57
7. Assess whether to disengage and/or escalate each time you deliver an
additional cycle.
8. Cover officers, if available, should use the deployment time to move
into positions for emergency handcuffing and/or ground stabilization.
Flammability of ECDs in conjunction with OC
Some OC propellants are flammable and can be ignited when used in consort
with an ECD. Check the manufacture’s recommendations and see if your
agency has performed its own tests on the combination of OC and ECD.
Another consideration is if adjoining/assisting agencies have tested their OC and
ECD. If unable to determine this through research then it recommended to not
use the two tools together.
Another consideration is deploying an ECD on a suspect who has doused
themselves with a flammable liquid (gasoline) or in a toxic environment (meth
lab). The spark that is often generated when an ECD is activated (this is the air
ionizing from the electricity being airborne) makes this very unsafe. An ECD
should not be used as a Control Device in situations like these.
Multiple deployments of an ECD on an individual
Repeated or prolonged application of an ECD may have an additive effect and
could cause injury, especially in someone whose health is already compromised
in some way, including by drug use, injury, or over-exertion, as can happen in
people displaying medically significant behavior. Before each application of an
ECD, as with any other use of force, reassess the situation. If use of the ECD is
not providing effective control to permit taking the subject into custody, consider
whether it would be appropriate to disengage and/or escalate to another
intervention option.
ECD After-Care
After the suspect has been properly stabilized and handcuffed, you must provide
appropriate care. In most cases, the subject will not require medical care.
However, always get medical assistance in these circumstances:
If the subject requests it
If a person has an adverse reaction to an ECD application
If you observe any other problem or feel that medical assistance is
warranted
Immediate after-care is often similar in contact and distance deployment. The
big difference is that after-care for distance deployment involves removing
projectiles. If the projectiles are embedded in sensitive tissue areas, i.e. neck,
face, groin, or the breast of a female, the suspect should be transported to a
medical facility for removal. If the projectiles are embedded in other non-
sensitive tissue areas, you may remove them yourself according to the
manufacturer’s guidelines. Remember, because the probes have penetrated the
suspect’s skin, they may have blood on them and should be treated as
58
contaminated needles. Always use standard precautions (wear gloves) and
dispose of the probes properly.
The following are typical instructions:
1. Break off the wires near the probes.
2. Grasp the probe firmly with your gloved hand and pull straight out.
3. Verify the probes are intact, and not broken-off inside the subject.
4. Dispose of the probe by placing it point-first into a sharps container, or
securing it temporarily (until a sharps container is available) in a location
where no one will accidentally touch it.
14
Reassess the suspect for indications of mental illness, emotional disturbance, or
medically significant behavior. It may be easier, now that the subject is
controlled, to observe signs that were not easily observed during the initial
confrontation. If you see signs of medically significant behavior or excited
delirium, obtain immediate medical intervention.
What if a Subject Threatens Me with an ECD?
When discussing possible options in such a situation, remember that your force
is examined under the totality of the circumstances known to you at the time. An
incomplete discussion about options could go like this: “If the suspect Tasered®
you, you could have been incapacitated. While incapacitated, you might have
more difficulty defending yourself against a gun grab. While you suffered the
effects of the ECD, the suspect could take your gun and kill you.”
The above information is not necessarily inaccurate. It is, however, an
incomplete analysis, and is insufficient on its own to justify a deadly force
response to the threat of an ECD. Remember, an ECD itself is not a deadly
weapon. It doesn’t cause great bodily harm or death, so its use does not
automatically justify a deadly force response. Given only the information in the
previous paragraph, death due to a disarming is a possible outcome, but it is not
a likely outcome without other supporting factors. What specific factors led you
to believe you were going to be the subject of a disarming attempt? Before an
officer can use deadly force, there must be a reasonable expectation of suffering
death or great bodily harm – not merely a possibility of that happening.
It is important to note that there are any number of factors that, when combined
with the above situation, could make a deadly force response reasonable. For
example, you are aware that an ECD will likely immobilize you, thereby reducing
your ability to counter an assault. Furthermore, if the suspect shows intent to
cause death or great bodily harm, and uses an ECD to aid in that attempt, deadly
force might be appropriate. If the suspect is imminently threatening to take your
handgun, that justifies deadly force. (A subject attempting to disarm an officer is
presumed to be attempting to use that weapon against the officer.) But a mere
possibility, without other supporting factors, would not satisfy the deadly force
59
criteria. As always, maintain a tactical advantage, continuously evaluate the
suspect’s threat level, and thoroughly explain the suspect’s behavior, your
observations, and your forced actions in your report.
As always, if you are faced with a subject threatening you with an ECD, you have
the options to disengage and/or escalate. An important factor in determining
what option to choose would be finding out what type of ECD deployment
capabilities the suspect may have. If you choose to disengage, you have two
goals:
Create enough distance to get out of range of the ECD
If fired upon, avoid being struck with multiple projectiles to prevent
completion of the electrical circuit
When disengaging, consider your next option. Here are some possibilities:
Attempt to defuse the situation using Professional Communication skills
Attempt to disarm the subject (especially if confrontation starts within
arm’s reach)
If unable to avoid being struck by more than one projectile, pull the ECD
close to your body and into a small muscle mass to decrease some of the
ECD effects. Possible smaller muscle masses include the abdomen,
forearm, bicep, or even the palm of the hand
Escalate to a higher level of force
The appropriate level of force depends on the totality of the circumstances,
including the number of officers present and your own response to an ECD. If
there are several officers present and the subject is armed with a one-shot ECD,
you might handle the situation by “taking the hit”—because while you ride out the
exposure, the other officers can control the subject without using deadly force.
On the other hand, if you are alone and you know through prior ECD exposures
that you become instantly incapacitated, you might have to defend yourself with
deadly force. Conduct a tactical evaluation to determine an appropriate level of
force.
Passive Countermeasures
The goal of passive countermeasures is to decentralize a subject—in other
words, to direct a subject to the ground. It is appropriate to use passive
countermeasures if you reasonably believe that you will be unable to achieve
control with the subject standing. For example, a subject continues to violently
resist, even while you apply a come-along, preventing you from achieving control
and applying handcuffs.
This tactic includes four techniques:
Secure-the-Head Decentralization
Hug-Yourself Decentralization
Lower-Your-Center Decentralization
60
Pull-In/Push-Down Decentralization
All four decentralizations depend on the same fundamental body mechanics: you
bring your center close to the subject, "take up the slack" in the subject's body,
take away the subject's balance, and direct the subject to the ground in a
descending arc.
Once the subject is decentralized, you take appropriate action: either stabilize the
subject on the ground and handcuff, or disengage and/or escalate. You will learn
the technique for ground stabilization in the chapter on Follow-Through
Considerations.
Decentralizations may be needed in a variety of situations and from a variety of
positions. Although only four techniques are taught as part of the DAAT system,
other techniques may be needed and justified in dynamically evolving
confrontations. Any decentralization technique used however, must allow you to
follow these critical guidelines to minimize the chance of injury to the subject:
Protect the subject's head and neck as much as possible
Control the speed of the subject’s descent
Decentralizations that do not permit these actions will require additional
justification and description by the officer.
Secure-the-Head Decentralization
This decentralization is especially useful if you are positioned at Level 3, behind a
subject. To apply the technique:
1. Starting from a defensive stance, using a high guard, blanket and secure
the subject's head with your reaction hand cupping the front of the subject's
chin, to prevent his/her biting you. (This position is the same as used to
secure the head in pressure point control.)
2. Simultaneously, place your strong hand over the subject's eyes and nose.
Be careful to avoid the subject's mouth.
3. Secure the subject's head against your chest/upper shoulder area, to
protect it. Tip the subject's chin toward his or her chest to further protect the
neck.
4. With your rear foot, step slightly backwards from the subject so that he/she
is initially taken off center. Keep your knees bent and your stance wide to
support the subject's weight.
5. Give loud verbal direction: "Stop resisting!" followed by the verbal stun:
"DOWN!"
6. Direct the subject to the ground by moving your rear leg in an arc, while
turning the subject toward your open (rear-leg) side. Reposition your hands
on the subject's back, to help control the speed of descent. The speed of
the descent will depend on the subject's resistance level and the exigency
61
of the situation. Verbally direct the subject to stay down, using a loud verbal
directive: "Stay Down!"
Hug-Yourself Decentralization
This decentralization is especially useful if you are in the escort position, and the
subject's resistance indicates the need for decentralization. To apply the
technique:
1. From the escort position, maintaining your pincer grip on the subject's wrist,
turn the subject's hand so that the palm is facing you, thumb down. Secure
the hand at your center, just above your belt level.
2. Release the pincer grip on the subject's elbow, and wrap your inside arm
around the subject's arm, so that you are "hugging" the arm to your body.
With your inside hand either a) establish a pincer grip on your own outside
wrist or b) place it tight against your chest just below the shoulder. The
subject's arm is now "hugged" tight against you.
3. Place your inside shoulder on the back of the subject's shoulder or against
the subject's upper arm, midway between shoulder and elbow.
4. Bend forward to place the weight of your upper body against the subject's
arm, simultaneously bending your knees to lower your center.
5. Using your upper body, move the subject's arm as a unit to a position where
the arm and torso are parallel to the ground.
6. Give a loud verbal directive ("Stop resisting!") followed by a verbal stun
("DOWN!").
7. Maintaining control of the subject's arm, move your outside foot in an arc
and direct the subject to the ground. Give a loud verbal directive to remain
on the ground ("Stay down!").
8. Once the subject is down, you can re-establish your escort hold on the
subject's arm in preparation for your next action.
Lower-Your-Center Decentralization
This decentralization is used to overcome resistance from the come-along
position. It also is effective if a subject has attempted to defeat your application of
a compliance hold by making a fist. To apply the technique:
1. From the come-along position, lower your center, bending your knees, and
keeping a wide stance. Your upper body remains erect.
2. Keeping the subject's wrist compressed and elbow stabilized, move your
outside leg in an arc to the rear, and direct the subject to the ground.
3. Give a loud verbal command ("Stop resisting!") followed by a verbal stun
("DOWN!").
4. Keep your balance, bending your knees as the subject goes down. When
the subject is down, give a loud verbal directive: "Stay down!"
5. Once the subject is down, you can re-establish your escort hold on the
subject's arm in preparation for your next action.
62
Pull-In/Push-Down Decentralization
This decentralization is useful when you are in the inside "grappling" position,
facing the subject. To apply the technique:
1. Pull the subject toward you so that he or she bends forward. (The subject
may also be bending forward as a result of an unarmed strike.)
2. "Hook up" your hands behind the subject's neck, by grasping your reaction
wrist with the fingers of your strong hand. Important: keep your thumb on
top. Keep your elbows close to your body to protect against possible strikes
to your torso.
3. Step-slide back, pulling the subject in toward your chest, and secure the
subject's head against your torso.
4. Give a loud verbal directive ("Stop resisting!") followed by a verbal stun
("DOWN!").
5. Continue to step-slide back, lowering your center by bending your knees
(thus also lowering the subject's center).
6. Placing your hands on the subject's back and pushing down, direct the
subject to the ground. Continue to move back as you do this to avoid being
grabbed by the subject or having the subject fall on you.
7. Give a loud verbal directive to the subject to remain on the ground ("Stay
down!")
PROTECTIVE ALTERNATIVES
Protective Alternatives is the fourth mode in Intervention Options. The overall
purpose is to overcome continued resistance, assaultive behavior or their threats.
These interventions are designed to protect officers in situations when they face
subjects continuing to resist or threatening to assault.
Continued resistance is defined as “maintaining a level of counteractive behavior
that is not controlled with the officer’s current level of force.” Assaultive behavior
is defined as “direct actions or conduct that generates bodily harm to the
officer(s) and/or another person(s).”
As you learn these techniques, remember to incorporate verbalization with them.
When you physically intervene to gain control of a subject, you are using force to
require the subject to comply with your orders—you must always make
reasonable efforts to be sure that the subject understands what it is you want him
or her to do. In addition, you can use verbalization to help calm the subject once
he or she is stabilized.
The mode of Protective Alternatives includes three tactics/tools:
Active Countermeasures
Incapacitating Techniques
Intermediate Weapon
63
Note that these tactics may also be used as control alternatives, depending on
the situation. For example, a jab with a baton (an intermediate weapon) may be
used to prevent a person from pushing into a room while officers are interviewing
a victim of domestic violence. In that situation, the baton would be used as a
Control Alternative rather than a Protective Alternative. Remember that
Intervention Options are just that--options. You will choose the appropriate
option depending on the totality of the circumstances.
Active Countermeasures
The goal of active countermeasures is to create a temporary dysfunction of an
actively resistive or assaultive subject. In essence you are interrupting the
subject's ability to resist, enabling the officer to direct the subject to the ground
for stabilization, handcuffing, and other follow-through procedures.
Note that you may have to block incoming strikes from a subject. Effective
blocking of hand or leg strikes permits you to disengage temporarily or escalate
to an appropriate intervention option. You must be able to block strikes from
various heights. Here are some general principles:
Keep your hands in a high guard position to protect your head.
Tuck your chin down to protect your throat.
Keep your shoulders up to protect your neck and chin.
Keep your elbows in to protect your ribs.
Use your hips to protect your groin.
Deliver blocks, using your forearms and elbows, in the appropriate direction to
deflect incoming blows: upward for neck and head attacks, rotating for torso
attacks, downward for abdominal and groin attacks. Good use of body
mechanics will enhance the effectiveness of active countermeasures, by
increasing the energy transferred. A baseball player does not stand immobile at
the plate, swinging the bat using arm movement alone. Instead, the player steps
into the swing, rotates hips, torso and shoulders, as well as arms, and follows
through after the hit. When you use active countermeasures, you should also use
your whole body to your advantage.
Here are some principles:
Stay balanced – if you over-extend your stance or reach for your target,
your strike will lose energy.
Move into strikes when possible, taking care to re-adjust your stance as
needed, and maintain it throughout the confrontation.
Rotate your hips in the direction of the strike to add power (be sure your
front foot is oriented to allow full rotation).
Raise or lower your center by straightening or bending your knees in the
direction of your strike to help put your body weight behind the strike.
64
When using strong-side techniques, maximize fluid shock by striking
"through" the target and allowing the strike to remain in contact with the
target long enough for full energy transfer. (A good analogy is splitting
wood: if you aim the axe at the top of the log to be split, it will be less
effective than if you aim at the chopping block beneath the log—striking
"through" the target means that the strike is accelerating at contact rather
than decelerating).
Active countermeasures include two categories of techniques:
Vertical stuns
Focused strikes
Vertical Stuns
Stuns are useful in close quarters confrontations when you are grappling with a
subject and have a suitably flat and sturdy vertical surface (such as a wall or
vehicle) nearby. When you use a stun, you attempt to create temporary
dysfunction of the subject's respiratory system and/or mental processes by
forcefully directing the subject's torso into a solid vertical surface.
Unlike with focused strikes, in a stun, the impact is diffused throughout the
subject's body, causing a temporary disruption of the ability to breathe and/or
temporarily disrupting nerve impulses to the brain. The disruption is short-lived—
about 5 to 7 seconds—during which you can take other appropriate action, such
as disengaging, decentralizing the subject for ground stabilization, or escalating
to a higher level of control, as needed. To apply the technique:
1. Starting from a defensive stance, secure an inside grappling position,
placing your forearms and elbows vertically against the subject's chest.
2. Step-slide forward, directing the subject to the vertical surface. Remain in
that position long enough for a transfer of force.
3. "Hook up" the subject in position for a Pull-In/Push-Down decentralization.
4. Evaluate the level of subject resistance and take appropriate action—such
as disengaging, lowering him/her to the ground for stabilization,
decentralizing, or escalating to a higher level of force.
Focused Strikes
Like stuns, focused strikes are intended to create dysfunction and disrupt the
subject's ability to continue resistive or assaultive behavior. Unlike stuns,
however, the impact is not diffused throughout the body—it is focused in a
particular target area. Within the DAAT system, eight focused strikes are taught:
Reaction Hand Strike
Reaction Forearm Strike
Strong Hand Strike
Strong Forearm Strike
Reaction Front Kick
Reaction Knee Strike

65
Strong Angle Knee Strike
Strong Angle Kick
Note: The terms "strong" and "reaction" refer to the officer's position, not which
side is his or her weapon side. While it is desirable to keep the weapon side
back (in the strong position), physical confrontations are fluid and dynamic, and
sometimes the weapon side may be forward (in the reaction position).
Here are the procedures for applying these techniques:
Reaction Hand Strike
The Reaction Hand Strike is a quick jab with the forward (reaction) hand to the
subject's chin (preferably) or upper chest. Its purpose is to stop forward
momentum, set up follow-up strikes, if appropriate, and provide a momentary
distraction to give you time to create distance to disengage and/or escalate. To
apply the technique:
1. From a defensive stance, using a high guard, deliver a strike with your
reaction hand to the subject's chin, using a vertical fist or palm-heel. Be
careful not to hyper-extend your elbow—keep it slightly flexed on contact.
Note: If you use a fist, curl the fingers tightly, thumb outside, folded next to
the fingers. Keep your wrist locked straight. The striking surface is the
large knuckles of the first and middle fingers. If you use a palm-heel, the
palm is flat with the fingers curled parallel to the palm and the thumb
alongside the palm. The wrist is extended. The striking surface is the
heel of the hand.
2. Issue a loud verbal stun ("BACK!").
3. Rapidly return the arm and hand to the high guard position.
4. Continue to issue loud verbal commands and prepare for follow-up
techniques. Remember that a reaction hand strike is merely a temporary
distraction.
Reaction Forearm Strike
The Reaction Forearm Strike is appropriate when the subject is too close to use
a Reaction Hand Strike. To apply the technique:
1. From a high guard position, draw your reaction fist in toward your chest,
and point the reaction elbow toward the subject's chest. Your forearm
should be horizontal, and approximately shoulder height. Your upper arm
will form a 90º angle with your torso.
2. Transfer your weight forward as your forearm/elbow makes contact with
the subject's chest.
3. Issue a loud verbal stun ("BACK!").
4. Rapidly return your arm and hand to the high guard position.
66
5. Continue to issue loud verbal commands and prepare for follow-up
techniques. Remember that a Reaction Forearm Strike is merely a
temporary distraction.
Strong Hand Strike
The Strong Hand Strike is used when the subject is out of range for a Strong
Forearm Strike (covered next). The target is the abdominal area, and the
purpose is to disrupt the actions of the subject's diaphragm, causing temporary
respiratory dysfunction. To apply the technique:
1. From a defensive stance, keep your knees bent, and step toward the
subject with your reaction foot.
2. Using a vertical fist, deliver a downward strike to the subject's abdominal
area with your strong hand, rotating your hips toward the target as you do
so. Hit and "stick," maintaining contact with the target area long enough
for full energy transfer.
3. Deliver a loud verbal stun ("DOWN!"). Be sure to keep your reaction arm
in high guard position, protecting your head.
4. Return to a high guard position and evaluate, issue verbal commands, and
prepare for follow-up techniques or to disengage and/or escalate, as
appropriate.
Strong Forearm Strike
The Strong Forearm Strike is intended to stop a subject's advance, violent
resistance, and/or assaultive behavior. Its purpose is to create dysfunctions in
the attacker, to decentralize him/her, and to stop the attack so control can be
established. It can be delivered multiple times, if needed, until control is
established. The Strong Forearm Strike can be "set up" by the Reaction Hand
Strike or the Reaction Forearm Strike.
The Strong Forearm Strike is the strongest hand strike in the DAAT system for
several reasons:
Officers responding to an assault by a subject are likely to be very close to
the subject, and this strike works well in close quarters.
Officers are less likely to be injured in its use because of the solid
construction of the forearm.
Officers of different sizes can use the technique effectively.
It is inherently a strong technique.
To apply the technique:
1. From a high guard position, draw your strong fist in toward your chest, and
point the strong elbow toward the subject. Your forearm should be
horizontal, and approximately shoulder height. Your upper arm will form a
90º angle with your torso.
67
2. Using your strong forearm/elbow, deliver a strike to the subject's
abdominal area, rotating your hips toward the target as you do so. Hit and
"stick," maintaining contact with the target area long enough for full energy
transfer. Adjust the angle of the strike to either direct the subject back and
away from you or to create dysfunction that will allow you to direct the
subject to the ground.
3. Deliver a loud verbal stun ("DOWN!"). Be sure to keep your reaction arm
in high guard position, protecting your head.
4. Return to a high guard position and evaluate, issue verbal commands, and
prepare for follow-up techniques or to disengage and/or escalate, as
appropriate.
Reaction Front Kick
This kick, like the reaction hand strike, is used to stop the forward momentum of
an attacker and to give you time to create distance, prepare to apply additional
active countermeasures, disengage, and/or escalate. To apply the technique:
1. From a defensive stance, using a high guard, lift your reaction knee and
snap your foot toward the subject, using the ball of your foot/sole of your
shoe as the striking surface. Your target is the ankle, shin, knee, or lower
abdomen of the subject.
2. Deliver a loud verbal stun ("BACK!") as you make contact.
3. Quickly replace your foot on the ground and be ready to apply follow-up
techniques. Continue to deliver loud verbal commands, and evaluate to
determine your next appropriate action.
Reaction Knee Strike
The Reaction Knee Strike, like the Reaction Front Kick, is used to stop the
forward momentum of an attacker and to give you time to create distance,
prepare to apply additional active countermeasures, disengage, and/or escalate.
To apply the technique:
1. From a defensive stance, using a high guard, lift your reaction knee as if
preparing to deliver a Reaction Front Kick.
2. Flex your knee to approximately 45º, and tighten your muscles so that
your leg does not extend on impact.
3. Direct your knee straight ahead at the subject's leg or lower abdominal
area.
4. Deliver a loud verbal stun ("BACK!") upon contact.
5. Quickly replace your foot on the ground and be ready to apply follow-up
techniques. Continue to deliver loud verbal commands, and evaluate to
determine your next appropriate action.
68
Strong Angle Knee Strike
The Strong Angle Knee Strike is designed to stop a subject's advance, violent
resistance, or assaultive behavior. It can be delivered multiple times, if needed,
until control is established. To apply the technique:
1. From a defensive stance, using a high guard, lift your strong leg on an
angle, until your thigh and knee are aimed at the subject's leg or lower
abdomen.
2. Flex your knee to approximately 45º, and tighten your muscles so that
your leg does not extend on impact. Your lower leg will be at an angle,
rather than vertical.
3. Firmly drive your knee into the target area, and remain in contact long
enough for full energy transfer.
4. Deliver a loud verbal stun ("DOWN!") upon contact, and continue to issue
loud verbal commands.
5. Keep a high guard or "hook up" the subject in preparation for a Pull-
In/Push-Down Decentralization.
6. Decentralize the subject for ground stabilization or deliver additional knee
strikes (if appropriate) or return to a defensive stance and evaluate your
next appropriate option.
Strong Angle Kick
The Strong Angle Kick may be used if the subject is too far away to use knee
strikes. The Strong Angle Kick is an extension of the Angle Knee Strike, and is
delivered similarly. To apply the technique:
1. From a defensive stance, using a high guard, lift your strong leg on an
angle, until your thigh and knee are aimed at the subject's leg.
2. Flex your knee to approximately 45º and smoothly pivot, extending your
leg and directing the shin/instep to the subject's lower thigh behind the
knee or lower leg. Maintain a high guard position with your arms.
3. Deliver a loud verbal stun ("DOWN!") at impact.
4. Return to a defensive stance and be ready to apply follow-up techniques.
Continue to deliver loud verbal commands, and evaluate to determine
your next appropriate action.
Combinations and Multiple Strikes
Active countermeasures are more effective when used in combination or
delivered more than once. Multiple strikes (either of the same technique or in
combination) may be required to gain control quickly of an extremely violent,
dangerous subject. The term multiple strike overload refers to a series of strikes
aimed at the same location—either of a single technique or more than one
technique in combination. The subject's response to combinations and multiple
strikes will determine when it is appropriate to reduce the level of force to
maintain control.
69
Some of the more effective combinations include these:
Reaction Hand Strike + Strong Hand Strike
Reaction Hand Strike + Strong Forearm Strike
Reaction Forearm Strike + Strong Forearm Strike
Reaction Front Kick + Strong Angle Kick
Reaction Front Kick + Strong Angle Knee Strike
Reaction Knee Strike + Strong Angle Knee Strike
Especially effective multiple strikes and multiple combinations include these:
Repeated Strong Forearm Strikes
Repeated alternating Strong and Reaction Forearm Strikes
Repeated Strong Angle Knee Strikes
Repeated alternating Strong and Reaction Knee Strikes
Incapacitating Techniques
The goal of incapacitating techniques is to cause the immediate, temporary
cessation of violent behavior. One such technique is taught in the DAAT system:
the Diffused Strike. Like the Vertical Stun, the Diffused Strike disrupts nerve
impulses to the brain. Unlike the Vertical Stun, however, the effect is usually
greater, rendering the subject temporarily unconscious.
Because the strike is delivered to the side of the subject's neck (the origin of the
brachial plexus of nerves), when possible make an effort to stabilize the head to
prevent striking other parts of the neck.
Diffused Strike - From the Front
To apply the technique:
1. From an inside position, stabilize the subject's head with your reaction
hand and arm to prevent movement and expose the target area: the base
of the subject's neck on the side of the neck.
2. Deliver a loud verbal command ("Stop resisting!").
3. Index the inner part of your forearm against the base of the subject's neck,
on the side of the neck.
4. Move your arm 6" - 8" away from the neck to "load" the strike.
5. Direct your inner forearm to the base of the subject's neck at a spot
located midway between jaw and collarbone, between the jugular vein and
the throat. Firmly strike the target area, and maintain contact to allow
energy transfer to cause fluid shock.
6. At impact, deliver a loud verbal stun ("DOWN!").
7. Be ready to direct the subject to the ground for stabilization, handcuffing,
and follow-through procedures. Continue giving loud verbal commands
("Stay down!")

70
Diffused Strike - From the Rear
The Diffused Strike may also be applied from the rear. To apply the technique:
1. Stabilize the head by cupping the chin with your reaction hand, turning the
head to expose the target area, and securing the head against your upper
chest or shoulder (similar to the Secure-the-Head Decentralization).
2. Index your palm against the base of the subject's neck, on the side of the
neck.
3. Move your palm 6" - 8" away from the neck to "load" the strike. Your wrist
should be extended, with your forearm nearly at a right angle to your palm.
You will "push" your palm against the target area, not "slap" it.
4. Direct your palm to the base of the subject's neck at a spot located
midway between jaw and collarbone, between the jugular vein and the
throat. Firmly strike the target area, and maintain contact to allow energy
transfer to cause fluid shock.
5. At impact, deliver a loud verbal stun ("DOWN!").
6. Be ready to direct the subject to the ground for stabilization, handcuffing,
and follow-through procedures. Continue giving loud verbal commands
("Stay down!")
Intermediate Weapon
The goal of using intermediate weapons is to impede a subject, preventing him or
her from continuing resistive, assaultive, or otherwise dangerous behavior.
Intermediate weapons include a variety of impact and other weapons designed to
impede subjects. The intermediate weapon included in the DAAT program is the
straight baton. The baton—either a wood or plastic fixed-length baton or a metal
expandable baton—is an impact weapon.
The baton can serve as a deterrent as well—often simply the display of the baton
as part of the officer's official presence will cause a subject to decide to comply
rather than resist. Unless the baton is carried, however, it has no deterrent
effect, nor is it available if needed. A baton left in a locker or a squad car leaves
an officer little choice if empty hand control techniques are not effective in
controlling a subject—the only escalation
possible may be to the level of deadly force.
While in some circumstances, escalating from
empty hand control to deadly force may be
justified, it is harder to defend the use of deadly
force if the officer neglected to carry an
intermediate weapon.
The appropriate target areas for baton strikes are the lower abdominal area
(Baton Jab) and the knee and elbow area (Angle Strike and Angle-Cross Strike).
The intentional use of a baton to strike the head of a subject carries with it a high
The baton is not deadly
force when used as trained
in this manual. Intentional
baton strikes to the head
would be deadly force.
71
propensity for serious injury or death. Therefore, although use of the baton is not
classified as deadly force, an intentional strike to the head could be considered
excessive force unless special circumstances justified it.
Drawing the Baton
The baton is normally carried on the reaction (non-weapon) side. The technique
for drawing the baton is as follows:
1. Verbal warning. Deliver a verbal warning, using heavy control talk if
necessary to issue ultimatums. Example: "Sir, stay back! If you don't
stop now I will use my baton!" Place your reaction hand on the baton in its
holder, while moving into a defensive stance and bringing your strong
hand to a high guard position. Continue verbalizing, escalating your
verbal tone.
2. Present the baton. Remove the baton from the holder with your reaction
hand, and transfer it to your strong hand. (If using an expandable baton,
expand it.). Hold the baton with both hands, strong hand near your body
and reaction hand near the tip, with the baton held horizontal and the tip
pointing at the subject. Keep your elbows in and your stance wide and
deep. Continue to issue verbal commands.
3. Load the baton. Using your strong hand, rotate the baton along a
horizontal plane approximately 180º so that it remains horizontal, but now
the butt is pointed toward the subject, and the tip is next to your
bicep/shoulder area (where a uniform patch is worn). Hold your reaction
arm in a high guard position, with the palm facing the subject and the
fingers extended as if to say "Stop!" Verbalize, “Stay back!”
Baton Techniques
If drawing, presenting, and loading the baton do not cause the subject to cease
his or her behavior, the next step is to strike with the baton. The DAAT system
includes these techniques:
Baton Jab
Baton Jab – Multiple Strikes
Angle Strike
Angle-Cross Strike
Multiple/Overload Strikes
Baton Jab
The baton jab is effective at close quarters to move an assaultive or resistive
subject back and to give you time to properly load your baton.
Note: In close quarters or with an assaultive subject, you may have to deliver a
palm-heel with your strong hand to create distance and time for you to draw your
baton. To apply the technique:
72
1. Present the baton, using your reaction hand to establish a pincer grip near
the tip of the baton, and your strong hand to establish a firm pincer grip 6"
- 8" from the opposite end. The baton should be parallel to the ground.
2. Issue a loud verbal directive ("Stay back!").
3. If the subject does not comply, thrust the end of the baton into the
subject's lower abdomen to stop his or her forward momentum and give
you time to disengage and deploy the baton.
4. Deliver a loud verbal stun at contact ("BACK!").
5. Step-slide back to a defensive stance and load the baton as described
earlier, keeping your reaction hand in high guard position.
6. Continue to issue verbal commands and evaluate the subject's response
to determine your next appropriate action.
Baton Jab – Multiple Strikes
In close quarters, multiple strikes may be necessary to gain enough distance to
properly load the baton. Multiple baton jabs may also be used in certain crowd
control situations, when a line of officers is moving a crowd of people. Typically
the officers will be shoulder-to-shoulder, making strikes from the loaded position
impractical. To apply the technique:
1. Present the baton, using your reaction hand to establish a pincer grip near
the tip of the baton, and your strong hand to establish a firm pincer grip 6”
– 8” from the opposite end. The baton should be parallel to the ground.
2. Issue a loud verbal directive (“Stay back!”).
3. If the subject does not comply, step-slide toward the subject and thrust the
end of the baton into the subject’s lower abdomen to stop his or her
forward momentum.
4. At the point of contact, deliver a verbal stun (“BACK!”).
5. Bring the baton back beyond the original “present” position to load it for
the next strike.
6. Step-slide toward the subject and deliver a second strike to the subject’s
lower abdomen, as before. Continue to verbalize.
7. Step-slide forward with each application, making sure that you do not
over-extend your stance or the baton. Keep your elbows bent and close
to the body.
8. When the subject has complied, either move the baton to the “load”
position, stand ready in the “present” position (close quarters or crowd
control), and evaluate to determine your next appropriate action.
Angle Strike
The Angle Strike is delivered from the “load” position. Its purpose is to impede a
subject by striking the knee and/or elbow area. To apply the technique:
1. Starting in a defensive stance, with the baton loaded, and your reaction
hand in a high guard position, issue a loud verbal command (Stay back!”).
73
2. If the subject does not comply, direct the baton in a smooth, angled motion
toward the target area—either the elbow area or the knee area.
Hold the baton in a pincer grip, and keep your wrist straight and
your palm up. At the moment of contact, tighten your grip on the
baton, using all your fingers.
Use good body mechanics to maximize power: step into the strike,
rotate your hips, and lower your center.
3. At the moment of impact, deliver a loud verbal stun (“DOWN!”)
4. Allow the baton to remain in contact with the target long enough to allow
full energy transfer.
5. Return the baton to the loaded position. Continue to issue verbal
commands.
6. Evaluate the subject’s response and determine your next appropriate
action.
Angle-Cross Strike
The Angle-Cross strike is used when more than one strike is necessary, and
using two or more Angle Strikes (delivered from the “load” position) is impractical.
For example, if your first angle strike missed its target and the baton continued in
an arc toward your reaction side, it would be better to deliver a Cross Strike (from
your reaction side toward your strong side) than to waste time returning to the
“load” position. To apply the technique:
1. Deliver an Angle Strike as described above.
2. Instead of returning to the “load” position, allow the baton to continue in its
path toward your reaction side. Let your wrist rotate as your arm crosses
in front of you so that your palm turns down. Important: Be sure your
reaction arm is in high guard position.
3. Bring the baton under your reaction arm, until the butt is pointing at the
subject and the tip is behind you.
4. Keeping your knees bent, rotate your hips toward your strong side, and
direct the tip of the baton toward the subject’s knee area.
5. Deliver a loud verbal stun (“DOWN!”).
6. Return the baton to the “load” position, again rotating the wrist as the
baton crosses in front of you, and be ready to deliver additional angle
strikes.
Multiple/Overload Strikes
As with active countermeasures, it may be necessary to deliver multiple baton
strikes before the subject complies. These can be delivered to different target
areas (for example, an angle strike to the elbow, followed by an angle strike to
the knee), or to the same target area, using the overload principle (for example,
multiple angle strikes to the knee). It is also possible that baton strikes could be
used in combination with active countermeasures. The appropriate response will
be dictated by your tactical evaluation and threat assessment.

74
Subjects Armed with a Baton
When you use a baton as you have been trained, you are not employing deadly
force. DAAT baton techniques do not target areas that are likely to cause death
or great bodily harm. If you intentionally target the suspect’s head, that would be
considered deadly force. Law enforcement officers are trained to use batons to
impede a subject, preventing him or her from continuing resistive, assaultive, or
otherwise dangerous behavior.
On the other hand, a subject armed with a baton has a weapon capable of
causing death or great bodily harm, and does not have the same limitations as
law enforcement officers. It is reasonable to believe that a subject possessing
such a weapon intends to use it to its greatest effect. The subject does not share
your motivation – it would be unreasonable to presume they have similar training
or restraint.
DEADLY FORCE
Deadly force is the fifth mode in Intervention Options.
The purpose of deadly force is to stop the threat. Within
the DAAT system, one trained tactic is classified as
deadly force: the firearm.
Use of Deadly Force
As you have learned, your legitimate use of force is limited by the U.S.
Constitution, Wisconsin law, agency policy, and your training.
The U.S. Constitution
In deciding the case of Graham v. Connor, the U.S. Supreme Court established
the standard that any law enforcement use of force must be objectively
reasonable, in light of:
The severity of the alleged crime at issue
Whether the suspect poses an imminent threat to the safety of officers
and/or others
Whether the suspect is actively resisting or attempting to evade arrest by
flight
In addition, the Court said that reasonableness should be judged under the
totality of the circumstances from the perspective of a reasonable officer at the
scene with similar training and experience.
A second U.S. Supreme Court case, Tennessee v. Garner, has particular
importance in deadly force decisions. Tennessee law permitted an officer, once
having given a suspect notice of intent to arrest for a crime, to use “all the
necessary means to effect the arrest” if the suspect fled or resisted. In this case,
The purpose of
deadly force is to
stop the threat.
75
an officer shot and killed a fleeing burglary suspect whom the officer believed
was unarmed. The Court, deciding the case in 1989, said it was not reasonable
to use deadly force against an unarmed fleeing felon, unless there is “probable
cause to believe that the suspect poses a significant threat of death or serious
physical injury to the officer or others.”
Wisconsin Law
While Wisconsin law affords officers the protection of privilege “when the actor’s
conduct is a reasonable accomplishment of a lawful arrest,”
15
the conduct must
be reasonable. Using deadly force in the absence of significant threat would not
be reasonable.
Wisconsin law specifically prohibits use of deadly force to prevent suicide
16
and
solely to protect property.
17
Agency Policy
Wisconsin law
18
requires that law enforcement agencies have policies governing
certain topics. One of these is the use of force, including deadly force. Certainly,
any use of deadly force must conform to your agency’s policy.
Training
In Firearms, you will learn to shoot. In other training, you may learn techniques
that are also considered deadly force. Just as is true with other uses of force,
some situations may dictate that you use a technique that is not trained, but
justifiable under the circumstances.
DEADLY FORCE DECISION-MAKING
The legal and policy guidelines presented above provide a conceptual backdrop
for the use of deadly force, but do not provide very specific guidelines. The
following section describes the specific criteria that must be present for the law
enforcement use of deadly force to be legitimate.
When Is Deadly Force Reasonable?
There are two situations wherein an officer is permitted to use deadly force. The
first (and by far the most common) is in defense of self or others. The second is
in defense of society at large.
Defense of Self or Others
You have an obvious right to protect yourself. You are also privileged to use
deadly force to protect others, both under your duty as a law enforcement officer,
and under Wisconsin Stat. § 939.48(4).
19
Thus, you may use deadly force when
a subject poses an imminent threat of death or great bodily harm to you or to
another person or persons.

76
The definition of deadly force is:
The intentional use of a firearm or other instrument that creates a high
probability of death or great bodily harm.
5
This definition has two important elements. First, the use must be intentional. If
you deliberately hit a person in the head with your baton, it would be considered
deadly force. On the other hand, suppose you attempted to strike a person in the
elbow area (an appropriate baton target), but the person ducked or fell, and your
baton actually struck his or her head. Your actions would not constitute deadly
force—even if the person died as a result of the blow—because you did not
intend to use deadly force.
Second, the use of the firearm or other instrument must create a high probability
of death or great bodily harm. A baton strike to the knee area is not likely to
cause a high probability of death or great bodily harm, but it conceivably could do
so in certain unlikely circumstances. Because a baton strike to the knee area
does not create a high probability of death or great bodily harm, it would not be
considered deadly force even if the subject did, in fact, suffer great bodily harm.
The same is true for a trained empty hand strike to the head. Because that strike
doesn’t create a high probability of death or great bodily harm, it would not be
considered deadly force.
Subject behavior that justifies an officer’s use of deadly force is:
Behavior which has caused or imminently threatens to cause death or
great bodily harm to you or another person or persons
The word imminent means “about to happen.” An imminent threat is an
immediate threat. For a subject’s threat to be considered imminent, it must meet
three criteria:
Intent
Weapon
Delivery System
5
Wis. Stat. § 939.48(1): …The actor may not intentionally use force which is intended or likely to
cause death or great bodily harm unless the actor reasonably believes that such force is
necessary to prevent imminent death or great bodily harm to himself or herself.
Wis. Stat. § 939.22(14) & (38): “’Great bodily harm’ means bodily injury which creates a
substantial risk of death, or which causes serious permanent disfigurement, or which causes a
permanent or protracted loss or impairment of the function of any bodily member or organ or
other serious bodily injury.” It is the most serious injury possible without actually causing death.
Great bodily harm is a more serious injury than broken bones; loss of consciousness, sight or
hearing; concussion; or loss of teeth (all of which are classified as “substantial bodily harm”).
77
Intent
The subject must indicate his or her intent to cause great bodily harm or death to
you or someone else. Some of the ways that intent might be shown would
include deliberately pointing a weapon at you, stating an intention to kill you,
rushing at you with a knife, and so on.
Weapon
The subject must have a conventional or unconventional weapon capable of
inflicting great bodily harm or death. Guns and knives are not the only
weapons—many other common objects can be used as weapons. Beer bottles,
baseball bats, pieces of broken glass, large rocks or bricks—all of these and
others can be weapons. Some individuals are even able to inflict death or serious
injury with their hands or feet alone, and some apparently innocuous items, such
as a pen or pencil, can be used as a weapon.
Delivery System
The subject must have a means of using the weapon to inflict harm. A person
armed with a baseball bat, having stated his or her intention to kill you, does not
meet the criteria for imminent threat if he or she is standing 50 yards away from
you on the other side of a fence. There is no delivery system. The same person
standing 10 feet away from you does meet the criteria.
Thus, deadly force is an option if a subject poses an imminent threat of death or
great bodily harm to you or to another person or persons.
Preclusion
Before you can use deadly force, you must reasonably believe that all other
options have been exhausted or would be ineffective. In other words, deadly
force is always a last resort. This concept is called preclusion. Note that in many
deadly-force situations, you will not have time or the ability to try other options—if
a subject a few feet away from you suddenly pulls a gun and threatens to shoot
you, generally the only reasonable response is to fire. There is simply not
enough time to try alternatives.
If feasible, you should give a verbal warning before firing, but this is not always
possible, and in some cases may not be desirable. A verbal warning is feasible if
you have sufficient time, distance, and/or cover from the subject posing the
deadly threat, such that the verbal warning would not increase or prolong the
danger to yourself or other innocent people.
Target Requirements
If you have determined that you face a threat that meets the requirements to
permit a deadly-force response, and you have decided to shoot, you must still
fulfill three target requirements:

78
Target acquisition
Target identification
Target isolation
Target Acquisition
Target acquisition means simply that you have acquired an actual target to shoot
at. You cannot fire blindly in the direction of a sound, for example, because you
may endanger others. If someone has shot at you from an apartment building,
you cannot return fire until you have a specific target to aim at.
Target Identification
Target identification means that you have identified your target as the source of
the imminent threat. To continue the previous example, just because you see
someone at a window in that apartment building, you cannot shoot until you
verify that the individual you see is the person who shot (or someone else who is
about to shoot at you).
Target Isolation
Target isolation means that you can shoot at your target without danger of
harming innocent people. If the person who shot at you from the apartment
building ran out of the building and into a crowd of people, you could not shoot at
him or her without endangering others.
The one exception to the requirement for target isolation is called the “greater
danger exception.” Essentially, this exception allows you to shoot without target
isolation if the consequence of not stopping the threat would be worse than the
possibility of hitting an innocent person. For example, if a deranged subject were
randomly shooting people, you might be justified in firing without target isolation
because if not stopped, the suspect could be expected to continue shooting. The
chance that your bullet might strike an innocent person is preferable to the
likelihood of the suspect killing or injuring many others.
Totality of Circumstances
Your judgment in a deadly-force situation is based on your reasonable perception
of threat, based on the totality of circumstances known to you at the time. For
example, if a suspect points a pistol at you, you are justified in using deadly
force. If it turns out later that the suspect’s gun was unloaded, that does not
make your decision unjustified. Your perception of the threat was reasonable,
under the circumstances.
The purpose for using deadly force, as presented in the Intervention Options, is
to stop a threat. Accordingly, when the threat stops, you must stop shooting.
Again, your judgment as to whether the threat has stopped is based on your
reasonable perception of the totality of the circumstances at the time.

79
Defense of Society at Large
Deadly force is most commonly used in defense of self or others. However, in
uncommon circumstances it may be used in defense of society at large—to make
an arrest or prevent the escape of a dangerous subject. This was addressed by
the U.S. Supreme Court in Tennessee v. Garner.
In Tennessee v. Garner, the U.S. Supreme Court said, “Where the suspect
poses no immediate threat to the officer and no threat to others, the harm
resulting from failing to apprehend him does not justify the use of deadly force to
do so…A police officer may not seize an unarmed, nondangerous suspect by
shooting him dead.”
20
Conversely, you may use deadly force to apprehend a criminal suspect who has
used or threatened to use deadly force against someone, and presents a
continued threat to the public, and you reasonably believe there is no other way
to make the arrest or retain custody of the person once arrested. In any case the
officer should not use deadly force unless he/she reasonably believes it is
necessary to capture a dangerous suspect, and then only as a last resort.
21
In these cases the “has caused” element of subject behavior becomes the focus
of attention in an officer’s use of deadly force:
Behavior which has caused or imminently threatens to cause death or
great bodily harm to you or another person or persons
In all such cases, the officer should warn the subject, if feasible, prior to using
deadly force.
These situations are fact-intensive inquiries, and are not easily reflected in
abstract analysis. As always, follow your agency’s policy and consult your
training officer with any questions.
These examples help illustrate when an officer may use deadly force:
Fact Pattern
6
Use of Deadly Force Would Be…
A knife-wielding subject is threatening
people a few steps away.
Reasonable under
“defense of others”
A subject armed with a firearm threatens
you and other officers in his line of sight.
Reasonable under
“defense of self”
An unarmed subject with an arrest warrant
for serial murders is running away from you,
faster than you can run.
Reasonable under
“defense of society at large”
6
These examples are designed to illustrate some of the considerations relevant to deadly force
decision making. Every use of force must be judged based on the totality of the circumstances
known to the officer at the time, and not just limited snippets as used in these examples.
80
Thus, officers have two types of situations where they may use deadly force—in
defense of themselves or others, or in defense of society at large.
WEAPON CONTROL
Weapon control refers both to retaining your own weapon (firearm, baton, or OC
spray) and to disarming and other control techniques when facing an armed
subject.
Weapon Retention
The privilege of going armed carries with it the responsibility to prevent those
weapons from falling into the hands of others. As a law enforcement officer, you
must always be aware of the potential for a subject to attempt to disarm you and
actively avoid giving subjects the opportunity to try to disarm you. Simple
everyday actions like remaining alert to the people around you and maintaining
proper distance will help, as will making it a practice to keep your gun side turned
away from subjects. In close-quarters confrontations, be sure to keep your
weapon in close to you so that the suspect cannot grab it. Officers can also
avoid a gun grab by preventing the subject from getting to their firearm with a
reaction technique coupled with a gun cover. (Example: Subject displays a
target glance towards an officer’s weapon while moving forward. Officer covers
his weapon with his strong hand, lowering himself into a defensive stance, while
directing a reaction hand strike to the subject’s chin.
Many disarmings occur because officers are physically defeated in empty-hand
confrontations and are no longer able to defend their weapons. The best
defense is never to let that happen: choose an appropriate Intervention Option to
control any situation quickly and effectively.
If a subject attempts to disarm you, the basic technique is called the GUN
technique, an acronym for Grab, Undo, and Neutralize. The GUN technique has
two variations, depending on whether the disarming attempt takes place when
your weapon (baton or firearm) is in the holder/holster or when the weapon is
outside of the holder/holster.
81
GUN - Weapon in holder/holster.
If the weapon is in the holder/holster, your goal will be to keep it there at least
until you can create distance and consider your options. To apply the technique:
1. Grab: Secure the weapon in its holder or holster, using one or both
hands, and lowering your center to increase your stability.
2. Undo: Undo the subject from your weapon, using an appropriate
technique, such as one of these:
Striking the subject’s hand or arm
Directing the subject to the ground
Striking the subject, using active countermeasures
Using deadly force, if it is justified
3. Neutralize: Neutralize the subject's ability to continue or re-initiate the
disarming attempt. Possible actions include these:
Disengaging
Verbalizing
Using passive or active countermeasures
Using the baton
Using deadly force, if justified
GUN - Weapon outside holder/holster
If a subject has succeeded in taking your baton or firearm away from you, you
are in an extremely dangerous situation, requiring prompt action.
If a subject has taken your baton, your best defense—if it is feasible—would be
to draw your firearm, create distance, and attempt to defuse the situation with
verbalization. In some situations, such as crowd control, drawing your firearm
might not be feasible.
If someone has taken your firearm, you are in immediate danger of losing your
life. Appropriate immediate action might include the use of deadly force by a
cover officer or by you. If you are disarmed and have a backup weapon
available, using it or another deadly force application would be another option.
If other alternatives are not available, you can use the GUN technique. To apply
the technique:
1. Grab: Secure the weapon with both hands. If you are grabbing a baton,
use a wide grip, with your hands near the ends. If you are grabbing a
firearm, be sure that your body is not in the line of fire.
2. Undo: Undo the weapon from the subject by using a "J-stroke" technique:
bringing the weapon first up and then rapidly and forcefully downward and
toward you in a circular motion, forcing the subject to release his or her
grip. Step-slide away, as you perform the action to increase momentum.
The J-stroke is a quick-release technique. If it does not work, you must
maintain your two-handed grip on the weapon. You can try to decentralize
82
the subject by pulling the weapon toward your center and attempting to
direct the subject to the ground by pivoting and lowering your center as in
the Hug-Yourself Decentralization.
3. Neutralize: Neutralize the subject's ability to continue or re-initiate the
disarming attempt. Options include these:
Disengaging, if you can safely do so – if a subject has control of
your firearm, it is unlikely you would be able to disengage safely
Using active countermeasures (be sure to keep a firm grip on the
weapon)
Using deadly force if justified
Facing an Armed Subject
If you are faced with an armed subject, your best defense if feasible is to be
armed with a superior weapon, create or maintain distance, use cover if
available, and attempt to defuse the situation using verbalization.
In some situations, that option may not be feasible. It such a case, you have two
possible immediate responses:
Attempt to disengage to gain time and distance
Attempt to disarm the subject
Sweep and disengage
If you are confronted at close quarters with an armed subject, you may choose to
disengage to gain time and distance before drawing your firearm. The technique
for doing so is called the Sweep and Disengage.
To apply the technique:
1. Using both hands and arms (if possible) in a sideways sweeping motion,
forcefully push the weapon to the side, using your body weight to provide
momentum. Do not attempt to grab the weapon—your goal is to move it
to the side, away from you. If the subject is holding a knife, recognize that
you may be cut during this effort.
2. Disengage as rapidly as possible. If the circumstances permit, disengage
by running through or past the subject to the subject's rear. This allows
you to run forward rather than backward, making you less likely to fall, and
forces the subject to locate you again before he or she can re-engage.
3. Draw your weapon and verbalize, evaluating to determine your next
appropriate action.
Disarming a subject
If confronted with an armed subject, you may choose to attempt to disarm him or
her. One option for doing so is to use the GUN technique described above.
While it is presented primarily as a weapon retention technique, it can also be
used to disarm a subject. A second option, if you have already drawn your baton
83
and the subject suddenly arms him- or herself with a knife or club, is to use a
Descending Strike with the baton to disarm the subject. To apply the technique:
1. With the baton in the loaded position, use the same technique as for the
angle strike, except move the baton in a vertical, descending arc.
2. Forcefully strike through the subject's forearm area, keeping your knees
bent.
3. As you strike, issue a loud verbal warning to other officers ("Knife!" or
"Club!").
4. Immediately step-slide back, keeping the baton as a barrier between you
and the subject, by turning your palm down and performing a cross strike.
Issue a loud verbal command ("Drop the knife!" or "Drop the club!").
5. Draw your firearm and create distance from the subject, continuing to
verbalize.
6. Evaluate to determine your next appropriate action.
84
THIS PAGE INTENTIONALLY LEFT BLANK
85
DYNAMIC SITUATIONS
Even though you will utilize Approach Considerations, Intervention Options, and
Follow-Through Considerations on every call, the number of contacts requiring
force is relatively small. However, you may encounter unusual circumstances,
atypical of “normal” use of force events, with a high potential for harm if you are
not prepared. Examples of these situations include “medically significant
behavior,” subjects threatening officers with non-lethal weapons, and fighting on
the ground.
MEDICALLY SIGNIFICANT BEHAVIOR
What is Medically Significant Behavior?
The term “medically significant behavior” cannot be precisely defined. It includes
a variety of behaviors that indicate a serious and potentially life-threatening
medical condition is present. While many acute medical conditions (such as
severe chest pain, anaphylaxis, or heat stroke) can be life-threatening, they are
not medically significant behaviors. This section focuses on particular signs and
behaviors exhibited by people in crisis that signal a medical emergency. Certain
unusual behaviors, particularly when combined with extreme agitation, can
indicate physiological imbalances that, if untreated, often lead to death.
As an officer, you must be aware of medically significant behavior for two
reasons:
You are most likely to be first on the scene
Medically significant behavior is associated with in-custody deaths
First on Scene
When someone is exhibiting extreme or peculiar behavior, bystanders usually
call the police rather than EMS—especially when the behavior is disruptive or
violent. When a person is exhibiting medically significant behavior, it is likely that
officers will be on the scene long before EMS. In fact, unless the subject has
obvious injuries, or has caused injury, EMS may not be called at all. Unless the
officer recognizes medically significant behavior and requests an EMS response,
the individual may not receive treatment in time to prevent death.
In-Custody Death
Medically significant behavior is also associated with in-custody deaths.
Here is a typical scenario:
22
A man who is high on meth suddenly begins acting bizarrely. He begins yelling
and screaming for no apparent reason. He starts to attack inanimate objects,
particularly a plate-glass window. He strips off his clothes. He may be cut by
the glass, but acts as if he is not even aware of the injuries. Bystanders call
86
police. The responding officers attempt to calm the individual without success.
He does not even acknowledge their presence and continues to behave violently.
Officers attempt to take him into custody, but he fights them off, showing
“superhuman” strength. More officers arrive and join the fray. Eventually, after
an extended struggle, six officers are able to subdue him. They handcuff him
and apply leg restraints and place him in the back of a squad car, where he
continues to struggle against the restraints. Eventually, he calms down. He
does not complain of any injury. The officers arrive at the jail only to discover
that the subject is dead. Resuscitation efforts fail.
Contemporary theory suggests that many in-custody deaths are associated with,
or the result of, underlying medical problems, often combined with the use of illicit
drugs, alcohol withdrawal, or use of psychotropic medications. These medical
problems may be exacerbated by prolonged struggles with police, setting in
motion a series of changes in the chemistry of the blood and brain that have
been referred to as “the freight train to death.”
23
Immediate medical intervention
may be able to reverse these changes and stop the train. Without prompt
medical intervention, a person experiencing these body chemistry changes will
almost certainly die.
Recognizing Medically Significant Behavior
Identifying medically significant behaviors in a timely way depends on two skills:
Developing an accurate field impression
Recognizing typical behaviors associated with Excited Delirium
Field Impression
One of the first questions that emergency medical technicians (EMTs) learn to
ask in initially assessing a patient is, “What’s my general impression?” They are
taught to form a general impression even before taking a blood pressure or
checking a pulse. If an EMT looks at a patient and thinks, “This guy looks really
sick,” the EMT is probably right. Of course, as new EMTs gains field experience,
their general impressions are likely to become even more reliable.
Similarly, as you gain experience on the street dealing with a variety of people
exhibiting various behaviors, you will get a sense of what’s “normal” bad behavior
and what’s out of the ordinary. If you encounter a person whose behavior is
extreme in ways you don’t normally see, consider the possibility that it might
indicate a serious medical problem. Ask yourself if the person’s behavior is
similar to other people you’ve dealt with in similar circumstances. For example,
officers are frequently called to remove an intoxicated person who is refusing to
leave a residence. Sometimes these people are combative, or have difficulty
processing information, or repeat themselves. Those are all common behaviors
associated with alcohol intoxication. If instead you find the subject fighting with
his own reflection in a mirror while ignoring the fact that you’re there, that’s not
typical for an everyday drunk. Something else may be going on.
87
Typical Behaviors Associated with Excited Delirium
Many medical conditions can cause behavior problems. Head injuries, for
example, can often cause behavior that is atypical for the person. Mental
disorders and illnesses often have associated behaviors. Purely medical
conditions, such as hypoglycemia (a type of diabetic emergency) or
hyperthyroidism can produce irritable or combative behavior. Of course,
ingestion of excessive alcohol or use of stimulant drugs such as cocaine and
methamphetamine can cause disruptive behavior as well. Recently, researchers
have identified a syndrome called Excited Delirium that may explain otherwise
inexplicable in-custody deaths.
24
Of course, your first priority is always safety—and your safety, your partner’s
safety, and the public’s safety come first. If, however, circumstances allow, the
following procedure may be helpful. (This process is detailed in “Multiple Officer
Ground Handcuffing with Chemical Restraint Application” later in this manual):
1. Attempt to calm the subject, using verbal techniques from Crisis
Management and Professional Communication.
2. Request backup and Advanced Life Support (ALS) EMS response
(paramedics).
3. Weigh the need for immediate control against the risk to the subject.
4. Maximize the number of officers in hopes of minimizing the initial level of
force.
5. Once EMS is on scene, use an Electronic Control Device to make it
possible to approach the subject.
6. Have the paramedics administer a tranquilizer, in accordance with local
protocols.
7. Contain the subject without restraints until he or she is calm.
8. Transport the subject to a hospital in an ambulance, using minimal
restraints.
Of course, not every situation will allow this procedure. If the subject is posing an
imminent threat of injury to someone, you cannot stand by while you wait for
EMS to arrive. Nor will this procedure work if an ALS ambulance is not readily
available (EMT-Basics and EMT-Intermediates cannot administer tranquilizing
drugs). If the subject does not calm down and remains combative, you may need
to use restraints. You certainly cannot place a combative patient in an
ambulance without restraints—nor should an ambulance transport a restrained
subject without an officer along who can remove the restraints if needed.
If the circumstances do not permit this procedure, use other customary practices
to gain control of the subject.
When circumstances make this procedure possible, however, following it can
literally save lives. By recognizing medically significant behavior early and acting
88
to allow quick medical intervention, you may be able to provide critical care and
derail the “freight train to death.”
Some of the common characteristic delusional and/or violent behaviors that
indicate that a subject may be in a state of medically significant behavior include:
Agitation or Excitement = Increased activity and intensity
Aggressive, threatening or combative – gets worse when challenged or
injured
Amazing/superhuman feats of strength
Insensitivity to pain
Pressured loud speech
Profuse sweating (or loss of sweating late); clothing removal caused by
extremely high body temperature
Dilated pupils/less reactive to light
Rapid breathing
Delirium = Confusion
Rapid/abrupt onset over a short period of recent time - “He just started
acting strange”
Confusion and impaired thinking
Disoriented to person, place, time, purpose
Easily distracted/lack of focus
Decreased awareness and perception
Rapid changes in emotions (laughter, anger, sadness)
Psychotic = bizarre behavior
Bizarre, often violent behavior directed at objects, especially glass
Thought content inappropriate for circumstances
Hallucinations (visual or auditory)
Delusions (grandeur, paranoia or reference)
Flight of ideas/tangential thinking
Makes you feel uncomfortable
Frequently, bystanders will report that the subject “just snapped” or suddenly
started acting strange. The subject will not follow your commands and indeed,
may not even acknowledge your existence.
If you see these behaviors, you may have a subject who is experiencing an
extreme medical emergency. While your first job is always to protect the safety
of yourself and others, you should recognize that getting medical help to this
individual is also a priority. Without medical intervention, a person experiencing
Excited Delirium will almost certainly die—and die quickly.
Responding to Medically Significant Behavior
Medically significant behavior is potentially dangerous on three levels:
89
1. Danger to the officer – the danger presented to the officer is that he/she is
facing an individual that has a high threshold for pain, is superhumanly
strong, and could believe that the officer is trying to harvest his/her brain
(i.e. delusional).
2. Danger to the public – the danger presented to the public is that the
behavior displayed above can be directed towards members of the public.
If these individuals are dangerous to well trained groups of police officers,
they are more dangerous to untrained individual members of the public.
3. Danger to the suspect – the individual experiencing this type of behavior
could very well be on the “Freight Train to Death.” The medical crisis that
they are experiencing could be the beginning of a condition that could
result in their death unless they are able to receive medical treatment, and
even then it could still occur.
If you are confronted with a subject who is displaying behaviors that suggest the
possibility of an underlying medical problem, especially an imminently life-
threatening one, managing the situation becomes more complex. Your
immediate goals remain the same as always: to stabilize the scene and preserve
life and evidence. How you accomplish these goals, however, may change.
An important point to remember is that at the center, what you are seeing is not
so much a crime in progress—although criminal acts may be taking place—as it
is a medical emergency in progress. If you recognize medically significant
behaviors, especially those consistent with Excited Delirium, your priority must be
the safety of all involved, including the suspect. Criminal prosecution can wait,
but the medical emergency won’t.
25
If a person is experiencing Excited Delirium or some other medical problem that
is contributing to violent behavior, your response tactics should be geared to
accomplish the following:
Avoid increasing the subject’s agitation or excitement
Minimize physical struggles with the subject
Minimize the use of restraints
Get medical care for the subject as quickly as possible
GROUND DEFENSE AND ESCAPES
This instruction focuses on how to escape from various positions of disadvantage
on the ground utilizing simple, effective techniques based on gross motor skill
movement. These concepts are bunched together based on their common
theme—they occur on the ground or other horizontal flat surface. However, the
force response that the officer may utilize can vary widely, based on the totality of
circumstances. Officer responses can range from a simple ground defense
technique that allows an officer to get up safely, to a dynamic assault that forces
90
an officer to use deadly force. Most techniques and positions in the DAAT
system are used for situations that involve control. However, many techniques
and positions covered in ground defense and escapes are designed for situations
that are out of control, requiring officers to defend themselves in a dynamic and
reactive manner.
An officer on the ground is at a significant tactical disadvantage. When on the
ground the officer cannot easily disengage from the suspect—and a core DAAT
concept is to disengage and/or escalate if your control efforts are ineffective.
Furthermore, the ground is an unyielding surface that limits an officer’s ability to
use other trained force options. Being on the ground can pose significant risk to
an officer, especially when the suspect intended to put the officer there. A
trained ground fighter is a potentially deadly adversary.
Ground Defense and Escapes complements existing techniques and tactics.
These strategies can be used in conjunction with active countermeasures and
will assist officers in establishing a position of advantage. Officer/Subject factors
and Special Circumstances strongly influence the use-of-force decision making
during a confrontation on the ground. The size and relative strength differences
between the officer and suspect are exacerbated as an officer attempts to control
a suspect or protect him/herself. In other words, “mass matters” in confrontations
on the ground. The physical position of the officer will also justify a rapid
escalation in force or higher force option during a ground confrontation. The
officer may have to “take what is there” when selecting target areas for active
countermeasures.
Officers on the ground with a subject have several options:
Stabilize and handcuff.
Utilize a Protective Alternative from that relative/physical position (for
example, a Strong Knee strike from a kneeling position).
Escape from a disadvantageous ground position. For example, creating
enough distance to get up safely.
Defend against a more dangerous ground position (ex; suspect attempting
to move out of an officer’s guard and mount the officer).
Disengage and/or Escalate through the application of a self defense
technique or apply deadly force if appropriate.
Ground Positions
The below positions represent some of the physical positions that officers can
find themselves in during use of force incidents. The dangers of each position
are different as the officer can be more susceptible to harm in one position than
another. The special circumstance created by this physical position can justify a
rapid escalation in force or higher force option.
91
1. Guard – Suspect is outside of officer’s knees or is positioned between
officer’s knees
2. Side Mount – Suspect’s chest is positioned on top of the officer’s chest,
with suspect’s knees positioned outside of the officer’s hip, possibly
parallel to the officer’s chest
3. Front Mount – Suspect is straddled over the officer’s abdomen or chest
4. Back Mount – Suspect is positioned behind the officer with suspect’s arms
controlling officer from behind
Ground Defense Position
Officer bends both legs with the bottom of the reaction foot facing the subject.
The strong elbow is on the ground supporting the upper body and head. The
reaction hand is positioned in front of the officer’s face with the elbow bent
outside 90 degrees.
While in the ground defense position, the officer can move in a circular fashion by
using the strong foot and forearm to pivot.
The reaction foot can be utilized to kick the subject if needed by directing the
bottom of the foot towards a low target (ankle, shin or knee). Kicking higher,
although possible and effective, is less desirable as it makes the groin an easier
target. Appropriate verbalization is added (ex: “Back!”). The officer can also
perform the same kick with their strong leg, as the suspect may focus his/her
attention on the reaction leg as it is chambered to kick.
The officer can switch sides by rotating on buttocks and switching over to the
same position, but with the reaction elbow on ground. The officer can also switch
directions by sitting up with back straight and switching sides while facing the
opposite direction. During this switch the officer must pull in his/her legs closer to
the body in order to facilitate the completion of the switch.
Table Top Concept
In ground positions the suspect’s ability to maintain a position of advantage on an
officer is based on the suspect’s ability to remain balanced and generate energy
to assault. The suspect’s balance is based on keeping four points of balance (2
knees and 2 hands) on the ground or on the officer, i.e. like the four legs of a
table. The suspect needs to move at least one or two hands to strike or choke an
officer. This movement is the removal of one or two of the legs of the table. It can
be achieved by his assault or an action by the officer. Once two legs on the same
side of the table are removed, the table tips over.
92
Format of techniques
There are four basic responses when you are on the ground:
Positional Defense: avoiding the position (or adopting a dominant
position-instructor manual note)
Escape: getting out of a specific position and achieving a less dangerous
position with the end goal to get up safely
Self Defense Responses: Tools or tactics used to defend an officer during
a ground defense confrontation
Deadly Force Response: the application of deadly force
Defenses and Escapes
Guard
The guard position has two subcategories – the inside and outside guard
positions.
Outside Guard
Description of Position
Officer is on his back and has his feet either positioned just to the outside of the
suspect’s groin or the officer’s knees are closed, feet out
Outside Guard Defense
Elongate the body by extending legs and shift into the ground defense position
Outside Guard Escape
Twist hips and place shin across the suspect’s hips. While creating distance the
officer can utilize a foot to kick the suspect’s supporting knee and force them to
fall forward. The officer then creates distance by sliding back while maintaining
the ground defense position.
Outside Guard Self Defense Responses
In such a dynamic situation the officer has a range of options based upon the
totality of circumstances. Options range from, but are not limited to, focused
strikes, holds on soft body parts within reach, to the use of a weapon:
Face (eyes, nose, ears, or mouth)
Neck area (trachea, throat, carotid, or jugular)
Groin area
Underarm and rib region
Back and spine area
Firearm on belt: The officer can rotate towards reaction side and draw.
Gun should be pulled back towards officer’s chest to prevent disarming.
Ankle weapon: The officer can draw a knife or handgun kept on the ankle.
93
Inside Guard
Description of Position
Suspect is positioned between the officer’s legs
Inside Guard Defense
1. Elongate the body by extending legs
2. Position feet (outside guard) or shin (inside guard) into the inside of the
groin to achieve the outside guard.
3. Elongate the body by extending legs and shift into the ground defense
position
Inside Guard Escape (Table Top)
Redirect the strikes/choke
1. Apply table top concept to disable a side by trapping or diverting the
suspect’s:
Arm
o Break Down the arm at the elbow
o Divert at the hand
o Wrap the arm up
Trap the arm at the shoulder
Head
Arm and Head
2. Bridge and Roll towards disabled side (with mule kick, or trapped leg, if
necessary)
Inside Guard Self Defense Responses
In such a dynamic situation the officer has a range of options based upon the
totality of circumstances. Options range from, but are not limited to, focused
strikes, holds on soft body parts within reach, to the use of a weapon.
Face (eyes, nose, ears, or mouth)
Neck area (trachea, throat, carotid, or jugular)
Groin area
Underarm and rib region
Back and spine area
Firearm on belt: The officer can rotate towards reaction side and draw.
Gun should be pulled back towards officer’s chest to prevent disarming.
Ankle weapon: The officer can draw a knife or handgun kept on the ankle.
Side Mount
Description of Position
Suspect and officer are positioned chest to chest with the officer on his back.
Suspect and officer are perpendicular to each other.
Side Mount Defense (suspect attempting to mount)
Often an opponent is attempting to move from side mount position into front
mount. Officer stops that movement with the leg closest to the suspect by driving
94
the knee up and positioning the leg between the suspect and the officer’s chest.
The officer then shrimps the hips away from the suspect and defends just like the
outside guard by elongating the body.
1. Place hands on suspect’s hips and push your hips off the ground
2. Shrimp hips out while pushing on suspect’s hips
Side Mount Escape (suspect striking or choking)
Redirect the strikes/choke
Apply table top concept by trapping the suspect’s:
Arm and head
Bridge and Roll direct energy towards suspect, not across officer’s chest. While
doing this, shrimp the hips away.
Side Mount Self Defense Responses
In such a dynamic situation the officer has a range of options based upon the
totality of circumstances. Options range from, but are not limited to, focused
strikes, holds on soft body parts within reach, to the use of a weapon.
Face (eyes, nose, ears, or mouth)
Neck area (trachea, throat, carotid, or jugular)
Groin area
Underarm and rib region
Back and spine area
Firearm on belt: The officer can rotate towards reaction side and draw.
Gun should be pulled back towards officer’s chest to prevent disarming.
Ankle weapon: The officer can draw a knife or handgun kept on the ankle.
Front Mount
Description of Position
Suspect is straddling the officer’s chest while officer is on his back.
Front Mount Escape (Table Top)
Redirect the strikes/choke
Apply table top concept by trapping the suspect’s:
1. Apply table top concept to disable a side by trapping or diverting the
suspect’s:
Arm
o Break Down the arm at the elbow
o Divert at the hand
o Wrap the arm up
o Break Down the arm at the elbow
Trap the arm at the shoulder
Head
Arm and Head
2. Bridge and Roll towards posted leg
Post one foot just outside ankle (disabled side) while bucking and
rolling towards that disabled side

95
Training safety point *Suspect’s feet must be angled in to protect
ankles during escape during training only
Front Mount Self Defense Responses
In such a dynamic situation the officer has a range of options based upon the
totality of circumstances. Options range from, but are not limited to, focused
strikes, holds on soft body parts within reach, to the use of a weapon. Face
(eyes, nose, ears, or mouth)
Neck Area (Trachea, Throat, Carotid, or Jugular)
Groin area
Underarm and rib region
Back and spine area
Firearm: The officer can rotate towards reaction side and draw. Gun is
very difficult to draw from this position and if successful a contact shot
should be directed into an area that the suspect cannot see to avoid the
suspect grabbing the gun.
Ankle weapon: The officer can draw a knife or handgun kept on the ankle.
Suspect’s Closed Guard
Description of Position
Officer is on his knees with suspect’s legs wrapping him in the guard.
Suspect’s Closed Guard Escape
1. Place forehead on suspect’s lower chest/upper abdomen to avoid strikes
while placing hands on suspect’s biceps to decrease power of possible
strikes
2. Center reaction knee with suspect’s tailbone
3. Simultaneously step out and away with strong side knee while driving
elbow down onto the femoral plexus with body weight.
4. When the guard has been relaxed the officer can throw the leg over and
force the suspect onto his stomach or disengage. Note: the suspect could
utilize a triangle choke if the leg is not directed quickly enough and the
officer’s head is too high.
One option after escaping the suspect’s guard is to disengage away
from the feet and assess your next force option
Another option after escaping the suspect’s guard is to stabilize his leg
and pass through into the side mount.
o The first step is to pin his leg to prevent kicking. Assess if moving
into ground stabilization is practical and/or feasible
o As the leg is pinned with the strong side the reaction side moves
behind the strong foot. This is to avoid being struck in the groin as
you pass the suspect’s leg
o After the reaction side leg has contact the strong side leg can safely
pass.
o After both legs have passed then the side mount can be achieved.
96
Suspect’s Closed Guard Self Defense Responses
In such a dynamic situation the officer has a range of options based upon the
totality of circumstances. Options range from, but are not limited to, focused
strikes, holds on soft body parts within reach, to the use of a weapon.
Face (eyes, nose, ears, or mouth)
Neck area (trachea, throat, carotid, or jugular)
Groin area
Underarm and rib region
Back and spine area
Firearm on belt: When reaching for the gun the officer may have to reach
over the leg to get to the holster.
Ankle weapon: The officer can draw a knife or handgun kept on the ankle.
Back Mount
Description of Position
Officer is face down with the suspect on the officer’s back.
Back Mount Escape (while suspect attempts to choke)
Protect the trachea and minimize the exposure of the carotid by tucking the chin
in and grabbing suspect’s forearm. Officer drives hips up and tosses the suspect
away from the choke. Walk legs toward suspect’s head while rotating officer's
abdomen towards the ground. Grab suspect’s head while grinding officer’s head
into the face of the suspect. Complete rotation and face suspect.
Back Mount Self Defense Responses
In such a dynamic situation the officer has a range of options based upon the
totality of circumstances. Options range from, but are not limited to, focused
strikes, holds on soft body parts within reach, to the use of a weapon.
Face (eyes, nose, ears, or mouth)
Neck area (trachea, throat, carotid, or jugular)
Groin area
Underarm and rib region
Back and spine area
Firearm on belt: Protect the trachea and minimize the exposure of the
carotid by tucking the chin in and grabbing suspect’s forearm. Rotate
towards reaction side and draw. The handgun may be difficult to draw
from this position and if successful a close combat shot should be directed
into an area that the suspect cannot see to avoid the suspect grabbing the
gun.
Ankle weapon: The officer can draw a knife or handgun kept on the ankle.
Transition from Side Mount into Ground stabilization
After the officer has escaped from several of the various positions that we’ve
demonstrated the officer will find him/herself in a side control position or mount.
The officer’s assessment may be to disengage and stabilize verbally, or to
97
maintain control and move into ground stabilization. In order to do this safely he
should utilize the Side Mount.
Body weight distribution is the most important in this position as your chest
sits above the suspect’s chest.
Knee closest to the head of the suspect is brought up to pin the arm
against the suspect’s body.
Arm closest to the suspect’s head reaches behind his head and grabs the
arm at the tricep.
Force the suspect’s arm straight and drive your weight forward and low in
order to turn him over onto his stomach.
Options for Ankle Weapon Access
This technique can be performed from any of the ground positions and contains
three parts. If your agency allows, you may carry a weapon on your ankle:
An ankle knife may be positioned on the inside of the strong side leg.
A handgun may be positioned on the inside of the reaction side leg, butt
facing to the rear.
A handgun may be position on the inside of the strong side leg, butt facing
forward.
To draw the weapon:
1. Pull the weapon side knee towards the strong side hand.
2. Grab the pants at the knee and straighten leg to expose the weapon.
3. Pull the weapon side knee back towards your hand to access and draw
the weapon.
Upon accessing the weapon, the officer then determines where to strike or shoot
based on the position of the suspect. Some of the areas that are the most
desirable to stop the threat are:
Head
Neck (carotid artery and trachea)
Kidneys
Femoral artery
Chest/under arm in an effort to affect the lungs
Cervical spine area
98
THIS PAGE INTENTIONALLY LEFT BLANK

99
FOLLOW-THROUGH CONSIDERATIONS
As you have learned, once you have gained control of a subject, using one or
more of the Intervention Options, you must initiate follow-through activities as
listed under Follow-Through Considerations in Disturbance Resolution. These
considerations include:
Considerations
A. Stabilize
Application of restraints, if necessary
B. Monitor/Debrief
C. Search
If appropriate
D. Escort
If necessary
E. Transport
If necessary
F. Turn-Over/Release
Removal of restraints, if necessary
This section discusses each of these.
STABILIZE
When a subject has been stabilized, it means that he or she has stopped
resisting and is in a position where you can apply handcuffs. A subject can be
stabilized verbally, if he or she complies with your verbal directions, or the
subject can be stabilized physically against a vertical surface, such as a wall, or
on the ground using the three-point position described here.
Ground Stabilization
The proper way to stabilize a subject on the ground prior to handcuffing is called
the Three-Point Position. Because most people are right handed, you should
establish this position using the subject’s right hand, if possible. To apply the
technique:
1. With the subject prone on the ground, establish an escort hold on the
subject's arm, pincer grip at wrist and elbow. Hold the subject's arm low
and if possible, secured to the ground.
2. Using a low, sweeping motion along the plane of the ground, rotate the
subject's hand to the center of his or her back at approximately waist level
100
(the "small" of the back). Important: do not lift the subject's arm high off
the ground.
3. Give loud verbal directives to the subject to remain on the ground ("Stay
down!") and to move the other hand away from the body so you can see it
("Move your hand out to the side, palm up!").
4. Place your left knee (if you have the subject's right hand) next to the elbow
to stabilize it for a compression hold. Most of your weight should be on
this knee.
5. Index your right foot (if you have the subject's right hand) near the juncture
between the subject's neck and shoulder. Keeping your weight on the ball
of the foot, place your right shin and knee across the subject's back, from
shoulder to opposite shoulder blade. Important: Do not place your knee
on the subject's neck or spine. This position allows you to control the
amount of weight on the subject's shoulders.
6. Verbally direct the subject to turn his or her head away from you.
7. Control the subject by wrist compression and/or mandibular angle
pressure-point techniques.
8. Continue to speak to the subject to give directions or to control.
9. When the subject is stable (not resisting), handcuff him or her.
Note: Always be ready to disengage from this position should the subject
begin violent resistance. Proper leg positioning—most of your weight on
your left knee, and your body balanced on your right foot (from the right-
hand position) will assist.
In some cases, you may choose to order a subject to the ground for stabilization,
rather than decentralize him or her yourself. An example might be if you were
arresting at gunpoint a suspect in a serious crime. Rather than give up the
tactical advantage of having the person at gunpoint, which would be necessary if
you were to perform a decentralization, you decide to order the subject down.
Here is the procedure:
1. From a position of cover, with the subject at gunpoint, direct the subject to
do the following:
Extend his/her arms over his/her head, palms forward and fingers
spread.
Slowly turn completely around with arms fully extended. (This
allows you to observe the subject’s waistband – a common location
where weapons are carried.)
If the subject’s clothing did not allow clear visualization of their
waistband, have the subject use their right hand to pull up on the
rear collar of their shirt/jacket/vest and again turn completely
around.
Face you, feet spread apart.
Slowly drop first to one knee, then to both knees.
101
Place the palms of his/her hands on the ground in front of him/her
Move backwards on his/her knees to a prone position. Keep hands
stationary.
When prone, extend arms out from his/her sides, palms up
Turn his/her face to the left.
Place his or her right hand in the small of the back, palms and
fingers up.
2. Use team tactics if possible to stabilize and handcuff the subject. If that is
not possible, with another officer providing cover for you, secure your
weapon in the holster, and approach the subject from his/her right side.
3. Move into the three-point position, stabilize and handcuff the subject.
Once an arrested subject is stabilized, you should handcuff him or her with hands
behind the back. Only if there is a clear medical reason not to do so should you
consider making an exception—but you still must ensure that the subject is
properly controlled.
Handcuffing
Handcuffs are temporary restraining devices—they reduce the ability of a person
to cause injury, by limiting the use of the hands, but they do not eliminate all
danger. Do not become complacent simply because a person has been placed
in handcuffs.
The DAAT system includes three handcuffing methods:
Cooperative-subject tactical handcuffing
One-officer ground handcuffing
Multiple-officer ground handcuffing
Cooperative-Subject Tactical Handcuffing
A subject who complies with your verbal directions may be handcuffed using this
method. Even if the subject is cooperative, it is a good idea to place him or her
near a vertical surface if possible, in case further stabilization is needed. You
can use this method with a subject who is standing, kneeling, or prone. To apply
the technique:
1. Direct the subject to fully extend his or her arms overhead with palms
forward and fingers spread.
2. Direct the subject to turn slowly until he or she is facing away from you.
You should be at a 45º angle to the subject's right rear, a safe distance
away.
3. Direct the subject to place his or her feet wide apart.
4. Direct the subject to extend his or her hands and arms straight out to the
side, thumbs down, with the palms facing back toward you.
102
5. Direct the subject to turn his or her head away from you, bring the arms
back behind the back, and bend slightly forward, remaining in that position
for handcuffing.
6. After the subject has assumed this position, quietly take out your
handcuffs, "pre-load" them, and grip them in your strong hand, single
strands toward the subject.
7. Approach from the rear to the subject's 2½, step-sliding as you get within
the subject's reach. Keep a defensive stance, with your reaction arm held
in a high guard.
8. Using your reaction hand, secure the subject's fingers and thumb or
middle two or three fingers of the near hand, holding it so the subject's
palm is up, arm and wrist are straight, and it is at a convenient height for
cuffing.
Important: Keep your stance erect—do not bend over or entirely direct
your attention downward. If the wrist is not high enough, direct the
subject to bend farther forward.
Note: Be aware of any resistance you feel in the subject's hand and be
prepared to disengage and/or escalate if needed.
9. Apply the single strand of the cuff to the subject's "handcuff groove" on the
little-finger side of the near wrist. Use touch-pressure, and ratchet the
handcuff closed.
10. Maintaining your grip on the handcuff, rotate the handcuffs, bringing the
cuffs under the subject's hand to the small of the subject's back. The
subject's cuffed hand should be resting with the back of the hand facing
the centerline of the back, and your hand should be palm up, with the
single strand of the remaining handcuff facing up.
11. Using your reaction hand, grasp the little-finger side of the subject's other
hand and rotate the hand, placing it into the handcuff. Close the handcuff.
The hands should be back-to-back.
12. Check the handcuffs for tightness, then safety-lock.
13. Establish a compression hold on the subject's arm and wrist, using your
reaction hand, stabilizing the subject's elbow with your strong hand. If the
subject begins to resist, compress the wrist for compliance.
Important: Search the subject before escorting or transporting.
Note: If the subject is very compliant, you may direct him or her to place
the hands behind the back in proper position for cuffing, proceed as
outlined above. Never assume that a compliant subject will remain
compliant: be prepared to respond to subject resistance.
One-Officer Ground Handcuffing
While it is certainly possible for one officer to handcuff a prone subject, if the
subject has been directed to the ground because he or she was violently
resisting, it is better to use multiple officers if possible. A single officer must
103
control the subject and stay alert to the surrounding environment as well as
handcuff. A coordinated team effort is usually preferable. A team is not always
available, however, and a single officer may decide to handcuff a prone subject
despite the inherent hazards. To apply the technique:
1. Beginning with the subject in the three-point position, take your handcuffs
in your strong hand, while maintaining wrist compression with your
reaction hand.
2. Establish a handcuff grip, with your palm facing up, and both single
strands pointing toward the subject's head. (Option: hold the cuffs with
palm down, both single strands pointing toward the subject's feet.)
3. Apply the handcuff to the subject's wrist being held in a compression hold.
Use the handcuff toward the little-finger side of your hand (Option: thumb
side if you're holding them palm-down), and apply it to the little-finger side
of the subject's wrist, using touch pressure and pulling it toward the
subject's head. Close the cuff snugly.
4. Maintain compression on the wrist, using the handcuff, and direct the
subject to bring his or her other hand to a position at the small of the back.
(Option: first reposition your hand from the palm-down position to palm-
up.)
5. Continuing to maintain your grip on the handcuffs, release wrist
compression and grasp the subject's free hand with your reaction hand.
6. Rotate the subject's wrist so that the hands are back-to-back, and apply
the single strand of the handcuff to the little finger side of the subject's
hand, using touch pressure to engage the cuff.
7. Close the handcuff with your reaction hand and safety-lock the handcuffs.
Multiple Officer Ground Handcuffing
Multiple officer ground handcuffing is a coordinated procedure for handcuffing a
violently resistive subject who has been directed to the ground in a prone
position. In this procedure, officers first stabilize the subject's arms, head, and
legs then place the arms in the proper configuration for handcuffing. This
approach is in accordance with the basic principle that subjects must be
stabilized before they can be handcuffed.
Note: This procedure may be modified to stabilize and handcuff a subject who
has been placed against a wall or other vertical surface. To apply the procedure:
1. Once the subject has been directed to the ground, the first officer secures
the subject's first arm by pinning it to the ground at elbow and wrist,
extended away from the body (where the subject might have access to
weapons).
2. The second officer secures the subject's other arm in the same manner.
3. The third officer secures the subject's head, by placing both hands on it
and holding it against the ground. The officer should take care to avoid
being bitten. Pressure points may be used to encourage compliance.
104
Throughout the remaining procedure, this officer attempts to calm the
subject by giving soft, simple verbal directives ("Stop resisting." "Take it
easy.")
4. The fourth officer secures the subject's feet and legs, pinning them to the
ground by holding them near the ankle or, alternatively, by placing his or
her body perpendicular to the subject's legs, using only necessary body
weight to secure them to the ground. (Option: the feet and ankles can be
rolled to the side to inhibit the subject from using his or her hamstrings to
lift the officer by doing a leg curl.)
5. Once all body parts are stabilized, the officers controlling the subject's
arms can sweep them along the ground rotating them to the small of the
back for handcuffing. Important: Maintain wrist compression while
completing this maneuver.
6. Any of the officers then applies handcuffs and safety-locks them.
7. Once the subject has been stabilized and handcuffed, the officer nearest
the subject's head should monitor and continue to debrief the subject,
using a calm reassuring tone of voice.
8. An officer should search the subject while he or she is still prone, and then
again when the subject is assisted to rise.
Multiple Officer Ground Handcuffing with Chemical Restraint Application
Note: This procedure is the same as Multiple Officer Ground Handcuffing, with
the additional of chemical restraints for subjects believed to be suffering from
medically significant behavior/Excited Delirium. To apply the procedure:
1. Once the subject has been directed to the ground, the first officer
secures the subject's first arm by pinning it to the ground at elbow and
wrist, extended away from the body (where the subject might have
access to weapons).
2. The second officer secures the subject's other arm in the same
manner.
3. The third officer secures the subject's head, by placing both hands on it
and holding it against the ground. The officer should take care to avoid
being bitten. Pressure points may be used to encourage compliance.
Throughout the remaining procedure, this officer attempts to calm the
subject by giving soft, simple verbal directives ("Stop resisting." "Take
it easy.")
4. The fourth officer secures the subject's feet and legs, pinning them to
the ground by holding them near the ankle or, alternatively, by placing
his or her body perpendicular to the subject's legs, using only
necessary body weight to secure them to the ground.
Options:
The feet and ankles can be rolled to the side to inhibit the
subject from using his or her hamstrings to lift the officer by
doing a leg curl.
105
The ankles can be crossed and the heels brought past 90
degrees and secured near an officers thigh while straddling over
the subject in an intermediate stance. Officer can also secure a
hold on the suspect’s belt if present, or have a second officer
use body weight behind the straddling officer to prevent
movement.
5. Once all body parts are stabilized, the officers controlling the subject's
arms can sweep them along the ground rotating them to the small of
the back for handcuffing. Important: Maintain wrist compression while
completing this maneuver.
6. Any of the officers then applies handcuffs and safety-locks them.
7. Once the subject has been stabilized and handcuffed, the officer
nearest the subject's head should monitor and continue to debrief the
subject, using a calm, reassuring tone of voice.
8. When the EMS personnel is advised by officers he/she can move in
towards one of the suspect’s thighs. The EMS personnel will confirm
that it is the suspect’s thigh then inject the chemical restraint.
9. An officer should search the subject while he or she is still prone, and
then again when the subject is assisted to rise.
10. When safe to do so the suspect can be turned on his side to facilitate
deep breathing.
MONITOR/DEBRIEF
Once a subject has been handcuffed, especially if you used physical force to
control the subject, you have a custodial responsibility for the subject's health
and safety. When you monitor a subject, you are carrying out this duty.
As you learned in Professional Communication, debriefing serves two important
psychological functions: enabling the participants to come full circle and
completing the transaction.
To come full circle means to return to the point at which you started. As you
have learned, nearly all police contacts start with verbalization. After a physical
confrontation, it is important to bring the level back down to verbalization at the
conclusion. This coming full circle helps both officers and subjects regain their
composure and return to normal. Debriefing also helps to complete the
transaction and provide proper closure to each contact.
As you have learned, subject debriefing involves five specific actions to take:
1. Calm yourself and your partner.
2. Calm the subject.
3. Provide initial medical assessment.
4. Reassure the subject.
106
5. Rebuild the subject's self-esteem.
You can calm yourself by using autogenic breathing and positive self-talk.
Similarly, talking calmly to your partner and suggesting that he or she use
autogenic breathing will help him or her to return to normal. You can use similar
techniques to help calm the subject. In addition to verbal directions to calm down
or take it easy, you may need to help someone to slow his or her breathing. A
useful technique is to say, "Here, breathe with me" and then model deep
breathing, having the other person breathe along with you.
After any contact involving a possibility of illness or injury—which certainly
includes contacts involving physical intervention—you must conduct an initial
medical assessment to find out if the subject (or anyone else) requires medical
care. The stress of a physical struggle or foot chase, especially when combined
with drug use, may cause sudden and severe changes in a person’s condition.
In some cases, these can be life-threatening emergencies. (As always, when
dealing with possible contact with blood and/or other body fluids, use appropriate
personal protective equipment, including gloves and/or a mask.) Here are the
steps:
1. Determine level of consciousness, using verbal or physical stimulus.
2. Check airway, breathing, and circulation.
3. Perform a body check for injuries—severe bleeding, broken bones, etc.
4. Provide any necessary treatment to your level of training, and if needed
(or the subject requests it), activate the emergency medical system.
5. Continue to monitor and remain with the subject until he or she is turned
over to someone of equal or greater responsibility. Find out if there is a
need for long-term monitoring of the subject because of special medical or
mental health needs.
Reassess the suspect for indications of mental illness, emotional disturbance, or
medically significant behavior. It may be easier, now that subject is controlled, to
observe signs that were not easily observed during the initial confrontation.
Remember, if you see the following, the suspect may be in a state of Excited
Delirium and require immediate medical intervention:
Sweating (or loss of sweating late)
Dilated pupils/less reactive to light
Rapid breathing
Decreased awareness and perception
Rapid changes in emotions (laughter, anger, sadness)
Thought content inappropriate for circumstances
Hallucinations (visual or auditory)
Delusions (grandeur, paranoia or reference)
Verbally reassure the subject, explaining that he or she is okay, or if the person is
injured, that medical care will be provided for the injury. Finally, take steps to help
107
a subject regain his or her sense of dignity and sense of control. The first step in
that direction will be to assist the subject (if able) to rise. Follow this procedure:
1. If you are starting from the three-point position, remove your knee and
shin from the subject's back/shoulder area, and place the knee on the
ground near your other knee.
2. Maintaining compression of the subject's wrist with your inside hand and
stabilizing the elbow with your outside hand, direct the subject to roll
toward you.
3. Use your hand on the elbow to assist the subject to sit up.
4. Place your inside foot on the ground, so that you are in a high kneeling
position, and direct the subject to come to a kneeling position. The
subject can place his or her elbow on your knee to assist in pushing up to
a kneeling position.
5. Stand up at the subject's 2½, keeping your knees bent and continuing to
maintain a compression hold, direct the subject to stand up, assisting him
or her as needed.
Note: Assist the subject to rise rather than lift the subject
If the subject is compliant, use compression and slight pressure. If the
subject is resistive, proceed as follows:
a. Insert your outside hand through the space between the subject's
nearest elbow and body, from front to back, then use that hand to
establish a compression hold, stabilizing the elbow against your
upper arm and body.
b. Place your inside hand on the subject's shoulder to prevent him or
her from rising too quickly.
c. Bring the subject slightly off center and verbally warn him or her to
stop resisting.
6. Escort the subject, continuing to use a compression hold and controlling
the subject's balance.
SEARCH
The term "searching" is often applied both to frisks and to searches, but the two
are quite distinct. A frisk is a pat down of a subject's outer clothing for the
purpose of discovering any concealed weapons. It is done when an officer has
articulable facts that the officer or someone else is in danger from the subject. A
search is a thorough checking of the subject, including emptying the pockets of
the clothing, looking for weapons, contraband, or evidence of a crime.
108
Frisk
If you reasonably suspect, based on articulable facts, that a subject is
committing, has committed, or is about to commit a crime, you may detain him or
her temporarily to investigate. This sort of detention is commonly called a Terry
stop, because it arose from Terry v. Ohio.
26
If you additionally have reasonable
suspicion, based on articulable facts, that you or someone else is in danger from
the subject, you may conduct a limited search (a frisk) for weapons or objects
that could be used as weapons.
Before conducting a frisk, make sure that the subject is controlled. He or she
may be placed in an escort hold or compression hold, or even handcuffed. If you
have another officer available, you can use team tactics to control and frisk the
subject. In some cases, verbal stabilization may be sufficient. Regardless of the
type of stabilization, always position yourself at the subject's 2½. Do not frisk
from the front.
To conduct a frisk:
1. Tell the subject you are going to frisk him or her, and ask if he or she has
any weapons or dangerous items, such as needles or other sharp objects.
2. Stabilize the subject. If the subject is not handcuffed, direct him or her to
face away from you with feet wide apart and arms extended to the side.
Direct the subject to place the one hand palm up, on top of the head.
Then blanket the other arm and establish an escort hold.
3. Maintain contact with the subject's arm/wrist at all times, even if it is not in
a compression hold. That will enable you to feel any resistive tension.
Frisk with your other hand.
4. Using your free hand, frisk the areas most likely to contain a weapon.
These include the waistline, torso, and pockets. Do not place your hands
inside the pockets—instead touch them from the outside to try to
determine if they contain a weapon. If you feel something you cannot
identify, and that could be a weapon, ask the subject what it is.
5. If you find a weapon, initiate appropriate arrest procedures. Immediately
take appropriate action based on continual threat assessment (i.e.,
stabilize, disengage and/or escalate). Example of options:
Stabilize and control the subject so that he or she cannot access it,
then remove and secure the weapon.
Disengage and arm yourself with a superior weapon while creating
distance or moving to cover, attempt to diffuse the situation with
strong verbal commands.
6. If you find a weapon, encounter resistance, or discover items that give
cause for an immediate arrest, make the arrest and proceed to search
incident to that arrest.
109
Search
You must thoroughly search all subjects in custody before transporting or turning
them over, and any time that you accept custody of a subject from another
agency. Officers have been killed by prisoners who were not thoroughly
searched, and who were able to access and use a weapon, even when
handcuffed. Thorough searching is critical to officer safety.
Important: Use appropriate personal protective equipment, such as fluid-
resistant and/or puncture-resistant gloves whenever possible.
Proper searching requires that you search all areas of the body, including parts,
such as the groin, that are ordinarily private. While this is likely to be not entirely
comfortable for either officer or subject, it is necessary because of the potential
safety risk if an area is left unsearched. A systematic and professional procedure
can minimize the discomfort associated with searching. While a same-sex
search is ideal, that is not always possible or feasible. Because ensuring the
safety of both officers and the public outweighs gender concerns in an arrest, an
officer of either sex may search a subject of either sex.
Certain basic principles apply to all searches:
Stabilize and handcuff the subject before searching.
Search systematically and thoroughly.
Search from behind the subject, not the front.
Search as many times as necessary.
If you find a weapon, assume there is another.
Here is a basic procedure for searching a subject. Remember, it is always safer
to have at least two officers present. Prior to searching, if possible, remove the
subject's hat, shoes, belt, and jacket. If the subject was handcuffed with a jacket
or coat on, open it and pull it down off the shoulders so that you can search the
torso more easily.
Note: Except as noted, use the palm, fingers extended, to search the subject's
clothing to make sure nothing is concealed underneath. When searching the
crotch (either sex) and under, on top, and between a female subject's breasts,
use the edge (thumb side) and back of your hand. You will still use your palm to
check the upper chest.
There is no need to search areas not covered by clothing.
If you feel something under the clothing or in a pocket, ask the subject what it is.
Carefully remove all items from pockets, using your fingers to pull the fabric of
the pocket toward the opening to expose the item rather than reaching in blindly
to withdraw it. Remove any items concealed under the clothing.
110
Be sure to check all areas of clothing where items could be concealed—the
linings of jackets, pants cuffs, etc.
1. Visually "search" the subject for any bulges under clothing or other
indicators of possible weapons.
2. Ask the subject if he or she has any weapons or other dangerous items
(e.g. needles) concealed on his or her person.
3. Have the subject open his or her mouth and lift the tongue, so you can see
if anything is concealed there.
4. With the handcuffed subject standing, knees bent, feet spread apart and
leaning forward from the waist, place yourself at the subject's 2½. With
your inside hand, grasp the subject's near hand, ready to apply
compression if needed.
5. Remove the subject's hat, if any, and set it aside. Begin to search the
upper near quadrant of the subject's body, starting by searching the hair,
then the collar, and working down the back and then the front of the
subject's torso, being sure to check under the arm and inside the
waistband. Remember, if you are searching a female, use the thumb
edge and back of your hand to check the breast area.
6. Search the arm, patting the sleeve against the skin from shoulder to wrist.
7. Search the waist area again on the near side, carefully running your
fingers inside the waistband. Overlap the areas already searched.
8. Using your palm, check the front, rear, and sides of the abdomen. Check
and empty the pants pockets.
9. Placing your inside foot just inside the subject's near foot , keeping your
stance wide and stable, use one hand to search the length of the subject's
pants leg, while maintaining a compression hold on the subject's wrist.
Switch hands to search the other side of the leg.
10. Check the crotch area. Using the thumb edge of your inside hand, check
the top of the leg at the crotch. Press firmly, but gently, upward once at the
juncture of the thigh and the hip. Then, using the back of your hand, check
the center of the crotch. Finally, again using the thumb edge of your hand
check the juncture of the other thigh and hip.
11. Check that the subject has nothing concealed in his/her sock, being sure
to check the bottom of the foot as well as the sides and toe.
12. Switch your position to the 2½ on the other side of the subject and repeat
steps 1-8, being sure that you overlap the edges of the areas already
searched.
Always maintain a professional demeanor when searching a subject. Never
make remarks that could be construed as demeaning, sexist, racist, or otherwise
inflammatory. On the contrary, continue the debriefing process during the
search.
111
ESCORT
Once you have searched the subject, you may need to escort him or her to a
vehicle or other location. Because the subject does not have the use of his or
her hands, you must be sure that you maintain physical contact with the subject
at all times, to prevent injury if he or she should stumble or trip.
How cooperative the subject is will determine the degree of control you exercise
in the escort. Depending on the circumstances, any of the following may be
appropriate:
Blanketing the arm
A rear escort position (inside hand grasping the subject’s near hand,
outside hand on the arm)
A rear compliance hold
TRANSPORT
If you must transport an arrested person to another location, such as a jail, you
are responsible for that individual's safety during transport. Normally you will
transport a subject in the rear seat of your squad (transporting in the front seat is
not recommended, because of safety issues). To place and secure the subject in
the vehicle, follow this procedure:
1. If you have a screen or cage, ensure that it is secured in place.
2. Open the passenger-side rear door of your squad and have the subject
carefully sit on the edge of the seat. If the subject is handcuffed, place
your hand over the subject's head to prevent it from hitting the top edge of
the door opening.
3. Assist the subject to move his or her head inside the vehicle.
4. Direct the subject to lift his or her feet into the vehicle. If the subject is
resistive, you may have to place the feet inside—be careful to avoid being
kicked.
5. Secure the subject's seat belt. If another officer is available, have him or
her positioned on the opposite side of the subject, so that you can hand
the seatbelt to the other officer, who can then secure it. If you are alone,
stabilize the subject's head and upper body with your forearm while you
secure the seat belt across the subject.
6. Monitor the subject during transport. Be sure that if the subject is ill or
injured, he or she has been medically screened before transport.
To remove a subject from a transport vehicle, reverse the process.
112
TURNOVER/RELEASE
When you turn over a subject to jailers or other authorities, or when a handcuffed
subject is to be released, you must safely remove the handcuffs. Two methods
are available, depending on the degree of compliance the subject exhibits:
Compliant subject handcuff removal
Multiple officer handcuff removal
Compliant Subject Handcuff Removal
This method is appropriate with a cooperative subject. You should nevertheless
have a cover officer present. Similar to Compliant Subject Handcuffing, you will
verbally stabilize the subject before removing the handcuffs. To apply the
technique:
1. Advise the subject that you are about to remove the handcuffs.
2. Order the subject to face away from you, feet apart, to look away from
you, and to remain this way throughout the procedure.
3. Move to the subject's Level 3, and assume a ready stance.
4. With your reaction hand, grasp the left hand. With your strong hand, open
and remove the left cuff. Note: It may be necessary to raise the hands
(direct the subject to lean forward to make this easier) to gain access to
the keyhole.
5. Close the left cuff and direct the subject to place his/her left hand on top of
the head, palm facing up.
6. With your reaction hand, establish a handcuff grip on the chain (or grasp
the free cuff) and rotate the cuff and subject's wrist counter-clockwise.
7. Move to the subject's 2½, extend and lift the arm up to your eyes so that
you can see the cuff and the subject.
8. Remove the handcuff, and order the subject to place the right hand on top
of the head, palm facing up.
9. Order the subject to remain motionless while you disengage.
Multiple Officer Handcuff Removal
If a subject is very resistive and aggressive, or has previously been violent,
evaluate whether it is appropriate to remove the handcuffs at all. If you
determine that it is appropriate, use the following technique, which is designed
for uncooperative subjects. Be sure that the subject has been stabilized by
several officers before handcuff removal. To apply the technique:
1. Have two officers establish rear escort holds, one on each side of the
subject, at the subject's 2½.
2. If a third officer is available, he or she should take up a defensive stance
at the subject's level 3, stabilizing the subject with the reaction hand on the
subject's upper back (not spine). This officer may need to stabilize the
head and/or apply pressure points.

113
3. Stabilize the subject against a wall or other flat surface. Place the
subject's chest against the surface, and have the officers on either side
using their inside shoulders to stabilize the upper body and their inside
knees to stabilize the subject's knees against the surface.
4. Remove the handcuffs, ensuring that the subject remains stabilized with
rear escort holds.
5. After the handcuffs have been removed, officers must coordinate their exit
from the cell or other containment area.
DOCUMENTATION
One of the most important steps in managing any emergency is documenting it.
Your report serves to document the event, including any use of force. Your
actions will be reviewed based, at least in part, upon your report. The report
format below will help ensure that your use of force includes the Graham v.
Connor reasonableness factors specified by the U.S. Supreme Court, including:
the severity of the crime at issue
whether the suspect poses an immediate threat to the safety of the
officers or others
whether the suspect is actively resisting arrest or attempting to evade
arrest by flight
Use of force reports should follow the following format:
1. Describe. Describe the physical and environmental factors that you
observed. Use plain English or layman's terms.
2. Identify. Explain what your trained observations told you. Use DAAT
terminology, i.e. early warning signs, pre-attack postures etc.
3. Forced Actions. Explain what your trained observations forced you to
do. What trained technique or dynamic application you used.
SUMMATION OF WHAT HAPPENED IN CHRONOLOGICAL ORDER
I. Background Information
A Day/date/time
B Location/address/specific area
C Officer(s) involved
D Subject(s) involved
E Witness(es)

114
II. Approach Considerations
A Decision making–why did you initiate contact? (i.e. justification and
desirability)
1. Dispatched / duty assignment / uniformed
2. Reasonable Suspicion
3. Probable Cause
4. Other reasons
B Tactical Deployment -- how did you approach?
1. Control of distance
2. Relative Positioning
3. Relative Positioning with Multiple Subjects
4. Team Tactics
C Tactical evaluation–– what were your perceptions?
1. Threat Assessment Opportunities
a Types of Resistance - Describe what the subject did
Passive Resistance - Non-compliant and non-threatening
behavior.
“Smith continued to conspicuously ignore my commands to stand up. He
had a blank stare on his face and wasn’t moving as I was speaking to
him. It was obvious that I was making no progress with him verbally.
Based on his non-compliant behavior I was forced to physically move
Smith from the seated position to my squad car. I blanketed his left arm
and assisted him to a standing position. As I did this he did not assist
me, and I was forced to manage his weight…”
Active Resistance - Behavior which physically counteracts an
officer’s control efforts and which creates a risk of bodily harm to
the officer, subject, and/or other person.
“Immediately upon making contact with Smith’s arm he quickly pulled it
closer to his body, trying to break my grasp. While doing this he also
turned his body away from me which made this motion even stronger. I
recognized this behavior as being active resistance as he was
counteracting my effort to control him. I was unable to control him and
he forced me to…”
Continued Resistance - Maintaining a level of counteractive
behavior that is not controlled by an officer’s current efforts.
“After making contact with the ground I attempted to stabilize Smith
with my body weight. Smith began to push off of the ground and I
was unable to keep him on the ground. As he pushed off I could feel
that I was losing my position of advantage. I recognized this
behavior as continued resistance as he was maintaining this
counteractive behavior…”
b Early Warning Signs - Signals or certain behaviors provided by the
subject that are often associated with a high level of danger to
officers.
Early Warning Signs
Term
Example Narrative
Conspicuously
Ignoring
“Smith continued to walk away from me as I ordered him to stop. I was in
full police uniform and stepping out of a marked police squad with

115
emergency lights operating. It was obvious that he heard me but he kept
on walking away from me. I recognized this behavior as being an early
warning sign called conspicuously ignoring. Early warning signs are
subject behaviors that are often associated with a higher level of danger
to officers.”
Excessive
Emotional
Attention
“As Smith turned around she shouted at me, “Leave me the fuck alone!”
She looked very angry; she bared her teeth and glared at me. I
recognized this behavior as being an early warning sign called excessive
emotional attention. Early warning signs are subject behaviors that are
often associated with a higher level of danger to officers.”
Exaggerated
Movement
“Smith threw both of his arms out to the side as he approached me. He
pushed his chest forward and kept his arms out while he continued to
glare at me. I recognized this behavior as being an early warning sign
called an exaggerated movement. Early warning signs are subject
behaviors that are often associated with a higher level of danger to
officers.”
Ceasing All
Movement
“During my entire contact with Smith he was pacing back and forth. He
was obviously agitated as we waited for his information to come back on
the radio. Suddenly he stopped moving as my radio began to receive a
transmission from dispatch. I recognized his behavior of ceasing all
movement as being an early warning sign. Early warning signs are
subject behaviors that are often associated with a higher level of danger
to officers.”
Known Violent
Background
“After advising dispatch of Smith’s information for a warrant check Officer
Jones provided information to me. Jones advised me to proceed with
caution while dealing with Smith as he had fought with officers in the past.
Based on my training and experience Smith’s known violent background
was an early warning sign. Early warning signs are subject behaviors that
are often associated with a higher level of danger to officers.”
c Pre-attack Postures – Behavior which may indicate imminent
danger of physical assault?
Pre-Attack Postures
Term
Example Narrative
Boxer Stance
“Smith took a step back and brought both of his hands up to the area of
his face. His hands were clenched in fists and he glared at me. I
recognized this behavior as a pre-attack posture called a boxer stance.
Pre-attack postures may indicate imminent threat of physical assault.”
Hand Set
“Smith pushed his chest out towards me as he clenched his fists while
they were at his sides. While doing this I saw his nostrils flare as if he
was breathing heavy. I recognized this behavior as a pre-attack posture
called a hand set. Pre-attack postures may indicate imminent threat of
physical assault.”
- or-

116
“Smith stepped back with his right foot while bringing his hands up in front
of his chest. His hands were open and he bent forward at the waist while
bending his knees. He looked like a wrestler preparing to grab his
opponent. I recognized this as a pre-attack posture called a hand set.
Pre-attack postures may indicate imminent threat of physical assault.”
Shoulder Shift
“Smith stepped back with his right foot while pulling his right shoulder
back. He appeared to be setting up for a punch. I recognized this
behavior as being a pre-attack posture called a shoulder shift. Pre-attack
postures may indicate imminent threat of physical assault.”
Target Glance
“Smith’s focused changed from my face to my duty belt. He looked down
as I was telling him he was under arrest. I saw he was focusing his
attention on my handgun and his jaw clenched as I could tell he was also
grinding his teeth. I recognized this behavior as being a pre-attack
posture called a target glance. Pre-attack postures may indicate imminent
threat of physical assault.”
Thousand
Yard Stare
“Smith was staring right through me and it appeared as if I didn’t even
exist to him. He looked to be very angry as his face was contorted into a
scowl. I recognized this behavior as being a pre-attack posture called a
thousand yard stare. Pre-attack postures may indicate imminent threat of
physical assault.”
d Assaultive Behavior - Direct actions or conduct that generates
bodily harm.
“Smith suddenly turned and faced me. Upon completing this turn he brought
both of his hands up and shoved me backward into the wall that was
approximately 2 feet away. I felt the wind get knocked out of me, and felt a
great deal of pain in the area of my back when I impacted the wall. Smith’s
sudden assault forced me to …… in order to defend myself.”
e Subject apparently "Emotionally Disturbed", i.e. mentally ill, under
of influence of a drugs and/or alcohol, is obviously in crisis and out
of control, or exhibiting signs of medically significant behavior?
Explain.
f Weapon Threat Assessment -- what weapons have you brought to
the scene? What weapons has the subject brought to the scene?
What other weapons are available? Explain
2. What were the Officer(s) / Subject(s) Factors?
a Number of Participants
b Individual Factors: Subject’s Officer’s
Officer/Subject Factors
Factor
Example Narrative
Age
“Smith was approximately 18-23 years of age and was obviously 10-15
years younger than me. Based on this age difference I was forced to
access my baton and expand it into a loaded position as the situation

117
became more volatile…”
Size
“Smith was approximately 6’5” and had a very athletic build. I would
estimate his weight to be between 250-265 pounds. I am only 5’10” and
175 pounds. The drastic size difference between us forced me to access
my baton and expand it. Upon doing so I brought my baton into a loaded
position and administered 3-5 baton strikes…”
Relative
Strength
“Smith was approximately 6’0” and had a very athletic build. I am a
female officer who is only 5’7” and 125 pounds. The obvious difference in
our strength level forced me to access my baton and expand it. Upon
doing so I brought my baton into a loaded position and administered 3-5
baton strikes…”
Skill Level
“I immediately recognized that Smith was the owner of a local martial arts
studio. I relayed this information to Officer Johnson and we both
observed that Smith was temporarily distracted by the noise behind him.
Based on Smith’s skill level we used this distraction as a window of
opportunity to control Smith. We directed him into the wall behind him
while shouting “down!” After his contact with the wall we were able to
direct him to the ground…”
3. Special Circumstances - Factors or situations that may justify rapid
escalation of force or selection of higher force options?
Special Circumstances
Term
Example Narrative
Reasonable
Perception of
Threat
“Smith opened his jacket and I observed an object sticking out of his
waistband. It appeared to be a dark colored handle with the rest of the
object concealed. Based on my training, experience, and the limited
information that I had, I believed that Smith was armed with a knife.”
Sudden
Assault
“Upon entering the room I was immediately knocked to the ground by
Smith. He had slammed his shoulder into my right arm and knocked me
to the ground. I was not prepared for this sudden assault and knew that I
had to use a high level of force to protect myself from further assault. I
was trained that situations like this are referred to as special
circumstances and justify a rapid escalation in force.”
Your Physical
Positioning
“Smith had knocked me to the ground and was positioned over me as I
was on my back. It was clear that he had the position of advantage.
Based on my training I was aware that this situation was a special
circumstance that justified a rapid escalation in force.”
Subject’s
Ability to
Escalate
Force Rapidly
“While attempting to control Smith he grabbed my holstered handgun with
one of his hands. Based on my training and experience I knew that he
had the ability to escalate force rapidly with access to my firearm. A
special circumstance like this justified a rapid escalation in force, as it was
out of control.”
Your Special
Knowledge
about the
“I recognized Smith from prior violent contacts in the past. I was aware
that he had fought with officers in the past. I was also familiar with his
training in the martial arts as he is one of the owners of Main Street

118
Subject
Karate Studio on West Main Street. I immediately displayed a higher
level of force by expanding my baton while instructing Officer Jones and
Johnson to do the same.”
Your Injury or
Exhaustion
“Upon making contact with the ground I felt a great deal of pain in my right
leg. I heard a tearing sound and knew immediately that I had sustained a
seriously injury to my knee. Smith was still under my body, but trying to
push me off of him by directing his weight towards me. Based on my
training I knew that my injury was a special circumstance that drastically
decreased my efficiency and thus justified a rapid escalation in force.”
The
Availability of
Back-up
“Upon making contact with the ground I felt Smith under my body, but
quickly trying to push me off of him by directing his weight towards me. I
had not been able to call out my location nor call for back-up. Based on
my training I knew that this situation was a special circumstance and I had
no available back-up. This situation justified a rapid escalation in force in
order to take control of Smith.”
Equipment or
Training
“I drew my ECD and pointed it at Smith while turning the safety off. The
ECD did not light up and it was obviously not working. Based on the
special circumstance that my ECD was not working I was forced to use a
higher level of force to control Smith.”
Other Special
Circumstances
“I was forced to decentralize Smith on the small median area that divides
traffic for right turns onto Main Street. Immediately upon making contact
with the ground he displayed active resistance by pushing off of the
ground to keep me from stabilizing him. We were surrounded by fast
moving vehicles and on all sides and if I was directed off of Smith I would
be thrown into traffic. Based on this special circumstance I was force to
rapidly escalate force in order to protect myself and gain control.”
4. Describe the Level/Stage/Degree of Stabilization achieved at each
point of the disturbance:
a Presence Stabilization -- describe type and degree that the officer's
or officers' physical presence stabilized the scene
b Verbal Stabilization -- describe type and degree that the officer's
verbal commands stabilized the scene
c Standing Stabilization -- describe type, degree of stabilization, and
if restraints were on yet
d Wall Stabilization -- describe type, degree of stabilization, and if
restraints were on yet
e Ground Stabilization -- describe type, degree of stabilization, and if
restraints were on yet
f Special Restraints -- describe type, degree, and degree of
immobilization
III. Intervention Options - Purpose
A Presence – To present a visible display of authority

119
B Dialog – To verbally persuade
1. What did the subject say? If possible, use direct quotes.
2. What did you say? If possible, use direct quotes.
C Control Alternatives – To overcome passive resistance, active resistance
or their threats
Control Alternatives
Tactic/Tool
Example Narrative
Escort Holds
“Based on his behavior I was forced to physically control Smith. I
blanketed his right arm and said, “Please cooperate.” Upon contact
with Smith his arm stiffened. I moved into an escort hold to overcome
this resistive tension and said, “Stop resisting!”
Compliance
Holds
“As I had Smith in an escort hold he displayed active resistance in the
form of trying to pull his arm out of my grasp. This behavior forced me
to place his right wrist in a compliance hold to overcome his resistance.
As I did this I yelled, “Stop resisting!”
- or -
“Smith was on the ground with Officer Jones on one side and Officer
Johnson on the other. Smith was flailing his body all over as the
officers tried to control him. Based on his continued resistance I
assisted in controlling Smith. I moved to his head and blanketed it
while shouting, “Stop resisting!” Smith continued to resist as he moved
his head back and forth to try and break my grasp. Based on his
continued resistance I applied the mandibular angle pressure point to
Smith. I applied it for 3-5 seconds while shouting, “Bring your hands
behind your back!” After doing this twice Smith complied and his
hands were controlled and handcuffed.”
Control Device
ECD Contact
Deployment
“Based on Smith’s behavior I was forced to use my ECD to control him.
I applied a contact deployment to the area of Smith’s left leg, just
below the back of his knee. While doing this I shouted “Stop resisting!”
Control Device
ECD Distance
Deployment
“Based on Smith’s behavior I was forced to use my ECD to control him.
I pointed my ECD at him and deployed it from a distance. The probes
appeared to make contact in the area of Smith’s right shoulder blade
and the right side of his buttocks. I observed that the deployment was
successful as his back stiffened up and he lowered himself to the
ground. While doing this I shouted, “Get down!”
-or-
“While attempting to stabilize Mr. Smith against the wall for handcuffing
he used his hands to push himself away from the wall. He shouted
“I’m not going to jail pig! I recognized this action as active resistance. I
was unable to control Smith using my body weight and strength and he
continued to push off the wall. Based on his actions Smith forced me
to access my ECD and deploy it into his right leg. As I deployed the
ECD I yelled, “Hands behind your back!” During deployment Officer

120
Jones and I were able to direct Smith’s hands behind his back, and
stabilize him for cuffing.”
Control Device
O.C.
“Based on Smith’s behavior I was forced to use my OC to control him.
I pointed my OC at him and sprayed into the area of his face. While
doing this I shouted, “Get down!” I observed the OC make contact, and
Smith immediately covered his eyes with his hands bent at the waist.
Passive
Countermeasures
“I had secured a hold of Smith’s right arm in the area of his bicep.
However, because of his active resistance I was unable to control him
in a standing position. He was pulling his arm away from my grasp
and taking me off balance. Based on this resistive behavior I was
forced to decentralize Smith. I pulled his arm close to my body and
lowered my center along an arc. While doing this I controlled Smith’s
rate of descent, and his other hand was free to protect his head as he
was decentralized.”
D Protective Alternatives - To overcome continued resistance, assaultive
behavior or their threats
Protective Alternatives
Tactic/Tool
Example Narrative
Active
Countermeasures
“Based on Smith’s behavior I was forced to use active
countermeasures to create dysfunction and overcome his continued
resistance. I was on his left side and unable to prevent him from
pushing off of the ground. He was moving from a prone position into a
standing position. I directed 3-5 knee strikes into the lower portion of
his abdomen, on his left side. While doing these strikes I shouted,
“Hands behind your back!” multiple times. After administering the
strikes his resistance decreased and I was able to secure him on the
ground.”
Incapacitating
Techniques
“I was positioned on my knees with Smith’s hands on the backs of my
knees. My hands were on his upper back and I was unable to stop his
assault, as he continued to try and pull me onto the ground. I was
forced to use a diffused strike to cause an immediate cessation of
Smith’s violent behavior. I used my left arm to direct his head slightly
to the side and stabilize it for the strike. I then directed 2-4 strikes into
the brachial plexus area of Smith’s left side. I used my right forearm as
the striking surface and shouted, “Stop!” each time. Smith
immediately, and uncontrollably, fell to the ground from his knees.”
Intermediate
Weapons
“I had my baton in a loaded position and again shouted, “Get down!”
Smith continued to glare at me with his hands in fists by his face.
Based on the imminent threat of physical assault I was forced to
administer 3-5 baton strikes to his knee area. While doing this I
shouted, “Get down!” At the completion of the strikes Smith fell to the
ground.”

121
E Deadly Force – To stop the threat
An officer’s deadly force incident may not be memorialized in a written
report, as some officers, agencies, and/or district attorneys prefer the
involved officer to be interviewed. However the below documentation
concepts can be used for either option.
Deadly Force
Tactic/Tool
Example Narrative
Deadly Force:
Example A
Describe
“She was working the action of a silver handgun. The noises of Smith
cycling the action of the handgun increased my perception of threat
because I saw her making the weapon fire ready. She had fired the
weapon multiple times before at officers, and I felt that she was preparing
to shoot again. I feared for my life and felt deadly force was imminent. I
also thought that she would shoot me or at Officers Jones and Johnson
because our positions had been revealed to her. I have been a police
officer for over seven years and a member of the PD’s Tactical Unit for
over three years. I've experienced numerous situations with the threat of
deadly force and this is the most that I feared for the lives of myself and
fellow officers. Suddenly Smith raised the silver handgun while looking at
me. She had a clear line of sight unobstructed by cover. It was obvious
that she was going to shoot me as the gun was being brought to eye level
and a shooting position.
Identify
Based on my training, experience and totality of the circumstances I
believed that Smith was displaying behavior which was imminently
threatening death to me. Smith displayed all three components of
imminence within the DAAT system. She had the weapon (gun), the
intent (pointing the gun at me), and the delivery system (a line of sight
unbroken by cover).
Forced Actions
I could see her clearly, and saw she was posing imminent danger of
death. There were no other persons in my line of fire. At this point I was
forced to fire my weapon to stop the threat that Smith posed. My point of
aim was the region of her upper chest. After I shot I saw her fall down
and I immediately reassessed the threat. I then determined that she was
no longer an imminent threat and I ceased firing.”
Deadly Force:
Example B
Describe
“After coming to a complete stop, I exited my squad and immediately
heard gunfire. I looked in the direction of the suspect vehicle and saw a
man exiting the driver's door and pointing a handgun in the direction of a
marked squad, which was parked on the shoulder of the road
approximately 75 feet away. I could hear several gunshots going off and I
believed Officer Jones was the officer closest to the suspect. I ran around

122
to the front of my squad to seek cover and still observed the suspect firing
shots in the direction of Officer Jones. The suspect then ran to the rear of
his vehicle and hunched down behind the trunk and periodically would
pop up and down and fire his gun in the direction of Officer Jones.
Identify
The suspect's action of firing a gun at Officer Jones posed an immediate
threat of death or great bodily harm to Officer Jones.
Forced Actions
The suspect’s actions forced me to fire my duty weapon at the suspect to
stop the threat. The suspect left me no other viable alternatives that
would have been effective at stopping the threat to Officer Jones.”
Deadly Force:
Example C
Describe
“I didn’t know which officer was in front of me. I only had time to react as
everyone (the officer to my front, the driver of the fleeing vehicle, and
myself) got out of our vehicles nearly simultaneously. I immediately saw
the suspect point a silver object at the officer to my front. I could hear
repeated “pop” sounds and saw whitish puffs of smoke emanate from the
silver object. I witnessed this gunfire violence directed at my fellow
officer.
Identify
As fast as I could react I was forced to stop this ongoing threat with
deadly force. There was absolutely no time to consider verbal
commands. I feared the officer to my front was in imminent danger of
great bodily harm or death as the result of hostile gunfire. I knew I was
also in immediate danger of death or great bodily harm.
Forced Actions
In order to obtain target acquisition I was forced to leave portions of my
upper torso and head exposed. I had target isolation as I only had a
grassy field beyond my target. Target identification was described above.
I repeatedly fired at the suspect until his imminent threat ceased.”
Deadly Force:
Example D
Describe
“Smith charged at me very quickly, rapidly closing the short distance
between us. Based on this sudden assault I was unable to disengage, as
his speed would easily overtake me if I turned around. I yelled at Smith,
"Stop! Show me your hands!" Smith was closing fast and was
approximately one-half car length away from me. His right hand was still
concealed under his jacket and his right wrist was canted as if he was
holding a straight object. The motion was consistent with the cross
drawing of a weapon.
Identify

123
Based on my training and experience, I believed that I was in imminent
threat of death. Smith was within two steps of being able to stab me,
clearly within the danger zone of a knife attack. There was no cover
between us and I could not disengage to obtain cover. I believed that he
had a knife and was preparing to stab me as he had just recently stabbed
the victim. I based that on the fact that not only was he attempting to
retrieve a knife, but was also closing the distance, which was required to
complete his knife assault.
Forced Actions
I was unable to disengage. I drew my firearm while stepping backwards.
Smith actions forced me to shoot. I fired multiple shots at Smith to stop
the threat he presented.”
Target
Specific
Directed Fire
Describe
“…a fourth shot ran out and hit something only a few feet away from
where Officer Jones and I were standing in the garage. (I later learned
this shot hit the garage door about two feet from where I was standing,
and traveled past us and hit the truck parked behind us inside the
garage.) At this time the residents of 17 W. Main St. were inside the
house and were susceptible to being shot by gunfire from the residence at
16 W. Main St.
Identify
Having saw debris come off whatever the bullet had hit, traveling from 16
W. Main St. towards Officer Jones, I became very fearful for my life and
the lives of Officer Jones and Deputy Johnson.
Forced Actions
Within a moment of the shot being fired, I stepped out from behind my
cover just a little bit. I knew that Smith was the only person in the suspect
residence, that Deputy Johnson saw the muzzle flash in the back
bedroom window of 16 W. Main St., and that other officers on the inner
perimeter had confirmed that other rounds had come out of that bedroom.
I was forced to take a shot at where I believe Smith was firing at us from.
I aimed my rifle and took a shot, trying to put it through the wall
underneath the window, believing that Smith was either on the floor or
behind this wall.”
Note: The use of any force option is dependent on the officer's Tactical
Evaluation of the situation that is based on Threat Assessment Opportunities,
Officer(s)/Subject(s) Factors, and Special Circumstances.
IV. Follow-thru Considerations
A Stabilization––Application of Restraints, if appropriate
B Monitoring / Debriefing
C Searching, if appropriate
124
D Escorting, if necessary
E Transportation, if necessary
F Turnover––Remove Restraints, if necessary
V. Investigative Findings
A Background Information
B Medical / Psychological History
C Booking Information
D Post-booking Information
E Other Information

125
PROTOCOLS FOR OFF-DUTY ACTIONS
The Law Enforcement Standards Board is authorized by statute to recommend
protocols for official action by off-duty officers. The purpose of this document is
to identify some of the issues that may be a consideration for agencies when
drafting policy for official action by off-duty officers and to offer recommended
procedures for officers to follow when taking action.
POLICY CONSIDERATIONS
In order for a law enforcement officer to provide assistance when not on duty, the
officer’s agency must have established written policies identifying the types of
conditions that warrant action and the appropriate actions to take. The following
section outlines the specific issues that need to be considered when an off-duty
officer provides assistance outside of the officer’s jurisdiction. No specific statute
addresses off-duty actions within the officer’s jurisdiction; however, it appears
appropriate that these guidelines would be followed for those situations as well.
Off-Duty Assistance Outside of an Officer’s Jurisdiction
Wisconsin Statute §175.40(6m)(a) states that an off-duty law enforcement officer
may arrest a person or provide aid or assistance outside of his or her jurisdiction
but in the state if all of the following criteria are met.
the officer is responding to an emergency situation that poses a significant
threat to life or bodily harm;
the officer is taking action that he or she would be authorized to take
under the same circumstances in the officer’s territorial jurisdiction;
the officer’s supervising agency has adopted written policies authorizing
off-duty officers to make arrests or provide aid or assistance outside the
agency’s territorial jurisdiction but in the state;
the supervising agency’s policies address reasonable responses to an
emergency situation that poses a significant threat to life or bodily harm;
the supervising agency’s policies address arrests made in response to an
emergency situation;
the supervising agency’s policies address notification of and cooperation
with a law enforcement agency of another jurisdiction regarding arrests
made and other actions taken in the other jurisdiction; and
the officer’s action is in compliance with the policies of the supervising
agency.
The guidance provided by this statute clearly directs an agency to establish
policies and procedures for off-duty actions. It should be noted, however, that a
supervising agency may limit its officer’s authority to act under this subsection by
including limitations in the written policies of the agency.

126
Liability for Off-Duty Officers Outside of the Officer’s Jurisdiction
Civil liability, criminal liability, and worker’s compensation issues are serious
concerns that may influence an agency’s policy considerations when developing
off-duty protocols. Because of this, Wisconsin statute §175.40(6m) was drafted
to attempt to identify some of the main issues that agencies are likely to
encounter when setting policy for off-duty actions by officers outside of the
officer’s territorial jurisdiction.
Wisconsin Statute §175.40(6m)(c)1. states that for purposes of civil and criminal
liability and for purposes of s. 895.46, an off-duty law enforcement officer acting
outside of his or her jurisdiction but in the state is considered to be acting in an
official capacity as an officer of the state, state employee, or agent of the state.
Wisconsin Statute §175.40(6m)(c)2. states that for purposes of worker’s
compensation under chapter 102, an off-duty law enforcement officer acting
outside of his or her jurisdiction but in the state is considered to be an employee
of the state and the officer is eligible for the same benefits as if the officer had
sustained the injury while performing services growing out of and incidental to the
officer’s employment with the employing supervisory agency.
Wisconsin Statute §175.40(6m)(c)3. states that an off-duty officer acting outside
the officer’s territorial jurisdiction as authorized under 175.40(6m) is considered
to be performing his or her duty and engaging in his or her occupation.
CONSIDERATIONS FOR OFF-DUTY CARRY
One of the main issues that agencies will need to consider is whether or not
officers are authorized to carry a weapon or weapons when they are off duty. If
an agency authorizes off-duty officers to carry there are several guidelines that
officers who elect to carry should consider. These include:
Proper law enforcement identification is necessary if an off-duty officer is
carrying a concealed weapon. This identification should not be contained
in the officer’s main wallet. A sterile civilian wallet and a separate
credentials wallet should be carried so officers do not inadvertently display
their credentials when paying for items.
Have the gun on your person where only you can get to it. It is not
appropriate to leave it under the seat of your car or in a place that is not
immediately accessible. Think of it like a seatbelt. When you need it, you
won’t have time to put it on.
An officer’s off-duty gun should be similar to the on-duty gun in style and
method of operation. If it is much different than what is used 90% of the
127
time, the officer will likely have more problems with its use in a high
intensity situation.
Carry at least one spare magazine, a flashlight, and, if possible, an
intermediate level of force, i.e. a baton or OC and restraints.
Make every attempt at carrying the gun in the same place as your duty rig.
Adjust your style of dress to carry, don’t adjust your carry to the style of
your dress. Remember, concealment is inversely proportional to
accessibility.
Invest in a quality concealed carry rig. Your concealed carry rig should be
a stable platform, with the holster matching the belt. The higher quality
designed CCW rigs are more comfortable, stable, secure, and therefore
will conceal better and more comfortably.
Do not act like you are on duty in uniform when you are off-duty. You
most likely do not have a radio, vest, multiple handcuffs, spray, ECD,
baton, cage car, and lots of backup. You might be in an area where you
won’t immediately be recognized as a police officer by those on duty.
Discuss “what if” scenarios with loved ones, so that they know what to do
if you should become involved in an incident requiring use of your off-duty
weapon.
Do not use alcohol or go to bars if you are carrying and off-duty.
Be a good witness to criminal activity off duty. Carry a cell phone and call
911 immediately. Let the officers who are on-duty handle it.
Do not attempt to intervene unless it is absolutely necessary to protect the
health and safety of innocent people.
Identify yourself as an armed, off-duty officer to any on-duty officers you
have contact with, regardless of circumstances.
If you choose not to carry a weapon when you are off-duty, don’t carry
credentials or anything that would identify you as an officer in your main
wallet. Carry a sterile civilian wallet and a separate credentials wallet so
you do not inadvertently display your credentials when paying for items.
CONSIDERATIONS FOR INTERVENTION
There are a number of issues which need to be taken into consideration when
faced with a situation that warrants off-duty officer intervention. Some of these
issues are:
A law enforcement officer’s off-duty action must be objectively reasonable
in any given situation. All aspects of the situation including the officer’s
own abilities, training, and experience, availability of equipment and a risk
assessment must be taken into consideration prior to deciding on a course
of action. In some instances, it may be more beneficial for an off-duty
officer to be a good witness, rather than to make an attempt to detain or
arrest.
No personal involvement. An officer shall not make any arrest or take any
enforcement action when they are personally involved in the incident
128
leading to the arrest – that is, where it involves a personal matter between
the officer, his family members, or friends and other parties. The personal
involvement prohibition is geared towards ascertaining whether, for liability
purposes, the officer was truly acting within the scope of his employment.
In addition, such scenarios present potential high-risk situations for the off-
duty officer. This does not apply to situations where the officer is a crime
victim.
Employment of a non-law enforcement nature will fundamentally change
the responsibilities of an off-duty officer. If actions to be taken only further
the interest of the non-law enforcement employer, an arrest by an off-duty
officer is inappropriate. In this setting, a law enforcement response is only
appropriate for emergency situations that pose a significant threat to life or
bodily harm.
Use of alcohol can severely impair an off-duty officer’s decision-making.
Therefore, if you have been drinking you are strongly discouraged from
becoming involved in a law enforcement situation.
The presence of the off-duty officer’s family members will limit the ability of
an officer to effectively intervene in a situation. Officers need to have a
plan worked out in advance with family members that provides direction
for them when a situation occurs. At the very least, this plan should
include directions for the family members to contact on-duty authorities
and to not intervene.
Potential Pitfalls to Physical Intervention
Off-duty officers are often faced with situations involving criminal conduct that
they are neither equipped nor prepared to handle in the same manner as if they
were on duty. This may lead to unnecessary injuries to off-duty officers, and
confusion for those on-duty officers arriving at the scene trying to correctly
assess the facts. In addition, there have been a number of documented
incidents of off-duty officers being killed by on-duty personnel because the on-
duty personnel were unaware that the individuals were off-duty officers.
ON-DUTY OFFICER CONSIDERATIONS
On-duty officers who come into contact with armed plainclothes subjects don’t
know whether the person is an off-duty, retired, or plainclothes officer; a licensed
concealed carry permit holder; or even an armed criminal. For this reason,
standard precautions should be followed by on-duty officers when being
confronted with an individual who claims to be an off-duty, retired, or
plainclothes/undercover officer.

129
Tactical Evaluation
As part of tactical evaluation, an officer is required to analyze the potential
hazards in a contact. In any situation where an individual that the on-duty officer
does not know says that they are also an officer, the on-duty officer has to make
a determination as to whether the individual is telling the truth.
27
In situations
where the individual is believed to be armed with a weapon, the threat
assessment should be high. It is possible that non-law enforcement personnel
could identify themselves as officers in order to provide an opportunity to escape
or attack the on-duty officers.
Tactical evaluation is not a one-time thing. Officers must continually reassess
the level of threat throughout the encounter. Situations are not static-they can
change in an instant. Officers need to remain aware and able to adapt to
changing circumstances. Staying alert for any indications that the situation has
changed is necessary in order to respond appropriately.
Appropriate Responses to Persons Who Indicate They are Off-Duty Officers
Your initial response to individuals who indicate that they are off-duty or retired
officers should be consistent with how you treat other individuals. Off-duty and
retired officers should not be granted any special favors. However, if an off-duty
officer is attempting to assist with the apprehension of a suspect or suspects, it is
reasonable to request that they fill a back-up role.
If an armed individual has drawn or used a weapon, it is appropriate for you to
order the person to drop the weapon, handcuff the individual and search them
(using the principles of cover, concealment, and distance to maintain a position
of tactical advantage). Once you have fully gained control of the scene, you
have the opportunity to make the determination as to whether the person is a law
enforcement officer, concealed carry licensee, or other armed individual.
Off-duty officers must understand that the uniformed response always has
primary authority. The off-duty officer must be compliant and follow all
commands from on-duty personnel without delay or question. This is strongly
emphasized to avoid the off-duty officer from being mistaken for an armed
suspect.
PROCEDURAL GUIDELINES FOR OFF-DUTY OFFICERS
Procedural guidelines are necessary to promote the safety of off-duty officers
who intervene in a situation when they are not likely to be recognized by other
officers. For this reason, agencies should provide guidance to their officers for
the types of off-duty responses that are appropriate.
130
Intervention Considerations or Protocols
The following steps should be used as a guide for off-duty officers who are
placed in a situation where intervention is necessary. The complexity of any
individual situation will guide the actions of an off-duty officer. Therefore, these
steps are not absolute. Rather, the details of the situation will drive the steps that
are to be taken and the off-duty officer will need to modify his or her behavior to
arrive at an acceptable outcome.
When practical, contact the law enforcement jurisdiction prior to
intervening. Provide the following information:
o What is occurring
o Where it is occurring
o Identify yourself as an off-duty officer who is armed and provide a
description of yourself
o Provide a description of the subject or subjects
o Identify that you intend to take police action
Example: “This is Officer Smith with the _______ police department. I am
a white male with brown hair, wearing a white shirt and blue jeans. I am at
(location) observing an armed robbery in progress. The suspect is a white
male armed with a handgun and wearing a black shirt and black pants. I
am armed and taking action.”
Alternatively, if there is no time for you personally to contact the on-duty
law enforcement officers, request other bystanders to contact law
enforcement and instruct the bystander to notify the authorities.
When practical, identify yourself to the subject or subjects by using one or
more of the following options:
o Visual display of identification card or badge
o Verbal commands consistent with the chosen intervention option
Example: (Officer Smith moves to cover while accessing his handgun).
From cover, Officer Smith yells, “Stop! Police, drop the weapon!”
Upon initial intervention, coupled with suspect compliance and equipment
considerations, officer will determine his level of stabilization
Example: Suspect drops his weapon and is verbally directed to the
ground. Officer maintains cover and awaits back-up.
When you have taken control of the scene, have other witnesses contact
911 and instruct them to notify dispatch that you are an off-duty officer
who has taken action and need assistance. If no one else is available to
make this call, make it yourself while still maintaining control of the scene.
131
Knowing that off-duty or undercover officers have been mistaken for
perpetrators in many instances, some of which have resulted in the use of
deadly force and the death of officers involved, it is your responsibility to
make others aware that you are a law enforcement officer.
Upon arrival of on-duty officers, the off-duty officer will base his next
course of action on the level of control he/she has on the subject and
scene. The off-duty officer shall consider the following:
o The need to maintain the current level of force or threat of force
o The need to holster the weapon so that on-duty officers do not see
you with a gun in your hand
o Using caution to ensure that any movements are not perceived as
threatening toward the responding officers.
o Accessing your identification safely in order to display it to the
officers
o Verbally identify yourself as an off-duty officer and ask them what
they want you to do
o Placing both hands in plain view and identifying yourself as a police
officer
o Understand that the on-duty officers are to assume control of the
scene
o Prepare yourself to comply with their requests which may include
being handcuffed, searched, and guns pointed at you
In summary, the decision to intervene is not a simple choice; as off-duty officers
do not necessarily carry the same equipment and are not as identifiable as on-
duty officers. Placing an individual in custody or possibly engaging in an armed
encounter can be extremely challenging both emotionally as well as physically. It
is critical that off-duty officers shall follow these guidelines in order to ensure their
safety and the safety of other responding law enforcement officers.
Post-Intervention Actions
Any officer acting under the authority of this section shall remain on the scene
until being granted permission to leave from the on-duty officers. Cooperation
with the law enforcement agency of the jurisdiction in which arrests were made
and other actions taken is required. In addition, the off-duty officer shall as soon
as possible notify the officer’s supervising agency’s on-duty shift commander and
apprise him/her of the actions taken by the officer while off-duty and within
another jurisdiction.
As with all other law enforcement actions, documentation of your actions will be
required. Be prepared to document the circumstances of the situation and
actions that you took to maintain order. Clearly identify your status as an off-duty
officer who was compelled to act based on the situation that was occurring and
the need for immediate intervention.
132
THIS PAGE INTENTIONALLY LEFT BLANK
133
APPENDIX A: CASE LAW
1. TERRY V. OHIO, 392 U.S. 1 (1968)
2. GRAHAM V. CONNOR, 490 U.S. 386 (1989)
3. TENNESSEE V. GARNER, 471 U.S. 1 (1985)
134
TERRY V. OHIO
U.S. Supreme Court
TERRY v. OHIO (1968)
28
392 U.S. 1
No. 67
Argued December 12, 1967
Decided June 10, 1968
A Cleveland detective (McFadden), on a downtown beat which he had been
patrolling for many years, observed two strangers (petitioner and another man,
Chilton) on a street corner. He saw them proceed alternately back and forth
along an identical route, pausing to stare in the same store window, which they
did for a total of about 24 times. Each completion of the route was followed by a
conference between the two on a corner, at one of which they were joined by a
third man (Katz) who left swiftly. Suspecting the two men of "casing a job, a stick-
up," the officer followed them and saw them rejoin the third man a couple of
blocks away in front of a store. The officer approached the three, identified
himself as a policeman, and asked their names. The men "mumbled something,"
whereupon McFadden spun petitioner around, patted down his outside clothing,
and found in his overcoat pocket, but was unable to remove, a pistol. The officer
ordered the three into the store. He removed petitioner's overcoat, took out a
revolver, and ordered the three to face the wall with their hands raised. He patted
down the outer clothing of Chilton and Katz and seized a revolver from Chilton's
outside overcoat pocket. He did not put his hands under the outer garments of
Katz (since he discovered nothing in his pat-down which might have been a
weapon), or under petitioner's or Chilton's outer garments until he felt the guns.
The three were taken to the police station. Petitioner and Chilton were charged
with carrying [392 U.S. 1, 2] concealed weapons. The defense moved to
suppress the weapons. Though the trial court rejected the prosecution theory
that the guns had been seized during a search incident to a lawful arrest, the
court denied the motion to suppress and admitted the weapons into evidence on
the ground that the officer had cause to believe that petitioner and Chilton were
acting suspiciously, that their interrogation was warranted, and that the officer for
his own protection had the right to pat down their outer clothing having
reasonable cause to believe that they might be armed. The court distinguished
between an investigatory "stop" and an arrest, and between a "frisk" of the outer
clothing for weapons and a full-blown search for evidence of crime. Petitioner
and Chilton were found guilty, an intermediate appellate court affirmed, and the
State Supreme Court dismissed the appeal on the ground that "no substantial
constitutional question" was involved.
Held:
1. The Fourth Amendment right against unreasonable searches and seizures,
made applicable to the States by the Fourteenth Amendment, "protects
135
people, not places," and therefore applies as much to the citizen on the
streets as well as at home or elsewhere. Pp. 8-9.
2. The issue in this case is not the abstract propriety of the police conduct but
the admissibility against petitioner of the evidence uncovered by the search
and seizure. P. 12.
3. The exclusionary rule cannot properly be invoked to exclude the products of
legitimate and restrained police investigative techniques; and this Court's
approval of such techniques should not discourage remedies other than the
exclusionary rule to curtail police abuses for which that is not an effective
sanction. Pp. 13-15.
4. The Fourth Amendment applies to "stop and frisk" procedures such as those
followed here. Pp. 16-20.
(a) Whenever a police officer accosts an individual and restrains his freedom
to walk away, he has "seized" that person within the meaning of the
Fourth Amendment. P. 16.
(b) A careful exploration of the outer surfaces of a person's clothing in an
attempt to find weapons is a "search" under that Amendment. P. 16.
5. Where a reasonably prudent officer is warranted in the circumstances of
a given case in believing that his safety or that of others is endangered,
he may make a reasonable search for weapons of the person believed
by him to be armed and dangerous [392 U.S. 1, 3] regardless of whether
he has probable cause to arrest that individual for crime or the absolute
certainty that the individual is armed. Pp. 20-27.
(a) Though the police must whenever practicable secure a warrant to make a
search and seizure, that procedure cannot be followed where swift action
based upon on-the-spot observations of the officer on the beat is required.
P. 20.
(b) The reasonableness of any particular search and seizure must be
assessed in light of the particular circumstances against the standard of
whether a man of reasonable caution is warranted in believing that the
action taken was appropriate. Pp. 21-22.
(c) The officer here was performing a legitimate function of investigating
suspicious conduct when he decided to approach petitioner and his
companions. P. 22.
(d) An officer justified in believing that an individual whose suspicious
behavior he is investigating at close range is armed may, to neutralize the
threat of physical harm, take necessary measures to determine whether
that person is carrying a weapon. P. 24.
(e) A search for weapons in the absence of probable cause to arrest must be
strictly circumscribed by the exigencies of the situation. Pp. 25-26.
(f) An officer may make an intrusion short of arrest where he has reasonable
apprehension of danger before being possessed of information justifying
arrest. Pp. 26-27.
6. The officer's protective seizure of petitioner and his companions and the
limited search which he made were reasonable, both at their inception and as
conducted. Pp. 27-30.

136
(a) The actions of petitioner and his companions were consistent with the
officer's hypothesis that they were contemplating a daylight robbery and
were armed. P. 28.
(b) The officer's search was confined to what was minimally necessary to
determine whether the men were armed, and the intrusion, which was
made for the sole purpose of protecting himself and others nearby, was
confined to ascertaining the presence of weapons. Pp. 29-30.
7. The revolver seized from petitioner was properly admitted into evidence
against him, since the search which led to its seizure was reasonable under
the Fourth Amendment. Pp. 30-31.
Affirmed. [392 U.S. 1, 4]
MR. CHIEF JUSTICE WARREN delivered the opinion of the Court.
This case presents serious questions concerning the role of the Fourth Amendment in the
confrontation on the street between the citizen and the policeman investigating suspicious
circumstances.
Petitioner Terry was convicted of carrying a concealed weapon and sentenced to the statutorily
prescribed term of one to three years in the penitentiary. Following the denial of a pretrial
motion to suppress, the prosecution introduced in evidence two revolvers and a number of bullets
seized from Terry and a codefendant, Richard Chilton, by Cleveland Police Detective Martin
McFadden. At the hearing on the motion to suppress this evidence, Officer McFadden testified
that while he was patrolling in plain clothes in downtown Cleveland at approximately 2:30 in the
afternoon of October 31, 1963, his attention was attracted by two men, Chilton and Terry,
standing on the corner of Huron Road and Euclid Avenue. He had never seen the two men before,
and he was unable to say precisely what first drew his eye to them. However, he testified that he
had been a policeman for 39 years and a detective for 35 and that he had been assigned to patrol
this vicinity of downtown Cleveland for shoplifters and pickpockets for 30 years. He explained
that he had developed routine habits of observation over the years and that he would "stand and
watch people or walk and watch people at many intervals of the day." He added: "Now, in this
case when I looked over they didn't look right to me at the time."
His interest aroused, Officer McFadden took up a post of observation in the entrance to a store
300 to 400 feet away from the two men. "I get more purpose to watch them when I seen their
movements," he testified. He saw one of the men leave the other one and walk southwest on
Huron Road, past some stores. The man paused for a moment and looked in a store window, then
walked on a short distance, turned around and walked back toward the corner, pausing once
again to look in the same store window. He rejoined his companion at the corner, and the two
conferred briefly. Then the second man went through the same series of motions, strolling down
Huron Road, looking in the same window, walking on a short distance, turning back, peering in
the store window again, and returning to confer with the first man at the corner. The two men
repeated this ritual alternately between five and six times apiece - in all, roughly a dozen trips. At
one point, while the two were standing together on the corner, a third man approached them and
engaged them briefly in conversation. This man then left the two others and walked west on
Euclid Avenue. Chilton and Terry resumed their measured pacing, peering, and conferring. After
this had gone on for 10 to 12 minutes, the two men walked off together, heading west on Euclid
Avenue, following the path taken earlier by the third man.
By this time Officer McFadden had become thoroughly suspicious. He testified that after
observing their elaborately casual and oft-repeated reconnaissance of the store window on Huron

137
Road, he suspected the two men of "casing a job, a stick-up," and that he considered it his duty as
a police officer to investigate further. He added that he feared "they may have a gun." Thus,
Officer McFadden followed Chilton and Terry and saw them stop in front of Zucker's store to talk
to the same man who had conferred with them earlier on the street corner. Deciding that the
situation was ripe for direct action. Officer McFadden approached the three men,
identified himself as a police officer and asked for their names. At this point his knowledge was
confined to what he had observed. He was not acquainted with any of the three men by name or
by sight, and he had received no information concerning them from any other source. When the
men "mumbled something" in response to his inquiries, Officer McFadden grabbed petitioner
Terry, spun him around so that they were facing the other two, with Terry between McFadden and
the others, and patted down the outside of his clothing. In the left breast pocket of Terry's
overcoat Officer McFadden felt a pistol. He reached inside the overcoat pocket, but was unable to
remove the gun. At this point, keeping Terry between himself and the others, the officer ordered
all three men to enter Zucker's store. As they went in, he removed Terry's overcoat completely,
removed a .38-caliber revolver from the pocket and ordered all three men to face the wall with
their hands raised. Officer McFadden proceeded to pat down the outer clothing of Chilton and the
third man, Katz. He discovered another revolver in the outer pocket of Chilton's overcoat, but no
weapons were found on Katz. The officer testified that he only patted the men down to see
whether they had weapons, and that he did not put his hands beneath the outer garments of
either Terry or Chilton until he felt their guns. So far as appears from the record, he never placed
his hands beneath Katz' outer garments. Officer McFadden seized Chilton's gun, asked the
proprietor of the store to call a police wagon, and took all three men to the station, where Chilton
and Terry were formally charged with carrying concealed weapons.
On the motion to suppress the guns the prosecution took the position that they had been seized
following a search incident to a lawful arrest. The trial court rejected this theory, stating that it
"would be stretching the facts beyond reasonable comprehension" to find that Officer [392 U.S. 1,
8] McFadden had had probable cause to arrest the men before he patted them down for
weapons. However, the court denied the defendants' motion on the ground that Officer
McFadden, on the basis of his experience, "had reasonable cause to believe . . . that the
defendants were conducting themselves suspiciously, and some interrogation should be made of
their action." Purely for his own protection, the court held, the officer had the right to pat down
the outer clothing of these men, who he had reasonable cause to believe might be armed. The
court distinguished between an investigatory "stop" and an arrest, and between a "frisk" of the
outer clothing for weapons and a full-blown search for evidence of crime. The frisk, it held, was
essential to the proper performance of the officer's investigatory duties, for without it "the answer
to the police officer may be a bullet, and a loaded pistol discovered during the frisk is admissible."
After the court denied their motion to suppress, Chilton and Terry waived jury trial and pleaded
not guilty. The court adjudged them guilty, and the Court of Appeals for the Eighth Judicial
District, Cuyahoga County, affirmed. State v. Terry, 5 Ohio App. 2d 122, 214 N. E. 2d 114 (1966).
The Supreme Court of Ohio dismissed their appeal on the ground that no "substantial
constitutional question" was involved. We granted certiorari, 387 U.S. 929 (1967), to determine
whether the admission of the revolvers in evidence violated petitioner's rights under the Fourth
Amendment, made applicable to the States by the Fourteenth. Mapp v. Ohio, (1961). We affirm
the conviction.
I.
The Fourth Amendment provides that "the right of the people to be secure in their persons,
houses, papers, and effects, against unreasonable searches and seizures, shall not be violated . . .
." This inestimable right of personal security belongs as much to the citizen on the streets of our
cities as to the homeowner closeted in his study to dispose of his secret affairs. For, as this Court
has always recognized,
"No right is held more sacred, or is more carefully guarded, by the common law, than the right of
every individual to the possession and control of his own person, free from all restraint or

138
interference of others, unless by clear and unquestionable authority of law." Union Pac. R. Co. v.
Botsford, 141 U.S. 250, 251 (1891).
We have recently held that "the Fourth Amendment protects people, not places," Katz v. United
States, 389 U.S. 347, 351 (1967), and wherever an individual may harbor a reasonable
"expectation of privacy," id., at 361 (MR. JUSTICE HARLAN, concurring), he is entitled to be free
from unreasonable governmental intrusion. Of course, the specific content and incidents of this
right must be shaped by the context in which it is asserted. For "what the Constitution forbids is
not all searches and seizures, but unreasonable searches and seizures." Elkins v. United
States, 364 U.S. 206, 222 (1960). Unquestionably petitioner was entitled to the protection of the
Fourth Amendment as he walked down the street in Cleveland. Beck v. Ohio, 379 U.S. 89 (1964);
Rios v. United States,364 U.S. 253 (1960); Henry v. United States, 361 U.S. 98 (1959); United
States v. Di Re, 332 U.S. 581 (1948); Carroll v. United States, 267 U.S. 132 (1925). The question is
whether in all the circumstances of this on-the-street encounter, his right to personal security was
violated by an unreasonable search and seizure.
We would be less than candid if we did not acknowledge that this question thrusts to the fore
difficult and troublesome issues regarding a sensitive area of police activity - issues which have
never before been squarely presented to this Court. Reflective of the tensions involved are the
practical and constitutional arguments pressed with great vigor on both sides of the public debate
over the power of the police to "stop and frisk" - as it is sometimes euphemistically termed -
suspicious persons.
On the one hand, it is frequently argued that in dealing with the rapidly unfolding and often
dangerous situations on city streets the police are in need of an escalating set of flexible
responses, graduated in relation to the amount of information they possess. For this purpose it is
urged that distinctions should be made between a "stop" and an "arrest" (or a "seizure" of a
person), and between a "frisk" and a "search." Thus, it is argued, the police should be allowed to
"stop" a person and detain him briefly for questioning upon suspicion that he may be connected
with criminal activity. Upon suspicion that the person may be armed, the police should have the
power to "frisk" him for weapons. If the "stop" and the "frisk" give rise to probable cause to
believe that the suspect has committed a crime, then the police should be empowered to make a
formal "arrest," and a full incident "search" of the person. This scheme is justified in part upon
the notion that a "stop" and a "frisk" amount to a mere "minor inconvenience and petty
indignity," 4 which can properly be imposed upon the citizen in the interest of effective law
enforcement on the basis of a police officer's suspicion.
On the other side the argument is made that the authority of the police must be strictly
circumscribed by the law of arrest and search as it has developed to date in the traditional
jurisprudence of the Fourth Amendment. It is contended with some force that there is not - and
cannot be - a variety of police activity which does not depend solely upon the voluntary
cooperation of the citizen and yet which stops short of an arrest based upon probable cause to
make such an arrest. The heart of the Fourth Amendment, the argument runs, is a severe
requirement of specific justification for any intrusion upon protected personal security, coupled
with a highly developed system of judicial controls to enforce upon the agents of the State the
commands of the Constitution. Acquiescence by the courts in the compulsion inherent in the field
interrogation practices at issue here, it is urged, would constitute an abdication of judicial control
over, and indeed an encouragement of, substantial interference with liberty and personal security
by police officers whose judgment is necessarily colored by their primary involvement in "the
often competitive enterprise of ferreting out crime." Johnson v. United States, 333 U.S. 10,
14 (1948). This, it is argued, can only serve to exacerbate police-community tensions in the
crowded centers of our Nation's cities.
In this context we approach the issues in this case mindful of the limitations of the judicial
function in controlling the myriad daily situations in which policemen and citizens confront each
other on the street. The State has characterized the issue here as "the right of a police officer . . . to

139
make an on-the-street stop, interrogate and pat down for weapons (known in street vernacular as
`stop and frisk')." But this is only partly accurate. For the issue is not the abstract propriety of the
police conduct, but the admissibility against petitioner of the evidence uncovered by the search
and seizure. Ever since its inception, the rule excluding evidence seized in violation of the Fourth
Amendment has been recognized as a principal mode of discouraging lawless police conduct. See
Weeks v. United States, 232 U.S. 383, 391 -393 (1914). Thus its major thrust is a deterrent one,
see Linkletter v. Walker, 381 U.S. 618, 629 -635 (1965), and experience has taught that it is the
only effective deterrent to police misconduct in the criminal context, and that without it the
constitutional guarantee against unreasonable searches and seizures would be a mere "form of
words." Mapp v. Ohio, 367 U.S. 643, 655 (1961). The rule also serves another vital function - "the
imperative of judicial integrity." Elkins v. United States, 364 U.S. 206, 222 (1960). Courts which
sit under our Constitution cannot and will not be made party to lawless invasions of the
constitutional rights of citizens by permitting unhindered governmental use of the fruits of such
invasions. Thus in our system evidentiary rulings provide the context in which the judicial process
of inclusion and exclusion approves some conduct as comporting with constitutional guarantees
and disapproves other actions by state agents. A ruling admitting evidence in a criminal trial, we
recognize, has the necessary effect of legitimizing the conduct which produced the evidence, while
an application of the exclusionary rule withholds the constitutional imprimatur.
The exclusionary rule has its limitations, however, as a tool of judicial control. It cannot properly
be invoked to exclude the products of legitimate police investigative techniques on the ground
that much conduct which is closely similar involves unwarranted intrusions upon constitutional
protections. Moreover, in some contexts the rule is ineffective as a deterrent. Street encounters
between citizens and police officers are incredibly rich in diversity. They range from wholly
friendly exchanges of pleasantries or mutually useful information to hostile confrontations of
armed men involving arrests, or injuries, or loss of life. Moreover, hostile confrontations are not
all of a piece. Some of them begin in a friendly enough manner, only to take a different turn upon
the injection of some unexpected element into the conversation. Encounters are initiated by the
police for a wide variety of purposes, some of which are wholly unrelated to a desire to prosecute
for crime. Doubtless some police "field interrogation" conduct violates the Fourth Amendment.
But a stern refusal by this Court to condone such activity does not necessarily render it responsive
to the exclusionary rule. Regardless of how effective the rule may be where obtaining convictions
is an important objective of the police, it is powerless to deter invasions of constitutionally
guaranteed rights where the police either have no interest in prosecuting or are willing to forgo
successful prosecution in the interest of serving some other goal.
Proper adjudication of cases in which the exclusionary rule is invoked demands a constant
awareness of these limitations. The wholesale harassment by certain elements of the police
community, of which minority groups, particularly Negroes, frequently complain, will not
be stopped by the exclusion of any evidence from any criminal trial. Yet a rigid and unthinking
application of the exclusionary rule, in futile protest against practices which it can never be used
effectively to control, may exact a high toll in human injury and frustration of efforts to prevent
crime. No judicial opinion can comprehend the protean variety of the street encounter, and we
can only judge the facts of the case before us. Nothing we say today is to be taken as indicating
approval of police conduct outside the legitimate investigative sphere. Under our decision, courts
still retain their traditional responsibility to guard against police conduct which is overbearing or
harassing, or which trenches upon personal security without the objective evidentiary justification
which the Constitution requires. When such conduct is identified, it must be condemned by the
judiciary and its fruits must be excluded from evidence in criminal trials. And, of course, our
approval of legitimate and restrained investigative conduct undertaken on the basis of ample
factual justification should in no way discourage the employment of other remedies than the
exclusionary rule to curtail abuses for which that sanction may prove inappropriate.
Having thus roughly sketched the perimeters of the constitutional debate over the limits on police
investigative conduct in general and the background against which this case presents itself, we
turn our attention to the quite narrow question posed by the facts before us: whether it is always
unreasonable for a policeman to seize a person and subject him to a limited search for weapons

140
unless there is probable cause for an arrest. Given the narrowness of this question, we have no
occasion to canvass in detail the constitutional limitations upon the scope of a policeman's power
when he confronts a citizen without probable cause to arrest him.
II.
Our first task is to establish at what point in this encounter the Fourth Amendment becomes
relevant. That is, we must decide whether and when Officer McFadden "seized" Terry and
whether and when he conducted a "search." There is some suggestion in the use of such terms as
"stop" and "frisk" that such police conduct is outside the purview of the Fourth Amendment
because neither action rises to the level of a "search" or "seizure" within the meaning of the
Constitution. 12 We emphatically reject this notion. It is quite plain that the Fourth Amendment
governs "seizures" of the person which do not eventuate in a trip to the station house and
prosecution for crime - "arrests" in traditional terminology. It must be recognized that whenever a
police officer accosts an individual and restrains his freedom to walk away, he has "seized" that
person. And it is nothing less than sheer torture of the English language to suggest that a careful
exploration of the outer surfaces of a person's clothing all over his or her body in an attempt to
find weapons is not a "search." Moreover, it is simply fantastic to urge that such a
procedure performed in public by a policeman while the citizen stands helpless, perhaps facing a
wall with his hands raised, is a "petty indignity." It is a serious intrusion upon the sanctity of the
person, which may inflict great indignity and arouse strong resentment, and it is not to be
undertaken lightly.
The danger in the logic which proceeds upon distinctions between a "stop" and an "arrest," or
"seizure" of the person, and between a "frisk" and a "search" is two-fold. It seeks to isolate from
constitutional scrutiny the initial stages of the contact between the policeman and the citizen. And
by suggesting a rigid all-or-nothing model of justification and regulation under the Amendment,
it obscures the utility of limitations upon the scope, as well as the initiation, of police action as a
means of constitutional regulation. This Court has held in the past that a search which is
reasonable at its inception may violate the Fourth Amendment by virtue of its intolerable
intensity and scope. Kremen v. United States, 353 U.S. 346 (1957); Go-Bart Importing Co. v.
United States, 282 U.S. 344, 356-358 (1931); see United States v. Di Re, 332 U.S. 581, 586-587
(1948). The scope of the search must be "strictly tied to and justified by" the circumstances which
rendered its initiation permissible. Warden v. Hayden, 387 U.S. 294, 310 (1967) (MR. JUSTICE
FORTAS, concurring); see, e. g., Preston v. United States, 376 U.S. 364, 367-368 (1964); Agnello
v. United States, 269 U.S. 20, 30-31 (1925).
The distinctions of classical "stop-and-frisk" theory thus serve to divert attention from the central
inquiry under the Fourth Amendment - the reasonableness in all the circumstances of the
particular governmental invasion of a citizen's personal security. "Search" and "seizure" are not
talismans. We therefore reject the notions that the Fourth Amendment does not come into play at
all as a limitation upon police conduct if the officers stop short of something called a "technical
arrest" or a "full-blown search."
In this case there can be no question, then, that Officer McFadden "seized" petitioner and
subjected him to a "search" when he took hold of him and patted down the outer surfaces of his
clothing. We must decide whether at that point it was reasonable for Officer McFadden to have
interfered with petitioner's personal security as he did. And in determining whether the seizure
and search were "unreasonable" our inquiry is a dual one - whether the officer's action was
justified at its inception, and whether it was reasonably related in scope to the circumstances
which justified the interference in the first place.
III.
If this case involved police conduct subject to the Warrant Clause of the Fourth Amendment, we
would have to ascertain whether "probable cause" existed to justify the search and seizure which
took place. However, that is not the case. We do not retreat from our holdings that the police
must, whenever practicable, obtain advance judicial approval of searches and seizures through

141
the warrant procedure, see, e. g., Katz v. United States, 389 U.S. 347 (1967); Beck v. Ohio, 379
U.S. 89, 96 (1964); Chapman v. United States, 365 U.S. 610 (1961), or that in most instances
failure to comply with the warrant requirement can only be excused by exigent circumstances,
see, e. g., Warden v. Hayden, 387 U.S. 294 (1967) (hot pursuit); cf. Preston v. United States, 376
U.S. 364, 367-368 (1964). But we deal here with an entire rubric of police conduct - necessarily
swift action predicated upon the on-the-spot observations of the officer on the beat - which
historically has not been, and as a practical matter could not be, subjected to the warrant
procedure. Instead, the conduct involved in this case must be tested by the Fourth Amendment's
general proscription against unreasonable searches and seizures. 17
Nonetheless, the notions which underlie both the warrant procedure and the requirement of
probable cause remain fully relevant in this context. In order to assess the reasonableness of
Officer McFadden's conduct as a general proposition, it is necessary "first to focus upon the
governmental interest which allegedly justifies official intrusion upon the constitutionally
protected interests of the private citizen," for there is "no ready test for determining
reasonableness other than by balancing the need to search [or seize] against the invasion which
the search [or seizure] entails." Camara v. Municipal Court, 387 U.S. 523, 534 -535, 536-537
(1967). And in justifying the particular intrusion the police officer must be able to point to specific
and articulable facts which, taken together with rational inferences from those facts, reasonably
warrant that intrusion. The scheme of the Fourth Amendment becomes meaningful only when it
is assured that at some point the conduct of those charged with enforcing the laws can be
subjected to the more detached, neutral scrutiny of a judge who must evaluate the reasonableness
of a particular search or seizure in light of the particular circumstances. And in making that
assessment it is imperative that the facts be judged against an objective standard: would the
facts available to the officer at the moment of the seizure or the search "warrant a man of
reasonable caution in the belief" that the action taken was appropriate? Cf. Carroll v. United
States, 267 U.S. 132 (1925); Beck v. Ohio, 379 U.S. 89, 96 -97 (1964). Anything less would invite
intrusions upon constitutionally guaranteed rights based on nothing more substantial than
inarticulate hunches, a result this Court has consistently refused to sanction. See, e. g., Beck v.
Ohio, supra; Rios v. United States, 364 U.S. 253 (1960); Henry v. United States, 361 U.S.
98 (1959). And simple "`good faith on the part of the arresting officer is not enough.' . . . If
subjective good faith alone were the test, the protections of the Fourth Amendment would
evaporate, and the people would be `secure in their persons, houses, papers, and effects,' only in
the discretion of the police." Beck v. Ohio, supra, at 97.
Applying these principles to this case, we consider first the nature and extent of the governmental
interests involved. One general interest is of course that of effective crime prevention and
detection; it is this interest which underlies the recognition that a police officer may in
appropriate circumstances and in an appropriate manner approach a person for purposes of
investigating possibly criminal behavior even though there is no probable cause to make an arrest.
It was this legitimate investigative function Officer McFadden was discharging when he decided
to approach petitioner and his companions. He had observed Terry, Chilton, and Katz go through
a series of acts, each of them perhaps innocent in itself, but which taken together warranted
further investigation. There is nothing unusual in two men standing together on a street corner,
perhaps waiting for someone. Nor is there anything suspicious about people in such
circumstances strolling up and down the street, singly or in pairs. Store windows, moreover, are
made to be looked in. But the story in quite different where, as here, two men hover about a street
corner for an extended period of time, at the end of which it becomes apparent that they are not
waiting for anyone or anything; where these men pace alternately along an identical route,
pausing to stare in the same store window roughly 24 times; where each completion of this route
is followed immediately by a conference between the two men on the corner; where they are
joined in one of these conferences by a third man who leaves swiftly; and where the two men
finally follow the third and rejoin him a couple of blocks away. It would have been poor police
work indeed for an officer of 30 years' experience in the detection of thievery from stores in this
same neighborhood to have failed to investigate this behavior further.
The crux of this case, however, is not the propriety of Officer McFadden's taking steps to
investigate petitioner's suspicious behavior, but rather, whether there was justification for

142
McFadden's invasion of Terry's personal security by searching him for weapons in the course of
that investigation. We are now concerned with more than the governmental interest in
investigating crime; in addition, there is the more immediate interest of the police officer in
taking steps to assure himself that the person with whom he is dealing is not armed with a
weapon that could unexpectedly and fatally be used against him. Certainly it would be
unreasonable to require that police officers take unnecessary risks in the performance of their
duties. American criminals have a long tradition of armed violence, and every year in this country
many law enforcement officers are killed in the line of duty, and thousands more are wounded.
Virtually all of these deaths and a substantial portion of the injuries are inflicted with guns and
knives.
In view of these facts, we cannot blind ourselves to the need for law enforcement officers to
protect themselves and other prospective victims of violence in situations where they may lack
probable cause for an arrest. When an officer is justified in believing that the individual whose
suspicious behavior he is investigating at close range is armed and presently dangerous to the
officer or to others, it would appear to be clearly unreasonable to deny the officer the power to
take necessary measures to determine whether the person is in fact carrying a weapon and to
neutralize the threat of physical harm.
We must still consider, however, the nature and quality of the intrusion on individual rights
which must be accepted if police officers are to be conceded the right to search for weapons in
situations where probable cause to arrest for crime is lacking. Even a limited search of the outer
clothing for weapons constitutes a severe, though brief, intrusion upon cherished personal
security, and it must surely be an annoying, frightening, and perhaps humiliating experience.
Petitioner contends that such an intrusion is permissible only incident to a lawful arrest, either
for a crime involving the possession of weapons or for a crime the commission of which led the
officer to investigate in the first place. However, this argument must be closely examined.
Petitioner does not argue that a police officer should refrain from making any investigation of
suspicious circumstances until such time as he has probable cause to make an arrest; nor does he
deny that police officers in properly discharging their investigative function may find themselves
confronting persons who might well be armed and dangerous. Moreover, he does not say that an
officer is always unjustified in searching a suspect to discover weapons. Rather, he says it is
unreasonable for the policeman to take that step until such time as the situation evolves to a point
where there is probable cause to make an arrest. When that point has been reached, petitioner
would concede the officer's right to conduct a search of the suspect for weapons, fruits or
instrumentalities of the crime, or "mere" evidence, incident to the arrest.
There are two weaknesses in this line of reasoning, however. First, it fails to take account of
traditional limitations upon the scope of searches, and thus recognizes no distinction in purpose,
character, and extent between a search incident to an arrest and a limited search for weapons.
The former, although justified in part by the acknowledged necessity to protect the arresting
officer from assault with a concealed weapon, Preston v. United States, 376 U.S. 364, 367 (1964),
is also justified on other grounds, ibid., and can therefore involve a relatively extensive
exploration of the person. A search for weapons in the absence of probable cause to arrest,
however, must, like any other search, be strictly circumscribed by the exigencies which justify its
initiation. Warden v. Hayden, 387 U.S. 294, 310 (1967) (MR. JUSTICE FORTAS, concurring).
Thus it must be limited to that which is necessary for the discovery of weapons which might be
used to harm the officer or others nearby, and may realistically be characterized as something less
than a "full" search, even though it remains a serious intrusion.
A second, and related, objection to petitioner's argument is that it assumes that the law of arrest
has already worked out the balance between the particular interests involved here - the
neutralization of danger to the policeman in the investigative circumstance and the sanctity of the
individual. But this is not so. An arrest is a wholly different kind of intrusion upon individual
freedom from a limited search for weapons, and the interests each is designed to serve are
likewise quite different. An arrest is the initial stage of a criminal prosecution. It is intended to

143
vindicate society's interest in having its laws obeyed, and it is inevitably accompanied by future
interference with the individual's freedom of movement, whether or not trial or conviction
ultimately follows. The protective search for weapons, on the other hand, constitutes a brief,
though far from inconsiderable, intrusion upon the sanctity of the person. It does not follow that
because an officer may lawfully arrest a person only when he is apprised of facts sufficient to
warrant a belief that the person has committed or is committing a crime, the officer is equally
unjustified, absent that kind of evidence, in making any intrusions short of an arrest. Moreover, a
perfectly reasonable apprehension of danger may arise long before the officer is possessed of
adequate information to justify taking a person into custody for the purpose of prosecuting him
for a crime. Petitioner's reliance on cases which have worked out standards of reasonableness
with regard to "seizures" constituting arrests and searches incident thereto is thus misplaced. It
assumes that the interests sought to be vindicated and the invasions of personal security may be
equated in the two cases, and thereby ignores a vital aspect of the analysis of the reasonableness
of particular types of conduct under the Fourth Amendment. See Camara v. Municipal Court,
supra.
Our evaluation of the proper balance that has to be struck in this type of case leads us to conclude
that there must be a narrowly drawn authority to permit a reasonable search for weapons for the
protection of the police officer, where he has reason to believe that he is dealing with an armed
and dangerous individual, regardless of whether he has probable cause to arrest the individual for
a crime. The officer need not be absolutely certain that the individual is armed; the issue is
whether a reasonably prudent man in the circumstances would be warranted in the belief that his
safety or that of others was in danger. Cf. Beck v. Ohio, 379 U.S. 89, 91 (1964); Brinegar v. United
States, 338 U.S. 160, 174 -176 (1949); Stacey v. Emery, 97 U.S. 642, 645 (1878). And in
determining whether the officer acted reasonably in such circumstances, due weight must be
given, not to his inchoate and unparticularized suspicion or "hunch," but to the specific
reasonable inferences which he is entitled to draw from the facts in light of his experience. Cf.
Brinegar v. United States supra.
IV.
We must now examine the conduct of Officer McFadden in this case to determine whether his
search and seizure of petitioner were reasonable, both at their inception and as conducted. He
had observed Terry, together with Chilton and another man, acting in a manner he took to be
preface to a "stick-up." We think on the facts and circumstances Officer McFadden detailed before
the trial judge a reasonably prudent man would have been warranted in believing petitioner was
armed and thus presented a threat to the officer's safety while he was investigating his suspicious
behavior. The actions of Terry and Chilton were consistent with McFadden's hypothesis that these
men were contemplating a daylight robbery - which, it is reasonable to assume, would be likely to
involve the use of weapons - and nothing in their conduct from the time he first noticed them
until the time he confronted them and identified himself as a police officer gave him sufficient
reason to negate that hypothesis. Although the trio had departed the original scene, there was
nothing to indicate abandonment of an intent to commit a robbery at some point. Thus, when
Officer McFadden approached the three men gathered before the display window at Zucker's
store he had observed enough to make it quite reasonable to fear that they were armed; and
nothing in their response to his hailing them, identifying himself as a police officer, and asking
their names served to dispel that reasonable belief. We cannot say his decision at that point to
seize Terry and pat his clothing for weapons was the product of a volatile or inventive
imagination, or was undertaken simply as an act of harassment; the record evidences the
tempered act of a policeman who in the course of an investigation had to make a quick decision as
to how to protect himself and others from possible danger, and took limited steps to do so.
The manner in which the seizure and search were conducted is, of course, as vital a part of the
inquiry as whether they were warranted at all. The Fourth Amendment proceeds as much by
limitations upon the scope of governmental action as by imposing preconditions upon its
initiation. Compare Katz v. United States, 389 U.S. 347, 354 -356 (1967). The entire deterrent
purpose of the rule excluding evidence seized in violation of the Fourth Amendment rests on the
assumption that "limitations upon the fruit to be gathered tend to limit the quest itself." United

144
States v. Poller, 43 F.2d 911, 914 (C. A. 2d Cir. 1930); see, e. g., Linkletter v. Walker, 381 U.S. 618,
629 -635 (1965); Mapp v. Ohio, 367 U.S. 643 (1961); Elkins v. United States, 364 U.S. 206, 216 -
221 (1960). Thus, evidence may not be introduced if it was discovered by means of a seizure and
search which were not reasonably related in scope to the justification for their initiation. Warden
v. Hayden,387 U.S. 294, 310 (1967) (MR. JUSTICE FORTAS, concurring).
We need not develop at length in this case, however, the limitations which the Fourth
Amendment places upon a protective seizure and search for weapons. These limitations will have
to be developed in the concrete factual circumstances of individual cases. See Sibron v. New York,
post, p. 40, decided today. Suffice it to note that such a search, unlike a search without a warrant
incident to a lawful arrest, is not justified by any need to prevent the disappearance or destruction
of evidence of crime. See Preston v. United States, 376 U.S. 364, 367 (1964). The sole justification
of the search in the present situation is the protection of the police officer and others nearby, and
it must therefore be confined in scope to an intrusion reasonably designed to discover guns,
knives, clubs, or other hidden instruments for the assault of the police officer.
The scope of the search in this case presents no serious problem in light of these standards.
Officer McFadden patted down the outer clothing of petitioner and his two companions. He did
not place his hands in their pockets or under the outer surface of their garments until he had felt
weapons, and then he merely reached for and removed the guns. He never did invade Katz'
person beyond the outer surfaces of his clothes, since he discovered nothing in his pat-down
which might have been a weapon. Officer McFadden confined his search strictly to what was
minimally necessary to learn whether the men were armed and to disarm them once he
discovered the weapons. He did not conduct a general exploratory search for whatever evidence of
criminal activity he might find.
V.
We conclude that the revolver seized from Terry was properly admitted in evidence against him.
At the time he seized petitioner and searched him for weapons, Officer McFadden had reasonable
grounds to believe that petitioner was armed and dangerous, and it was necessary for the
protection of himself and others to take swift measures to discover the true facts and neutralize
the threat of harm if it materialized. The policeman carefully restricted his search to what was
appropriate to the discovery of the particular items which he sought. Each case of this sort will, of
course, have to be decided on its own facts. We merely hold today that where a police officer
observes unusual conduct which leads him reasonably to conclude in light of his experience that
criminal activity may be afoot and that the persons with whom he is dealing may be armed and
presently dangerous, where in the course of investigating this behavior he identifies himself as a
policeman and makes reasonable inquiries, and where nothing in the initial stages of the
encounter serves to dispel his reasonable fear for his own or others' safety, he is entitled for the
protection of himself and others in the area to conduct a carefully limited search of the outer
clothing of such persons in an attempt to discover weapons which might be used to assault him.
Such a search is a reasonable search under the Fourth Amendment, and any weapons seized may
properly be introduced in evidence against the person from whom they were taken.
Affirmed.
145
GRAHAM V. CONNOR
U.S. Supreme Court
GRAHAM v. CONNOR (1989)
29
490 U.S. 386
No. 87-6571
Argued February 21, 1989
Decided May 15, 1989
Petitioner Graham, a diabetic, asked his friend, Berry, to drive him to a
convenience store to purchase orange juice to counteract the onset of an insulin
reaction. Upon entering the store and seeing the number of people ahead of him,
Graham hurried out and asked Berry to drive him to a friend's house instead.
Respondent Connor, a city police officer, became suspicious after seeing
Graham hastily enter and leave the store, followed Berry's car, and made an
investigative stop, ordering the pair to wait while he found out what had
happened in the store. Respondent backup police officers arrived on the scene,
handcuffed Graham, and ignored or rebuffed attempts to explain and treat
Graham's condition. During the encounter, Graham sustained multiple injuries.
He was released when Connor learned that nothing had happened in the store.
Graham filed suit in the District Court under 42 USC 1983 against respondents,
alleging that they had used excessive force in making the stop, in violation of
"rights secured to him under the Fourteenth Amendment to the United States
Constitution and 42 USC 1983." The District Court granted respondents' motion
for a directed verdict at the close of Graham's evidence, applying a four-factor
test for determining when excessive use of force gives rise to a 1983 cause of
action, which inquires, inter alia, whether the force was applied in a good-faith
effort to maintain and restore discipline or maliciously and sadistically for the very
purpose of causing harm. Johnson v. Glick, 481 F.2d 1028. The Court of Appeals
affirmed, endorsing this test as generally applicable to all claims of
constitutionally excessive force brought against government officials, rejecting
Graham's argument that it was error to require him to prove that the allegedly
excessive force was applied maliciously and sadistically to cause harm, and
holding that a reasonable jury applying the Johnson v. Glick test to his evidence
could not find that the force applied was constitutionally excessive.
Held:
All claims that law enforcement officials have used excessive force – deadly or
not – in the course of an arrest, investigatory stop, or other "seizure" of a free
citizen are properly analyzed under the Fourth Amendment's "objective
reasonableness" standard, rather than under a substantive due process
standard. Pp. 392-399. [490 US 386, 387]
(a) The notion that all excessive force claims brought under 1983 are
governed by a single generic standard is rejected. Instead, courts must
identify the specific constitutional right allegedly infringed by the

146
challenged application of force and then judge the claim by reference to
the specific constitutional standard which governs that right. Pp. 393-394.
(b) Claims that law enforcement officials have used excessive force in
the course of an arrest, investigatory stop, or other "seizure" of a
free citizen are most properly characterized as invoking the
protections of the Fourth Amendment, which guarantees citizens the
right "to be secure in their persons…against unreasonable seizures,"
and must be judged by reference to the Fourth Amendment's
"reasonableness" standard. Pp. 394-395.
(c) The Fourth Amendment "reasonableness" inquiry is whether the
officers' actions are "objectively reasonable" in light of the facts and
circumstances confronting them, without regard to their underlying
intent or motivation. The "reasonableness" of a particular use of
force must be judged from the perspective of a reasonable officer on
the scene, and its calculus must embody an allowance for the fact
that police officers are often forced to make split-second decisions
about the amount of force necessary in a particular situation. Pp.
396-397.
(d) The Johnson v. Glick test applied by the courts below is incompatible with
a proper Fourth Amendment analysis. The suggestion that the test's
"malicious and sadistic" inquiry is merely another way of describing
conduct that is objectively unreasonable under the circumstances is
rejected. Also rejected is the conclusion that because individual officers'
subjective motivations are of central importance in deciding whether force
used against a convicted prisoner violates the Eighth Amendment, it
cannot be reversible error to inquire into them in deciding whether force
used against a suspect or arrestee violates the Fourth Amendment. The
Eighth Amendment terms "cruel" and "punishments" clearly suggest some
inquiry into subjective state of mind, whereas the Fourth Amendment term
"unreasonable" does not. Moreover, the less protective Eighth
Amendment standard applies only after the State has complied with the
constitutional guarantees traditionally associated with criminal
prosecutions. Pp. 397-399.
827 F.2d 945, vacated and remanded.
“Determining whether the force used to effect a particular seizure is "reasonable"
under the Fourth Amendment requires a careful balancing of "’the nature and
quality of the intrusion on the individual's Fourth Amendment interests'" against
the countervailing governmental interests at stake. Id., at 8, quoting United
States v. Place, 462 U.S. 696, 703 (1983). Our Fourth Amendment jurisprudence
has long recognized that the right to make an arrest or investigatory stop
necessarily carries with it the right to use some degree of physical coercion or
threat thereof to effect it. See Terry v. Ohio, 392 U.S., at 22 -27. Because "[t]he
test of reasonableness under the Fourth Amendment is not capable of precise

147
definition or mechanical application," …, however, its proper application
requires careful attention to the facts and circumstances of each particular
case, including the severity of the crime at issue, whether the suspect
poses an immediate threat to the safety of the officers or others, and
whether he is actively resisting arrest or attempting to evade arrest by
flight. See Tennessee v. Garner, 471 U.S., at 8 -9 (the question is "whether the
totality of the circumstances justifie[s] a particular sort of . . . seizure").
The "reasonableness" of a particular use of force must be judged from the
perspective of a reasonable officer on the scene, rather than with the 20/20
vision of hindsight. See Terry v. Ohio, supra, at 20-22. The Fourth Amendment
is not violated by an arrest based on probable cause, even though the wrong
person is arrested, Hill v. California, 401 U.S. 797 (1971), nor by the mistaken
execution of a valid search warrant on the wrong premises, Maryland v. Garrison,
480 U.S. 79 (1987). With respect to a claim of excessive force, the same
standard of reasonableness at the moment applies: "Not every push or shove,
even if it may later seem unnecessary in the peace of a judge's chambers,"
Johnson v. Glick, 481 F.2d, at 1033, violates the Fourth Amendment. The
calculus of reasonableness must embody [490 U.S. 386, 397] allowance for
the fact that police officers are often forced to make split-second
judgments - in circumstances that are tense, uncertain, and rapidly
evolving - about the amount of force that is necessary in a particular
situation.
As in other Fourth Amendment contexts, however, the "reasonableness"
inquiry in an excessive force case is an objective one: the question is
whether the officers' actions are "objectively reasonable" in light of the
facts and circumstances confronting them, without regard to their
underlying intent or motivation. See Scott v. United States, 436 U.S. 128, 137
-139 (1978); see also Terry v. Ohio, supra, at 21 (in analyzing the
reasonableness of a particular search or seizure, "it is imperative that the facts
be judged against an objective standard"). An officer's evil intentions will not
make a Fourth Amendment violation out of an objectively reasonable use
of force; nor will an officer's good intentions make an objectively
unreasonable use of force constitutional. See Scott v. United States, supra, at
138, citing United States v. Robinson, 414 U.S. 218 (1973).”
REHNQUIST, C.J., delivered the opinion of the Court, in which WHITE, STEVENS, O'CONNOR,
SCALIA, and KENNEDY, JJ., joined. BLACKMUN, J., filed an opinion concurring in part and
concurring in the judgment, in which BRENNAN and MARSHALL, JJ., joined, post, p. 490 U. S.
399.
CHIEF JUSTICE REHNQUIST delivered the opinion of the Court.
This case requires us to decide what constitutional standard governs a free citizen's claim that law
enforcement officials used excessive force in the course of making an arrest, investigatory stop, or
other "seizure" of his person. We hold that such claims are properly analyzed under the Fourth

148
Amendment's "objective reasonableness" standard, rather than under a substantive due process
standard.
In this action under 42 U.S.C. § 1983, petitioner Dethorne Graham seeks to recover damages for
injuries allegedly sustained when law enforcement officers used physical force against him during
the course of an investigatory stop. Because the case comes to us from a decision of the Court of
Appeals affirming the entry of a directed verdict for respondents, we take the evidence hereafter
noted in the light most favorable to petitioner. On November 12, 1984, Graham, a diabetic, felt the
onset of an insulin reaction. He asked a friend, William Berry, to drive him to a nearby
convenience store so he could purchase some orange juice to counteract the reaction. Berry
agreed, but when Graham entered the store, he saw a number of people ahead of him in the
checkout line. Concerned about the delay, he hurried out of the store and asked Berry to drive him
to a friend's house instead.
Respondent Connor, an officer of the Charlotte, North Carolina, Police Department, saw Graham
hastily enter and leave the store. The officer became suspicious that something was amiss, and
followed Berry's car. About one-half mile from the store, he made an investigative stop. Although
Berry told Connor that Graham was simply suffering from a "sugar reaction," the officer ordered
Berry and Graham to wait while he found out what, if anything, had happened at the convenience
store. When Officer Connor returned to his patrol car to call for backup assistance, Graham got
out of the car, ran around it twice, and finally sat down on the curb, where he passed out briefly.
In the ensuing confusion, a number of other Charlotte police officers arrived on the scene in
response to Officer Connor's request for backup. One of the officers rolled Graham over on the
sidewalk and cuffed his hands tightly behind his back, ignoring Berry's pleas to get him some
sugar. Another officer said:
"I've seen a lot of people with sugar diabetes that never acted like this. Ain't nothing wrong with
the M.F. but drunk. Lock the S.B. up."
App. 42. Several officers then lifted Graham up from behind, carried him over to Berry's car, and
placed him face down on its hood. Regaining consciousness, Graham asked the officers to check
in his wallet for a diabetic decal that he carried. In response, one of the officers told him to "shut
up" and shoved his face down against the hood of the car. Four officers grabbed Graham and
threw him headfirst into the police car. A friend of Graham's brought some orange juice to the car,
but the officers refused to let him have it. Finally, Officer Connor received a report that Graham
had done nothing wrong at the convenience store, and the officers drove him home and released
him.
At some point during his encounter with the police, Graham sustained a broken foot, cuts on his
wrists, a bruised forehead, and an injured shoulder; he also claims to have developed a loud
ringing in his right ear that continues to this day. He commenced this action under 42 U.S.C. §
1983 against the individual officers involved in the incident, all of whom are respondents here,
alleging that they had used excessive force in making the investigatory stop, in violation of "rights
secured to him under the Fourteenth Amendment to the United States Constitution and 42 U.S.C.
§ 1983." Complaint 10, App. 5. The case was tried before a jury. At the close of petitioner's
evidence, respondents moved for a directed verdict. In ruling on that motion, the District Court
considered the following four factors, which it identified as "[t]he factors to be considered in
determining when the excessive use of force gives rise to a cause of action under § 1983": (1) the
need for the application of force; (2) the relationship between that need and the amount of force
that was used; (3) the extent of the injury inflicted; and (4) "[w]hether the force was applied in a
good faith effort to maintain and restore discipline or maliciously and sadistically for the very
purpose of causing harm." 644 F.Supp. 246, 248 (WDNC 1986). Finding that the amount of force
used by the officers was "appropriate under the circumstances," that "[t]here was no discernible
injury inflicted," and that the force used "was not applied maliciously or sadistically for the very
purpose of causing harm," but in "a good faith effort to maintain or restore order in the face of a

149
potentially explosive situation," id. at 248-249, the District Court granted respondents' motion for
a directed verdict.
A divided panel of the Court of Appeals for the Fourth Circuit affirmed. 827 F.2d 945 (1987). The
majority ruled first that the District Court had applied the correct legal standard in assessing
petitioner's excessive force claim. Id. at 948-949. Without attempting to identify the specific
constitutional provision under which that claim arose, the majority endorsed the four-factor test
applied by the District Court as generally applicable to all claims of "constitutionally excessive
force" brought against governmental officials. Id. at 948. The majority rejected petitioner's
argument, based on Circuit precedent, that it was error to require him to prove that the allegedly
excessive force used against him was applied "maliciously and sadistically for the very purpose of
causing harm." Ibid. Finally, the majority held that a reasonable jury applying the four-part test it
had just endorsed to petitioner's evidence "could not find that the force applied was
constitutionally excessive." Id. at 949-950. The dissenting judge argued that this Court's decisions
in Terry v. Ohio, 392 U. S. 1 (1968), and Tennessee v. Garner, 471 U. S. 1(1985), required that
excessive force claims arising out of investigatory stops be analyzed under the Fourth
Amendment's "objective reasonableness" standard. 827 F.2d at 950-952. We granted certiorari,
488 U.S. 816 (1988), and now reverse.
Fifteen years ago, in Johnson v. Glick, 481 F.2d 1028 (CA2), cert. denied, 414 U.S. 1033 (1973),
the Court of Appeals for the Second Circuit addressed a § 1983 damages claim filed by a pretrial
detainee who claimed that a guard had assaulted him without justification. In evaluating the
detainee's claim, Judge Friendly applied neither the Fourth Amendment nor the Eighth, the two
most textually obvious sources of constitutional protection against physically abusive
governmental conduct. Instead, he looked to "substantive due process," holding that,
"quite apart from any 'specific' of the Bill of Rights, application of undue force by law enforcement
officers deprives a suspect of liberty without due process of law."
481 F.2d at 1032. As support for this proposition, he relied upon our decision in Rochin v.
California, 342 U. S. 165 (1952), which used the Due Process Clause to void a state criminal
conviction based on evidence obtained by pumping the defendant's stomach. 481 F.2d at 1032-
1033. If a police officer's use of force which "shocks the conscience" could justify setting aside a
criminal conviction, Judge Friendly reasoned, a correctional officer's use of similarly excessive
force must give rise to a due process violation actionable under § 1983. Ibid. Judge Friendly went
on to set forth four factors to guide courts in determining "whether the constitutional line has
been crossed" by a particular use of force -- the same four factors relied upon by the courts below
in this case. Id. at 1033.
In the years following Johnson v. Glick, the vast majority of lower federal courts have applied its
four-part "substantive due process" test indiscriminately to all excessive force claims lodged
against law enforcement and prison officials under § 1983, without considering whether the
particular application of force might implicate a more specific constitutional right governed by a
different standard. Indeed, many courts have seemed to assume, as did the courts below in this
case, that there is a generic "right" to be free from excessive force, grounded not in any particular
constitutional provision, but rather in "basic principles of § 1983 jurisprudence."
We reject this notion that all excessive force claims brought under § 1983 are governed by a single
generic standard. As we have said many times, § 1983 "is not itself a source of substantive rights,"
but merely provides "a method for vindicating federal rights elsewhere conferred." Baker v.
McCollan, 443 U. S. 137, 443 U. S. 144, n. 3 (1979). In addressing an excessive force claim brought
under § 1983, analysis begins by identifying the specific constitutional right allegedly infringed by
the challenged application of force. See id. At 443 U. S. 140 ("The first inquiry in any § 1983 suit"
is "to isolate the precise constitutional violation with which [the defendant] is charged"). In most
instances, that will be either the Fourth Amendment's prohibition against unreasonable seizures
of the person or the Eighth Amendment's ban on cruel and unusual punishments, which are the
two primary sources of constitutional protection against physically abusive governmental

150
conduct. The validity of the claim must then be judged by reference to the specific constitutional
standard which governs that right, rather than to some generalized "excessive force"
standard. See Tennessee v. Garner, supra, at 471 U. S. 7-22 (claim of excessive force to effect
arrest analyzed under a Fourth Amendment standard); Whitley v. Albers, 475 U. S. 312, 475 U. S.
318-326 (1986) (claim of excessive force to subdue convicted prisoner analyzed under an Eighth
Amendment standard).
Where, as here, the excessive force claim arises in the context of an arrest or investigatory stop of
a free citizen, it is most properly characterized as one invoking the protections of the Fourth
Amendment, which guarantees citizens the right "to be secure in their persons . . . against
unreasonable . . . seizures" of the person. This much is clear from our decision in Tennessee v.
Garner, supra. In Garner, we addressed a claim that the use of deadly force to apprehend a
fleeing suspect who did not appear to be armed or otherwise dangerous violated the suspect's
constitutional rights, notwithstanding the existence of probable cause to arrest.
Though the complaint alleged violations of both the Fourth Amendment and the Due Process
Clause, see 471 U.S. at 471 U. S. 5, we analyzed the constitutionality of the challenged application
of force solely by reference to the Fourth Amendment's prohibition against unreasonable seizures
of the person, holding that the "reasonableness" of a particular seizure depends not only on when
it is made, but also on how it is carried out. Id. at 471 U. S. 7-8. Today we make explicit what was
implicit in Garner's analysis, and hold that all claims that law enforcement officers have used
excessive force -- deadly or not -- in the course of an arrest, investigatory stop, or other "seizure"
of a free citizen should be analyzed under the Fourth Amendment and its "reasonableness"
standard, rather than under a "substantive due process" approach. Because the Fourth
Amendment provides an explicit textual source of constitutional protection against this sort of
physically intrusive governmental conduct, that Amendment, not the more generalized notion of
"substantive due process," must be the guide for analyzing these claims.
Determining whether the force used to effect a particular seizure is "reasonable" under the Fourth
Amendment requires a careful balancing of "the nature and quality of the intrusion on the
individual's Fourth Amendment interests'" against the countervailing governmental interests at
stake. Id. at 471 U. S. 8, quoting United States v. Place, 462 U. S. 696, 462 U. S. 703 (1983). Our
Fourth Amendment jurisprudence has long recognized that the right to make an arrest or
investigatory stop necessarily carries with it the right to use some degree of physical coercion or
threat thereof to effect it. See Terry v. Ohio, 392 U.S. at 392 U. S. 22-27. Because "[t]he test of
reasonableness under the Fourth Amendment is not capable of precise definition or mechanical
application," Bell v. Wolfish, 441 U. S. 520, 441 U. S. 559 (1979), however, its proper application
requires careful attention to the facts and circumstances of each particular case, including the
severity of the crime at issue, whether the suspect poses an immediate threat to the safety of the
officers or others, and whether he is actively resisting arrest or attempting to evade arrest by
flight. See Tennessee v. Garner, 471 U.S. at 471 U. S. 8-9 (the question is "whether the totality of
the circumstances justifie[s] a particular sort of. . . seizure").
The "reasonableness" of a particular use of force must be judged from the perspective of a
reasonable officer on the scene, rather than with the 20/20 vision of hindsight. See Terry v. Ohio,
supra, at 392 U. S. 20-22. The Fourth Amendment is not violated by an arrest based on probable
cause, even though the wrong person is arrested, Hill v. California, 401 U. S. 797 (1971), nor by
the mistaken execution of a valid search warrant on the wrong premises, Maryland v.
Garrison, 480 U. S. 79 (1987). With respect to a claim of excessive force, the same standard of
reasonableness at the moment applies: "Not every push or shove, even if it may later seem
unnecessary in the peace of a judge's chambers," Johnson v. Glick, 481 F.2d at 1033, violates the
Fourth Amendment. The calculus of reasonableness must embody allowance for the fact that
police officers are often forced to make split-second judgments -- in circumstances that are tense,
uncertain, and rapidly evolving -- about the amount of force that is necessary in a particular
situation.
151
As in other Fourth Amendment contexts, however, the "reasonableness" inquiry in an excessive
force case is an objective one: the question is whether the officers' actions are "objectively
reasonable" in light of the facts and circumstances confronting them, without regard to their
underlying intent or motivation. See Scott v. United States, 436 U. S. 128, 436 U. S. 137-139
(1978); see also Terry v. Ohio, supra, at 392 U. S. 21 (in analyzing the reasonableness of a
particular search or seizure, "it is imperative that the facts be judged against an objective
standard"). An officer's evil intentions will not make a Fourth Amendment violation out of an
objectively reasonable use of force; nor will an officer's good intentions make an objectively
unreasonable use of force constitutional. See Scott v. United States, supra, at 436 U. S. 138,
citing United States v. Robinson, 414 U. S. 218 (1973).
Because petitioner's excessive force claim is one arising under the Fourth Amendment, the Court
of Appeals erred in analyzing it under the four-part Johnson v. Glick test. That test, which
requires consideration of whether the individual officers acted in "good faith" or "maliciously and
sadistically for the very purpose of causing harm," is incompatible with a proper Fourth
Amendment analysis. We do not agree with the Court of Appeals' suggestion, see 827 F.2d at 948,
that the "malicious and sadistic" inquiry is merely another way of describing conduct that is
objectively unreasonable under the circumstances. Whatever the empirical correlations between
"malicious and sadistic" behavior and objective unreasonableness may be, the fact remains that
the "malicious and sadistic" factor puts in issue the subjective motivations of the individual
officers, which our prior cases make clear has no bearing on whether a particular seizure is
"unreasonable" under the Fourth Amendment. Nor do we agree with the Court of Appeals'
conclusion, see id. at 948, n. 3, that, because the subjective motivations of the individual officers
are of central importance in deciding whether force used against a convicted prisoner violates the
Eighth Amendment, see Whitley v. Albers, 475 U.S. at 475 U. S. 320-321, it cannot be reversible
error to inquire into them in deciding whether force used against a suspect or arrestee violates the
Fourth Amendment. Differing standards under the Fourth and Eighth Amendments are hardly
surprising: the terms "cruel" and "punishment" clearly suggest some inquiry into subjective state
of mind, whereas the term "unreasonable" does not. Moreover, the less protective Eighth
Amendment standard applies "only after the State has complied with the constitutional
guarantees traditionally associated with criminal prosecutions." Ingraham v. Wright, 430 U. S.
651, 430 U. S. 671, n. 40 (1977). The Fourth Amendment inquiry is one of "objective
reasonableness" under the circumstances, and subjective concepts like "malice" and "sadism"
have no proper place in that inquiry.
Because the Court of Appeals reviewed the District Court's ruling on the motion for directed
verdict under an erroneous view of the governing substantive law, its judgment must be vacated
and the case remanded to that court for reconsideration of that issue under the proper Fourth
Amendment standard.
It is so ordered.
152
TENNESSEE V. GARNER
U.S. Supreme Court
TENNESSEE v. GARNER (1985)
30
471 U.S. 1
No. 83-1035.
Argued October 30, 1984
Decided March 27, 1985
A Tennessee statute provides that if, after a police officer has given notice of an
intent to arrest a criminal suspect, the suspect flees or forcibly resists, "the officer
may use all the necessary means to effect the arrest." Acting under the authority
of this statute, a Memphis police officer shot and killed appellee-respondent
Garner's son as, after being told to halt, the son fled over a fence at night in the
backyard of a house he was suspected of burglarizing. The officer used deadly
force despite being "reasonably sure" the suspect was unarmed and thinking that
he was 17 or 18 years old and of slight build. The father subsequently brought an
action in Federal District Court, seeking damages under 42 USC 1983 for
asserted violations of his son's constitutional rights. The District Court held that
the statute and the officer's actions were constitutional. The Court of Appeals
reversed.
Held:
The Tennessee statute is unconstitutional insofar as it authorizes the use of
deadly force against, as in this case, an apparently unarmed, nondangerous
fleeing suspect; such force may not be used unless necessary to prevent the
escape and the officer has probable cause to believe that the suspect
poses a significant threat of death or serious physical injury to the officer
or others. Pp. 7-22. [471 US 1, 2]
(a) Apprehension by the use of deadly force is a seizure subject to the Fourth
Amendment's reasonableness requirement. To determine whether such a
seizure is reasonable, the extent of the intrusion on the suspect's rights
under that Amendment must be balanced against the governmental
interests in effective law enforcement. This balancing process
demonstrates that, notwithstanding probable cause to seize a suspect, an
officer may not always do so by killing him. The use of deadly force to
prevent the escape of all felony suspects, whatever the circumstances, is
constitutionally unreasonable. Pp. 7-12.
(b) The Fourth Amendment, for purposes of this case, should not be
construed in light of the common-law rule allowing the use of whatever
force is necessary to affect the arrest of a fleeing felon. Changes in the
legal and technological context mean that that rule is distorted almost
beyond recognition when literally applied. Whereas felonies were formerly
capital crimes, few are now, or can be, and many crimes classified as
misdemeanors, or nonexistent, at common law are now felonies. Also, the

153
common-law rule developed at a time when weapons were rudimentary.
And, in light of the varied rules adopted in the States indicating a long-
term movement away from the common-law rule, particularly in the police
departments themselves, that rule is a dubious indicium of the
constitutionality of the Tennessee statute. There is no indication that
holding a police practice such as that authorized by the statute
unreasonable will severely hamper effective law enforcement. Pp. 12-20.
(c) While burglary is a serious crime, the officer in this case could not
reasonably have believed that the suspect - young, slight, and unarmed -
posed any threat. Nor does the fact that an unarmed suspect has broken
into a dwelling at night automatically mean he is dangerous. Pp. 20-22.
710 F.2d 240, affirmed and remanded.
“The use of deadly force to prevent the escape of all felony suspects, whatever
the circumstances, is constitutionally unreasonable. It is not better that all felony
suspects die than that they escape. Where the suspect poses no immediate
threat to the officer and no threat to others, the harm resulting from failing
to apprehend him does not justify the use of deadly force to do so. It is no
doubt unfortunate when a suspect who is in sight escapes, but the fact that the
police arrive a little late or are a little slower afoot does not always justify killing
the suspect. A police officer may not seize an unarmed, nondangerous suspect
by shooting him dead. The Tennessee statute is unconstitutional insofar as it
authorizes the use of deadly force against such fleeing suspects.
It is not, however, unconstitutional on its face. Where the officer has probable
cause to believe that the suspect poses a threat of serious physical harm,
either to the officer or to others, it is not constitutionally unreasonable to
prevent escape by using deadly force. Thus, if the suspect threatens the
officer with a weapon or there is probable cause to believe that he has
committed a crime involving the infliction or threatened infliction of serious
physical harm, deadly force may be used if necessary to prevent escape,
and if, where [471 U.S. 1, 12] feasible, some warning has been given.”
JUSTICE WHITE delivered the opinion of the Court.
This case requires us to determine the constitutionality of the use of deadly force to prevent the
escape of an apparently unarmed suspected felon. We conclude that such force may not be used
unless it is necessary to prevent the escape and the officer has probable cause to believe that the
suspect poses a significant threat of death or serious physical injury to the officer or others.
I
154
At about 10:45 p. m. on October 3, 1974, Memphis Police Officers Elton Hymon and Leslie Wright
were dispatched to answer a "prowler inside call." Upon arriving at the scene they saw a woman
standing on her porch and gesturing toward the adjacent house.[1] She told them she had heard
glass breaking and that "they" or "someone" was breaking in next door. While Wright radioed the
dispatcher to say that they were on the scene, Hymon went behind the house. He heard a door
slam and saw someone run across the backyard. The fleeing suspect, who was appellee-
respondent's decedent, Edward Garner, stopped at a 6-feet-high chain link fence at the edge of
the yard. With the aid of a flashlight, Hymon was able to see Garner's face and hands. He saw no
sign of a weapon, and, though not certain, was "reasonably sure" and "figured" that Garner was
unarmed. App. 41, 56; Record 219. He thought Garner was 17 or 18 years old and about 5' 5" or 5'
7" tall.[2] While Garner was crouched at the base of the fence, Hymon called out "police, halt" and
took a few steps toward him. Garner then began to climb over the fence. Convinced that if Garner
made it over the fence he would elude capture,[3] Hymon shot him. The bullet hit Garner in the
back of the head. Garner was taken by ambulance to a hospital, where he died on the operating
table. Ten dollars and a purse taken from the house were found on his body.[4]
In using deadly force to prevent the escape, Hymon was acting under the authority of a Tennessee
statute and pursuant to Police Department policy. The statute provides that "[i]f, after notice of
the intention to arrest the defendant, he either flee or forcibly resist, the officer may use all the
necessary means to effect the arrest." Tenn. Code Ann. § 40-7-108 (1982).[5] The Department
policy was slightly more restrictive than the statute, but still allowed the use of deadly force in
cases of burglary. App. 140-144. The incident was reviewed by the Memphis Police Firearm's
Review Board and presented to a grand jury. Neither took any action. Id., at 57.
Garner's father then brought this action in the Federal District Court for the Western District of
Tennessee, seeking damages under 42 U. S. C. § 1983 for asserted violations of Garner's
constitutional rights. The complaint alleged that the shooting violated the Fourth, Fifth, Sixth,
Eighth, and Fourteenth Amendments of the United States Constitution. It named as defendants
Officer Hymon, the Police Department, its Director, and the Mayor and city of Memphis. After a
3-day bench trial, the District Court entered judgment for all defendants. It dismissed the claims
against the Mayor and the Director for lack of evidence. It then concluded that Hymon's actions
were authorized by the Tennessee statute, which in turn was constitutional. Hymon had employed
the only reasonable and practicable means of preventing Garner's escape. Garner had "recklessly
and heedlessly attempted to vault over the fence to escape, thereby assuming the risk of being
fired upon." App. to Pet. for Cert. A10.
The Court of Appeals for the Sixth Circuit affirmed with regard to Hymon, finding that he had
acted in good-faith reliance on the Tennessee statute and was therefore within the scope of his
qualified immunity. 600 F. 2d 52 (1979). It remanded for reconsideration of the possible liability
of the city, however, in light of Monell v. New York City Dept. of Social Services, 436 U. S. 658
(1978), which had come down after the District Court's decision. The District Court was directed
to consider whether a city enjoyed a qualified immunity, whether the use of deadly force and
hollow point bullets in these circumstances was constitutional, and whether any unconstitutional
municipal conduct flowed from a "policy or custom" as required for liability under Monell. 600 F.
2d, at 54-55.
The District Court concluded that Monell did not affect its decision. While acknowledging some
doubt as to the possible immunity of the city, it found that the statute, and Hymon's actions, were
constitutional. Given this conclusion, it declined to consider the "policy or custom" question. App.
to Pet. for Cert. A37-A39.
The Court of Appeals reversed and remanded. 710 F. 2d 240 (1983). It reasoned that the killing of
a fleeing suspect is a "seizure" under the Fourth Amendment,[6] and is therefore constitutional
only if "reasonable." The Tennessee statute failed as applied to this case because it did not
adequately limit the use of deadly force by distinguishing between felonies of different
magnitudes — "the facts, as found, did not justify the use of deadly force under the Fourth
Amendment." Id., at 246. Officers cannot resort to deadly force unless they "have probable cause .
155
. . to believe that the suspect [has committed a felony and] poses a threat to the safety of the
officers or a danger to the community if left at large." Ibid.[7]
The State of Tennessee, which had intervened to defend the statute, see 28 U. S. C. § 2403(b),
appealed to this Court. The city filed a petition for certiorari. We noted probable jurisdiction in
the appeal and granted the petition. 465 U. S. 1098 (1984).
II
Whenever an officer restrains the freedom of a person to walk away, he has seized that person.
United States v. Brignoni-Ponce, 422 U. S. 873, 878 (1975). While it is not always clear just when
minimal police interference becomes a seizure, see United States v. Mendenhall, 446 U. S. 544
(1980), there can be no question that apprehension by the use of deadly force is a seizure subject
to the reasonableness requirement of the Fourth Amendment.
A
A police officer may arrest a person if he has probable cause to believe that person committed a
crime. E.g., United States v. Watson, 423 U. S. 411 (1976). Petitioners and appellant argue that if
this requirement is satisfied the Fourth Amendment has nothing to say about how that seizure is
made. This submission ignores the many cases in which this Court, by balancing the extent of the
intrusion against the need for it, has examined the reasonableness of the manner in which a
search or seizure is conducted. To determine the constitutionality of a seizure "[w]e must balance
the nature and quality of the intrusion on the individual's Fourth Amendment interests against
the importance of the governmental interests alleged to justify the intrusion." United States v.
Place, 462 U. S. 696, 703 (1983); see Delaware v. Prouse, 440 U. S. 648, 654 (1979); United
States v. Martinez-Fuerte, 428 U. S. 543, 555 (1976). We have described "the balancing of
competing interests" as "the key principle of the Fourth Amendment." Michigan v. Summers, 452
U. S. 692, 700, n. 12 (1981). See also Camara v. Municipal Court, 387 U. S. 523, 536-537 (1967).
Because one of the factors is the extent of the intrusion, it is plain that reasonableness depends on
not only when a seizure is made, but also how it is carried out. United States v. Ortiz, 422 U. S.
891, 895 (1975); Terry v. Ohio, 392 U. S. 1, 28-29 (1968).
Applying these principles to particular facts, the Court has held that governmental interests did
not support a lengthy detention of luggage, United States v. Place, supra, an airport seizure not
"carefully tailored to its underlying justification," Florida v. Royer, 460 U. S. 491, 500 (1983)
(plurality opinion), surgery under general anesthesia to obtain evidence, Winston v. Lee, 470 U.
S. 753 (1985), or detention for fingerprinting without probable cause, Davis v. Mississippi, 394 U.
S. 721 (1969); Hayes v. Florida, 470 U. S. 811 (1985). On the other hand, under the same
approach it has upheld the taking of fingernail scrapings from a suspect, Cupp v. Murphy, 412 U.
S. 291 (1973), an unannounced entry into a home to prevent the destruction of evidence, Ker v.
California, 374 U. S. 23 (1963), administrative housing inspections without probable cause to
believe that a code violation will be found, Camara v. Municipal Court, supra, and a blood test of
a drunken-driving suspect, Schmerber v. California, 384 U. S. 757 (1966). In each of these cases,
the question was whether the totality of the circumstances justified a particular sort of search or
seizure.
B
The same balancing process applied in the cases cited above demonstrates that, notwithstanding
probable cause to seize a suspect, an officer may not always do so by killing him. The
intrusiveness of a seizure by means of deadly force is unmatched. The suspect's fundamental
interest in his own life need not be elaborated upon. The use of deadly force also frustrates the
interest of the individual, and of society, in judicial determination of guilt and punishment.
Against these interests are ranged governmental interests in effective law enforcement.[8] It is
argued that overall violence will be reduced by encouraging the peaceful submission of suspects
who know that they may be shot if they flee. Effectiveness in making arrests requires the resort to
156
deadly force, or at least the meaningful threat thereof. "Being able to arrest such individuals is a
condition precedent to the state's entire system of law enforcement." Brief for Petitioners 14.
Without in any way disparaging the importance of these goals, we are not convinced that the use
of deadly force is a sufficiently productive means of accomplishing them to justify the killing of
nonviolent suspects. Cf. Delaware v. Prouse, supra, at 659. The use of deadly force is a self-
defeating way of apprehending a suspect and so setting the criminal justice mechanism in motion.
If successful, it guarantees that that mechanism will not be set in motion. And while the
meaningful threat of deadly force might be thought to lead to the arrest of more live suspects by
discouraging escape attempts,[9] the presently available evidence does not support this
thesis.[10] The fact is that a majority of police departments in this country have forbidden the use
of deadly force against nonviolent suspects. See infra, at 18-19. If those charged with the
enforcement of the criminal law have abjured the use of deadly force in arresting nondangerous
felons, there is a substantial basis for doubting that the use of such force is an essential attribute
of the arrest power in all felony cases. See Schumann v. McGinn, 307 Minn. 446, 472, 240 N. W.
2d 525, 540 (1976) (Rogosheske, J., dissenting in part). Petitioners and appellant have not
persuaded us that shooting nondangerous fleeing suspects is so vital as to outweigh the suspect's
interest in his own life.
The use of deadly force to prevent the escape of all felony suspects, whatever the
circumstances, is constitutionally unreasonable. It is not better that all felony
suspects die than that they escape. Where the suspect poses no immediate threat to
the officer and no threat to others, the harm resulting from failing to apprehend
him does not justify the use of deadly force to do so. It is no doubt unfortunate
when a suspect who is in sight escapes, but the fact that the police arrive a little
late or are a little slower afoot does not always justify killing the suspect. A police
officer may not seize an unarmed, nondangerous suspect by shooting him dead.
The Tennessee statute is unconstitutional insofar as it authorizes the use of deadly force against
such fleeing suspects.
It is not, however, unconstitutional on its face. Where the officer has probable cause to believe
that the suspect poses a threat of serious physical harm, either to the officer or to others, it is not
constitutionally unreasonable to prevent escape by using deadly force. Thus, if the suspect
threatens the officer with a weapon or there is probable cause to believe that he
has committed a crime involving the infliction or threatened infliction of serious
physical harm, deadly force may be used if necessary to prevent escape, and if,
where feasible, some warning has been given. As applied in such circumstances, the
Tennessee statute would pass constitutional muster.
III
A
It is insisted that the Fourth Amendment must be construed in light of the common-law rule,
which allowed the use of whatever force was necessary to effect the arrest of a fleeing felon,
though not a misdemeanant. As stated in Hale's posthumously published Pleas of the Crown:
"[I]f persons that are pursued by these officers for felony or the just suspicion thereof . . . shall not
yield themselves to these officers, but shall either resist or fly before they are apprehended or
being apprehended shall rescue themselves and resist or fly, so that they cannot be otherwise
apprehended, and are upon necessity slain therein, because they cannot be otherwise taken, it is
no felony." 2 M. Hale, Historia Placitorum Coronae 85 (1736). See also 4 W. Blackstone,
Commentaries *289. Most American jurisdictions also imposed a flat prohibition against the use
of deadly force to stop a fleeing misdemeanant, coupled with a general privilege to use such force
to stop a fleeing felon. E. g., Holloway v. Moser, 193 N. C. 185, 136 S. E. 375 (1927); State v.
Smith, 127 Iowa 534, 535, 103 N. W. 944, 945 (1905); Reneau v. State, 70 Tenn. 720 (1879);
Brooks v. Commonwealth, 61 Pa. 352 (1869); Roberts v. State, 14 Mo. 138 (1851); see generally R.
157
Perkins & R. Boyce, Criminal Law 1098-1102 (3d ed. 1982); Day, Shooting the Fleeing Felon:
State of the Law, 14 Crim. L. Bull. 285, 286-287 (1978); Wilgus, Arrest Without a Warrant, 22
Mich. L. Rev. 798, 807-816 (1924). But see Storey v. State, 71 Ala. 329 (1882); State v. Bryant, 65
N. C. 327, 328 (1871); Caldwell v. State, 41 Tex. 86 (1874).
The State and city argue that because this was the prevailing rule at the time of the adoption of
the Fourth Amendment and for some time thereafter, and is still in force in some States, use of
deadly force against a fleeing felon must be "reasonable." It is true that this Court has often
looked to the common law in evaluating the reasonableness, for Fourth Amendment purposes, of
police activity. See, e.g., United States v. Watson, 423 U. S. 411, 418-419 (1976); Gerstein v. Pugh,
420 U. S. 103, 111, 114 (1975); Carroll v. United States, 267 U. S. 132, 149-153 (1925). On the other
hand, it "has not simply frozen into constitutional law those law enforcement practices that
existed at the time of the Fourth Amendment's passage." Payton v. New York, 445 U. S. 573, 591,
n. 33 (1980). Because of sweeping change in the legal and technological context, reliance on the
common-law rule in this case would be a mistaken literalism that ignores the purposes of a
historical inquiry.
B
It has been pointed out many times that the common-law rule is best understood in light of the
fact that it arose at a time when virtually all felonies were punishable by death.[11] "Though
effected without the protections and formalities of an orderly trial and conviction, the killing of a
resisting or fleeing felon resulted in no greater consequences than those authorized for
punishment of the felony of which the individual was charged or suspected." American Law
Institute, Model Penal Code § 3.07, Comment 3, p. 56 (Tentative Draft No. 8, 1958) (hereinafter
Model Penal Code Comment). Courts have also justified the common-law rule by emphasizing the
relative dangerousness of felons. See, e. g., Schumann v. McGinn, 307 Minn., at 458, 240 N. W.
2d, at 533; Holloway v. Moser, supra, at 187, 136 S. E., at 376 (1927).
Neither of these justifications makes sense today. Almost all crimes formerly punishable by death
no longer are or can be. See, e. g., Enmund v. Florida, 458 U. S. 782 (1982); Coker v. Georgia,
433 U. S. 584 (1977). And while in earlier times "the gulf between the felonies and the minor
offences was broad and deep," 2 Pollock & Maitland 467, n. 3; Carroll v. United States, supra, at
158, today the distinction is minor and often arbitrary. Many crimes classified as misdemeanors,
or nonexistent, at common law are now felonies. Wilgus, 22 Mich. L. Rev., at 572-573. These
changes have undermined the concept, which was questionable to begin with, that use of deadly
force against a fleeing felon is merely a speedier execution of someone who has already forfeited
his life. They have also made the assumption that a "felon" is more dangerous than a
misdemeanant untenable. Indeed, numerous misdemeanors involve conduct more dangerous
than many felonies.[12]
There is an additional reason why the common-law rule cannot be directly translated to the
present day. The common-law rule developed at a time when weapons were rudimentary. Deadly
force could be inflicted almost solely in a hand-to-hand struggle during which, necessarily, the
safety of the arresting officer was at risk. Handguns were not carried by police officers until the
latter half of the last century. L. Kennett & J. Anderson, The Gun in America 150-151 (1975). Only
then did it become possible to use deadly force from a distance as a means of apprehension. As a
practical matter, the use of deadly force under the standard articulation of the common-law rule
has an altogether different meaning — and harsher consequences — now than in past centuries.
See Wechsler & Michael, A Rationale for the Law of Homicide: I, 37 Colum. L. Rev. 701, 741
(1937).[13]
One other aspect of the common-law rule bears emphasis. It forbids the use of deadly force to
apprehend a misdemeanant, condemning such action as disproportionately severe. See Holloway
v. Moser, 193 N. C., at 187, 136 S. E., at 376; State v. Smith, 127 Iowa, at 535, 103 N. W., at 945.
See generally Annot., 83 A. L. R. 3d 238 (1978).
158
In short, though the common-law pedigree of Tennessee's rule is pure on its face, changes in the
legal and technological context mean the rule is distorted almost beyond recognition when
literally applied.
C
In evaluating the reasonableness of police procedures under the Fourth Amendment, we have also
looked to prevailing rules in individual jurisdictions. See, e. g., United States v. Watson, 423 U. S.,
at 421-422. The rules in the States are varied. See generally Comment, 18 Ga. L. Rev. 137, 140-144
(1983). Some 19 States have codified the common-law rule,[14] though in two of these the courts
have significantly limited the statute.[15] Four States, though without a relevant statute,
apparently retain the common-law rule.[16] Two States have adopted the Model Penal Code's
provision verbatim.[17] Eighteen others allow, in slightly varying language, the use of deadly force
only if the suspect has committed a felony involving the use or threat of physical or deadly force,
or is escaping with a deadly weapon, or is likely to endanger life or inflict serious physical injury if
not arrested.[18] Louisiana and Vermont, though without statutes or case law on point, do forbid
the use of deadly force to prevent any but violent felonies.[19] The remaining States either have
no relevant statute or case law, or have positions that are unclear.[20]
It cannot be said that there is a constant or overwhelming trend away from the common-law rule.
In recent years, some States have reviewed their laws and expressly rejected abandonment of the
common-law rule.[21] Nonetheless, the long-term movement has been away from the rule that
deadly force may be used against any fleeing felon, and that remains the rule in less than half the
States.
This trend is more evident and impressive when viewed in light of the policies adopted by the
police departments themselves. Overwhelmingly, these are more restrictive than the common-law
rule. C. Milton, J. Halleck, J. Lardner, & G. Abrecht, Police Use of Deadly Force 45-46 (1977). The
Federal Bureau of Investigation and the New York City Police Department, for example, both
forbid the use of firearms except when necessary to prevent death or grievous bodily harm. Id., at
40-41; App. 83. For accreditation by the Commission on Accreditation for Law Enforcement
Agencies, a department must restrict the use of deadly force to situations where "the officer
reasonably believes that the action is in defense of human life . . . or in defense of any person in
immediate danger of serious physical injury." Commission on Accreditation for Law Enforcement
Agencies, Inc., Standards for Law Enforcement Agencies 1-2 (1983) (italics deleted). A 1974 study
reported that the police department regulations in a majority of the large cities of the United
States allowed the firing of a weapon only when a felon presented a threat of death or serious
bodily harm. Boston Police Department, Planning & Research Division, The Use of Deadly Force
by Boston Police Personnel (1974), cited in Mattis v. Schnarr, 547 F. 2d 1007, 1016, n. 19 (CA8
1976), vacated as moot sub nom. Ashcroft v. Mattis, 431 U. S. 171 (1977). Overall, only 7.5% of
departmental and municipal policies explicitly permit the use of deadly force against any felon;
86.8% explicitly do not. K. Matulia, A Balance of Forces: A Report of the International
Association of Chiefs of Police 161 (1982) (table). See also Record 1108-1368 (written policies of
44 departments). See generally W. Geller & K. Karales, Split-Second Decisions 33-42 (1981); Brief
for Police Foundation et al. as Amici Curiae. In light of the rules adopted by those who must
actually administer them, the older and fading common-law view is a dubious indicium of the
constitutionality of the Tennessee statute now before us.
D
Actual departmental policies are important for an additional reason. We would hesitate to declare
a police practice of long standing "unreasonable" if doing so would severely hamper effective law
enforcement. But the indications are to the contrary. There has been no suggestion that crime has
worsened in any way in jurisdictions that have adopted, by legislation or departmental policy,
rules similar to that announced today. Amici note that "[a]fter extensive research and
consideration, [they] have concluded that laws permitting police officers to use deadly force to
apprehend unarmed, non-violent fleeing felony suspects actually do not protect citizens or law
159
enforcement officers, do not deter crime or alleviate problems caused by crime, and do not
improve the crime-fighting ability of law enforcement agencies." Id., at 11. The submission is that
the obvious state interests in apprehension are not sufficiently served to warrant the use of lethal
weapons against all fleeing felons. See supra, at 10-11, and n. 10.
Nor do we agree with petitioners and appellant that the rule we have adopted requires the police
to make impossible, split-second evaluations of unknowable facts. See Brief for Petitioners 25;
Brief for Appellant 11. We do not deny the practical difficulties of attempting to assess the
suspect's dangerousness. However, similarly difficult judgments must be made by the police in
equally uncertain circumstances. See, e. g., Terry v. Ohio, 392 U. S., at 20, 27. Nor is there any
indication that in States that allow the use of deadly force only against dangerous suspects, see
nn. 15, 17-19, supra, the standard has been difficult to apply or has led to a rash of litigation
involving inappropriate second-guessing of police officers' split-second decisions. Moreover, the
highly technical felony/misdemeanor distinction is equally, if not more, difficult to apply in the
field. An officer is in no position to know, for example, the precise value of property stolen, or
whether the crime was a first or second offense. Finally, as noted above, this claim must be viewed
with suspicion in light of the similar self-imposed limitations of so many police departments.
IV
The District Court concluded that Hymon was justified in shooting Garner because state law
allows, and the Federal Constitution does not forbid, the use of deadly force to prevent the escape
of a fleeing felony suspect if no alternative means of apprehension is available. See App. to Pet. for
Cert. A9-A11, A38. This conclusion made a determination of Garner's apparent dangerousness
unnecessary. The court did find, however, that Garner appeared to be unarmed, though Hymon
could not be certain that was the case. Id., at A4, A23. See also App. 41, 56; Record 219. Restated
in Fourth Amendment terms, this means Hymon had no articulable basis to think Garner was
armed.
In reversing, the Court of Appeals accepted the District Court's factual conclusions and held that
"the facts, as found, did not justify the use of deadly force." 710 F. 2d, at 246. We agree. Officer
Hymon could not reasonably have believed that Garner — young, slight, and unarmed — posed
any threat. Indeed, Hymon never attempted to justify his actions on any basis other than the need
to prevent an escape. The District Court stated in passing that "[t]he facts of this case did not
indicate to Officer Hymon that Garner was `nondangerous.' " App. to Pet. for Cert. A34. This
conclusion is not explained, and seems to be based solely on the fact that Garner had broken into
a house at night. However, the fact that Garner was a suspected burglar could not, without regard
to the other circumstances, automatically justify the use of deadly force. Hymon did not have
probable cause to believe that Garner, whom he correctly believed to be unarmed, posed any
physical danger to himself or others.
The dissent argues that the shooting was justified by the fact that Officer Hymon had probable
cause to believe that Garner had committed a nighttime burglary. Post, at 29, 32. While we agree
that burglary is a serious crime, we cannot agree that it is so dangerous as automatically to justify
the use of deadly force. The FBI classifies burglary as a "property" rather than a "violent" crime.
See Federal Bureau of Investigation, Uniform Crime Reports, Crime in the United States 1
(1984).[22] Although the armed burglar would present a different situation, the fact that an
unarmed suspect has broken into a dwelling at night does not automatically mean he is physically
dangerous. This case demonstrates as much. See also Solem v. Helm, 463 U. S. 277, 296-297, and
nn. 22-23 (1983). In fact, the available statistics demonstrate that burglaries only rarely involve
physical violence. During the 10-year period from 1973-1982, only 3.8% of all burglaries involved
violent crime. Bureau of Justice Statistics, Household Burglary 4 (1985).[23] See also T. Reppetto,
Residential Crime 17, 105 (1974); Conklin & Bittner, Burglary in a Suburb, 11 Criminology 208,
214 (1973).
V
160
We wish to make clear what our holding means in the context of this case. The complaint has
been dismissed as to all the individual defendants. The State is a party only by virtue of 28 U. S. C.
§ 2403(b) and is not subject to liability. The possible liability of the remaining defendants — the
Police Department and the city of Memphis — hinges on Monell v. New York City Dept. of Social
Services, 436 U. S. 658 (1978), and is left for remand. We hold that the statute is invalid insofar as
it purported to give Hymon the authority to act as he did. As for the policy of the Police
Department, the absence of any discussion of this issue by the courts below, and the uncertain
state of the record, preclude any consideration of its validity.
The judgment of the Court of Appeals is affirmed, and the case is remanded for further
proceedings consistent with this opinion.
So ordered.

161
APPENDIX B: INCIDENT RESPONSE
INCIDENT RESPONSE - RESPOND MODEL
R Report
Become aware
Plan response
Arrive/Assess
Alarm/Inform
E Evaluate
Look for Dangers
Determine backup needs
Enter when appropriate/tactically sound
S Stabilize
Subject(s)
Scene
P Preserve
Life
o Conduct an initial medical assessment (as trained)
o Treat to level of training
o Continue to monitor the subject(s)
Evidence
O Organize
Coordinate additional responding units (if necessary)
Communicate with dispatch and others
Organize the collection of evidence (if appropriate)
N Normalize
Provide long-term monitoring (as appropriate)
Restore scene to normal
Return radio communications to normal
D Document/Debrief
Debrief self, other responding personnel, subject(s), other persons
Document incident appropriately
162
THIS PAGE INTENTIONALLY LEFT BLANK

163
APPENDIX C: DISTURBANCE
RESOLUTION
APPROACH CONSIDERATIONS
Decision-Making
Justification
Desirability
Tactical Deployment
Control of Distance
Relative Positioning
Relative Positioning with Multiple Subjects
Team Tactics
Tactical Evaluation
Threat Assessment Opportunities
Officer/Subject Factors
Special Circumstances
Level/Stage/Degree of Stabilization
INTERVENTION OPTIONS
MODE PURPOSE
A. Presence To present a visible display of authority
B. Dialog To verbally persuade
C. Control Alternatives To overcome passive resistance, active
resistance, or their threats
D. Protective Alternatives To overcome continued resistance,
assaultive behavior, or their threats
E. Deadly Force To stop the threat
FOLLOW-THROUGH CONSIDERATIONS
A. Stabilize Application of restraints, if necessary
B. Monitor/Debrief
C. Search If appropriate
D. Escort If necessary
E. Transport If necessary
F. Turn-Over/Release Removal of restraints, if necessary
164
THIS PAGE INTENTIONALLY LEFT BLANK
165
APPENDIX D: GLOSSARY
ABS: Anti-lock braking system, computer-controlled braking system that prevents
wheel lockup regardless of pedal pressure.
ACCELERATION: The rate of increased velocity with respect to time.
ACTION TIME: The period it takes the action to cycle through all the acts
necessary to fire one round.
ACTION: The assembly of functional moving parts which makes the operation of
a firearm possible; the mechanism used in the act of loading, firing, and
unloading a firearm.
ACTIVE LISTENING: Using an effective method of hearing what people say in
an attentive manner that uses both nonverbal and verbal behavior, and asking
additional questions for clarification or more detail.
ACTIVE RESISTANCE: Behavior which physically counteracts an officer’s
control efforts and which creates a risk of bodily harm to the officer, subject,
and/or other persons.
ADVERSARY: A person that opposes or attacks; in this context, a subject who
is placing you in danger of great bodily injury or death by his or her actions.
APEX: The most critical part of a turn. It is the point on the inside of the turn at
which a car finishes the entry phase and begins the exit phase. The car must be
as balanced as possible and accelerating toward the exit point (see) when it
”clips" the apex.
APPROACH CONTACT: A vehicle contact in which the officer approaches the
driver of the subject vehicle.
ARBITRATION: A dispute resolution strategy (REACT) used with one non-
compliant individual.
ARMORER: A person who has received special training, usually from a firearm
manufacturer, to clean and maintain firearms according to factory specifications.
ASSAULTIVE BEHAVIOR: Direct actions or conduct that generates bodily
harm.
ATMOSPHERE: Perception and environment surrounding the communication
model.
166
ATTENDING SKILLS: A component of active listening that uses nonverbal
communication to demonstrate attention to what people say.
AUDITORY EXCLUSION: A kind of stress-induced deafness that may occur as
part of the fight or flight response to danger.
B.A.C.: Blood Alcohol Concentration
BALANCED HAND POSITION: A wide grip on the steering wheel, with hands
approximately at the 9 o’clock and 3 o’clock position.
BACK STRAP: The rear metal portion of a handgun grip.
BANKED PAVEMENT: One side of the roadway is elevated, banked, or higher
than the opposite side; normally exists on a curve.
BARREL BUSHING: The bushing in the front of the slide of an automatic pistol
that holds the muzzle end of the barrel in place. (Note: Not all auto pistols have
separate barrel bushings.)
BARREL: That part of a firearm through which the projectile is fired; a cylinder
that also imparts spin on the projectile in flight by means of rifling in order to give
it stability and direction.
BARRIERS: Barriers are obstacles to effective communication that can be
physical, officer-generated, or interpersonal.
BASIC CONTACT: A model for law enforcement contacts with citizens.
BATON: A police impact weapon used to impede an adversary by striking parts
of the body. Conventional batons are made of wood or plastic; expanding batons
are constructed of a series of telescoping metal shafts.
BODY CHECK: A physical inspection for possible injury.
BRACKETING: The physical positioning of the contact officer and cover officer
with respect to the subject and the situation.
BRAKE FADE: The loss of braking efficiency, normally due to heat buildup
resulting from excessive use.
BRAKE LOCKUP: The application of brakes to the point that the wheels can no
longer rotate.
BRAKING DISTANCE: The distance from application of brakes to slowing or
stopping a vehicle.
167
BRAKING, THRESHOLD: The brakes are pressed firmly to a point just before
lockup and held at that point, and the wheels never lose their rolling friction.
BREACHING: Forcing entry into a building.
BREATH CONTROL: To exercise proper control of the breath during the aiming
and firing process, in such a manner as to minimize disturbance of sight
alignment and sight picture. Breath control is important in precision shooting at
long range, but is not a factor in close-range combat shooting.
BUCKSHOT: A type of shotgun load containing multiple round lead or steel
projectiles that are launched simultaneously out of the barrel in a group called a
“pattern.”
BULLET: General term used to describe the projectile fired by a firearm.
CALIBER: The diameter of a projectile, such as a bullet; the diameter of the
bore of a gun barrel. Caliber can be expressed in hundredths of an inch (.38) or
in millimeters (9mm).
CANT: Tilting a pistol slightly off vertical, used to increase stability in
unsupported shooting.
CAPABILITY: The ultimate limit of an individual’s possible development as
determined at a given time, assuming optimum environment and training from
that time onward.
CARTRIDGE CASE: A case (usually of brass, but sometimes of aluminum or
steel) which holds the propellant charge and the means of ignition (the primer).
The bullet is seated in the open end of the cartridge case.
CENTRAL NERVOUS SYSTEM: In a human being, the system of neurons,
neurochemicals, and allied structures involved in receiving sensory stimuli,
generating and coordinating responses, and controlling bodily activities; includes
the brain and spinal column.
CENTRIFUGAL FORCE: The force on a body in a curved motion that is directed
away from the axis of rotation. A force which acts or impels an object away from
the center of rotation.
CENTRIPETAL FORCE: The force on a body in a curved motion that is
directed toward the center axis of rotation. The force required for keeping a
moving mass in a circular path. A force which acts or impels an object toward a
center of rotation.
168
CHAMBER: That inner portion of the gun barrel at the breech into which the
cartridge is placed for firing, or, in the case of a revolver, the holes in the cylinder
that contain the cartridges. Also, the act of inserting a round of ammunition into
the chamber: “to chamber a round.”
CLOSE COMBAT: Engaging a target within a distance of 0-3 yards. When firing
at such close ranges, a modified position is used to minimize the possibility that
the adversary will be able to disarm the officer.
COMBAT DISTANCE: Within 12 yards distance. Within such range a shooter
can get hits on target using only the front sight.
CONCENTRATION: The will to command the mind to obey.
CONDITIONED RESPONSE: An automatic response to a given situation.
Conditioned Response can ONLY be achieved by constant and repetitive
practice. Conditioned Response is only desirable if that response is correct for
the situation by which it is triggered.
CONTINUED RESISTANCE: Maintaining a level of counteractive behavior that is
not controlled by an officer’s current efforts
CONTROLLED BRAKING: This term refers to slowing down a vehicle as rapidly
as possible without locking the wheels. Using this method of braking, vehicles
will still respond to steering inputs.
COUNTERMEASURE: An opposing measure, taken in response to the actions
of another.
COME FULL CIRCLE: Concept integrating verbalization and physical
intervention.
COMMUNICATION MODEL: A process in which a message moves from sender
to receiver.
CONGRUENCE The message received is the same as the message sent.
CONTACT/COVER: The contact officer’s primary responsibility is to talk to the
subject contacted. The cover officer observes the contact from a position of
tactical advantage and intervenes when necessary to prevent escape,
destruction of evidence, or assault on the contact officer.
CONTACTS: People to interact with.
169
CONTINGENCY PLAN: A plan made at a scene, describing what officers will do
if the suspect starts shooting, begins a countdown, releases hostages,
surrenders, etc.
CONTROL PROCESS: Achieving control of a contact or situation through
presence and dialogue, or, if necessary, through physical intervention.
CONTROL: The purpose of an officer's use of Defensive and Arrest Tactics is
control.
COOPERATIVE SUBJECT: A non-resistive subject who is controlled by the use
of verbal direction.
COUNTER-STEER: Turning the front wheels to counter the effects of a previous
turning movement or of a skid, to put the vehicle on its intended course of travel.
COVER: Anything that will stop a particular threat. Skillful use of available cover
is more important to your survival in a gunfight than is skillful shooting.
CRASH: That occurrence in a sequence of events that usually produces
unintended injury, death, or property damage.
CRISIS INTERVENTION: A method of contacting and intervening with irrational
persons.
CRITICAL MALFUNCTION: A malfunction that the shooter cannot clear in the
field and that may require the services of an armorer or gunsmith.
CYCLE OF OPERATION: The series of mechanical operations necessary to
cause a weapon to fire one round and to return to a state of readiness.
CYLINDER: Component of a revolver that carries the individual chambers. It is
held behind the barrel on an axis pin (also called the “yoke” or “crane”) and is
revolved by a mechanical link to the hammer or trigger so as to present
successive chambers to be fired in sequence.
CYLINDER RELEASE: Also called a “Thumbpiece,” it is the lever or button
manipulated to allow the cylinder to swing free of the frame of the revolver to
allow loading and unloading and the extraction of fired cartridge cases.
DAAT: A system of verbalization coupled with physical alternatives for Wisconsin
law enforcement.
DANGER ZONES: Distances at which an officer is subject to an attack.
170
DEADLY FORCE: The intentional use of a firearm or other instrument that
creates a high probability of death or great bodily harm.
DEADLY FORCE REACTIONS: Determining if a threat is so serious that the
only appropriate response capable of immediately stopping it is the use of deadly
force.
DEBRIEFING: The procedure used after the use of force or a critical incident to
apply closure, treatment, and/or evaluation. Also a technique used to calm self,
partner, and the subject.
DECELERATION: The rate of change of velocity with respect to time. The
slowing down of a body.
DECOCK: A mechanical procedure whereby a cocked hammer is safely lowered
to the rest position without contacting the firing pin and accomplished by the
activation of a decocking lever or switch without touching the trigger.
DE-ESCALATE: To decrease in intensity, to select another, less extreme
alternative.
DEFENSIVE DRIVING: Operating a vehicle in such a manner as to be able to
avoid involvement in a preventable crash, no matter what the road and weather
conditions. Synonymous with precision driving.
DEFENSIVE AND ARREST TACTICS: A training program for law enforcement
that is a system of verbalization skills coupled with physical alternatives.
DEFLECT: Redirect a person’s attention from his or her agenda using
verbalization.
DELIVERY SYSTEM: In this context, the capacity for use of a weapon.
DIM-LIGHT SHOOTING: Shooting in low light conditions where it is not possible
for the shooter to see the sights of the weapon; it may be so dark that the shooter
needs artificial illumination as an aid to target identification.
DIRECTED FIRE: Shooting using the front sight.
DISENGAGE: To remove oneself from a situation; to cease involvement in a
course of action.
DISTURBANCE RESOLUTION: A higher level of verbal control than a basic
contact. Examples are arbitration and mediation, which are used to defuse
dangerous situations. Also, the conceptual model for officer's use of intervention
options.
171
D.O.N.E.: An acronym describing the conditions under which disengagement
and/or escalation to physical force would be appropriate.
DOOR OPENERS: Comments that encourage dialogue.
DOUBLE ACTION: A pistol firing mechanism which permits firing in either of two
ways; either by manually cocking the hammer and then releasing it by trigger
pressure, or by pulling through on the trigger so as to cock and release the
hammer.
DRY FIRE: A method of practicing the fundamentals of marksmanship that does
not involve the use of live ammunition. Dry Fire is a good way to develop trigger
control and sight alignment and sight picture. It is also possible to practice
reloading and clearing malfunctions in this way.
DUE REGARD: Phrase implying that a reasonably careful person, performing
similar duties and acting under similar circumstances, would act in the same
manner.
DYSFUNCTION: Temporary disruption of the subject’s ability to resist or attack.
EAR PROTECTION: Any type of headphones or earplugs worn to protect the
ears and hearing from the effect of loud gunfire.
EARLY WARNING SIGNS: Signals or certain behaviors provided by the subject
that are often associated with a high level of danger to officers.
ECD: Electronic control device.
EJECTION PORT: The opening in the top of the slide of an automatic pistol out
of which the empty case is ejected.
EJECTOR: A component of a weapon that tips the spent cartridge case out of
the ejection port after it has been extracted from the chamber.
ELEVATION: The vertical component of a sighting system, i.e., the up or down
movement of a sight that changes the bullet’s point of impact vertically.
EDGED WEAPONS: Any item that by design or demonstrated use is capable of
causing injury by stabbing, cutting, or slashing.
EMPATHY: To have understanding of and identify with another’s situation and
feelings.
172
EMERGENCY DRIVING: A response to a situation that is life threatening or that
involves an extreme property loss; justifies the legal use of an emergency
warning device.
ESCALATE/DE-ESCALATE: To increase/decrease the intensity or move to a
higher/lower level of force or control.
EVASIVE ACTION: Any action taken by a driver to avoid a hazardous situation;
steering, braking, or accelerating to avoid a collision or other crash.
EVOC: An acronym for Emergency Vehicle Operation Course.
EXIT POINT: The point in a turn, typically at the far outside edge of the roadway,
at which the car has completed the turning maneuver and all the dynamic forces
acting on the car are in balance.
EXTRACTOR: In an automatic pistol, a claw-like device that removes the
cartridge case from the chamber of a weapon and presents it to the ejector.
FATAL FUNNEL: Any congestion point that officers must traverse while
exposed to a wider threat area.
FEEDING: The process of driving live cartridges from the magazine into the path
of the bolt or slide prior to chambering.
FEED RAMP: The slanted metal surface at the rear of a barrel that guides
cartridges into the chamber during feeding.
FIGHT-OR-FLIGHT FALLACY: An officer-generated barrier that provides only
two options of behavior for a contacted individual.
FIELD STRIP: To disassemble the major components of a firearm for cleaning,
lubrication, and inspection. Unless you are a trained armorer, you should never
disassemble a firearm past the point listed in the owner’s manual.
FIREARM: A weapon in which a projectile is launched as a result of chemical
combustion. Usually used to describe “small arms,” those weapons such as
handguns, rifles, or shotguns that can be easily operated by one person.
FLASHLIGHT-ASSISTED SHOOTING: In dim light or darkness means the use
of a flashlight as an aid to illuminating the target.
FLOOR PLATE: The base or bottom of a magazine, usually capable of being
detached for cleaning.
173
FOLLOWER: That part of the magazine that rides on top of the spring on which
the cartridges rest for feeding into the chamber.
FOLLOWING SKILLS: A component of Active Listening that uses verbal
techniques to encourage a person to continue talking and provide additional
information.
FOLLOW-THROUGH: To pursue fully and to carry an act to completion. When
all of the integrated elements of firing a shot are maintained until the shot strikes
the target, such as stance, sight alignment and sight picture, trigger control and
breath control. Also, the third major part of Disturbance Resolution.
FORCE: That which changes the state of rest or motion of matter, measured by
the rate of change of momentum. Mass times acceleration.
FOULING: The accumulation of a deposit within the bore and mechanism of a
firearm caused by unburned powder and byproducts of combustion remaining
after the cartridge has been fired.
FRICTION: Resistance to any force trying to produce motion; constantly present
and always working opposite the direction in which an object is being moved. A
force of resistance acting on a body which prevents or inhibits any possible
slipping of the body.
FRONT-END SWING: Themovement of the front end in the opposite direction of
the steering input when backing up.
FUNCTION CHECK: An inspection and test of the mechanical operations of a
weapon, conducted after cleaning or repair, to verify that the weapon is
serviceable.
FUNCTIONAL CHARACTERISTICS: The method of operation of a weapon, to
include the cycle of operation and the manipulation of external controls such as
the trigger or magazine release.
FUNDAMENTALS OF MARKSMANSHIP: Basic skills necessary to the proper
accomplishment of the integrating act of shooting, to include stance or position,
grip, trigger control, sight alignment, sight picture, breath control, and follow-
through.
GAUGE: The diameter of the bore of a shotgun, expressed in the number of
lead balls of that diameter required to make a pound. A “12-gauge” shotgun is
one with a diameter of such size that twelve balls of lead, each fitting the bore,
weigh one pound.

174
GREAT BODILY HARM: (§ 939.22(14), Wis. Stats.) Means bodily injury which
creates a substantial risk of death or which causes serious permanent
disfigurement, or which causes a permanent or protracted loss or impairment of
the function of any bodily member or organ or other serious bodily injury.
GREATER DANGER EXCEPTION: The greater danger exception allows you to
shoot without target isolation if the consequence of not stopping the threat would
be worse than the possibility of hitting an innocent person.
GRIP: The method of placing the hands upon the firearm. GRIPS (stocks) are the
portion of the firearm held in the hand.
GROOVES: The spiral cuts in the bore of a weapon that form the rifling and
affect spin on the bullet. The uncut portions between grooves are the “lands.”
The type of weapon, ammunition, and designer preferences influence the
number and form of the grooves.
GROUP: A group of shots on a target which shows a pattern with respect to the
point of aim.
HAMMER: The mechanism that strikes the firing pin in a firearm; a rotating
element, driven by the mainspring, which imparts the firing impetus to the firing
pin, the latter which may be part of the hammer or separate.
HANDCUFF GROOVE: Proper location for placement of handcuffs.
HANDCUFFS: Temporary restraining device.
HANDLING: A vehicle’s ability to quickly and accurately respond to a driver’s
command with no or minimal negative reaction and the ability to compensate for
sudden irregularities in road or wind conditions.
HANGFIRE: An ignition failure in a cartridge that results in a delay before the
charge fires. Caused by faulty ammunition—frequently by a primer contaminated
by cleaning solvent or penetrating oils.
HIGH-RISK VEHICLE CONTACT: A vehicle contact in which the officers'
perception of danger is very high. Typically, these contacts involve multiple
officers, ordering of vehicle occupants out one at a time, etc.
HOT BUTTONS: Actions, remarks, insults, or challenges that provoke an
emotional and less than professional response from an officer (officer-generated
barrier).
175
HYDROPLANING: Tires ride upon the water causing loss of contact with the
surface of the road. Contributing factors are water depth, tire pressure, and
vehicle speed.
IMMEDIATE ACTION: The action taken by the shooter as rapidly as possible to
correct a malfunction without taking the time to analyze the cause.
IMMEDIATE COVER: Objects that can shield you from hostile fire and that are
accessible in time of emergency. Another term for this would be “available
cover.”
IMMINENT THREAT: An impending likelihood of trouble; in this context,
“Imminent Threat” of death or great bodily harm to you or another is a justification
for the use of deadly force.
IMPACT WEAPON: (Baton) Weapon whose force is manifested by blunt force
caused by striking.
IN-BATTERY: The position of the barrel of a weapon when it is ready to fire. An
“in-battery reload” of an auto pistol is one where a round is in the chamber, the
slide is forward, and the magazine is removed and exchanged for a fully loaded
one.
INCIDENT RESPONSE: A model of systematic approach for proper police action
(RESPOND).
INERTIA FORCE: The tendency of a body to resist acceleration; the tendency of
a body at rest to remain at rest or a body in motion to stay in motion in a straight
line unless disturbed by an external force.
INITIAL APPROACH: Considerations of an officer before making contact.
INTENT: The act or fact of intending, as to do something; intent is a necessary
element in most crimes.
INTERVENTION OPTIONS: An element of Disturbance Resolution in DAAT
containing five modes in which an officer can intervene with a subject.
INVISIBLE DEPLOYMENT: Remaining out-of-sight or undetected by the
perpetrator while establishing a perimeter or preparing to confront the suspect.
JACKET: The metal covering over the lead core of the bullet, found in ball and
hollow point ammunition.
KINETIC ENERGY: The energy possessed by a body in motion. Kinetic energy
= ½ mass x velocity
2
.
176
LANDS: The interior surface of a gun barrel between the grooves.
LATERAL MOVEMENT: Movement side to side; in this context, usually a quick
move to one side or another to take advantage of available cover.
LEAD FOULING: A deposit of lead left in the rifling grooves of a firearm after
prolonged firing of lead bullets. Eventually has a detrimental effect upon
accuracy if not removed, and is the reason for the adoption of jacketed
compound bullets.
LEAPFROGGING: A movement technique where officers alternate moving and
covering the moving officer.
LIABILITY: Direct civil is the liability that is imposed upon a person for causing
injury to another through negligent or willful misconduct. Vicarious civil is the
liability that is imposed upon one who is without personal fault or complicity
because of the relationship that person bears towards the person who actually
performed the wrongful act or omission.
LOAD: To place ammunition into the chamber of a gun.
LOOK-SHOOT: A technique for traverse fire on multiple targets, where the
shooter engages the first target, looks to visually locate the second target, and
then swings the weapon to fire on the second target. The “Look-Shoot”
technique prevents an officer from “over-running” the target when traversing.
MAGAZINE: That part of a gun or firearm that holds ammunition ready for
chambering.
MAGAZINE DISCONNECT SAFETY: A safety device on some semi-auto
firearms: a linkage that disconnects the trigger mechanism when the magazine is
removed, preventing fire even when a round is chambered.
MAGAZINE RELEASE: A button or switch depressed or moved in order to
remove the magazine from the weapon.
MAGAZINE WELL: That opening in the receiver of a rifle or in the grip of an auto
pistol where the magazine is inserted.
MAINSPRING: That spring which furnishes energy to the hammer or striker.
MALFUNCTION: Any mechanical interruption in the cycle of operation of a
weapon, which may or may not keep it from firing.
MASTER EYE: Also, “Dominant Eye,” is the eye that takes control during
binocular vision (both eyes open). Most people have the master eye on the
177
same side as their master hand. Some individuals are “cross dominant” meaning
that the master eye is on the opposite side from their master hand.
MEDIATION: A conflict resolution strategy to assist disputants in voluntarily
reaching a mutually acceptable decision.
MENTAL CONDITIONING: The preparation of the driver to deal with the
psychological, physiological,and environmental conditions that may be
encountered while operating a motor vehicle.
METERING: Also known as “slicing the pie.” Taking small views of a potential
threat area to locate suspects while limiting your own exposure; performed during
a “Threshold Evaluation” and at other times.
MUTUAL AID: Upon the request of any law enforcement agency, personnel from
another law enforcement agency may assist the requesting agency within their
jurisdiction and upon that request the assisting officer shall have full police
powers within the requesting jurisdiction, including all protections for the officer
such as worker’s compensation.
MUZZLE: The end of the barrel of a gun from which the bullet or projectile
emerges.
MUZZLE BLAST: Sudden air pressure exerted at the muzzle of a weapon by the
rush of hot propellant gases and air upon firing.
MUZZLE VELOCITY: The speed of a bullet, relative to the gun, at the instant it
leaves the muzzle. Usually expressed in feet per second (fps).
MUZZLE WHIP: The tendency of the muzzle to climb in recoil.
MOMENTUM: The product of a body’s mass times velocity. An amount of
motion; it is the property of a moving body which determines the length of time
required to bring it to a rest.
NEGLIGENCE: For civil litigation in some states, it is the failure of a law
enforcement officer to conform his or her conduct to the standard of a reasonable
law enforcement officer under the same or similar circumstances.
NEWTON’S FIRST LAW OF MOTION: Every body continues in its state of rest
or of uniform motion in a straight line unless acted upon by another force.
NEWTON’S SECOND LAW OF MOTION: A change of motion is proportional to
force applied and takes place in the direction of the line of action of the force.
178
NEWTON’S THIRD LAW OF MOTION: To every action there is always an equal
and opposite reaction.
NOMENCLATURE: A set or system of names or symbols given to items of
equipment as a means of classification and identification.
NON-APPROACH VEHICLE CONTACT: A vehicle contact in which the officer
does not approach the subject vehicle, because of an increased perception of
threat. The officer may order the driver out of the vehicle or wait for backup
before making contact.
NON-CRITICAL MALFUNCTION: A malfunction that the shooter can clear in the
field without assistance.
NON-EMERGENCY DRIVING: All operations of a vehicle in other than an
emergency or pursuit mode, as defined herein.
OBJECTIVELY REASONABLE: The standard by which many actions of a police
officer are judged: Would your actions be judged appropriate by a reasonable
person based on the totality of circumstances and the information known to you
at that time?
OFFICER/SUBJECT FACTORS: Some of the criterion used in evaluating a
subject and selecting the appropriate response option. How officer(s) “match up”
to the subject, how many officers are there compared to the number of subjects,
as well as age, size, relative strength, and skill.
OUT-OF-BATTERY: When the action of the weapon is open and the gun is
unable to fire.
OVERSTEER: The characteristic of a vehicle to tighten its turning radius as the
rear end slips to the outside of the curve. This is normally caused by too much
steering input by the driver.
PANIC BRAKING: Loss of vehicular control due to driver-induced sudden
locking of all wheels.
PARASYMPATHETIC NERVOUS SYSTEM: That component of the nervous
system that controls the functions of the body under normal, non-stressful
conditions.
PASSIVE RESISTANCE: Non-compliant and non-threatening behavior.
PERCEPTION: (1) Awareness of objects and other data through the medium of
the senses, and (2) having insight or intuition as an abstract quality.
179
PERIMETER: Formed when officers surround a location to prevent the escape
of a suspect and/or contain the threat posed by the suspect.
PERSONAL DISTANCE: Within 10 feet distance from a subject.
PHYSICAL FORCE: Intervention using bodily activity or equipment.
PHYSICAL INTERVENTION: To establish and maintain control with the use of
specific psychomotor skills.
PINCER GRIP: Encircling with the thumb and middle finger.
PISTOL: A handgun using the energy of a discharged cartridge to eject the fired
cartridge and load a live cartridge into the chamber while recocking the action.
POINT OF AIM: That place on the target the shot is intended to go; at the top of
the front sight if proper alignment between the front and rear sights is obtained.
POLICE JARGON: Specialized or technical language of the law
enforcement/criminal justice profession.
POP: "Provoke Other People"; an officer-generated barrier.
POSITION OF ADVANTAGE: Provides the officer the ability to escalate force in
order to maintain control.
POWDER: A slang term for gunpowder.
PRE-ATTACK POSTURES: Behaviors that may indicate imminent danger of
physical assault.
PRECLUSION: The officer reasonably believes all other options have been
exhausted or would be ineffective.
PRESENCE: A person’s bearing which appears self-assured and effective and
commands respectful attention.
PRESUMED COMPLIANCE: An officer-generated barrier exhibited by officer
complacency when dealing with human behavior.
PRIMARY THREAT: The adversary armed with the most dangerous weapon or
the one immediately capable of inflicting great bodily harm or death.
PRIMER: The sensitive component in the base of the cartridge that when struck
by the firing pin explodes and ignites the propellant charge in the cartridge case.
180
PRIVILEGE: Section 939.45, Wis. Stats., states certain conduct is defensible
from prosecution under certain circumstances. The defense of privilege can be
claimed: conduct is in defense of persons or property, conduct is in good faith,
and conduct is a reasonable accomplishment of a lawful arrest.
PROFESSIONAL: An individual that exhibits behavior and traits expected within
their profession.
PROJECTILE: An object, such as a bullet, projected by an applied exterior force
and continuing in motion by its own inertia.
PROXEMICS: The relationship of distance and relative positioning.
PSYCHOMOTOR: Of or pertaining to a response involving both the brain and
motor activity.
PUBLIC EYE/PUBLIC RECORDS: Revealed to or open to knowledge or
judgment of community.
PURSUIT: An event involving a peace officer attempting to apprehend a person
in a motor vehicle while that person is trying to avoid capture by willfully failing to
yield to the officer’s signal to stop. It also includes the catching or closing the
distance between a police vehicle and the violator’s vehicle under circumstances
where the person is not yet aware of the police action.
RANGE: A prescribed area where weapon firing is conducted.
REACTION TIME: The amount of time it takes for a person to react to a
particular stimulus. Fatigue and use of drugs or alcohol may affect reaction time.
The total length of time it takes for the brain to receive the information from the
senses, make a decision, transmit the decision to the appropriate muscles, and
for the muscles to respond.
R.E.A.C.T.: A systematic dispute resolution strategy (see arbitration).
REACTION SIDE: Non-firearm side.
RECEIVER: The basic unit of a firearm that the barrel and other components are
attached. (Also referred to as the “frame.”)
RECOIL: The backward movement of a firearm caused by the pressure of the
propellant gases pushing against the bullet being propelled forward when the
firearm is discharged.
RECOIL SPRING: Aspring in a semi-automatic weapon which cushions the
rearward movement of the slide or bolt and returns it to the forward position; the
181
spring that returns the action into battery after the discharge of a chambered
round.
RECOIL SPRING GUIDE ROD: A rod the recoil spring rides on to prevent
kinking. Not all auto pistols have recoil spring guide rods.
RECOVERY: A procedure to follow after drawing your weapon that allows you to:
evaluate the threat, look around to check the environment for adversaries, break
tunnel vision, decock if needed and remove your finger from the trigger guard
prior to reholstering.
RESISTIVE TENSION: Level of agitation in a subject’s body.
R.E.S.P.O.N.D.: A systematic seven-step response for law enforcement to an
incident.
RESPONDING SKILLS: A component of Active Listening using verbal skills to
illustrate understanding of what people are expressing and feeling.
REVOLVER: A handgun having a rotating cylinder carrying several rounds of
ammunition, each round being in a chamber that comes into alignment with the
barrel before the round is fired.
RIFLED SLUG: A slug (see) with rifling grooves to stabilize the trajectory.
RIFLING: Spiral grooves cut into the interior of a gun barrel to spin the bullet and
impart gyroscopic stabilization to it. The degree of twist of the rifling depends
upon the weight and length of the bullet fired from the weapon.
ROLLOVER PRONE: A modified prone position that results in greater shooter
comfort and accuracy at extended ranges; also maximizes the use of available
cover.
SAFETY: (1) The state of being safe from threat, personal injury, and danger or
loss, and (2) any device or mechanism that locks or blocks the trigger or hammer
so that a firearm cannot be discharged.
SEAR: Part of the firing mechanism of a weapon, linked to the trigger, which
engages on the striker, firing pin, hammer or bolt, and is withdrawn from
engagement to fire the weapon.
SELF-DEFENSE: The act of defending one’s person by physical force (§ 939.48,
Wis. Stats.). “The actor may intentionally use only such force or threat thereof as
he or she reasonably believes is necessary to prevent or terminate the
interference. He or she may not intentionally use force which is intended or likely
to cause death or great bodily harm unless he or she reasonably believes that
182
such force is necessary to prevent imminent death or great bodily harm to him- or
herself or another.”
SHOULDER SHIFT: Pre-attack posture.
SIGHT: A device on a firearm to view the target and give proper direction to the
projectile.
SIGHT ALIGNMENT: The relationship of the front and rear sights with each
other. An ideal sight alignment has the top of the front sight level with the top of
the rear sight and the front sight is evenly centered in the rear sight notch.
SIGHT PICTURE: The relationship between sight alignment and the target.
SIGHTING IN: The adjustment of a weapon sight so that the bullet will strike the
point of aim at some specified distance.
SILENT EMERGENCY: An emergency situation in which police do not use a
siren or other audible signal in response to a crime.
SINGLE ACTION: A mode of firing in which the hammer is manually cocked and
then released by trigger pressure.
SKID: Loss of traction between the tire surface and the road surface. Cornering
skid is the loss of traction in negotiating a curve or a turn at a speed faster than
can be sustained by the tire-road cornering traction limits. Power skid is the loss
of traction when excessive power is applied, causing the drive wheels to spin and
no longer provide traction. A secondary skid is one in the opposite direction of
the original skid.
SLIDE: In automatic pistols, the device which positions the barrel, acts as the
breech, and slides back and forth on the frame or receiver.
SLIDE STOP: A lever on an automatic pistol that holds the slide open, usually
after the last round has been fired. Allows the slide to go forward when
depressed.Sometimes called a “Slide Release” or “Slide Catch” or “Slide Lock.”
SLUG: A single ball projectile, weighing between 7/8 and 1-1/4 ounce, used in
shotguns when the situation requires better long range accuracy and/or
penetration ability than is possible with a multiple projectile load like buckshot.
SPACE CUSHION: The open area surrounding a vehicle while it is in motion, or
an “escape route” to the front, rear, and sides.
183
SPACE MANAGEMENT: The driver selection of the best speed control, path of
travel, or communication technique to maximize control of the space surrounding
the vehicle.
SPECIAL CIRCUMSTANCES: Factors or situation that may justify rapid
escalation of force or selection of higher force options.
STEP SLIDE: A movement technique used to minimize the possibility of
stumbling or tripping over your own feet.
STOPPAGE: Any unintentional interruption in the cycle of operation.
STRONG SIDE: Firearm side.
SUBJECT DEBRIEFING: A procedure to calm and attend to an individual after
the use of physical intervention.
SYMPATHETIC NERVOUS SYSTEM: The component of the nervous system
that controls the functions of the body under conditions of great stress or danger
and that regulates the involuntary reactions to stress.
TANG: The curved portion at the top of the back strap of an automatic pistol that
sweeps back over the web of the firing hand.
TARGET ACQUISITION: The process of locating your adversary.
TARGET ASSESSMENT: Analyzing the situation and choosing the proper
response option.
TARGET IDENTIFICATION: The process of identifying the subject as the
adversary that is placing you and/or others in “imminent danger.”
TARGET ISOLATION: The process of separating the subject from innocent
persons.
TARGET SPECIFIC DIRECTED FIRE: Purposeful, controlled, sustained fire
directed at a perpetrator who has caused or imminently threatens to cause death
or great bodily harm to you or others, but whom you may not be able to clearly
observe.
TEAM TACTICS: Unity of effort between two or more officers attempting to
control a subject.
THRESHOLD BRAKING: The technique of applying brake pedal pressure just to
the point of lockup (the threshold) and maintaining the pressure at that point.
Generates maximum braking power and maintains steerability.
184
THRESHOLD EVALUATION: The use of “metering” through a doorway or other
funnel, to assess the area beyond the threshold.
TOTALITY OF THE CIRCUMSTANCES: Represents all information known to
the officer at the moment action is taken and the facts used to judge the
appropriateness of the action.
TRAIL BRAKING: The technique of gradually reducing brake pressure after the
car has begun to turn into the corner.
TRAINING AND EXPERIENCE: The sum total of an officer’s life experiences
and training.
TRAVERSE FIRE: The process of engaging multiple targets using the “Look-
Shoot” technique.
TRIGGER: The mechanism that is actuated by the finger and that releases the
hammer or firing pin.
TRIGGER CONTROL: The ability to pull the trigger smoothly without disturbing
the proper alignment of the sights.
TRIGGER GUARD: A curved piece of metal, attached to the frame, which
surrounds and protects the trigger.
TRIGGER LOCK: A safety device that fits over the trigger guard and immobilizes
and prevents access to the trigger. It is a good safety device for firearms
storage.
TRUE EMERGENCY: A situation in which there is a high probability of death or
serious injury to an individual, or significant property loss, and action by an
emergency vehicle operator may reduce the seriousness of the situation.
TUNNEL VISION: A narrow arc of vision an individual experiences under stress.
The lens of the eye flattens to give sharper vision, but this cuts down on
peripheral vision. (Peripheral vision is a wide arc of vision that allows a person to
see objects to the right and left of center.) To avoid this, you have to consciously
look around during a confrontation to avoid visually “locking in” on one adversary
and missing others that may present a threat.
TURN-IN POINT: The spot at the entrance of a turn at which the driver first turns
the steering wheel to initiate the cornering sequence.
UNCOOPERATIVE SUBJECT: A person who will not comply with verbal
direction.
185
UNIFIED TACTICAL TRAINING: Wisconsin’s integrated system of training in
verbal and physical skills and concepts.
UNLOAD: To remove the round from the chamber and/or remove the magazine.
UNSUPPORTED SHOOTING: Firing with only one hand.
UNWANTED DISCHARGE: An unintended firing of a weapon caused by error or
carelessness on the part of the operator and not attributable to a mechanical
malfunction or breakage.
VEHICLE CONTROL: Developing an understanding of the principles and
developing the proficiency pertaining to the successful operation of vehicles
under all driving conditions.
VEHICLE DYNAMICS: Any force or condition that effects the path of a vehicle in
motion.
VEHICLE, MARKED: An authorized emergency vehicle equipped with an
emergency roof light or emergency lights mounted in the grill area, or the front or
rear window areas; a siren; and police agency identification decals. An
unmarked vehicle may or may not be equipped with concealed emergency lights
and siren, and has no visible indicators that it is a law enforcement vehicle.
VERBAL CONTROL: Directions issued by the officer to command the adversary
what to do.
VERBAL STUN: A short, very loud, shouted verbal command that serves as a
warning and may impede the subject’s neuro-muscular function.
VERBAL WARNING: A clear command, followed by a contingency, which is a
statement of your intended actions if your order is not obeyed.
VERTICAL STUN: Create dysfunction by directing the subject into a vertical
surface (e.g., a wall).
VISUALIZATION: A process of mental rehearsal similar to directed daydreaming.
In visualization, the officer imagines realistic situations that might occur and how
he/she might best respond to them.
VOLUNTARY COMPLIANCE: Willingly submitting or yielding.
WARNING SIGNS OF DANGER: Your reaction in a tactical situation depends on
your perception of warning signs such as the subject’s sudden escalation of
anger or the subject’s suddenly reaching for or drawing a weapon.
186
WEAPON: Any instrument or device used for attack or defense in a fight or in
combat.
WEAVER STANCE: A shooting position invented by Jack Weaver in 1959. The
stance offers good recoil control, a stable firing platform, and mobility and
flexibility in application. Components: reaction side forward, strong side back,
knees slightly bent, support elbow flexed and pointing down, strong elbow locked
or slightly bent, strong arm pushing out slightly, support arm pulling back slightly.
WEIGHT TRANSFER (vehicle): The shift in the distribution of weight on the four
tires caused by a change in the car’s status. The transfer of weight to the front,
rear, or either side caused by acceleration, deceleration, or turning.
WHEELBASE: The distance from the center of the front wheels to the center of
the rear wheels.

187
APPENDIX E – LAW ENFORCEMENT
CODE OF ETHICS
LAW ENFORCEMENT CODE
OF ETHICS
AS A LAW ENFORCEMENT OFFICER, my fundamental duty is to serve the
community; to safeguard lives and property; to protect the innocent against deception, the
weak against oppression or intimidation and the peaceful against violence or disorder; and to
respect the constitutional rights of all men to liberty, equality and justice.
I WILL keep my private life unsullied as an example to all and will behave in a manner that
does not bring discredit to me or my agency. I will maintain courageous calm in the face of
danger, scorn, or ridicule; develop self-restraint; and be constantly mindful of the welfare of
others. Honest in thought and deed in both my personal and official life. I will be exemplary
in obeying the law and the regulations of my department. Whatever I see or hear of a
confidential nature or that is confided to me in my official capacity will be kept ever-secret
unless revelation is necessary in the performance of my duty.
I WILL never act officiously or permit personal feelings, prejudices, political beliefs,
aspirations, animosities or friendships to influence my decisions. With no compromise for
crime and with relentless prosecution of criminals, I will enforce the law courteously and
appropriately without fear or favor, malice or ill-will, never employing unnecessary force or
violence and never accepting gratuities.
I RECOGNIZE the badge of my office as a symbol of public faith, and I accept it as a
public trust to be held so long as I am true to the ethics of the police service. I will
constantly strive to achieve these objectives and ideals, dedicating myself before God to my
chosen profession... law enforcement. I will never engage in acts of corruption or bribery,
nor will I condone such acts by other police officers. I will cooperate with all legally
authorized agencies and their representatives in the pursuit of justice.
I KNOW that I alone am responsible for my own standard of professional performance and
will take every reasonable opportunity to enhance and improve my level of knowledge and
competence.
I WILL constantly strive to achieve these objectives and ideals, dedicating myself before
God to my chosen profession…law enforcement.
Signed ___________________________________________

188
END NOTES
1
Wis. Stat. §895.46.
2
Quoted with permission from Defensive Handgunning: A Treatise on Handgun Carry and Use
(Rehberg, 2007).
3
Escobedo v. Bender, 600 F.3d 770, Seventh Circuit U.S. Court of Appeals (2010); Armstrong v.
Village of Pinehurst, Fourth Circuit U.S. Court of Appeals, 15-1191 (2016).
4
Brown v. Blanchard and Walworth County, Seventh Circuit U.S. Court of Appeals, 14-2808
(2015).
5
“Relative culpability”, as taken into account in the US Supreme Court decision of Scott v. Harris
(in appendix).
6
“The desire to resolve quickly a potentially dangerous situation is not the type of government
interest that, standing alone, justifies the use of force that may cause serious injury.”) Phillips v.
Community Ins. Corp., 678 F.3d 513, Seventh Circuit U.S. Court of Appeals (2012).
7
Information taken from Taser International version 13 Instructor material
8
The photographs of ECD’s were taken from manufacturer and retailer websites – Nova stun belt
(left), and Sepco stun belt (right).
9
The photographs of ECD’s were taken from manufacturer and retailer websites – New
Generation ECD (left), and Sabre stun gun (right). Both stun shields from Nova.
10
Image adapted from Taser International version 15 Instructor material
11
Photo adapted from Taser International version 15 Instructor material
12
Defensive and Arrest Tactics: A Training Guide for Law Enforcement Officers, December 2014,
pp. 9-11.
13
Electricity 101 - Some common terms used in understanding electrical units. For purposes of
theses explanations, numbers from the Taser X26 are used.
Current (amperes) “A”: “Flow”-total electrons per second.
• It’s not the volts that are dangerous; it’s the amps that determine safety.
• The electrical output of the TASER is 50,000 volts. The voltage may seem high, but
the average current in the system is well below dangerous levels. The X26 output is
2.1mA (0.0021 amps).
Voltage (volts) “V”: “Pressure” pushing electrons.
• The high peak arcing voltage of 50,000 volts only occurs when the arc is required to
jump a gap such as between the electrodes on the end of the X26, or when a probe
lodges in loose clothing and must jump the gap to the body. When traveling across
the human body, the peak voltage drops to 1200 V for the X26. Reports that the
TASER devices send 50,000 volts through the body are inaccurate.
• Carpet Static discharge - 30,000 V.
• Van de Graaff Generator 1,000,000+ V.
Energy (joules) “J”: Energy in single pulse.
• Energy stored in device per pulse: 0.36 joules.
• Energy delivered per pulse: 0.07 joules, compared to external cardiac defibrillators
which typically deliver 150-400 joules per pulse.
14
Taken from Taser International version 13 Instructor material
15
Wis. Stat. §939.45(4)
16
Wis. Stat. §939.48(5)
17
Wis. Stat. §939.49(1)
18
Wis. Stat. §66.0511(2)
19
“A person is privileged to defend a 3rd person from real or apparent unlawful interference by
another under the same conditions and by the same means as those under and by which the
person is privileged to defend himself or herself from real or apparent unlawful interference,
provided that the person reasonably believes that the facts are such that the 3rd person would
be privileged to act in self-defense and that the person's intervention is necessary for the
protection of the 3rd person.”

189
20
The Seventh Circuit Court of Appeals said, “Because we as Americans respect the dignity of
human life, the firing of a weapon must never become an automatic response to the law
enforcement officer when attempting to capture a fleeing felon. Law enforcement officers must
never forget that their decision to use a weapon must be reasonable given the totality of the
facts and circumstances known to them at the critical moment the decision is made to use
deadly force.” Ford v. Childers, 855 F.2d 1271, Seventh Circuit U.S. Court of Appeals (1988)
21
Criminal Law Handbook for Wisconsin Law Enforcement, p. 9. Wis. Dept. of Justice, 2016.
22
Adapted from a PowerPoint created by Michael D. Curtis, M.D., EMS Medical Director Saint
Michael’s Hospital, Stevens Point, Wisconsin; St. Clare’s Hospital, Weston, Wisconsin; Ministry
Health Care. Used by permission.
23
Michael Curtis, M.D.
24
While the existence of Excited Delirium as a distinct condition is still somewhat controversial in
the medical world, autopsies of persons who have died in police custody after violent
confrontations have revealed certain abnormalities in the brain and blood chemistry that are
unlikely to be the result of police action. Usually, the person has ingested a stimulant drug that
may serve as a trigger to set the process in motion. In some cases, psychiatric drugs may also
be involved.
25
From a PowerPoint by Michael D. Curtis, M.D.
26
Terry v. Ohio, (1968), in the Appendix.
27
There are many instances of subjects claiming to be police officers while they are merely
impersonating the police. Wisconsin examples: La Crosse man arrested for impersonating
police officer in Caledonia, WXOW TV, December 19, 2013. Racine man accused of
impersonating officer, Journal Times, January 3, 2014. Judge Won't Dismiss Case Against
[Wausau] Man Accused of Impersonating Officer, WSAW TV, March 21, 2014. [Eau Claire]
Man charged with impersonating police officer, WKOW TV. [Spooner] Wisconsin man allegedly
caught on video drinking, firing gun, impersonating officer, Pioneer Press, March 27, 2016.
[Sheboygan] Man stops semi, says ‘apologize to Jesus’, Sheboygan Press, March 2, 2016.
[Sparta] Men Impersonate Officer, Post it on YouTube, WEAU TV, November 24, 2008. (All
sites accessed 8/5/16).
28
https://www.law.cornell.edu/supremecourt/text/392/1
29
http://caselaw.findlaw.com/us-supreme-court/490/386.html
30
http://caselaw.findlaw.com/us-supreme-court/471/1.html
