
SSH.COM
Tectia
®
Client/Server 6.6 (Unix)
Quick Start Guide
19 August 2022

Tectia
®
Client/Server 6.6 (Unix): Quick Start Guide
19August2022
Copyright © 1995–2022 SSH Communications Security Corporation
This software and documentation are protected by international copyright laws and treaties. All rights reserved.
ssh® and Tectia® are registered trademarks of SSH Communications Security Corporation in the United States and in certain other
jurisdictions.
SSH and Tectia logos and names of products and services are trademarks of SSH Communications Security Corporation. Logos
and names of products may be registered in certain jurisdictions.
All other names and marks are property of their respective owners.
No part of this publication may be reproduced, published, stored in an electronic database, or transmitted, in any form or
by any means, electronic, mechanical, recording, or otherwise, for any purpose, without the prior written permission of SSH
Communications Security Corporation.
THERE IS NO WARRANTY OF ANY KIND FOR THE ACCURACY, RELIABILITY OR USEFULNESS OF THIS
INFORMATION EXCEPT AS REQUIRED BY APPLICABLE LAW OR EXPRESSLY AGREED IN WRITING.
For Open Source Software acknowledgements, see appendix Open Source Software License Acknowledgements in the User Manual.
SSH Communications Security Corporation
Karvaamokuja 2b, Suite 600, FI-00380 Helsinki, Finland

3
Table of Contents
1. About This Document .................................................................................................. 5
1.1. Reference Documents .............................................................................................. 5
1.2. Component Terminology .......................................................................................... 6
1.3. Documentation Conventions ...................................................................................... 7
1.3.1. Operating System Names ................................................................................... 8
1.4. Customer Support ................................................................................................... 9
2. Installation ................................................................................................................ 11
2.1. Preparing for Installation ........................................................................................ 11
2.1.1. Hardware and Disk Space Requirements .............................................................. 11
2.1.2. Upgrading Previously Installed Tectia Software ..................................................... 12
2.1.3. License File ................................................................................................... 12
2.1.4. Creating Operating System User Accounts ........................................................... 12
2.2. Installing Tectia Software ........................................................................................ 12
2.2.1. Installing Tectia Client on Linux ........................................................................ 13
2.2.2. Installing on AIX ............................................................................................ 14
2.2.3. Installing on HP-UX ........................................................................................ 14
2.2.4. Installing on Solaris ........................................................................................ 15
2.2.5. Installing Tectia Server on Linux ....................................................................... 16
2.2.6. Installing on AIX ............................................................................................ 18
2.2.7. Installing on HP-UX ........................................................................................ 19
2.2.8. Installing on Solaris ........................................................................................ 21
2.2.9. Installation Complete ....................................................................................... 23
2.3. Removing Tectia Software ....................................................................................... 23
2.3.1. Removing from Linux ...................................................................................... 23
3. Connecting to Remote Server ...................................................................................... 25
3.1. First Connection with Password ............................................................................... 25
3.2. Creating Connection Profiles ................................................................................... 26
3.2.1. Defining Connection Profile Settings .................................................................. 27
4. Configuring Authentication Methods ............................................................................ 31
4.1. Server Authentication Methods ................................................................................ 31
4.2. User Authentication with Passwords .......................................................................... 31
4.3. User Authentication with Public Keys ....................................................................... 32
4.3.1. Creating Keys with Public-Key Authentication Wizard ........................................... 33
Tectia® Client/Server 6.6 (Unix) Quick Start Guide
© 1995–2022 SSH Communications Security
Corporation

4 Tectia
®
Client/Server 6.6 (Unix)
4.3.2. Uploading Public Keys Automatically ................................................................. 37
4.3.3. Creating and Uploading Keys with the Command Line Tools ................................... 38
4.4. Setting up Non-interactive Authentication for Automatic Scripts ..................................... 39
5. Using Secure File Transfer .......................................................................................... 41
5.1. Using SFTP on Tectia Client ................................................................................... 41
5.1.1. Using SFTP on Command Line ......................................................................... 41
5.2. Configuring Tectia Server for Automated Secure File Transfer ........................................ 41
5.2.1. Configuration Settings in ssh-server-config.xml ..................................................... 42
5.3. Automated Secure File Transfer Script ....................................................................... 47
6. Using Secure Application Connectivity ......................................................................... 49
6.1. Defining Automatic Tunnels .................................................................................... 50
6.1.1. Settings in Tectia Client ................................................................................... 50
6.1.2. Settings in the Tunneled Application ................................................................... 52
6.1.3. Settings in the Connection Broker Configuration File ............................................. 52
Index ............................................................................................................................. 55
© 1995–2022 SSH Communications Security
Corporation Tectia® Client/Server 6.6 (Unix) Quick Start Guide

5
Chapter1About This Document
This guide gives quick instructions for getting started with Tectia Client and Server. There are alternative
client/server products for different platform architectures:
• Tectia Client/Server for AIX, HP-UX, Linux, Solaris, and Windows platforms
• Tectia Server for IBM z/OS for IBM mainframes
In this guide, we handle Tectia Client and Server that can be installed on Linux x86-64 and Unix platforms.
The instructions are intended for a system where Tectia Client is used to connect to Tectia Server, and
both are running on the Linux/Unix operating system.
The purpose of this quick start guide is to help you in getting the Tectia client/server solution up and
running with the default settings so that you can evaluate the product.
The target audience of this guide are system administrators and other professionals who need to evaluate
Tectia products. To be able to use the information presented in this document, you should have system-
administrator-level knowledge on Linux/Unix concepts and know what Tectia Client and Server are meant
for.
1.1Reference Documents
The Tectia client/server solution is described and more advanced user instructions are given in the
following product-specific manuals:
•
Tectia Client/Server Product Description contains general information about the product, its
architecture, main features, and the product structure.
•
Tectia Client User Manual contains detailed instructions on installing, configuring and using Tectia
Client.
•
Tectia Server Administrator Manual contains detailed instructions on installing, configuring and using
Tectia Server.
Instructions for evaluating Tectia Client and Server on Windows are available in a separate quick guide
Tectia Client/Server (Windows) Quick Start Guide.
Tectia® Client/Server 6.6 (Unix) Quick Start Guide
© 1995–2022 SSH Communications Security
Corporation

6 Chapter1About This Document
1.2Component Terminology
The following terms are used throughout the documentation.
client computer
The computer from which the Secure Shell connection is initiated.
Connection Broker
The Connection Broker is a component included in Tectia Client, Tectia ConnectSecure, and in the
Tectia Server for IBM z/OS client tools. Connection Broker handles all cryptographic operations and
authentication-related tasks.
FTP-SFTP conversion
Tectia ConnectSecure can automatically capture FTP connections on the client and convert them
to SFTP and direct them to an SFTP server running Tectia Server, Tectia Server for IBM z/OS, or
another vendor's Secure Shell server software.
host key pair
A public-key pair used to identify a Secure Shell server. The private hostkey file is accessible only to
the server. The public key file is distributed to users connecting to the server.
remote host
Refers to the other party of the connection, client computer or server computer, depending on the
viewpoint.
Secure Shell client
A client-side application that uses the Secure Shell version 2 protocol, for example sshg3, sftpg3,
or scpg3 of Tectia Client.
Secure Shell server
A server-side application that uses the Secure Shell version 2 protocol.
server computer
The computer on which the Secure Shell service is running and to which the Secure Shell client
connects.
SFTP server
A server-side application that provides a secure file transfer service as a subsystem of the Secure
Shell server.
Tectia Client
A software component installed on a workstation. Tectia Client provides secure interactive file
transfer and terminal client functionality for remote users and system administrators to access and
manage servers running Tectia Server or other applications using the Secure Shell protocol. It also
supports (non-transparent) static tunneling.
Tectia client/server solution
The Tectia client/server solution consists of Tectia Client, Tectia ConnectSecure, Tectia Server, and
Tectia Server for IBM z/OS (including the Tectia Server for IBM z/OS client tools).
© 1995–2022 SSH Communications Security
Corporation Tectia® Client/Server 6.6 (Unix) Quick Start Guide

Documentation Conventions 7
Tectia Connections Configuration GUI
Tectia Client and ConnectSecure have a graphical user interface for configuring the connection
settings to remote servers. The GUI is supported on Windows and Linux.
Tectia ConnectSecure
A software component installed on a server host, but it acts as a Secure Shell client. Tectia
ConnectSecure is designed for FTP replacement and it provides FTP-SFTP conversion, transparent
FTP tunneling, transparent TCP tunneling, and enhanced file transfer services. Tectia ConnectSecure
is capable of connecting to any standard Secure Shell server.
Tectia Secure File Transfer GUI
Tectia Client and ConnectSecure on Windows include a separate graphical user interface (GUI) for
handling and performing file transfers interactively.
Tectia Server
Tectia Server is a server-side component where Secure Shell clients connect to. There are two versions
of the Tectia Server product available: Tectia Server for Linux, Unix and Windows platforms, and
Tectia Server for IBM z/OS.
Tectia Server for IBM z/OS
Tectia Server for IBM z/OS provides normal Secure Shell connections and supports the enhanced file
transfer (EFT) features and transparent TCP tunneling on IBM mainframes.
Tectia Server Configuration tool
Tectia Server has a graphical user interface that can be used to configure the server instead of editing
the configuration file. The GUI is supported on Windows.
transparent FTP tunneling
An FTP connection transparently encrypted and secured by a Secure Shell tunnel.
transparent TCP tunneling
A TCP application connection transparently encrypted and secured by a Secure Shell tunnel.
tunneled application
A TCP application secured by a Secure Shell connection.
user key pair
A public-key pair used to identify a Secure Shell user. The private key file is accessible only to the
user. The public key file is copied to the servers the user wants to connect to.
1.3Documentation Conventions
The following typographical conventions are used in Tectia documentation:
Tectia® Client/Server 6.6 (Unix) Quick Start Guide
© 1995–2022 SSH Communications Security
Corporation
8 Chapter1About This Document
Table1.1.Documentation conventions
Convention Usage Example
Bold Tools, menus, GUI elements and
commands, command-line tools,
strong emphasis
Click Apply or OK.
→ Series of menu selections Select File → Save
Monospace Command-line and
configuration options, file
names and directories, etc.
Refer to readme.txt
Italics
Reference to other documents or
products, URLs, emphasis
See Tectia Client User Manual
Monospace
Italics
Replaceable text or values rename oldfile newfile
#
In front of a command, #
indicates that the command is
run as a privileged user (root).
# rpm --install package.rpm
$
In front of a command, $
indicates that the command is
run as a non-privileged user.
$ sshg3 user@host
\
At the end of a line in a
command, \ indicates that the
command continues on the next
line, but there was not space
enough to show it on one line.
$ ssh-keygen-g3 -t rsa \
-F -c mykey
Note
A Note indicates neutral or positive information that emphasizes or supplements important
points of the main text. Supplies information that may apply only in special cases (for example,
memory limitations, equipment configurations, or specific versions of a program).
Caution
A Caution advises users that failure to take or to avoid a specified action could result in loss
of data.
1.3.1Operating System Names
When the information applies to several operating systems versions, the following naming systems are
used:
• Unix refers to the following supported operating systems:
• HP-UX
© 1995–2022 SSH Communications Security
Corporation Tectia® Client/Server 6.6 (Unix) Quick Start Guide

Customer Support 9
• IBM AIX
• Red Hat Linux, SUSE Linux
• Solaris
• IBM z/OS, when applicable; as Tectia Server for IBM z/OS is running in USS and uses Unix-like
tools.
• z/OS is used for IBM z/OS, when the information is directly related to IBM z/OS versions.
• Windows refers to all supported Windows versions.
1.4Customer Support
All Tectia product documentation is available at https://www.ssh.com/manuals/.
FAQ with how-to instructions for all Tectia products are available at https://documents.ssh.com/.
If you have purchased a maintenance agreement, you are entitled to technical support from SSH
Communications Security. Review your agreement for specific terms and log in at https://support.ssh.com/
.
Information on submitting support requests, feature requests, or bug reports, and on accessing the online
resources is available at https://support.ssh.com/.
Tectia® Client/Server 6.6 (Unix) Quick Start Guide
© 1995–2022 SSH Communications Security
Corporation

10 Chapter1About This Document
© 1995–2022 SSH Communications Security
Corporation Tectia® Client/Server 6.6 (Unix) Quick Start Guide

11
Chapter2Installation
This chapter gives instructions for installing the Tectia client/server solution on the Linux 64-bit operating
system running on x86-64 platform architecture.
Tectia products can also be run on other platforms. For a full list of supported operating systems and
instructions for installing Tectia on them, see Tectia Client User Manual and Tectia Server Administrator
Manual.
2.1Preparing for Installation
Make the following preparations and check-ups before you start installing Tectia Client and Server.
2.1.1Hardware and Disk Space Requirements
Tectia products do not have any special hardware requirements. They can be installed on any computer
capable of running the supported operating system versions and equipped with a functional network
connection.
The Tectia Client installation requires about 100 MB of disk space. Note that Tectia Client will save each
user's settings in that particular user's personal directory.
The Tectia Server installation requires 100 MB free disk space.
For general installation information, see Tectia Client User Manual and Tectia Server Administrator
Manual.
Prerequisites
Before installing Tectia products on Unix platform, stop any OpenSSH or other third-party Secure Shell
servers running on port 22, or change their listener port. You do not need to uninstall the OpenSSH
software.
If installing on SuSE, install prerequisite package insserv-compat.
On SELinux-enabled systems, ensure that the semanage command is available. In older Linux versions
semanage is typically installed via policycoreutils-python-utils or policycoreutils.
Tectia® Client/Server 6.6 (Unix) Quick Start Guide
© 1995–2022 SSH Communications Security
Corporation

12 Chapter2Installation
2.1.2Upgrading Previously Installed Tectia Software
If installed on the same machine, Tectia Client and Tectia Server should always be upgraded to be the
same version, because there are dependencies between the common components.
Check if you have some Secure Shell software, such as earlier versions of Tectia products or third-party
Secure Shell server or client, running on the machine where you are planning to install the new Tectia
versions.
In the following cases you must uninstall the existing version of Tectia Client/Server before installing
version 6.6.1:
• Your existing version is 4.x.
• You are installing on Solaris.
In any other case you can upgrade to Tectia Client/Server 6.6.1 without first uninstalling the existing
version. The existing version will be automatically removed from the host during the installation
procedure.
2.1.3License File
Tectia Client and Server require a license to function. The license file for Tectia Client is named
stc66.dat and the license file for Tectia Server is named sts66.dat.
Consider the following license-related issues:
• You need to install the license file manually to directory: /etc/ssh2/licenses
• In the commercial installation packages, the license file(s) are included in the compressed (.tar) files
together with the release notes (.txt) files and the PDF-format documentation.
• The Tectia evaluation packages do not contain license files; the evaluation versions can be used for 45
days without a license file. A banner message will remind users of how many days are left until the
license expires.
• When upgrading the evaluation version or standard commercial version to Tectia Quantum Safe Edition
only license file(s) need to be copied to the license directory and Tectia Client and Server software
restarted.
2.1.4Creating Operating System User Accounts
Tectia Server does not have a user management program of its own - the user accounts are created with
the standard operating system tools.
2.2Installing Tectia Software
This section introduces how Tectia Client and Server are installed on Linux versions running on the 64-
bit x86-64 platform architecture.
© 1995–2022 SSH Communications Security
Corporation Tectia® Client/Server 6.6 (Unix) Quick Start Guide

Installing Tectia Client on Linux 13
The installation packages of Tectia products are compressed into installation bundles.
There are three bundles for each supported operating system version, the Tectia Quantum Safe Edition
commercial version (-comm-pqc), the commercial version (-comm) and the upgrade and evaluation version
(-upgrd-eval). The commercial versions require that you also purchase a license. The evaluation versions
can be used for 45 days without a license file.
2.2.1Installing Tectia Client on Linux
Tectia Client for Linux is supplied in RPM (Red Hat Package Manager) binary packages for Red Hat
Enterprise Linux and SUSE Linux running on the 64-bit x86-64 architecture.
The Tectia installation bundle contains the RPM installation files and the license file.
To install Tectia Client on Linux, follow the instructions below:
1. Download the relevant installation bundle according to your license type:
• Commercial Tectia Quantum Safe Edition License:
tectia-client-<version>-linux-x86_64-comm-pqc.tar
• Commercial License:
tectia-client-<version>-linux-x86_64-comm.tar
• Evaluation:
tectia-client-<version>-linux-x86_64-upgrd-eval.tar
In the package names, <version> corresponds to the release version and build number, for example
6.6.1.123.
2. Unpack the downloaded tar package.
3. Select the installation packages. Two packages are always required: one for the common components
of Tectia Client and Server, and one for the specific components of Tectia Client. If you want to use
the product with a graphical user interface (GUI), install also the optional GUI support package.
ssh-tectia-common-<version>-linux-x86_64.rpm
ssh-tectia-client-<version>-linux-x86_64.rpm
ssh-tectia-guisupport-<version>-linux-x86_64.rpm
4. Install the packages with root privileges:
# rpm -ivh ssh-tectia-common-<version>-linux-x86_64.rpm
# rpm -ivh ssh-tectia-client-<version>-linux-x86_64.rpm
# rpm -ivh ssh-tectia-guisupport-<version>-linux-x86_64.rpm
Or upgrade the packages if you already have an older Tectia Client version installed:
# rpm -Uvh ssh-tectia-common-<version>-linux-x86_64.rpm
Tectia® Client/Server 6.6 (Unix) Quick Start Guide
© 1995–2022 SSH Communications Security
Corporation

14 Chapter2Installation
# rpm -Uvh ssh-tectia-client-<version>-linux-x86_64.rpm
# rpm -Uvh ssh-tectia-guisupport-<version>-linux-x86_64.rpm
5.
Copy the license file to the /etc/ssh2/licenses directory. (This is not necessary in "third-digit"
maintenance updates.) See also Section2.1.3.
2.2.2Installing on AIX
The downloaded installation package contains the compressed installation files.
Two packages are required: one for the common components of Tectia Client and Server, and one for the
specific components of Tectia Client and Server.
To install Tectia Client and Server on AIX, follow the instructions below:
1. Unpack the downloaded tar package.
2. Unpack the installation packages:
$ uncompress ssh-tectia-common-<version>-aix-6-7-powerpc.bff.Z
$ uncompress ssh-tectia-client-<version>-aix-6-7-powerpc.bff.Z
In the commands, <version> is the current package version of Tectia Client and Server (for example,
6.6.1.123).
3. Install the packages by running the following commands with root privileges:
# installp -d ssh-tectia-common-<version>-aix-6-7-powerpc.bff SSHTectia.Common
# installp -d ssh-tectia-client-<version>-aix-6-7-powerpc.bff SSHTectia.Client
4.
Copy the license file to directory: /etc/ssh2/licenses. (This is not necessary in "third-digit"
maintenance updates.)
2.2.3Installing on HP-UX
Check that you have the operating system fully patched. See the latest patch information on the Hewlett-
Packard web site. In case PAM/Kerberos is used on a HP-UX platform, install also the latest patches
related to Kerberos.
The downloaded installation package contains the compressed installation files.
Two packages are required: one for the common components of Tectia Client and Server, and one for the
specific components of Tectia Client and Server.
To install Tectia Client and Server on HP-UX, follow the instructions below:
1. Unpack the downloaded tar package.
2. Select the installation package according to your HP-UX version.
When installing on HP-UX 11i v3 (11.31) running on the PA-RISC architecture, use the packages
named:
© 1995–2022 SSH Communications Security
Corporation Tectia® Client/Server 6.6 (Unix) Quick Start Guide

Installing on Solaris 15
ssh-tectia-common-<version>-hpux-11iv2-3-hppa.depot.Z
ssh-tectia-client-<version>-hpux-11iv2-3-hppa.depot.Z
When installing on HP-UX 11i v3 running on the Itanium architecture, use the packages named:
ssh-tectia-common-<version>-hpux-11i-ia64.depot.Z
ssh-tectia-client-<version>-hpux-11i-ia64.depot.Z
In the commands, <version> indicates the product release version and the current build number (for
example, 6.6.1.123).
3. Unpack the packages with uncompress. In order to be installable, the created packages must have the
correct long file name. In the command examples below, we use the Itanium versions:
$ uncompress ssh-tectia-common-<version>-hpux-11i-ia64.depot.Z
$ uncompress ssh-tectia-client-<version>-hpux-11i-ia64.depot.Z
4. Install the packages by running the following commands with root privileges:
# swinstall -s <path>/ssh-tectia-common-<version>-hpux-11i-ia64.depot SSHG3common
# swinstall -s <path>/ssh-tectia-client-<version>-hpux-11i-ia64.depot SSHG3client
Note
In the commands, <path> is the full path to the installation package. HP-UX requires the full
path even when the command is run in the same directory.
5.
Copy the license file to directory: /etc/ssh2/licenses (This is not necessary in "third-digit"
maintenance updates.)
2.2.4Installing on Solaris
The downloaded installation package contains the compressed installation files.
Two packages are required: one for the common components of Tectia Client and Server, and one for the
specific components of Tectia Client and Server.
Tectia Client and Server includes support for Zones on Solaris 10 and 11. The Tectia software can be
installed into the global and local zones. When the Tectia software is installed into the global zone, it
becomes automatically installed also into the existing local zones. However, if the local zones are added
into the system later, the Tectia Client and Server needs to be separately installed on them.
In case you are installing Tectia Client and Server into a sparse zone, note that the installation process
will report a failure in creating symlinks. The actual installation is finished successfully, but you need to
manually add the /opt/tectia/bin to the path settings.
For information on the Solaris Zones, see the Oracle documentation: System Administration Guide:
Solaris Containers-Resource Management and Solaris Zones.
To install Tectia Client and Server on Solaris, follow the instructions below:
1. Unpack the downloaded tar package.
Tectia® Client/Server 6.6 (Unix) Quick Start Guide
© 1995–2022 SSH Communications Security
Corporation

16 Chapter2Installation
2. Select the installation package according to your Solaris version.
When installing on Solaris version 10 running on the SPARC architecture, use the packages named:
ssh-tectia-common-<version>-solaris-10-sparc.pkg.Z
ssh-tectia-client-<version>-solaris-10-sparc.pkg.Z
When installing on Solaris version 11 running on the SPARC architecture, use the packages named:
ssh-tectia-common-<version>-solaris-11-sparc.pkg.Z
ssh-tectia-client-<version>-solaris-11-sparc.pkg.Z
When installing on Solaris version 10 or 11 running on the x86-64 architecture, use the packages
named:
ssh-tectia-common-<version>-solaris-<solaris-version>-x86_64.pkg.Z
ssh-tectia-client-<version>-solaris-<solaris-version>-x86_64.pkg.Z
In the commands, <version> indicates the product release version and the current build number (for
example, 6.6.1.123). <solaris-version> refers to the Solaris version number (10 or 11), in case
of installing on x86-64 architecture.
3. Unpack the installation packages to a suitable place. The standard place is /var/spool/pkg in Solaris
environment. In the command examples below, we use Solaris 10 x86-64:
$ uncompress ssh-tectia-common-<version>-solaris-10-x86_64.pkg.Z
$ uncompress ssh-tectia-client-<version>-solaris-10-x86_64.pkg.Z
4. Install the packages with the pkgadd tool with root privileges:
# pkgadd -d ssh-tectia-common-<version>-solaris-10-x86_64.pkg all
# pkgadd -d ssh-tectia-client-<version>-solaris-10-x86_64.pkg all
5.
Copy the license file to directory: /etc/ssh2/licenses (This is not necessary in "third-digit"
maintenance updates.) .
2.2.5Installing Tectia Server on Linux
Tectia Server for Linux platforms is supplied in RPM (Red Hat Package Manager) binary packages for
Red Hat Enterprise Linux and SUSE Linux running on the 64-bit x86-64 architecture.
The Tectia Server installation bundle contains the RPM files and the license files for both the Tectia Server
and Tectia Client that can be optionally installed on the same host.
To install Tectia Server on Linux, follow the instructions below:
Note
If you have already installed Tectia Client, you don't need to install the common file again.
Or upgrade the packages if you already have an older Tectia Server version installed:
# rpm -Uvh ssh-tectia-common-<version>-linux-x86_64.rpm
# rpm -Uvh ssh-tectia-server-<version>-linux-x86_64.rpm
© 1995–2022 SSH Communications Security
Corporation Tectia® Client/Server 6.6 (Unix) Quick Start Guide

17
1. Make sure no other Secure Shell software is using port 22 (Tectia Server default listen port). Also make
sure the firewall is open for port 22.
2. Download the installation bundle according to your license type:
• Commercial Tectia Quantum Safe Edition License:
tectia-server-<version>-linux-x86_64-comm-pqc.tar
• Commercial License:
tectia-server-<version>-linux-x86_64-comm.tar
• Evaluation:
tectia-server-<version>-linux-x86_64-upgrd-eval.tar
In the package names, <version> is the current product release (for example, 6.6.1.123).
3. Unpack the downloaded tar package.
4. Select the installation packages (in this example, we install Tectia Server only). Two packages are
always required: one for the common components of Tectia Client and Server, and one for the specific
components of Tectia Server.
ssh-tectia-common-<version>-linux-x86_64.rpm
ssh-tectia-server-<version>-linux-x86_64.rpm
5. Install the packages with root privileges:
# rpm -ivh ssh-tectia-common-<version>-linux-x86_64.rpm
# rpm -ivh ssh-tectia-server-<version>-linux-x86_64.rpm
The server host key is generated during the initial installation. The key generation may take several
minutes on slow machines.
6.
Copy the license file to the /etc/ssh2/licenses directory. (This is not necessary in "third-digit"
maintenance updates.) See also Section2.1.3.
If this is the initial installation of Tectia, the directory does not yet exist. You can either create it
manually or copy the license after the installation. In the latter case, you have to start Tectia Server
manually after copying the license file.
7. The installation should (re)start Tectia Server automatically.
If Tectia Server does not start (for example because of a missing license or because some other secure
shell software is running on port 22), you can start it after correcting the problem by issuing the
command:
# ssh-server-ctl start
For troubleshooting instructions, see Tectia Server Administrator Manual.
Tectia® Client/Server 6.6 (Unix) Quick Start Guide
© 1995–2022 SSH Communications Security
Corporation

18 Chapter2Installation
2.2.6Installing on AIX
The downloaded installation package contains the compressed installation files.
Two packages are required: one for the common components of Tectia Client and Server, and one for the
specific components of Tectia Client and Server.
If you are upgrading Tectia Server version 6.2.1 or earlier to 6.6, you must do the following steps before
installing the new version:
1. Rename the subsystem group from tcpip to ssh-tectia-server:
# /usr/bin/rmssys -s ssh-tectia-server
2. Redefine ssh-tectia-server with the new group option:
# mkssys -s ssh-tectia-server -p "/opt/tectia/sbin/ssh-server-g3" -q -u 0 -S \
-n 15 -f 9 -R -G ssh-tectia-server -i /dev/null -o /dev/null -e \
/dev/null
3. Restart the ssh-tectia-server:
# stopsrc -s ssh-tectia-server
# startsrc -s ssh-tectia-server
Now you can continue with the installation steps.
Note that upgrading from Tectia Server version 6.2.x or 6.3.x will not restart the server automatically after
installing the upgrade packages. Upgrading from Tectia Server versions 6.1.x (or earlier), and versions
6.4.2 (or later) will work normally and restart the server after upgrade.
To install Tectia Client and Server on AIX, follow the instructions below:
1. Unpack the downloaded tar package.
2. Make sure no other software is using port 22 (Tectia Server default listen port). Stop any competing
server software or change their listen port.
3. Unpack the installation packages:
$ uncompress ssh-tectia-common-<version>-aix-6-7-powerpc.bff.Z
$ uncompress ssh-tectia-server-<version>-aix-6-7-powerpc.bff.Z
In the commands, <version> is the current package version of Tectia Client and Server (for example,
6.6.1.123).
4. Install the packages by running the following commands with root privileges:
# installp -d ssh-tectia-common-<version>-aix-6-7-powerpc.bff SSHTectia.Common
# installp -d ssh-tectia-server-<version>-aix-6-7-powerpc.bff SSHTectia.Server
The server host key is generated during the initial installation. The key generation may take several
minutes on slow machines.
© 1995–2022 SSH Communications Security
Corporation Tectia® Client/Server 6.6 (Unix) Quick Start Guide

Installing on HP-UX 19
5.
Copy the license file to directory: /etc/ssh2/licenses. (This is not necessary in "third-digit"
maintenance updates.)
If this is the initial installation of Tectia Client and Server, the directory does not yet exist. You can
either create it manually or copy the license after the installation. In the latter case, you have to start
the server manually after copying the license file.
6. The installation should (re)start the server automatically.
Note
If you upgraded from Tectia Server 6.2.x or 6.3.x, the server will not restart automatically.
Note
If the server does not start (for example because of a missing license or because some other
secure shell software is running on port 22), correct the problem and you can start the server
process by using the System Resource Controller (SRC).
To start Tectia Server manually, enter command:
# startsrc -s ssh-tectia-server
Installing 32-bit LAM package for AIX
There is a 32-bit binary ssh-aix-lam-proxy32 shipped with the Tectia Server installation package for
AIX. In some cases there is a need to use a 32-bit Lightweight Authentication Module (LAM) in a 64-bit
operating system, for example, when using Safeword authentication via LAM.
There are two binaries in /opt/tectia/libexec:
• ssh-aix-lam-proxy (64-bit binary)
• ssh-aix-lam-proxy32 (32-bit binary)
By default, the 64-bit binary is used. If the 32-bit binary is to be used, follow these steps:
1. Backup the ssh-aix-lam-proxy to a safe place.
2. Copy the ssh-aix-lam-proxy32 to ssh-aix-lam-proxy.
This will automatically start using the 32-bit LAM on the 64-bit AIX host.
2.2.7Installing on HP-UX
Check that you have the operating system fully patched. See the latest patch information on the Hewlett-
Packard web site. In case PAM/Kerberos is used on a HP-UX platform, install also the latest patches
related to Kerberos.
The downloaded installation package contains the compressed installation files.
Tectia® Client/Server 6.6 (Unix) Quick Start Guide
© 1995–2022 SSH Communications Security
Corporation
20 Chapter2Installation
Two packages are required: one for the common components of Tectia Client and Server, and one for the
specific components of Tectia Client and Server.
To install Tectia Client and Server on HP-UX, follow the instructions below:
1. Unpack the downloaded tar package.
2. Make sure no other software is using port 22 (Tectia Server default listen port). Stop any competing
server software or change their listen port.
3. Select the installation package according to your HP-UX version.
When installing on HP-UX 11i v3 (11.31) running on the PA-RISC architecture, select the following
packages:
ssh-tectia-common-<version>-hpux-11iv2-3-hppa.depot.Z
ssh-tectia-server-<version>-hpux-11iv2-3-hppa.depot.Z
When installing on HP-UX 11i v3 running on the Itanium architecture, select the following packages:
ssh-tectia-common-<version>-hpux-11i-ia64.depot.Z
ssh-tectia-server-<version>-hpux-11i-ia64.depot.Z
In the commands, <version> indicates the product release version and the current build number (for
example, 6.6.1.123).
4. Unpack the installation packages with uncompress. In order to be installable, the created packages must
have the correct long file names. In the following command examples, we use the Itanium packages:
$ uncompress ssh-tectia-common-<version>-hpux-11i-ia64.depot.Z
$ uncompress ssh-tectia-server-<version>-hpux-11i-ia64.depot.Z
5. Install the packages by running the following commands with root privileges:
# swinstall -s <path>/ssh-tectia-common-<version>-hpux-11i-ia64.depot SSHG3common
# swinstall -s <path>/ssh-tectia-server-<version>-hpux-11i-ia64.depot SSHG3server
In the commands, <path> is the full path to the installation package.
Note
HP-UX requires the full path even when the command is run in the same directory.
The server host key is generated during the initial installation. The key generation may take several
minutes on slow machines.
6.
Copy the license file to the /etc/ssh2/licenses directory. (This is not necessary in "third-digit"
maintenance updates.)
If this is the initial installation of Tectia Client and Server, the directory does not yet exist. You can
either create it manually or copy the license after the installation. In the latter case, you have to start
the server manually after copying the license file.
7. The installation should (re)start the server automatically.
© 1995–2022 SSH Communications Security
Corporation Tectia® Client/Server 6.6 (Unix) Quick Start Guide

Installing on Solaris 21
Note
If the server does not start (for example because of a missing license or because some other
secure shell software is running on port 22), you can start it after correcting the problem by
issuing the command:
# /sbin/init.d/ssh-server-g3 start
2.2.8Installing on Solaris
The downloaded installation package contains the compressed installation files.
Two packages are required: one for the common components of Tectia Client and Server, and one for the
specific components of Tectia Client and Server.
Tectia Client and Server includes support for Zones on Solaris 10 and 11. The Tectia software can be
installed into the global and local zones. When the Tectia software is installed into the global zone, it
becomes automatically installed also into the existing local zones. However, Tectia Server needs to be
separately installed into local zones added later into the system.
In case you are installing Tectia Client and Server into a sparse zone, note that the installation process
will report a failure in creating symlinks. The actual installation is finished successfully, but you need to
manually add the /opt/tectia/bin to the path settings.
For information on Solaris Zones, see the Oracle's documentation: System Administration Guide: Solaris
Containers-Resource Management and Solaris Zones.
To install Tectia Client and Server on Solaris, follow the instructions below:
1. Unpack the downloaded tar package.
2. Make sure no other software is using port 22 (Tectia Server default listen port). Stop any competing
server software or change their listen port.
3. Select the installation package according to your Solaris version.
When installing on Solaris version 10 running on the SPARC architecture, use the following packages:
ssh-tectia-common-<version>-solaris-10-sparc.pkg.Z
ssh-tectia-server-<version>-solaris-10-sparc.pkg.Z
When installing on Solaris version 11 running on the SPARC architecture, use the following packages:
ssh-tectia-common-<version>-solaris-11-sparc.pkg.Z
ssh-tectia-server-<version>-solaris-11-sparc.pkg.Z
When installing on Solaris version 10 or 11 running on the x86-64 architecture, use the following
packages:
ssh-tectia-common-<version>-solaris-<solaris-version>-x86_64.pkg.Z
ssh-tectia-server-<version>-solaris-<solaris-version>-x86_64.pkg.Z
Tectia® Client/Server 6.6 (Unix) Quick Start Guide
© 1995–2022 SSH Communications Security
Corporation
22 Chapter2Installation
In the commands, <version> indicates the product release version and the current build number (for
example, 6.6.1.123). <solaris-version> refers to the Solaris version number (10 or 11), in case
of installing on x86-64 architecture.
4. Unpack the installation packages to a suitable location. The standard location is /var/spool/pkg in
Solaris environment. In the command examples below, we use the x86-64 version for Solaris 10:
$ uncompress ssh-tectia-common-<version>-solaris-10-x86_64.pkg.Z
$ uncompress ssh-tectia-server-<version>-solaris-10-x86_64.pkg.Z
5. Install the packages with the pkgadd tool with root privileges:
# pkgadd -d ssh-tectia-common-<version>-solaris-10-x86_64.pkg all
# pkgadd -d ssh-tectia-server-<version>-solaris-10-x86_64.pkg all
The server host key is generated during the installation. The key generation may take several minutes
on slow machines.
6.
Copy the license file to the /etc/ssh2/licenses directory. (This is not necessary in "third-digit"
maintenance updates.)
If this is the initial installation of Tectia Client and Server, the directory does not yet exist. You can
either create it manually or copy the license after the installation. In the latter case, you have to start
the server manually after copying the license file.
7. The installation should (re)start the server automatically.
Note
If the server does not start (for example because of a missing license or because some other
secure shell software is running on port 22), you can start it after correcting the problem by
issuing the command:
# /etc/init.d/ssh-server-g3 start
Tip
On Solaris, it is recommended that you raise the maximum open files limit. The default limit
for open files per process is set to 256, but it is too low for Tectia Server that will receive lots of
connections. The servant may run out of file descriptors causing the connections to fail.
How much the maximum open files limit must be raised, depends on the system and the number
of servants running; 8192 should be sufficient in most cases.
To set the maximum open files limit to 8192, before starting ssh-server-g3, run this command
in shell:
# ulimit -n 8192
The default limit set for open files varies between operating system versions. Refer to the
instructions of your operating system for more information.
© 1995–2022 SSH Communications Security
Corporation Tectia® Client/Server 6.6 (Unix) Quick Start Guide

Installation Complete 23
2.2.9Installation Complete
After a successful installation, Tectia Server is automatically started at reboot and keeps running in the
background until you stop it manually, or shut the host down.
You can use Tectia Client and Tectia Server with the default settings to test their functions. For instructions
on opening a secure connection for the first time, see Chapter3.
It is also possible to customize the behavior of the Tectia client/server solution according to your needs.
To learn more about modifying the Tectia configuration for different purposes, refer to the later chapters
in this manual:
• Chapter4 explains configuring of authentication methods
• Chapter5 explains secure file transfer
• Chapter6 explains securing application connections.
2.3Removing Tectia Software
If you need to remove the Tectia Client and Server software, follow the instructions below.
Note
The uninstallation procedure removes only the files that were created when installing the
software. Any configuration files have to be removed manually from directory /etc/ssh2 and
from each user's $HOME/.ssh2 directory.
2.3.1Removing from Linux
To remove Tectia Client and Server from a Linux environment, follow the instructions below:
1. Log in as root user.
2. Stop Tectia Server by giving the following command:
# ssh-server-ctl stop
3. Remove the Tectia Server installation by giving the following command:
# rpm -e ssh-tectia-server
4. Remove the Tectia Client installation by giving the following command :
# rpm -e ssh-tectia-client
5. Remove the GUI support components by giving the following command:
# rpm -e ssh-tectia-guisupport
Tectia® Client/Server 6.6 (Unix) Quick Start Guide
© 1995–2022 SSH Communications Security
Corporation

24 Chapter2Installation
6. If you will remove both Tectia Client and Server, remove also the common components by giving the
following command:
# rpm -e ssh-tectia-common
© 1995–2022 SSH Communications Security
Corporation Tectia® Client/Server 6.6 (Unix) Quick Start Guide

25
Chapter3Connecting to Remote Server
This section explains how you can log in from Tectia Client to Tectia Server using password authentication
with the default settings. The default settings on Tectia Client and Server allow login with passwords,
public keys, GSSAPI, and keyboard-interactive. By default, passwords are used for user authentication,
and public keys for server authentication.
You are expected to have a user account on the remote server where you will connect, and the server must
have a Secure Shell server running. In the following example, you can also just connect within the local
machine, to make sure that you know the server's address and that it has Tectia Server running.
3.1First Connection with Password
You can connect to a remote host by using sshg3 on the command line:
1. Enter the sshg3 command using the following syntax:
$ sshg3 <hostname>
For example:
$ sshg3 abc.example.com
The basic syntax is:
$ sshg3 user@host#port
where:
• user - Enter a user name that is valid on the remote host. The user@ attribute is optional. If no user
name is given, the local user name is assumed.
• host - Enter the name of the remote host as an IP address, FQDN (fully qualified domain name),
or short host name. The remote host must be running a Secure Shell version 2 server.
• port - Enter the number of the Secure Shell listen port on the remote server. The #port attribute is
optional. If no port is given, the default Secure Shell port 22 is assumed.
2. The server authentication phase starts. The server sends its public key to the client for validation (when
server public-key authentication is used).
Tectia® Client/Server 6.6 (Unix) Quick Start Guide
© 1995–2022 SSH Communications Security
Corporation

26 Chapter3Connecting to Remote Server
When Tectia Client receives a new host public key, a host identification message is displayed. For
example:
$ sshg3 user@host
Host key not found from database.
Key fingerprint:
xecic-fifub-kivyh-kohag-zedyn-logum-pycuz-besug-galoh-gupah-xaxby
You can get a public key's fingerprint by running
% ssh-keygen-g3 -F publickey.pub
on the keyfile.
Are you sure you want to continue connecting (yes/no)?
The message shows the fingerprint of the host's public key in the SSH Babble format that is a series
of pronounceable five-letter words in lower case and separated by dashes.
3. Verify the validity of the fingerprint, preferably by contacting the administrator of the remote host
computer by telephone.
After the fingerprint has been verified and found to be correct, it is safe to save the key and continue
connecting.
If you choose to save the server public key, relevant information about the key will be stored on the client
host in directory $HOME/.ssh2/hostkeys. After the first connection, the locally stored information
about the server public key will be used in server authentication.
4. The user authentication phase starts. You will be prompted to authenticate yourself to the server with
your password.
After the server has successfully authenticated you, the Secure Shell connection to the server is opened.
3.2Creating Connection Profiles
On Tectia Client on Linux, you can configure separate connection settings for each Secure Shell server
you connect to. You can also create several profiles for the same server, for example, with different user
accounts.
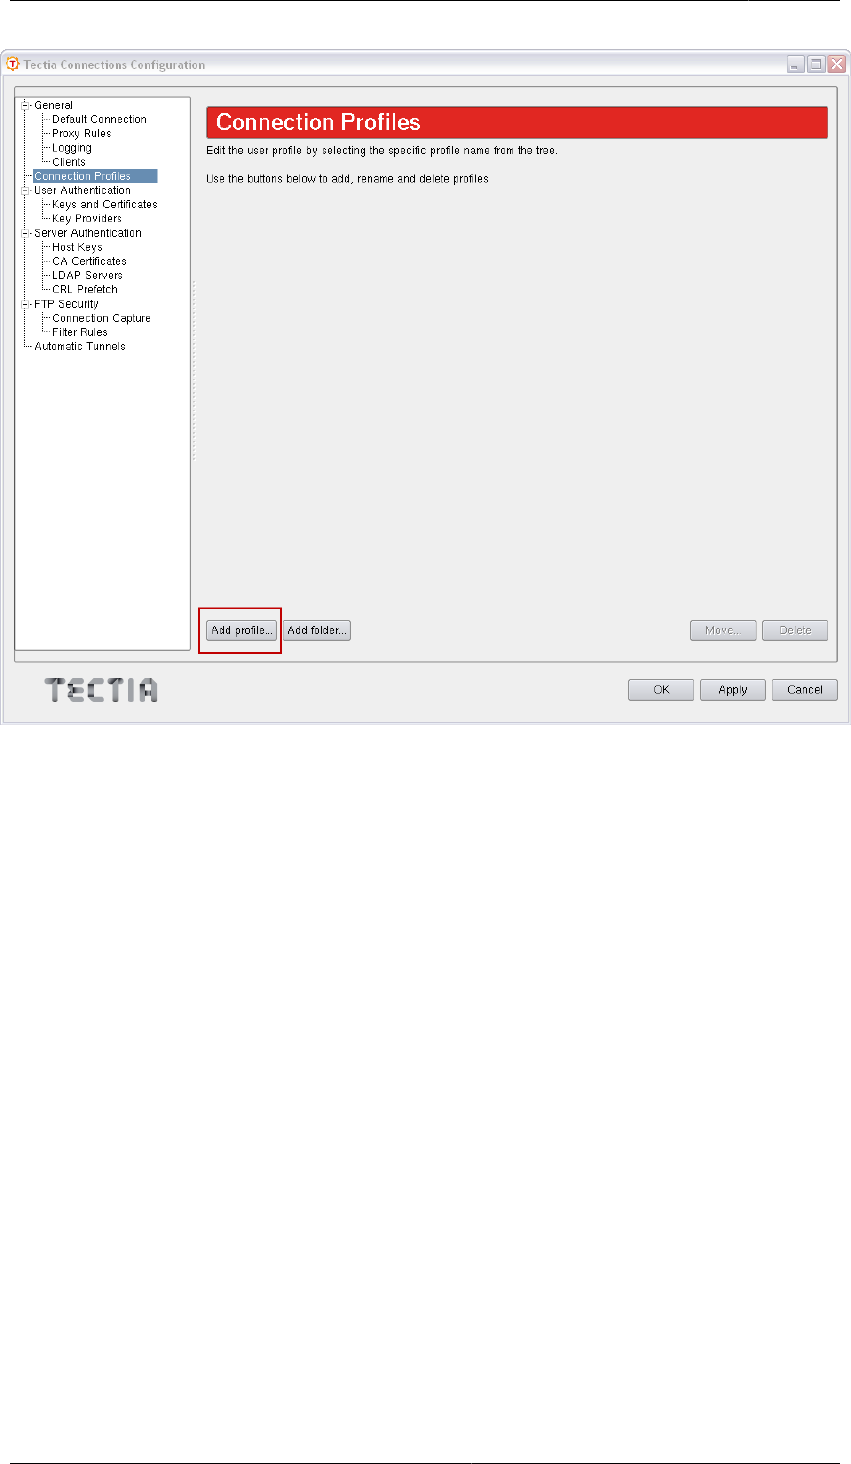
Open the Tectia Connections Configuration GUI:
1. Go to the /opt/tectia/bin directory by entering:
$ cd /opt/tectia/bin/
2. Start the Tectia Connections Configuration GUI with the following command:
$ ssh-tectia-configuration
In the Tectia Connections Configuration GUI, go to the Connection Profiles page (as shown below) and
click Add profile.
© 1995–2022 SSH Communications Security
Corporation Tectia® Client/Server 6.6 (Unix) Quick Start Guide
Defining Connection Profile Settings 27
Figure3.1.Adding connection profiles
Newly created connection profiles will inherit the default values for authentication, ciphers, MACs, KEXs,
tunneling, and advanced server settings defined under the General → Default Connection page. The
values can be customized on the profile-specific tabbed pages, see Figure3.2.
To rename a connection profile, right-click the profile name in the Connection Profiles list and click
Rename. Type in the new name.
To remove a connection profile, select the profile and click Delete. You will be asked for confirmation.
Click Yes to proceed with the deletion.
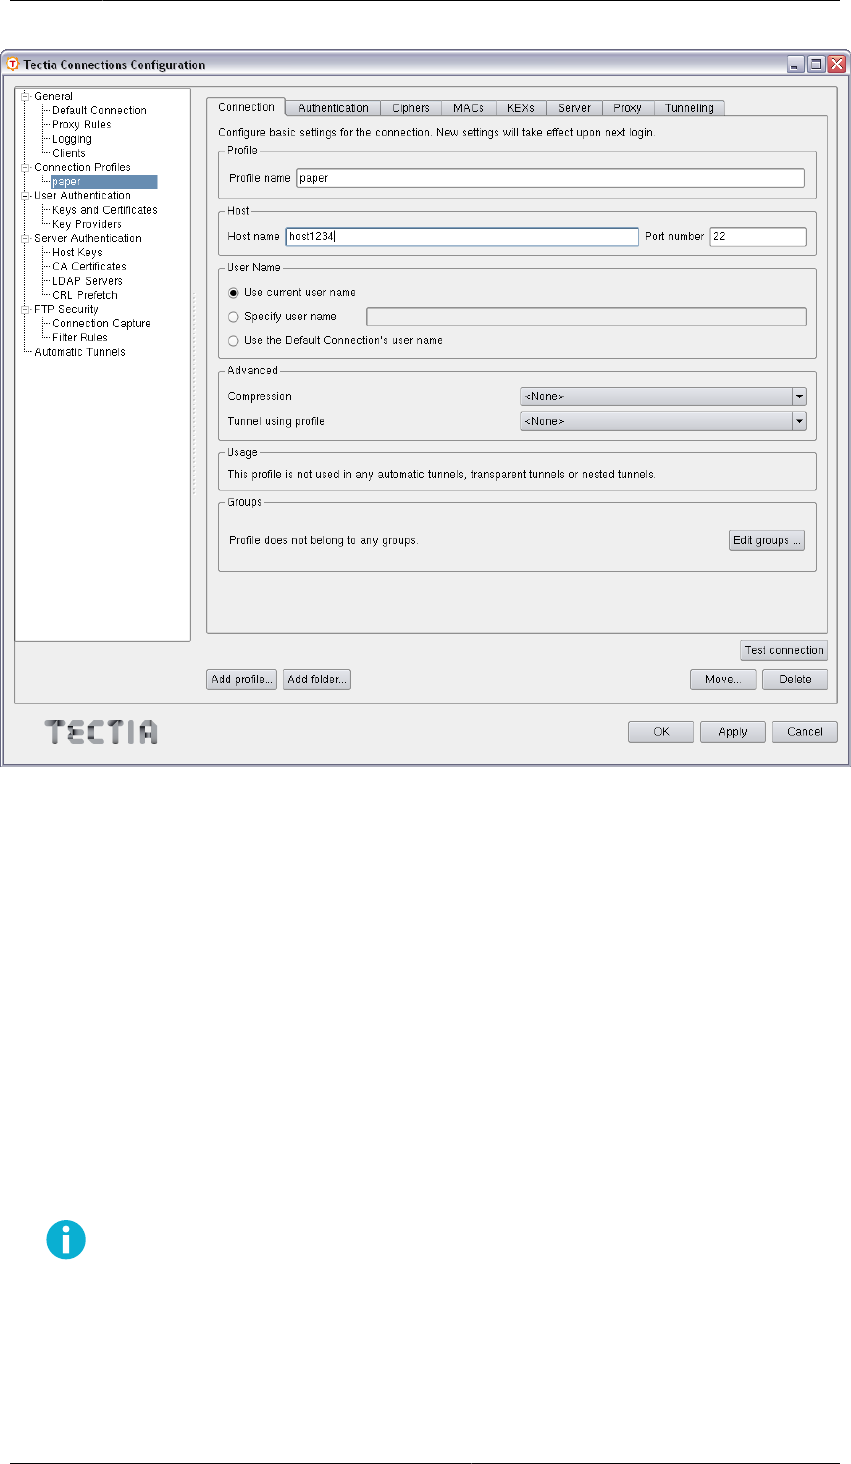
3.2.1Defining Connection Profile Settings
Under the Connection Profile page, on the Connection tab, you can define the protocol settings used in
the connection. Any changed connection settings will take effect the next time you log in.
Tectia® Client/Server 6.6 (Unix) Quick Start Guide
© 1995–2022 SSH Communications Security
Corporation
28 Chapter3Connecting to Remote Server
Figure3.2.Configuring connection profiles
Profile
In Profile name, type a name for the profile.
Host
In Host name, enter the name of the remote host computer to which you want to connect with the
profile.
In Port number, enter the port number you want to use for the Secure Shell connection. The default
port is 22.
Note
A Secure Shell server program must be listening to the specified port on the remote host
computer or the connection attempt will not succeed. If you are unsure which port the
remote host computer is listening to, contact the system administrator of the remote host.
© 1995–2022 SSH Communications Security
Corporation Tectia® Client/Server 6.6 (Unix) Quick Start Guide

29
User Name
Select Use current user name if the connection should always be made using the currently logged
in Unix user name. This is similar to defining %USERNAME% (note the percent signs) as the user name.
Select Specify user name and enter the user name, if you want to define the user name to be used
when connecting to the remote host computer. If you specify %USERNAME% (note the percent signs) as
the user name, it will be replaced with the name of the current Unix user account upon connecting.
Advanced
Not needed now: In Compression, select the desired compression setting from the drop-down menu.
Valid choices are zlib and none. Compression is disabled by default.
Not needed now: In Tunnel using profile, select the desired connection profile from the drop-down
menu. Any nested tunnels will be created through the profile. For information on the tunneling
features, refer to the Tectia Client User Manual .
Tectia® Client/Server 6.6 (Unix) Quick Start Guide
© 1995–2022 SSH Communications Security
Corporation

30 Chapter3Connecting to Remote Server
© 1995–2022 SSH Communications Security
Corporation Tectia® Client/Server 6.6 (Unix) Quick Start Guide

31
Chapter4Configuring Authentication Methods
The Tectia client/server solution has separate authentication procedures for authenticating the servers and
the users. The authentication is mutual; the client authenticates the server and the server authenticates
the user.
The server configuration defines which authentication methods are allowed, and the client configuration
defines the order in which the methods will be tried.
In this guide we introduce how public-key authentication is used in authenticating the remote Tectia Server
host. For user authentication, we introduce both the password authentication method, as it is set up by
default, and public keys, which provide stronger security and make it possible to use non-interactive login
securely.
4.1Server Authentication Methods
The server is authenticated with a digital signature based on an RSA, DSA, ECDSA or Ed25519 public-
key algorithm.
During the server installation process, one RSA key pair (with the file names hostkey and hostkey.pub)
is generated and stored on the server host in directory /etc/ssh2. By default, this key pair is used for
server authentication.
For information on connecting to a remote server for the first time, see Chapter3.
4.2User Authentication with Passwords
The password and public-key authentication methods are set up by default on both Tectia Client and
Server. Passwords are the easiest method for authenticating users because no configuring is required on
the server side. The passwords are protected from eavesdroppers, since all communication is encrypted.
On Linux, password authentication uses the /etc/passwd or /etc/shadow file, depending on how the
passwords are set up.
Tectia® Client/Server 6.6 (Unix) Quick Start Guide
© 1995–2022 SSH Communications Security
Corporation

32 Chapter4Configuring Authentication Methods
4.3User Authentication with Public Keys
Public-key authentication is based on the use of digital signatures and provides very good authentication
security.
To use public keys in user authentication, you must first create a key pair on the client. One of the created
key files is your public key, and the other is your secret private key.
The security level of the key pair depends on the complexity (or bit length) of the key. Larger keys are
more secure, but generating and using them takes a longer time.
Note
The default RSA key size (3072 bits) provides 128-bit security and default ECDSA key size
(384 bits) provides 192-bit security. We do not recommend generating RSA or DSA keys smaller
than 2048 bits even for interoperability with 3rd party implementations.
Note
We recommend you to replace your SSH keys with new ones at a minimum frequency of every
two years.
The server must know the user's public key, so you need to upload the public key to the server, but the
private key must remain only in your possession.
Tectia Client
private key public key
ClientUser
Client
ServerUser
Server
Secure Shell v2 server
Figure4.1.User public-key authentication
When you start logging in to a remote server, the client sends a signature to the server, and the server
checks for matching public keys. If the key is protected with a passphrase, the client requests you to enter
the passphrase.
Remember that your private key is used to authenticate you. Keep your private key in a secure place and
make sure that no one else has access to it. If anyone else can access your private key, they can attempt
to log in to the remote host computer pretending to be you. Define a passphrase to protect your private
key, whenever possible.
Caution
Generate keys only on your personal computer that no one else can access! Do not store your
private key on a computer that is shared with other users.
© 1995–2022 SSH Communications Security
Corporation Tectia® Client/Server 6.6 (Unix) Quick Start Guide

Creating Keys with Public-Key Authentication Wizard 33
When you start using public-key authentication, do the following:
1. Generate a key pair. You can generate your own key files with the help of a built-in Public-Key
Authentication Wizard (see Section 4.3.1), or using the command line tool ssh-keygen-g3 (see
Section4.3.3).
You can also import existing keys on the Keys and Certificates page of the Tectia Connections
Configuration GUI.
2. Upload your public key to the remote host computer (running Tectia Server) automatically (see
Section4.3.2).
Note
Tectia Server supports also user public keys generated with OpenSSH. Tectia Server can
be configured to check the OpenSSH authorized_keys file in addition to the Tectia
authorized_keys directory and/or authorization file. Public keys defined in the Tectia
locations have precedence over the keys in the OpenSSH file if the same key is defined in both.
These instructions assume that the client user is allowed to log in to the remote host, where Tectia Server
is running, using password authentication.
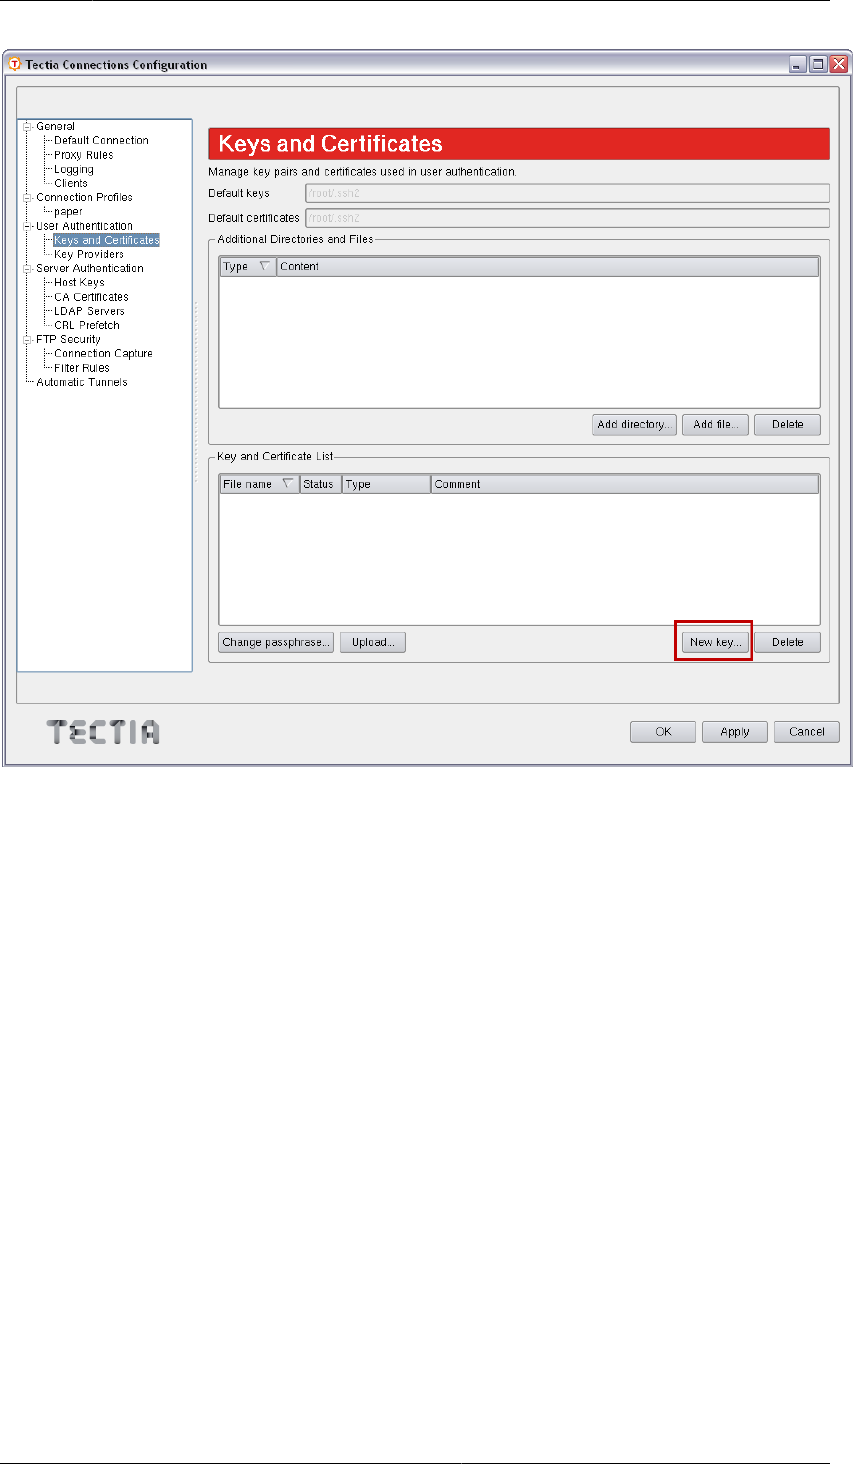
4.3.1Creating Keys with Public-Key Authentication Wizard
On Linux, you can use the Tectia Public-Key Authentication Wizard to generate a key pair. The wizard
will generate two key files, your private key and your public key, and store them in the $HOME/.ssh2
directory on your local computer. The public key has .pub as the file extension, and the private key file
has the same base file name as the public key but no file extension.
Public key pairs can also be generated with the command line tool ssh-keygen-g3. For instructions, see
Section4.3.3.
1. Go to the /opt/tectia/bin directory by entering:
$ cd /opt/tectia/bin/
2. Start the Tectia Connections Configuration GUI with the following command:
$ ssh-tectia-configuration
3. Go to User Authentication and select the Keys and Certificates page. Click New key.
Tectia® Client/Server 6.6 (Unix) Quick Start Guide
© 1995–2022 SSH Communications Security
Corporation
34 Chapter4Configuring Authentication Methods
Figure4.2.Tectia Connections Configuration GUI, Keys and Certificates view
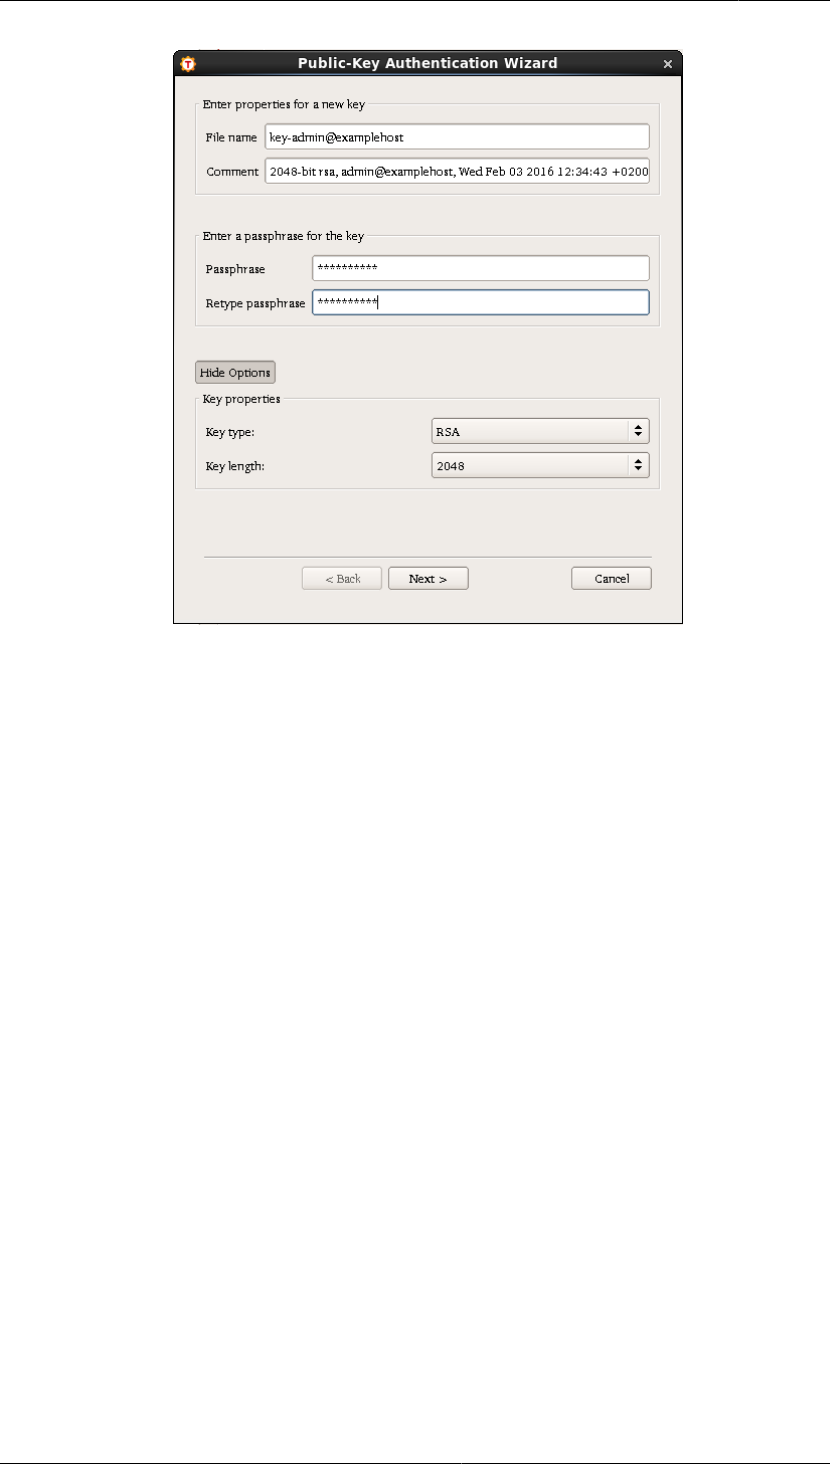
4. The Public-Key Authentication Wizard starts.
© 1995–2022 SSH Communications Security
Corporation Tectia® Client/Server 6.6 (Unix) Quick Start Guide
35
Figure4.3.The Public-Key Authentication Wizard
5. Define the key properties and the required passphrase to protect your key pair.
File Name
Type a unique name for the key file. The wizard suggests a name consisting of your user name
and the host name.
Comment
Write a short comment that describes the key pair. For example, describe the connection the key
is used for. The wizard suggests a comment consisting of the key length and type, your user name
and the host name, and the current date and time. This field is not obligatory, but it helps to identify
the key later.
Passphrase
Type a phrase that is difficult to guess. Use ideally at least 20 characters, both letters and numbers.
Any punctuation characters can be used as well. While the passphrase or private key is never sent
over the network, a dictionary attack can be used against a private key if it is accessible locally.
For ease of use, an authentication agent is recommended instead of leaving the passphrase empty.
By default ssh-broker-g3 functions as an authentication agent.
Tectia® Client/Server 6.6 (Unix) Quick Start Guide
© 1995–2022 SSH Communications Security
Corporation
36 Chapter4Configuring Authentication Methods
Note
In FIPS mode, due to a FIPS regulation which forbids exporting unencrypted private
keys out of the FIPS module, it is not possible to generate user keys without a passphrase.
If the key pair will be used for automated jobs, you can leave the passphrase field empty to generate
the key without a passphrase.
You will be requested to enter the passphrase always when using the keys to authenticate yourself.
The passphrase works in a way similar to a password and gives some protection for your private key.
Memorize the passphrase carefully, and do not write it down.
Retype passphrase
Type the passphrase again. This ensures that you have not made a typing error.
6. Click the Advanced Options if you want to define the type and/or length of the key to be generated to
be different from the defaults. By default, Tectia Client generates a pair of 3072-bit RSA keys.
In the Key Properties area, you can define the following:
Key Type
Select the type of the key to be generated. Available options are DSA, RSA, ECDSA and Ed25519.
Key Length
Select the length (complexity) of the key to be generated. Available options are:
• DSA/RSA keys: 1024, 2048, 3072, 4096, 5120, 6144, 7168, 8192 bits
Note
In FIPS mode (conforming to FIPS 186-3) the available DSA key lengths are limited
to 1024, 2048 and 3072 bits.
• ECDSA keys: 256, 384, 521 bits
• Ed25519 keys: 256 bits
Note
Ed25519 keys are not available in FIPS mode.
Larger keys of the same key type are more secure, but also slower to generate. A 256-bit ECDSA
key and a 3072-bit DSA or RSA key provide equivalent security.
7. Click Next to proceed to uploading the key. The wizard continues with Step 3 in Section4.3.2.
© 1995–2022 SSH Communications Security
Corporation Tectia® Client/Server 6.6 (Unix) Quick Start Guide

Uploading Public Keys Automatically 37
Uploading existing public keys to new remote servers is instructed in Section4.3.2.
4.3.2Uploading Public Keys Automatically
Public keys can be automatically uploaded to servers that have the SFTP subsystem enabled, and by
default, SFTP is enabled on Tectia Servers. The Public-Key Authentication Wizard automatically
uploads each new public key to a remote host of your choice. All existing keys are also listed on the Keys
and Certificates page of the Tectia Connections Configuration GUI, and you can select a key to upload
it to a remote server at any time.
The public key will be uploaded to the default user home directory ($HOME/.ssh2 on Unix) on the remote
server.
Note
The key user is required to have write permissions to the key directory on the server, otherwise
the automatic upload will fail. The administrator of the remote host computer may have restricted
user access so that users are not able to configure public-key authentication for themselves even
if public-key authentication is allowed in the server configuration.
1. To access the Public-Key Authentication Wizard, click User Authentication → Keys and
Certificates on the tree view.
2. Select a key from the Key and Certificate List and click Upload.
3. The Upload Public Key view of the wizard appears.
Tectia® Client/Server 6.6 (Unix) Quick Start Guide
© 1995–2022 SSH Communications Security
Corporation
38 Chapter4Configuring Authentication Methods
Figure4.4.Uploading a key
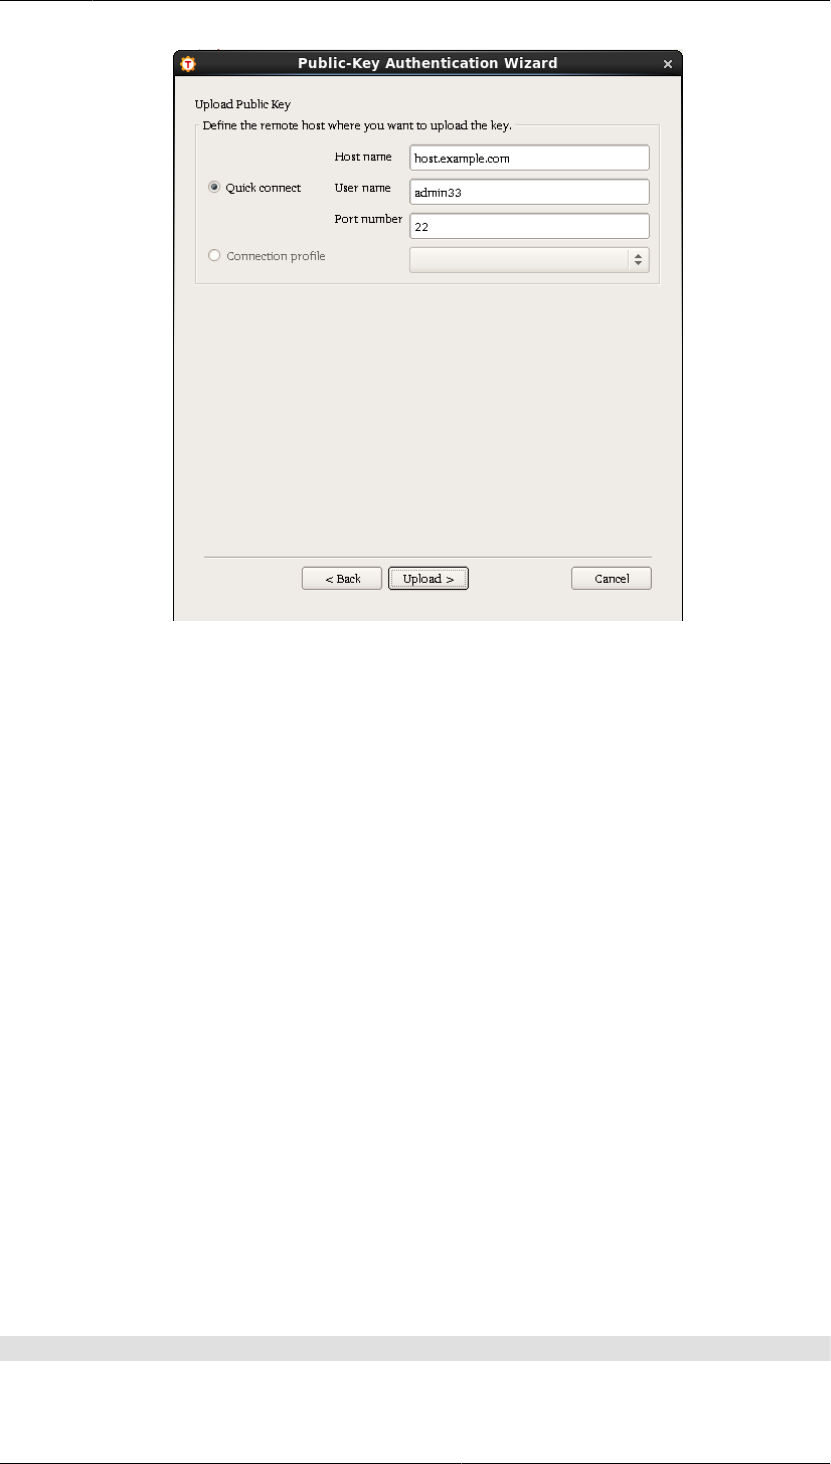
Define the remote host where you want to upload the key:
Quick connect
Select this option to define the remote Host name and your User name there. The default Secure
Shell Port number is 22.
Connection profile
Select a Connection profile from the drop-down list that specifies the desired remote host and
user name.
4. Click Upload to transfer the key to the selected server. If you are already connected to the remote server
host, the key upload starts immediately. If you are not connected, you will be prompted to authenticate
on the server (by default with password).
4.3.3Creating and Uploading Keys with the Command Line Tools
In addition to the Tectia Connections Configuration GUI available on Linux, you can use the command
line tools for creating and uploading keys.
To create a public key pair, run ssh-keygen-g3 on the command line on Tectia Client:
Client$ ssh-keygen-g3
© 1995–2022 SSH Communications Security
Corporation Tectia® Client/Server 6.6 (Unix) Quick Start Guide

Setting up Non-interactive Authentication for Automatic Scripts 39
Generating 3072-bit rsa key pair
15 o.oOo.oOOo.o
Key generated.
3072-bit rsa, ClientUser@Client, Mon Aug 15 2022 12:08:07 +0200
Passphrase :
Again :
Private key saved to /home/ClientUser/.ssh2/id_rsa_3072_a
Public key saved to /home/ClientUser/.ssh2/id_rsa_3072_a.pub
ssh-keygen-g3 asks for a passphrase for the new key. Enter a sufficiently long (20 characters or so)
sequence of any characters (spaces are OK).
The new authentication key pair consists of two separate files. One of the keys is your private key which
must never be made available to anyone but yourself. The private key can only be used together with the
passphrase.
The key pair is by default stored in your $HOME/.ssh2 directory (created by ssh-keygen-g3 if it does not
exist previously).
In the example above, the private key file is id_rsa_3072_a. The other file id_rsa_3072_a.pub is your
public key, which can be distributed to other computers.
By default, ssh-keygen-g3 creates a 3072-bit RSA key pair. DSA, ECDSA or Ed25519 keys can be
generated by specifying the -t option with ssh-keygen-g3. Key length can be specified with the -b option.
For automated jobs, the key can be generated without a passphrase with the -P option:
$ ssh-keygen-g3 -t ecdsa -b 384 -P
Uploading Public Key Manually
To enable public-key authentication with your key pair:
1. Check that your keys are stored in the default location: the $HOME/.ssh2 directory.
2. Connect to Server using your password.
3. Use the Secure Shell file copy client scpg3 to upload your public key to the server, to your default
authorized_keys directory, the $HOME/.ssh2/authorized_keys directory:
$ scpg3 id_rsa_3072_a.pub ServerUser@Server:.ssh2/authorized_keys/
The server will then use the uploaded public key to authenticate you when you log in after this.
4.4Setting up Non-interactive Authentication for Automatic
Scripts
When Tectia Server is used for automated file transfer, you can create separate user accounts for file
transfer purposes. When such user accounts are used only for non-interactive file transfers, it is advisable
Tectia® Client/Server 6.6 (Unix) Quick Start Guide
© 1995–2022 SSH Communications Security
Corporation

40 Chapter4Configuring Authentication Methods
to disable terminal access on the server side. See instructions in the section called “Restricting Terminal
Access”.
Non-interactive authentication with public keys and scripted commands can be set for the SFTP accounts.
For non-interactive batch jobs, you can use public-key authentication without a passphrase.
Running the client non-interactively requires that you have already saved the server's public host key on
the client, and set up a non-interactive method for user authentication. Batch mode should be used non-
interactively with command-line tools.
1. Generate a 3072-bit RSA (default length and type) key pair with an empty passphrase by giving the
following command:
Client$ ssh-keygen-g3 -P
where -P generates the private key with an empty passphrase.
2. For uploading the keys, see instructions in the section called “Uploading Public Key Manually”.
Caution
Make sure your private key is not accessible to others. This is especially important when the
key is stored without a passphrase.
For more information on other non-interactive authentication methods, see Chapter Authentication in
Tectia Server Administrator Manual.
© 1995–2022 SSH Communications Security
Corporation Tectia® Client/Server 6.6 (Unix) Quick Start Guide

41
Chapter5Using Secure File Transfer
Secure File Transfer Protocol (SFTP) is a secure replacement for the plain-text FTP service. The SFTP
service encrypts all files during the transfer.
This chapter shows how secure file transfer is used and describes a use case plus the required configuration
changes.
5.1Using SFTP on Tectia Client
On Tectia Client, the default settings for SFTP are applicable in most cases, so you can start experimenting
with file transfers immediately.
5.1.1Using SFTP on Command Line
Command sftpg3 is used on the command line to connect to any host that is running a Secure Shell version
2 server with the SFTP server subsystem enabled.
The basic syntax of sftpg3 is:
sftpg3 username@remotehost
This logs you in to the remote host. For example, after a successful login you can fetch a file from the
remote host to your local host with a command like this:
sftp> get filename
To view the commands available with sftpg3, type help at the SFTP prompt:
sftp> help
For more information on sftpg3, see the sftpg3(1) man page or the Tectia Client User Manual.
5.2Configuring Tectia Server for Automated Secure File
Transfer
Tectia Server can be used for automated secure file transfer. This use case shows how to configure Tectia
Server for it. Tectia Client does not require any configuration changes.
Tectia® Client/Server 6.6 (Unix) Quick Start Guide
© 1995–2022 SSH Communications Security
Corporation

42 Chapter5Using Secure File Transfer
The goal of changing the Tectia Server configuration is to improve the security of the system for automated
file transfers. This requires some user restrictions on the SFTP usage. In this use case, the following
restrictions are defined on Tectia Server:
1. Public keys are the only allowed authentication method. See instructions in the section called “Enabling
Public-Key Authentication”.
2. SFTP service is allowed only for specially created user groups SFTP-users and admin. SFTP service
is denied from all other users. See instructions in the section called “Restricting Access to File Transfer
Service ”.
3. Members of SFTP-users have access to their user-specific home folders only. This can be defined
with chrooting settings. See instructions in the section called “Restricting Access to Folders”.
4. Terminal access is allowed only for administrators; from everyone else, it is denied. See instructions
in the section called “Restricting Terminal Access”.
5. Tectia Server will be connecting to port 22, the default port for secure shell connections.
5.2.1Configuration Settings in ssh-server-config.xml
For the example use case, we need to override some of the Tectia Server default settings. This is done by
creating an xml-format configuration file ssh-server-config.xml.
Create the configuration file by copying and renaming one of the following files (use the settings as a
model):
/etc/ssh2/ssh-server-config-example.xml
/etc/ssh2/ssh-server-config-tutorial.xml
You can view the default settings in file:
/etc/ssh2/ssh-server-config-default.xml
The following example shows the configuration file with the settings required to produce the use case
described in Section5.2.
For instructions, see the sections below the configuration file example.
<?xml version="1.0" encoding="UTF-8"?>
<!DOCTYPE secsh-server SYSTEM
"/opt/tectia/share/auxdata/ssh-server-ng/ssh-server-ng-config-1.dtd" [
<!ENTITY configdir PUBLIC "secsh:directory(config-server)" "">
]>
<secsh-server>
<!--This block defines the allowed cryptographic methods-->
<!--Keep the default settings-->
<params>
<crypto-lib mode="standard" />
<hostkey>
<private file="&configdir;/hostkey" />
<public file="&configdir;/hostkey.pub" />
</hostkey>
© 1995–2022 SSH Communications Security
Corporation Tectia® Client/Server 6.6 (Unix) Quick Start Guide

43
<listener id="listener" port="22" />
<limits max-connections="256" max-processes="40" />
</params>
<!--This block defines the allowed server authentication methods-->
<!--Keep the default settings-->
<connections>
<connection action="allow">
<cipher name="aes128-cbc" />
<cipher name="aes192-cbc" />
<cipher name="aes256-cbc" />
<cipher name="aes128-ctr" />
<cipher name="aes192-ctr" />
<cipher name="aes256-ctr" />
<cipher name="3des-cbc" />
<cipher name="[email protected]" />
<mac name="hmac-sha1" />
<mac name="hmac-sha1-96" />
<mac name="[email protected]" />
<mac name="[email protected]" />
<mac name="[email protected]" />
<mac name="[email protected]" />
<mac name="[email protected]" />
<mac name="[email protected]" />
</connection>
</connections>
<!--This block defines the allowed user authentication methods-->
<!--Allow only public key authentication-->
<authentication-methods login-grace-time="600">
<authentication action="allow">
<auth-publickey />
</authentication>
</authentication-methods>
<!--This block defines first user groups and then a set of rules for each group-->
<!--The default settings are applied to users left outside the groups-->
<services>
<!--Define a group for enforced password changing for users with-->
<!--expired passwords.-->
<!--Omit this group if you do not want to enforce password changes-->
<group name="passwd-change">
<selector>
<user-password-change-needed />
</selector>
</group>
<!--Define a group for privileged users-->
<!--Selector is used to define criteria for inclusion into the group-->
<group name="admin">
<selector>
<user-privileged value="yes" />
</selector>
Tectia® Client/Server 6.6 (Unix) Quick Start Guide
© 1995–2022 SSH Communications Security
Corporation

44 Chapter5Using Secure File Transfer
</group>
<!--Define a group for SFTP-only users-->
<!--The members are listed in a separate group named staff-->
<group name="SFTP-users">
<selector>
<user-group name="staff" />
</selector>
</group>
<!--Define the enforced password changing policy-->
<!--Omit this group if you do not want to enforce password changes-->
<rule group="passwd-change">
<terminal action="deny" />
<command application="/usr/bin/passwd" action="forced" />
<tunnel-local action="deny" />
<tunnel-remote action="deny" />
</rule>
<!--Define what the privileged users are allowed to do-->
<rule group="admin"
idle-timeout="0">
<terminal action="allow" />
<subsystem type="sftp"
action="allow"
application="sft-server-g3" />
<command action="allow" />
<tunnel-local action="allow" />
<tunnel-remote action="allow" />
</rule>
<!--Define what the SFTP-only users are allowed to do-->
<rule group="SFTP-users">
<terminal action="deny" />
<subsystem type="sftp"
action="allow"
application="sft-server-g3"
chroot="/home/%username%" />
<command action="deny" />
<tunnel-local action="deny" />
<tunnel-remote action="deny" />
</rule>
<!--Define that all actions are denied from the rest of the users-->
<rule>
<terminal action="deny" />
<subsystem type="sftp"
action="deny"
application="sft-server-g3" />
<command action="deny" />
<tunnel-local action="deny" />
<tunnel-remote action="deny" />
</rule>
</services>
© 1995–2022 SSH Communications Security
Corporation Tectia® Client/Server 6.6 (Unix) Quick Start Guide

45
</secsh-server>
For information on Tectia Server behavior with expired passwords, see section Configuration File for
Tectia Server in Tectia Server Administrator Manual.
Enabling Public-Key Authentication
To enable public-key authentication on the server, include the following settings in the ssh-server-
config.xml file, in the <authentication-methods/> block:
<authentication action="allow">
<auth-publickey />
</authentication>
When one or more <authentication/> elements are defined, only those methods specified in them are
applicable. If no <authentication/> elements are defined, the default settings are used.
Restricting Access to File Transfer Service
To restrict the access to the file transfer service, first create user groups and then define rules for them.
In the ssh-server-config.xml file, define groups with names admin and SFTP-users in the services
block.
With element <selector/>, define who belongs to each group. Group admin includes all privileged users.
Group SFTP-users includes those users who are allowed to use the SFTP service. Attach an existing
operating system-related user group, for example "staff", to the SFTP-users group.
<group name="admin">
<selector>
<user-privileged value="yes" />
</selector>
</group>
<group name="SFTP-users">
<selector>
<user-group name="staff" />
</selector>
</group>
Definitions of the XML elements:
group
Creates a group that can be used as a basis for restricting services. Groups are defined based on
selectors.
The name must be given as an attribute. The value of name must be a valid XML name beginning with
a letter and containing alphanumeric characters and underscore characters without any whitespaces.
selector
The selector defines criteria that specify the users that belong to the group.
Tectia® Client/Server 6.6 (Unix) Quick Start Guide
© 1995–2022 SSH Communications Security
Corporation

46 Chapter5Using Secure File Transfer
rule
This element defines a rule for the specified group of users. Rules can be used to restrict the services
and commands the server allows to the users.
The rules are read in order, and the first rule that matches the user's group is used. The match must
be exact. No wildcards are allowed in the group attribute. If no group is specified, the rule matches
to all users.
<rule group="SFTP-users">
<terminal action="deny" />
<subsystem type="sftp"
action="allow"
application="sft-server-g3"
chroot="/home/%username%" />
<command action="deny" />
<tunnel-local action="deny" />
<tunnel-remote action="deny" />
</rule>
<rule>
<terminal action="deny" />
<subsystem type="sftp"
action="deny"
application="sft-server-g3" />
<command action="deny" />
<tunnel-local action="deny" />
<tunnel-remote action="deny" />
</rule>
For the rest of the XML element definitions, see Tectia Server Administrator Manual.
Restricting Access to Folders
By default, file access by the user using the SFTP subsystem is restricted by the file system access controls.
You can define more restrictions by activating chrooting.
Chrooting definitions are made in the ssh-server-config.xml configuration file.
Folder access can be further restricted by using the chroot attribute. The chroot attribute can be used
with the subsystem, terminal, and command elements. For more information on chrooting, see Tectia
Server Administrator Manual.
The chroot attribute must be a directory path. Values %username%, %homedir%, and %hostname% will
be substituted with the user name currently logged in, the user's home directory, and the FQDN of the
connected client, respectively.
An example of chroot usage is shown below:
<rule group="SFTP-users">
<subsystem type="sftp"
action="allow"
© 1995–2022 SSH Communications Security
Corporation Tectia® Client/Server 6.6 (Unix) Quick Start Guide

Automated Secure File Transfer Script 47
application="sft-server-g3"
chroot="/home/%username%" />
</rule>
Here %username% will be replaced. For example, for user user7, the path would be /home/user7. During
an SFTP session, user user7 is now restricted to this directory (and its subdirectories).
Note
Chrooting the SFTP subsystem affects both SFTP and SCP2 operations to the server, but it does
NOT affect OpenSSH-style SCP operations. To chroot also OpenSSH SCP, you should chroot the
scp1-compat-srv command. For instructions, see Tectia Server Administrator Manual. If you
want to deny OpenSSH SCP, you can disable all remote commands as is done in this example.
Restricting Terminal Access
You can restrict terminal access so that it is allowed only for users in group admin. To disable terminal
access from everyone else, make the following settings in the ssh-server-config.xml file, in the
services block:
<rule group="admin">
<terminal action="allow" />
...
</rule>
<rule group="SFTP-users">
<terminal action="deny" />
...
</rule>
<rule>
<terminal action="deny" />
...
</rule>
This setting denies also X11 and agent forwarding and shell commands for the specified group (unless
some commands are explicitly allowed).
The users will be able to use SFTP and other subsystems defined in the Tectia Server configuration. Any
other "exec" and "shell" requests will be denied for the users. This includes forced commands with public
keys and the legacy-style password changing when performed as a forced command.
5.3Automated Secure File Transfer Script
You can set up automated file transfer between Tectia Client and Server hosts using scripts.
When Tectia Server is used for automated file transfer, separate user accounts can be created for the file
transfer users. Non-interactive authentication with public keys and scripted commands are then set for
these accounts, and the file transfers are carried out as the current user.
Tectia® Client/Server 6.6 (Unix) Quick Start Guide
© 1995–2022 SSH Communications Security
Corporation

48 Chapter5Using Secure File Transfer
The following example script first transfers testfile from Tectia Client to Tectia Server and then
transfers the file back. The script logs the command and the return values to a file.
#!/bin/bash
date=`date +%d.%m.%Y-%H.%M`
SRV=sftp.example.com
#scpg3 put
echo "/opt/tectia/bin/scpg3 -B -q testfile $SRV:test" >> scpg3_put_$DATE
/opt/tectia/bin/scpg3 -B -q testfile.dat $SRV:test
echo $? >> scpg3_put_$DATE
#scpg3 get
echo "/opt/tectia/bin/scpg3 -B -q $SRV:test test" >> scpg3_get_$DATE
/opt/tectia/bin/scpg3 -B -q $SRV:test test
echo $? >> scpg3_get_$DATE
The script can be set to run as a forced command.
© 1995–2022 SSH Communications Security
Corporation Tectia® Client/Server 6.6 (Unix) Quick Start Guide

49
Chapter6Using Secure Application
Connectivity
This chapter shows how to set up easy application tunneling with pre-configured automatic tunnels for
secure e-mail server access. The client machine where the e-mail application is running requires Tectia
Client.
The tunneling capability of Tectia is a feature that allows, for example, company employees to access their
e-mail, company intranet pages, and shared files securely even when working outside the office.
Tunneling, or port forwarding, is a way of forwarding otherwise unsecured TCP application traffic through
Tectia in secure encrypted format. You can secure, for example, POP3, SMTP, and HTTP connections
that would otherwise be unsecured.
Tunneling makes it possible to access e-mail from any type of Internet service, whether accessed via
modem, GPRS, 3G, a DSL line or a cable connection, or a hotel Internet service. As long as the users have
a TCP/IP connection to the Internet, they can get their e-mail and access other resources from anywhere
in the world securely.
The Tectia Connection Broker takes care of the tunneling in the background. When the Connection Broker
starts up, it opens the listeners for the defined automatic tunnels and asks the user to enter the password
or passphrase. If the connections are authenticated with public keys that have empty passphrases, the user
does not need to take any actions. The actual tunnel is formed the first time a connection is made to the
listener port.
Note
The user applications using the tunnel will carry out their own authentication procedures (if any)
the same way they would without the encrypted tunnel.
The automatic tunnels are local (outgoing) tunnels, which means that they protect TCP connections that
your local computer forwards from a specified local port to a specified port on the remote host computer
where you are connecting to. It is also possible to forward the connection beyond the remote host computer,
but the connection is encrypted only between Tectia Client and the Secure Shell server.
Tectia® Client/Server 6.6 (Unix) Quick Start Guide
© 1995–2022 SSH Communications Security
Corporation
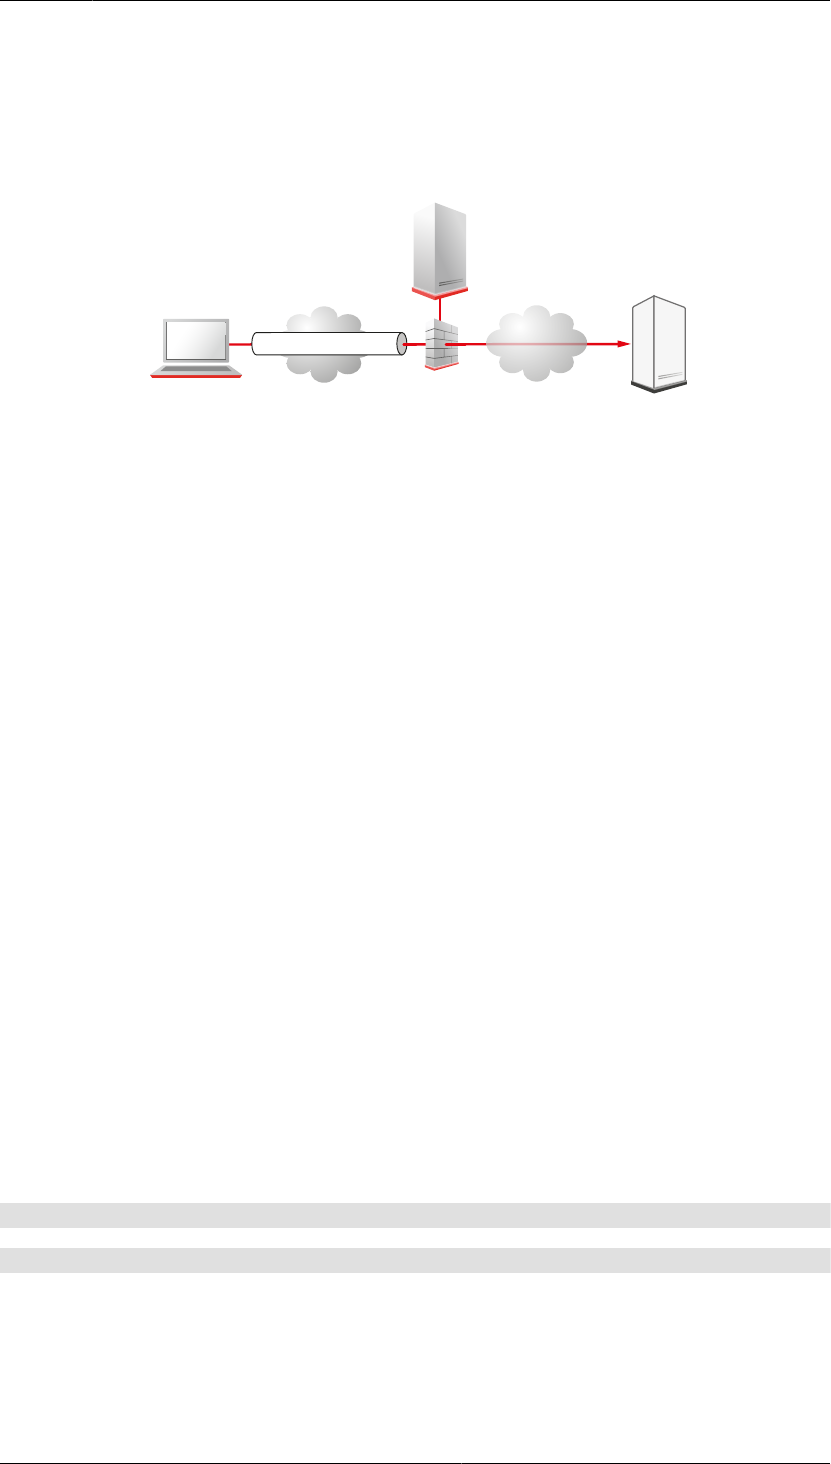
50 Chapter6Using Secure Application Connectivity
Figure6.1 shows an example where the Secure Shell server resides in the DMZ network. The connection
is encrypted from Tectia Client to the Secure Shell server and continues unencrypted within the corporate
network to the IMAP server.
E-mail Client
IMAP Server
Tectia Client/
Tectia ConnectSecure
Tectia Server
Internet
Local tunnel
Corporate
network
Figure6.1.Local tunnel to an IMAP server
6.1Defining Automatic Tunnels
Automatic tunnels are pre-configured secure connections to servers and the connections are opened
automatically when Tectia Client starts up (usually when the session is started). The actual tunnel is
formed the first time an application connects to the listener port. If the connection to the server is not
open at that time, it will be opened automatically as well.
Automatic tunneling requires settings on Tectia Client and on the application. For instructions on defining
the automatic tunnels on Tectia Client, see Section6.1.1.
For instructions on defining the automatic tunnels on the application to be tunneled, see Section6.1.2.
For instructions on defining the automatic tunnels in the Connection Broker configuration file, see
Section6.1.3.
6.1.1Settings in Tectia Client
Automatic tunnels are configured with the Tectia Connections Configuration GUI.
Open the tool by going to the /opt/tectia/bin/ directory and starting the tool:
$ cd /opt/tectia/bin/
$ ssh-tectia-configuration
Select Automatic Tunnels in the tree menu and click Add to open the Automatic Tunnel dialog box.
© 1995–2022 SSH Communications Security
Corporation Tectia® Client/Server 6.6 (Unix) Quick Start Guide
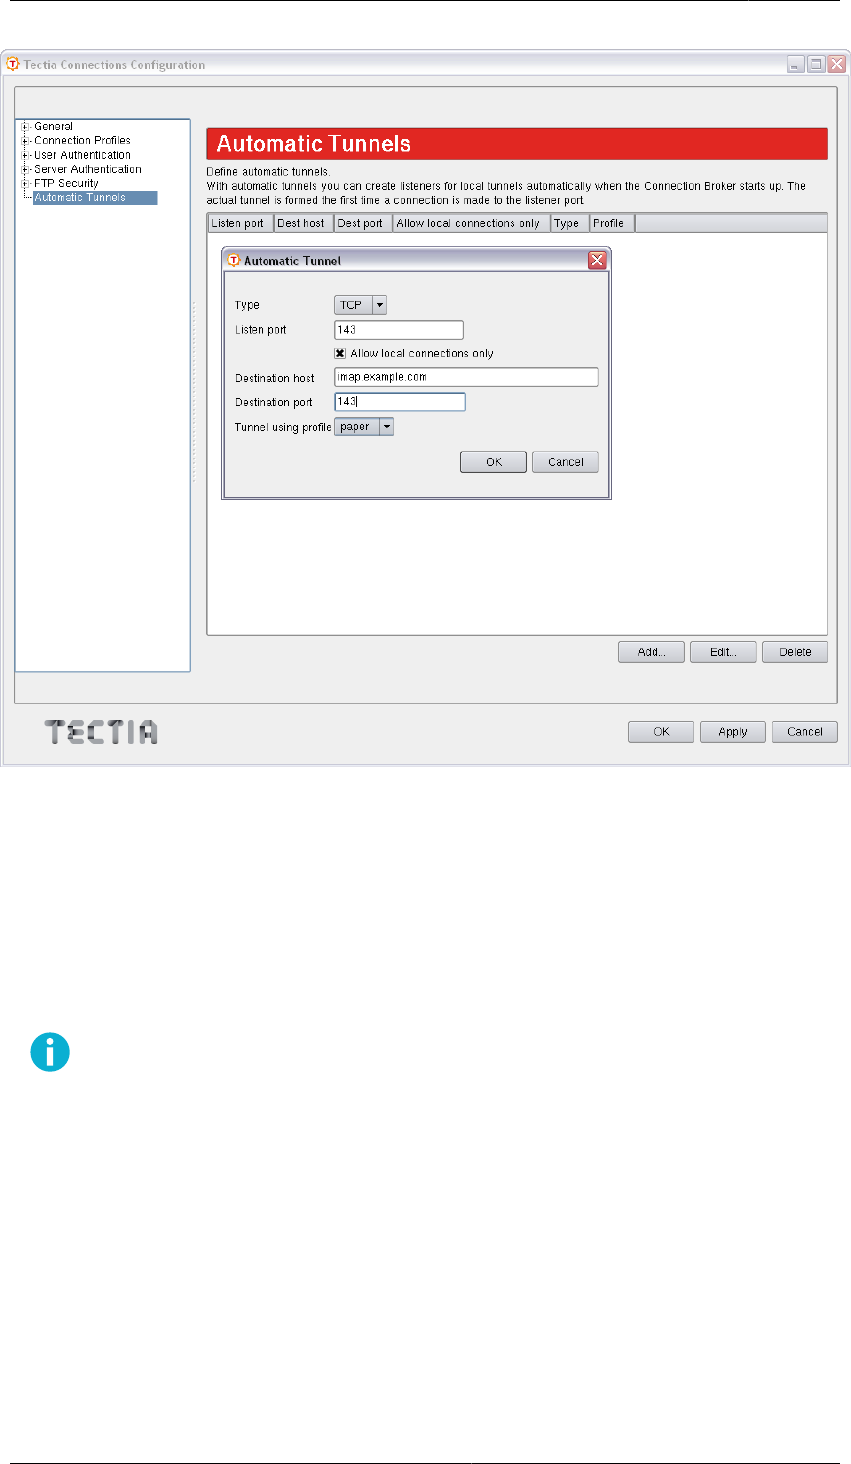
51
Figure6.2.Defining an automatic tunnel
Fill in the fields as follows:
• Type: Select the type of the tunnel from the drop-down list. Available types are TCP and FTP.
• Listen port: Define the number of a local port that Tectia Client listens to and that the applications
connect to. Do not use a reserved port number.
Note
The protocol or application for which you wish to create the tunnel may have a fixed port
number (for example, 143 for IMAP and 25 for SMTP) that it needs to use to connect
successfully. Other protocols or applications may require an offset (for example, 5900 for
VNC) that you will have to take into account.
• Allow local connections only: Leave this option selected if you want to allow only local connections
to be made. This means that other computers will not be able to use the tunnel you created. By default,
only local connections are allowed. This is the right choice for most situations. You should carefully
consider the security implications if you decide to also allow outside connections.
• Destination host: This field defines the destination host for the tunnel.
Tectia® Client/Server 6.6 (Unix) Quick Start Guide
© 1995–2022 SSH Communications Security
Corporation

52 Chapter6Using Secure Application Connectivity
Note
The destination host address is resolved after the Secure Shell connection has been
established, so here localhost means to the Tectia Server host you have connected to.
• Destination port: The destination port defines the port to which the tunneled connection is made on
the destination host.
• Tunnel using profile: Select a connection profile through which the tunnel will be created. See
Section3.2 for instructions on creating connection profiles.
To edit an automatic tunnel, select the tunnel from the list and click Edit.
To delete an automatic tunnel, select the tunnel from the list and click Delete.
6.1.2Settings in the Tunneled Application
The application (for example, an IMAP and SMTP e-mail, such as Pine) must be configured to connect
to the localhost port instead of the application server port.
When the tunneled application connects to the localhost port, the connection is forwarded in encrypted
format to Tectia Server, and from there unencrypted to the application server.
6.1.3Settings in the Connection Broker Configuration File
You can define automatic tunnels in the Connection Broker configuration file ssh-broker-config.xml
with the static-tunnels XML element.
The following configuration example shows a connection profile with the static-tunnels settings for
IMAP and SMTP e-mails whose connections will be forwarded through a connection profile:
<profiles>
<profile id="id1"
user="user7"
host="sshserver.example.com" />
</profiles>
<static-tunnels>
<tunnel type="TCP"
listen-port="143"
dst-host="imap.example.com"
dst-port="143"
allow-relay="no"
profile="id1"/>
<tunnel type="TCP"
listen-port="25"
dst-host="smtp.example.com"
dst-port="143"
© 1995–2022 SSH Communications Security
Corporation Tectia® Client/Server 6.6 (Unix) Quick Start Guide

53
allow-relay="no"
profile="id1"/>
</static-tunnels>
With the static-tunnels setting, the listeners for local tunnels are automatically created when the
Connection Broker starts up. The actual tunnel is formed the first time a connection is made to the listener
port. If the connection to the server is not open at that time, it will be opened automatically as well.
Whenever a connection is made to the specified listener, the connection is tunneled over Secure Shell to
the remote server and another connection is made from the server to a specified destination host and port.
The connection from the server onwards will not be secure, it is a normal TCP connection.
The static-tunnels element can contain any number of tunnel elements.
The tunnel element specifies the characteristics of an automatic tunnel. It has the following attributes:
type, listen-port, listen-address (optional), dst-host, dst-port, allow-relay, and profile.
The type attribute defines the type or protocol of the tunnel. This can be either tcp or ftp.
The listen-port attribute defines the local port to which Tectia Client listens. The optional listen-
address attribute can be used to define which network interfaces on the client listens to. Its value can
be an IP address belonging to an interface on the local host. Value 0.0.0.0 listens to all interfaces. The
default is 127.0.0.1 (localhost loopback address on the client). Setting any other value requires setting
allow-relay="yes".
The dst-host and dst-port attributes define the destination host address and port. The value of dst-
host can be either an IP address or a domain name. The default is 127.0.0.1 (localhost = server host).
The allow-relay attribute defines whether connections to the listened port are allowed from outside the
client host. The default is no.
The profile attribute specifies the identifier of the connection profile through which the connection is
tunneled.
Tectia® Client/Server 6.6 (Unix) Quick Start Guide
© 1995–2022 SSH Communications Security
Corporation

54 Chapter6Using Secure Application Connectivity
© 1995–2022 SSH Communications Security
Corporation Tectia® Client/Server 6.6 (Unix) Quick Start Guide

55
Index
A
AIX
installation, 14, 18
application connectivity, 49
application tunneling, 49
authentication, 31
of server, 31
of user, 31, 32
public-key, 45
with passwords, 31
with public keys, 32
automated file transfer, 47
automatic tunnels, 50, 52
C
chrooting, 46
client
installation, 13
connection profiles, 26
customer support, 9
D
denying terminal access, 47
documentation, 5
documentation conventions, 7
F
file transfer, 41
automated, 47
G
generating keys, 33
group, 45
H
home directory, 46
HP-UX
installation, 14, 19
I
IBM AIX, 14, 18
installation
preparations, 11
removing Tectia products, 23
upgrading, 12
installing
client on Linux, 13
server on Linux, 16
Tectia products, 12
installing Tectia Client and Server
on AIX, 14, 18
on HP-UX, 14, 19
on Solaris, 15, 21
K
key file, 35
L
license file, 12
licensing, 12
Linux
client installation, 13
server installation, 16
uninstallation, 23
N
nested tunnel, 29
O
online purchase, 12
Oracle Solaris, 15, 21
P
passphrase, 39
port, 29
prerequisites, 11
private key
of user, 39
profile settings, 26
public key
of user, 39
uploading, 37
public-key authentication, 45
Public-Key Authentication Wizard, 33
R
Red Hat Linux, 13, 16
Tectia® Client/Server 6.6 (Unix) Quick Start Guide
© 1995–2022 SSH Communications Security
Corporation

56 Index
related documents, 5
removing
old versions, 12
software, 23
removing from Linux, 23
restricting services, 46
RPM packages, 13, 16
S
secure file transfer, 41
configuring it, 41
using it, 41
services
restricting, 46
settings
profile, 26
setting users to a group, 45
SFTP, 41
use case, 41
Solaris
installation, 15, 21
ssh-keygen-g3, 38
static tunnels, 50, 52
support, 9
SUSE Linux, 13, 16
T
technical support, 9
Tectia Client, 6
Tectia ConnectSecure, 7
Tectia Server, 7
Tectia Server Configuration tool, 7
Tectia Server for IBM z/OS, 7
terminology, 6
tunneling, 49
U
uninstalling, 23
uninstalling from Linux, 23
upgrading, 12
uploading a public key, 37, 39
user account, 12
user authentication, 31, 32
user key, 39
X
XML attribute
allow-relay, 53
XML element
group, 45
rule, 46
selector, 45
services, 45
static-tunnels, 52
tunnel, 53
© 1995–2022 SSH Communications Security
Corporation Tectia® Client/Server 6.6 (Unix) Quick Start Guide
