3/16/23, 2:11 PM
Legacy Developer Documentation
https://documentation.b2c.commercecloud.salesforce.com/DOC1/advanced/print.jsp?topic=/com.demandware.dochelp/LegacyDevDoc/LegacyDevDoc.html&cp=0…
1/158
Legacy Developer Documentation
Contents
1. UX Studio
1.1. Install or Update UX Studio
1.2. Create a Workspace
1.3. Connect to Your Server
1.3.1. Create a Proxy Server Connection for Studio
1.3.2. Create Version Directories
1.3.3. Configure Your Salesforce B2C Commerce Server Connection
1.3.4. Troubleshoot Your Server Connection
1.4. Create a Storefront Project
1.5. Studio File System
1.6. Configuring Automatic Updates for Studio
1.7. Studio Perspectives
1.8. Configuring Studio Views
1.8.1. Studio Properties View
1.8.2. Studio Outline View
1.9. Studio Editor Area
1.9.1. Enabling Code Completion for Controllers
1.9.2. Code Completion/Syntax Highlighting
1.9.3. Code Checking
1.9.4. Enable Content Assist in UX Studio
1.9.5. Form Autocomplete
1.9.6. Setting Studio Preferences
1.10. Troubleshooting Studio
1.11. Upload Cartridges
1.12. Import Cartridges into Your Storefront
1.13. Add Existing Cartridges to Your Storefront
1.14. Reassign Cartridges from One Server Connection to Another
1.15. Using a Custom Builder
1.16. Code Deployment
1.17. Creating a New Template
2. Site Genesis
2.1. Getting Started with SGJC
2.1.1. Site Genesis Learning Path Resources
2.2. SGJC Setup
2.3. SiteGenesis JavaScript Controller (SGJC) Model-View-Controller Development Model
2.4. SiteGenesis JavaScript Controllers (SGJC) Standards Compliance
2.5. SiteGenesis Modules and Hooks
2.6. SiteGenesis and CSS
2.7. Migrating Your Storefront to SGJC Controllers
2.7.1. Pipeline to Controller Conversion
2.7.2. TLS Browser Detection
2.7.3. Configuring Storefront Preferences
2.7.4. Categories Don't Show in Storefront
2.7.5. Cookies Notification/Opt-in for European Cookie Law
2.7.6. SiteGenesis and Web Content Accessibility Guidelines (WCAG)
2.7.7. SiteGenesis Features
2.7.7.1. SiteGenesis Locale and Multicurrency
2.7.7.2. SiteGenesis JavaScript Controller (SGJC) Cart Calculation
2.7.7.3. SiteGenesis CAPTCHA and Rate Limiting
2.7.7.4. SiteGenesis Content Sharing
2.7.7.5. SiteGenesis Dynamic Payment Processing
2.7.7.6. SiteGenesis Gift Registry and Wish List Features
2.7.7.7. SiteGenesis Forgot Password
2.7.7.8. SiteGenesis Passwords
2.7.7.9. SiteGenesis Infinite Scrolling
2.7.7.10. SiteGenesis Mini Images Code Example
2.7.7.11. SiteGenesis Promotions
2.7.7.11.1. SiteGenesis Choice of Bonus Product Discount Implementation
2.7.7.11.2. SiteGenesis Coupons
2.7.7.11.3. SiteGenesis Source Codes
2.7.7.12. SiteGenesis Recommendations
2.7.7.12.1. SiteGenesis Recommendation Examples
2.7.7.13. SiteGenesis Responsive Design
2.7.7.14. SiteGenesis Search
2.7.7.14.1. SiteGenesis Search Triggered Banner
2.7.7.14.2. SiteGenesis Search Pipelines
2.7.7.14.3. SiteGenesis Search Scripts
2.7.7.14.4. Result Attributes in the Search Grid
2.7.7.14.5. Result Attributes in Product Detail Pages
2.7.7.14.6. Refinement Bar Customization
2.7.7.14.7. Manually Changing Search Attributes and Settings
2.7.7.14.8. SiteGenesis Search Properties Files
2.7.7.15. SiteGenesis in-Store Pickup
2.7.7.15.1. Understanding in-Store Pickup
2.7.7.16. SiteGenesis Taxes

3/16/23, 2:11 PM
Legacy Developer Documentation
https://documentation.b2c.commercecloud.salesforce.com/DOC1/advanced/print.jsp?topic=/com.demandware.dochelp/LegacyDevDoc/LegacyDevDoc.html&cp=0…
2/158
2.8. Common Page Components
2.9. Development Components
2.10. Import Reference Application Data into a Sandbox
2.11. SGJC Forms
2.11.1. What Is a Form Definition
2.11.2. Object Binding with Forms
2.11.3. Extracting Form Field Parameters from Metadata
2.11.4. Form Element Naming Conventions
2.11.5. Cross Site Request Forgery Protection
2.11.6. Form Validation
2.11.7. Using API Form Classes
2.11.8. Form Definition Elements
2.11.8.1. Action Form Element
2.11.8.2. Field Form Element
2.11.8.3. Option Form Element
2.11.8.4. Options Form Element
2.11.8.5. Group Form Element
2.11.8.6. Include Form Element
2.11.8.7. List Form Element
2.11.9. Developing Forms with Pipelines
2.11.9.1. How Pipelines Process Forms
2.11.9.2. Salesforce B2C Commerce Forms Components
2.11.9.2.1. Using Business Objects with Forms
2.11.9.2.2. Creating a Form Definition
2.11.9.2.3. Using Forms in Templates
2.11.9.2.4. Using Form Pipelets
2.11.9.2.5. Using Interaction Continue Nodes with Forms
2.11.9.2.6. Form Components Working Together
2.11.9.3. Forms Tutorial
2.11.9.3.1. Using Transitions with Forms
2.11.9.3.1.1. Transitions with Forms
2.11.9.3.2. Forms Tutorial: Business Manager
2.11.9.3.2.1. 1 Forms Tutorial: Extend Profile System Object
2.11.9.3.2.2. 2 Forms Tutorial: Create Preferences Attribute Group
2.11.9.3.3. Forms Tutorial: UX Studio
2.11.9.3.3.1. 1 Forms Tutorial: Create Form Definition
2.11.9.3.3.2. 2 Forms Tutorial: Update Content Asset
2.11.9.3.3.3. 3 Forms Tutorial: Add Templates
2.11.9.3.3.4. 4 Forms Tutorial: Add Localizable Text Messages
2.11.9.3.3.5. 5 Forms Tutorial: Modify the Pipeline
2.11.9.3.3.6. 6 Forms Tutorial: Final Results
2.12. Working with SGJC Controllers
2.13. Comparing Pipelines and SGJC Controllers
2.14. Debugging Scripts
2.14.1. Configuring a Script Debugging Session
2.14.2. Setting Breakpoints
2.14.3. Running the Script Debugger
2.14.4. Using the Breakpoints View
2.14.5. Stepping Through a Script
2.14.6. Using Other Views with Script Debugger
3. Pipelines
3.1. System Pipelines and Controllers
3.2. Pipeline Scripting Quick Start Example
3.3. Pipeline Elements
3.3.1. Pipeline Building Blocks
3.3.2. Start and End Nodes
3.3.3. Subpipelines
3.4. The Pipeline Dictionary
3.5. Database Transaction Handling
3.6. Pipeline Execution Steps
3.7. Error Handling
3.8. Debugging Pipelines
3.9. Analyze Performance with Pipeline Profiler
3.10. Excluding Pipelines from Permission Checks
Legacy Developer Documentation
Documentation in this section describes legacy B2C Commerce functionality.
UX Studio
UX Studio provides a storefront development environment as a plugin for the Eclipse IDE. With UX Studio, you have control over storefront customization while linked to your development server. You
make changes within UX Studio on your PC, then view the effect on your storefront, thus speeding storefront customization delivery.
Site Genesis
SiteGenesis JavaScript Controllers (SGJC) is a demonstration ecommerce reference application that enables you to explore Salesforce B2C Commerce and its capabilities. You can use it as the basis of your
own custom site, although SFRA is recommended for new projects.
Pipelines
Pipelines predated controllers and are similar in terms of functionality they provide.
3/16/23, 2:11 PM
Legacy Developer Documentation
https://documentation.b2c.commercecloud.salesforce.com/DOC1/advanced/print.jsp?topic=/com.demandware.dochelp/LegacyDevDoc/LegacyDevDoc.html&cp=0…
3/158
© Copyright 2000-2023, Salesforce, Inc. All rights reserved. Various trademarks held by their respective owners. Show URL Submit Feedback Privacy Policy
1. UX Studio
UX Studio provides a storefront development environment as a plugin for the Eclipse IDE. With UX Studio, you have control over storefront customization while linked to your
development server. You make changes within UX Studio on your PC, then view the effect on your storefront, thus speeding storefront customization delivery.
Using UX Studio you can:
Create new storefront functionality
Create new business processes
Integrate with external applications
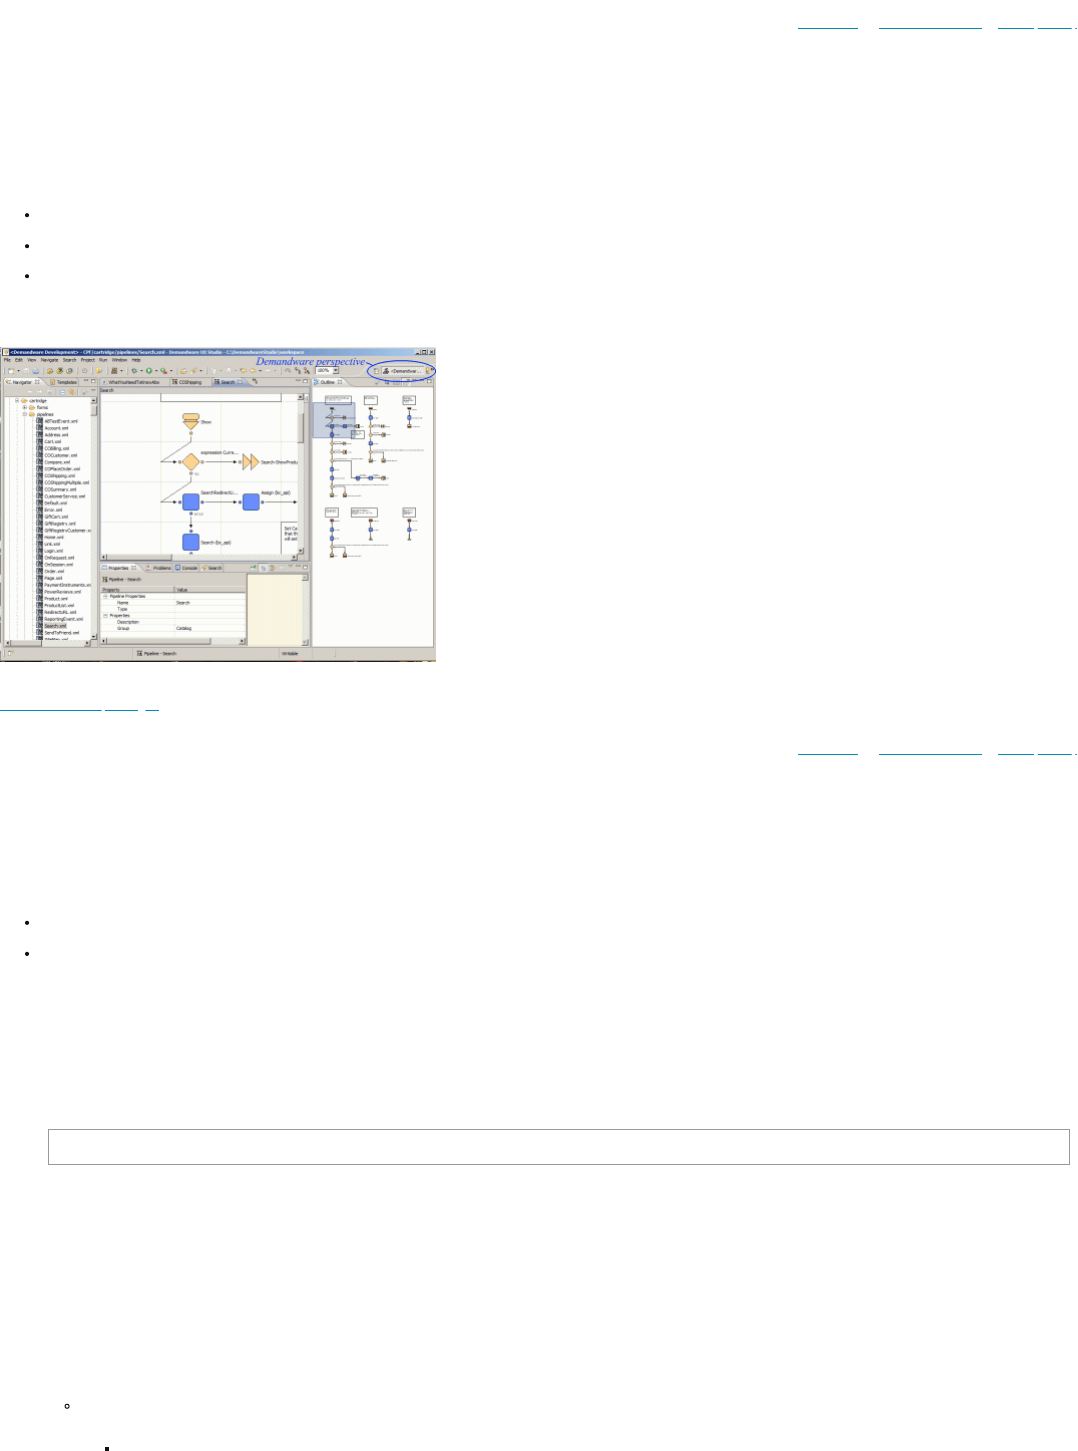
After you install the UX Studio plugin, you can open UX Studio by selecting the Commerce Cloud Development perspective.
Related tasks
Create an Access Key for Logins
© Copyright 2000-2023, Salesforce, Inc. All rights reserved. Various trademarks held by their respective owners. Show URL Submit Feedback Privacy Policy
1.1. Install or Update UX Studio
UX Studio is a plug-in for Eclipse IDE for Java EE Developers.
The UX Studio plug-in requires JDK 8 and supports the following Eclipse versions.
Mars - Eclipse 4.5
Neon - Eclipse 4.6
Note: Newer versions can work, but have not been tested and are not supported.
If you are updating Eclipse, first close the Salesforce B2C Commerce Development perspective.
UX Studio is installed as a plug-in for Eclipse. First, install Eclipse. Then, start the program and install the UX Studio plug-in.
1. (Windows only) In your Eclipse directory, open the eclipse.ini file and add the following line under the -vmargs option if it is not already there.
-Djava.net.preferIPv4Stack=true
2. Run Eclipse.
3. Select Help > Install New Software.
4. Click Add.
5. Enter UX Studio as the name.
6. Enter a location according to your Eclipse version and instance type. To access different instance types, install different Eclipse instances with different Studio versions.
Mars
Sandbox

3/16/23, 2:11 PM
Legacy Developer Documentation
https://documentation.b2c.commercecloud.salesforce.com/DOC1/advanced/print.jsp?topic=/com.demandware.dochelp/LegacyDevDoc/LegacyDevDoc.html&cp=0…
4/158
https://developer.salesforce.com/media/commercecloud/uxstudio/4.5
PIG (Production, Staging, or Development)
https://developer.salesforce.com/media/commercecloud/uxstudio_pr/4.5
Extended Preview or Early Access Sandbox
https://developer.salesforce.com/media/commercecloud/uxstudio_ea/4.5
Neon
Sandbox
https://developer.salesforce.com/media/commercecloud/uxstudio/4.6
PIG (Production, Staging, or Development)
https://developer.salesforce.com/media/commercecloud/uxstudio_pr/4.6
Extended Preview or Early Access Sandbox
https://developer.salesforce.com/media/commercecloud/uxstudio_ea/4.6
7. Select Salesforce B2C Commerce, and click Next.
Eclipse verifies compatibility.
8. Click Next.
9. Select I accept the terms of the license agreements, and click Finish.
10. When the installation finishes, click Yes to restart Eclipse.
If you experience problems, make sure that JDK 8 is installed.
© Copyright 2000-2023, Salesforce, Inc. All rights reserved. Various trademarks held by their respective owners. Show URL Submit Feedback Privacy Policy
1.2. Create a Workspace
In Studio, you create and modify cartridges in a workspace. You can only work in one workspace at a time. In the workspace, you can create one or more server projects.
If you are working on multiple sites, create a workspace for each site.
If you have multiple workspaces, you can select which one is shown when you open UX Studio.
1. In your extraction file location, double-click eclipse.exe.
See Eclipse documentation.
2. In Eclipse, create a workspace on your local machine with sufficient space to store your project.
3. Click OK.
4. Select I accept the terms of the license agreements, and click OK.
© Copyright 2000-2023, Salesforce, Inc. All rights reserved. Various trademarks held by their respective owners. Show URL Submit Feedback Privacy Policy
1.3. Connect to Your Server
After you create your workspace, specify your server connection to your Salesforce B2C Commerce to upload code to your Sandbox or Staging instance. To simplify connection
management, we recommend that you create only one server connection per workspace. Usually, the server you want to connect to the one for your assigned Sandbox instance.
1. In Eclipse, click and select B2C Commerce Development.
2. Click File > New > B2C Commerce Server Connection.
3. For Project Name, enter your instance name (dev01), or accept the default (CommerceCloudServer).
4. Accept Use default location.
This is the location of your workspace. You can specify a different location, but the server connection must be inside the workspace. Otherwise, unexpected results can occur.
We recommend that you accept the default workspace.

3/16/23, 2:11 PM
Legacy Developer Documentation
https://documentation.b2c.commercecloud.salesforce.com/DOC1/advanced/print.jsp?topic=/com.demandware.dochelp/LegacyDevDoc/LegacyDevDoc.html&cp=0…
5/158
5. For the host name, enter the fully qualified domain name (FQDN).
Example: If you are connecting to your sandbox instance via a browser, the FQDN portion of the URL looks similar to: dev01.web.mycompany.demandware.net.
6. For the user name, enter a name that has Site Developer rights, such as admin. These rights are assigned in Business Manager. Contact your administrator for information
about a user name and password.
7. Enter the password (case sensitive).
If you or someone else changes the password later in Business Manager, Studio detects the change and requires you to update the information in Studio.
8. Select Remember Password. By default, this option is disabled.
The B2C Commerce Server Connection password isn't saved locally. You are prompted to enter your password the first time you perform any operation that requires server
interaction. The password is retained in memory only for the period of time configured in the UX Studio preferences in Eclipse. The default is 4 hours.
If you stop and restart Studio and the password isn't remembered, you are prompted to update your configuration information the first time Studio tries to upload files to the
server.
9. For Use Certificate Authentication, which enables two-factor authentication on the server:
For Sandbox instances, do not select it. You are connecting to a Sandbox instance if your host name starts with dev.
For Staging instances, select this option and enter the location of the keystore file and its password. If the keystore file and password combination are correct, the
keystore file is saved in the local server project directory. You are connecting to a Staging instance if your host name starts with staging.
Note: Two-factor authentication must be enabled at the server for the Staging instance. Two-factor authentication is a basic security precaution. Code is directly
uploaded only to Sandbox and Staging instances. For Development and Production instances, code is replicated from Staging.
10. Click Yes.
11. Select the target upload directory.
For a new sandbox, this is always version1.
The server uses the code version in the Active directory field. Select this version if you want your code changes to be visible in the storefront.
12. Whether you click Next or Finish depends on whether you are creating storefront cartridge. If you are following the Developer Getting Started trail, you have not yet created a
cartridge.
If you haven't yet created a cartridge, click Finish.
If you've already created a cartridge, click Next to associate the cartridge with the server.
Select the cartridges you want to associated with the server, and click Finish.
If the Do you want to download the API source cartridges now? message appears, click Yes. These cartridges let you take advantage of new B2C Commerce
features, providing a strong foundation for your ecommerce storefront.
13. Click Yes.
During the download, the log output scrolls in the Studio console. When the download is complete, the Cartridge Explorer view appears within Studio.
14. Refresh the server connection and verify that the latest B2C Commerce API is downloaded to your Studio workspace.
© Copyright 2000-2023, Salesforce, Inc. All rights reserved. Various trademarks held by their respective owners. Show URL Submit Feedback Privacy Policy
1.3.1. Create a Proxy Server Connection for Studio
If the Salesforce B2C Commerce instance is behind a firewall, it can prevent you from accessing the instance from your local computer vial Studio. For personal firewall--disable the
firewall. For corporate server--use a proxy server.
Windows-based proxy servers or Windows-based networks require NTLM authentication, and you must use the native provider. Other systems can use a director or manual provider.
Note: Studio interacts with remote servers via HTTPS. If your Proxy Server is configured for HTTPS traffic, use the HTTPS scheme in the Eclipse proxy preferences. However, if
your Proxy Server is configured to use the HTTP, use the HTTP scheme in the Eclipse proxy preferences.
1. (Windows) To use the native provider, first configure the proxy server information in Internet Explorer.
a. In Internet Explorer, select Tools > Internet Options.
b. On the Connections tab, click LAN Settings.
c. In the Proxy server section, click Advanced.
3/16/23, 2:11 PM
Legacy Developer Documentation
https://documentation.b2c.commercecloud.salesforce.com/DOC1/advanced/print.jsp?topic=/com.demandware.dochelp/LegacyDevDoc/LegacyDevDoc.html&cp=0…
6/158
d. Configure the proxy information in the HTTP entry fields.
e. Select Use the same proxy server for all protocols.
2. In Studio, select Window > Preferences.
3. Under General, select Network Connections.
4. Select one of the following options for the Active Provider:
Direct--Instead of using a proxy, Studio uses a direct connection to a remote server.
Manual--Studio uses the proxy settings that you configured.
Windows--Studio uses the local system's proxy configuration. The information that you configured via Internet Explorer, is displayed in the Network Connections dialog
box.
© Copyright 2000-2023, Salesforce, Inc. All rights reserved. Various trademarks held by their respective owners. Show URL Submit Feedback Privacy Policy
1.3.2. Create Version Directories
You can create version directories on your server instance via the Business Manager if you have the appropriate permissions.
When developing your application in Studio, you can select which directory to upload files. Using version directories lets you retain previous versions while saving your changes to a
specific server directory so that you can retest the application against an older version.
In Business Manager, define your directories and set one of them as active. In Studio, each time you create a project, define the upload directory.
© Copyright 2000-2023, Salesforce, Inc. All rights reserved. Various trademarks held by their respective owners. Show URL Submit Feedback Privacy Policy
1.3.3. Configure Your Salesforce B2C Commerce Server Connection
You can configure your B2C Commerce server connection in several locations in Eclipse.
To configure Navigate to
Server connection timeout
Server connection password expiration
Directories to exclude from upload
1. From Eclipse main menu:
On Windows, select Window> Preferences.
On a Mac, select Eclipse > Preferences.
2. In the list, expand UX Studio.
3. Click Server.
B2C Commerce connection settings as an Eclipse project In the Navigation pane, right-click the server connection and
select Properties.
B2C Commerce password for connecting to the server
1. In the Navigator view, right-click the server connection.
2. Select B2C Commerce Server > Change Upload
Staging Directory.
3. Enter the password for your connection, and click Next.
4. Select the directory to upload your changes.
or
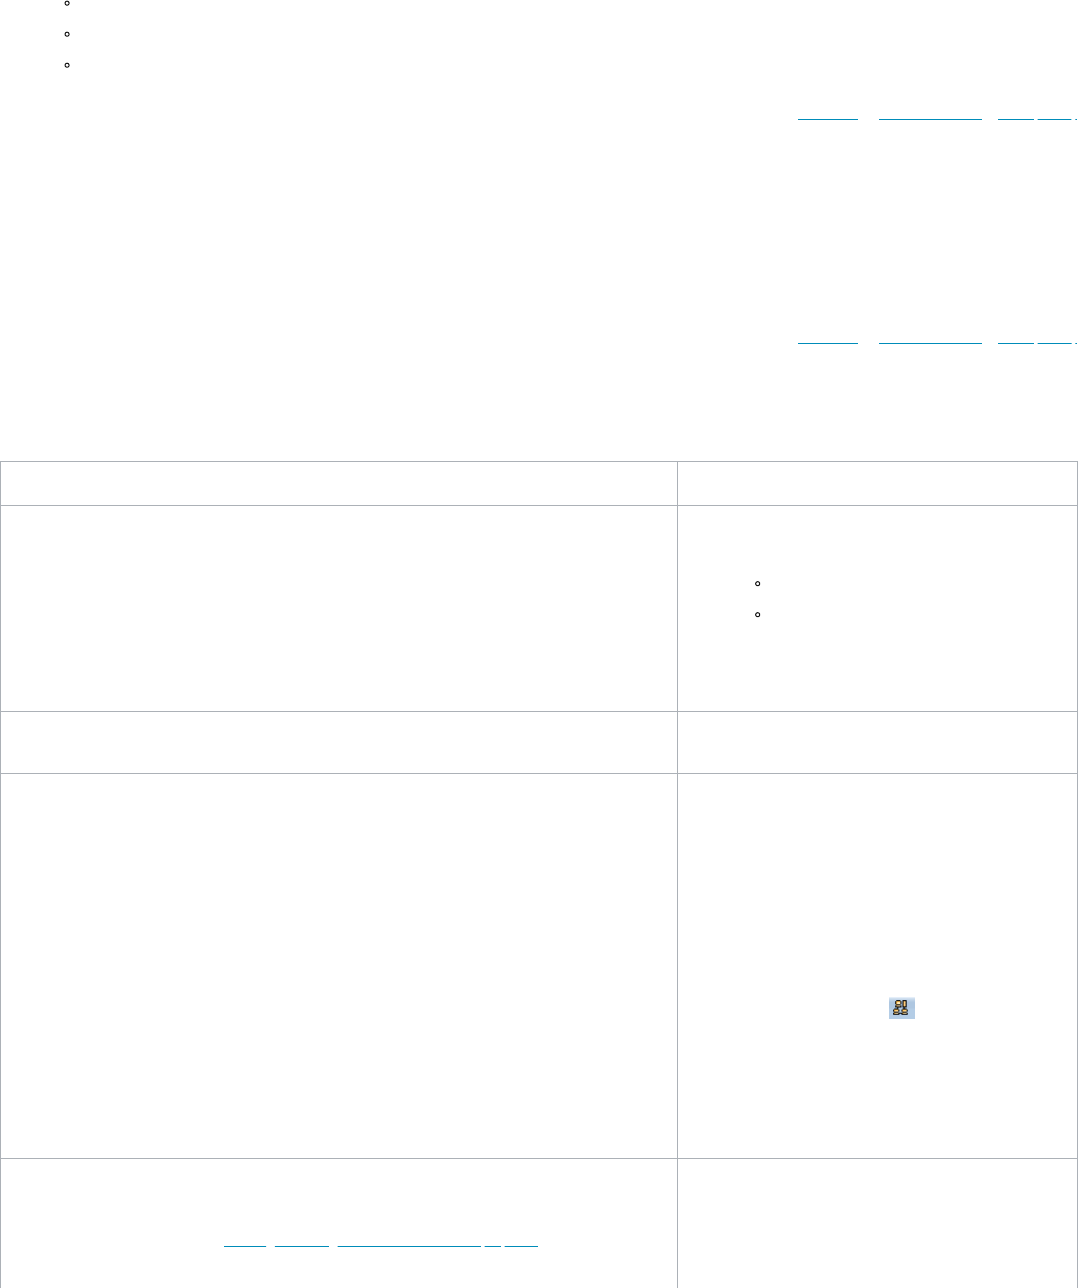
1. In the Studio toolbar, click
2. Select B2C Commerce_Server_Connection > Change
Upload Staging Directory.
3. Enter the password for your connection, and click Next .
4. Select the directory to upload your changes.
B2C Commerce server connection host name or certificate information
Note: You must first communicate with Salesforce Customer Support to get the files required to set up
two-factor authentication. See Creating and Using Certificates for Code Deployment. .
1. In the Navigator view, right-click the server connection.
2. Select B2C Commerce Server > Update Server
Connection.
3/16/23, 2:11 PM
Legacy Developer Documentation
https://documentation.b2c.commercecloud.salesforce.com/DOC1/advanced/print.jsp?topic=/com.demandware.dochelp/LegacyDevDoc/LegacyDevDoc.html&cp=0…
7/158
To configure Navigate to
or
1. In the Studio toolbar, click
2. Select B2C Commerce_Server_Connection > Update
Server Configuration.
Automatic upload of code to your instance
1. In the Studio toolbar, click
2. Click Auto-Upload.
Related concepts
Code Upload
© Copyright 2000-2023, Salesforce, Inc. All rights reserved. Various trademarks held by their respective owners. Show URL Submit Feedback Privacy Policy
1.3.4. Troubleshoot Your Server Connection
If you don't see your code changes on the server, check your server connection. These instructions use CommerceCloudServer, which is the default name for a server connection.
Only one server is active at a time, and a server must be configured to automatically upload.
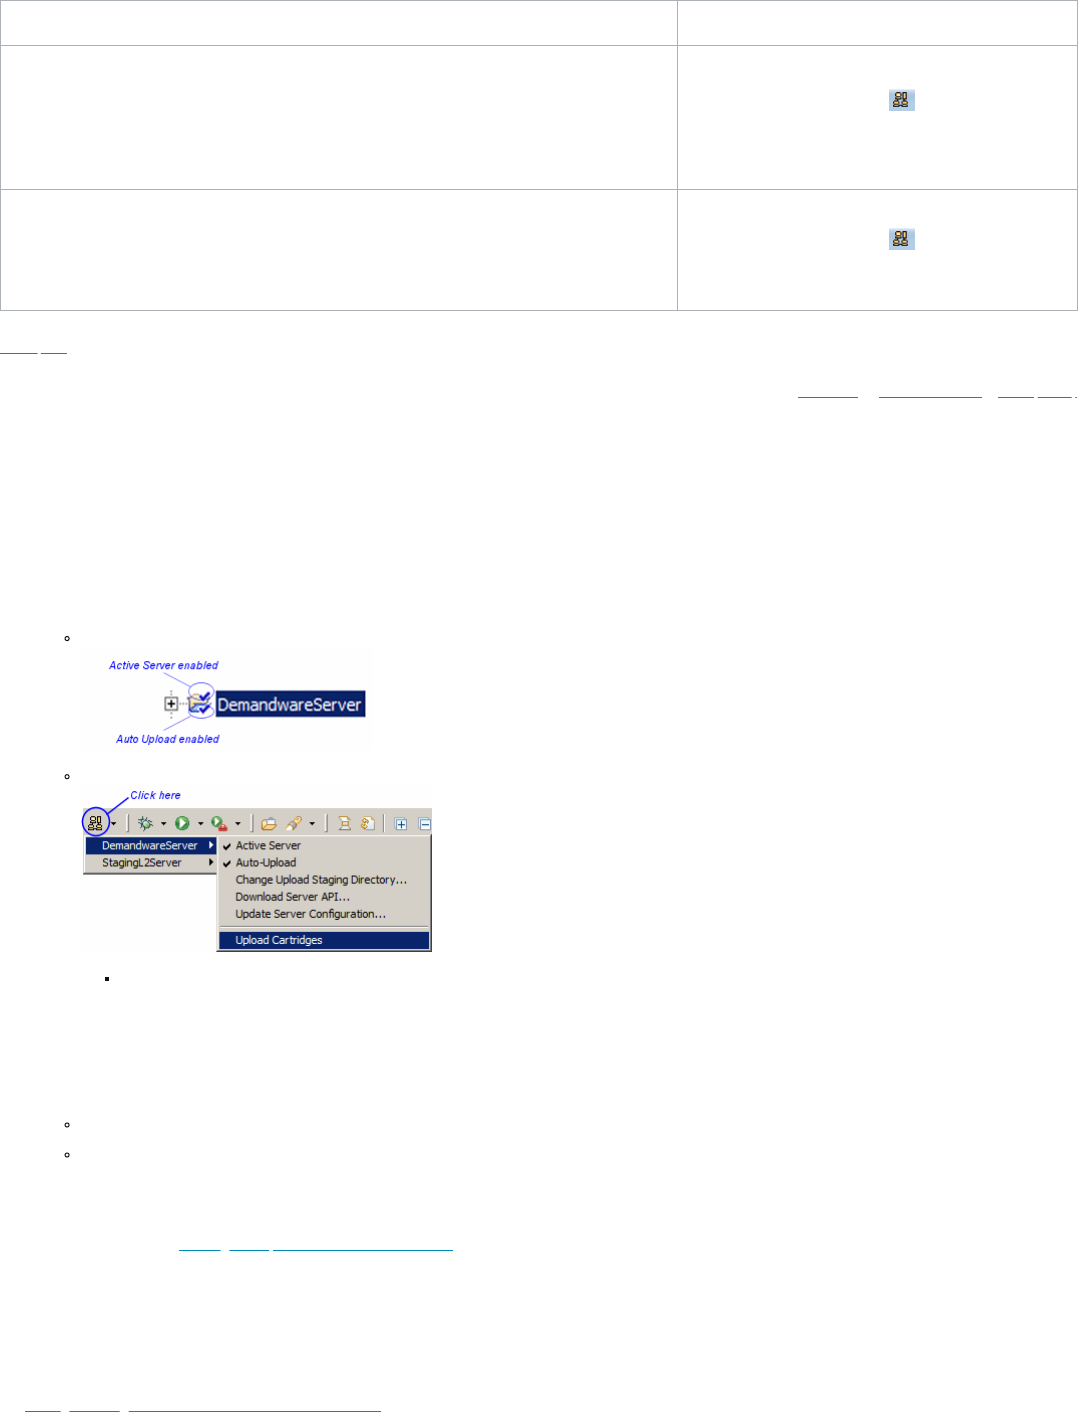
Check that the server connection has Active Server and Auto Upload selected
1. Do one of the following:
In Studio, on the Navigator tab, view the CommerceCloudServer connection folder icon.
On the Studio toolbar, click the Salesforce B2C Commerce Server icon, and select the CommerceCloudServer connection.
Click B2C Commerce Server, and ensure that Active Server and Auto Upload are selected.
Check the Server Connection Configuration
1. In Studio, on the Navigator tab, right-click CommerceCloudServer.
2. Select B2C Commerce Server > Update Server Configuration.
Check that the correct instance is configured.
Check that the correct user and password are entered.
Check Whether a Firewall is Interfering with Your Connection
It’s possible that Studio can’t access the B2C Commerce instance if your local computer is behind the firewall. Create a proxy server to establish a connection. See Creating a Proxy
Server Connection for Studio. Creating a Proxy Server Connection for Studio.
Upload the Cartridge
To force an upload, on the Studio toolbar, click the Commerce Cloud server button > the CommerceCloudServer connection > Upload Cartridges. This might give you more
information about the problems you are experiencing.
Reassign the Cartridge
See Reassign Cartridges from One Server Connection to Another.
3/16/23, 2:11 PM
Legacy Developer Documentation
https://documentation.b2c.commercecloud.salesforce.com/DOC1/advanced/print.jsp?topic=/com.demandware.dochelp/LegacyDevDoc/LegacyDevDoc.html&cp=0…
8/158
© Copyright 2000-2023, Salesforce, Inc. All rights reserved. Various trademarks held by their respective owners. Show URL Submit Feedback Privacy Policy
1.4. Create a Storefront Project
How you create a storefront project depends on whether you are using SFRA or SGJC.
If you are using SFRA, see Adding Custom Cartridges.
If you are using SGJC, perform the steps below.
When you have installed UX Studio and downloaded the API source cartridges, you can create a cartridge for your code.
1. Start UX Studio.
2. Select File > New > SiteGenesis Storefront Cartridges.
3. Select a Salesforce B2C Commerce Server, and click Next.
4. Configure the cartridge, and then click Finish.
a. Name: Enter a root name for the Storefront Cartridges.
The name must begin with a letter and can include only letters, numbers, and underscores (_). We suggest using the naming convention HostnameProjectname.
b. Location: enter a location for the project or accept the default, which is a projects directory outside t the workspace.
c. Attach to B2C Commerce Servers: select the server connection to the instance where you want to upload code.
Note: Use the controller cartridge. The cartridge is included for legacy projects that are migrating to controllers.
5. Create a tern project, which provides code completion in the editor. If you do not create the tern project, code completion isn't available when editing scripts with Commerce
Cloud APIs in Eclipse.
Troubleshooting Cartridges
If you don't see a cartridge named myname_storefront_core, it's likely that you created a New B2C Commerce Cartridge instead of a B2C Commerce Storefront Cartridge.
Fix: Delete the cartridge, and create the cartridge again.
If the server connection doesn't have two checkmarks next to it.
Fix: Delete the cartridge, and create the cartridge again.
© Copyright 2000-2023, Salesforce, Inc. All rights reserved. Various trademarks held by their respective owners. Show URL Submit Feedback Privacy Policy
1.5. Studio File System
When you install and configure UX Studio, you choose the location of the various files.
Files Location example Notes
Executable UX Studio files c:\studio\Studio (default) Microsoft Windows only.
Workspace
c:\projects\workspace
Should be different from executable file location.
Server and property files are stored in Workspace folders. These files change
infrequently and are usually specific to the local Studio environment.
Consists of projects, files and directories
Can contain multiple projects from multiple repositories
Files are created as standard files, which allows use of tools/editors
Contains .metadata (plug-in subdirectories)
Server files
c:\projects\CommerceCloudServer
CAUTION:
Cannot be the same as the Workspace
location, or unexpected results will occur.
You can create multiple server connection cartridges within your Studio workspace.
Contains .settings and .project files.
Warning: Don't modify server files, or unexpected results will occur.
3/16/23, 2:11 PM
Legacy Developer Documentation
https://documentation.b2c.commercecloud.salesforce.com/DOC1/advanced/print.jsp?topic=/com.demandware.dochelp/LegacyDevDoc/LegacyDevDoc.html&cp=0…
9/158
Files Location example Notes
Project-specific files,
including new cartridges,
pipelines and templates
c:\projects\MyStore
Use separate (project) folders to store cartridges and other files that change frequently.
These files should also be under source control.
Can be opened, closed, built or shared
Can consist of one or more cartridges
Each cartridge contains directories for forms, pipelines, scripts, static files,
templates, webreferences files and a <cartridge_name>.properties file, which
enables the system to load and run the cartridge.
You can store cartridges in one or more local directories.
You can rename cartridges
© Copyright 2000-2023, Salesforce, Inc. All rights reserved. Various trademarks held by their respective owners. Show URL Submit Feedback Privacy Policy
1.6. Configuring Automatic Updates for Studio
You can configure Studio to automatically update to a new version if one becomes available.
Note: Studio automatically checks for updates to the Salesforce B2C Commerce API for your server and downloads them. No configuration is necessary for the automatic
download to occur. If you are not downloading updates, there might be some problem with your connection to your B2C Commerce server.
1. On Windows, select Window > Preferences.
2. On a Mac, select Eclipse > Preferences.
3. Expand Install/Update.
4. Select Automatic Updates.
5. Select the Automatically find new updates and notify me box.
6. Configure the Update schedule, Download options, and When updates are found options.
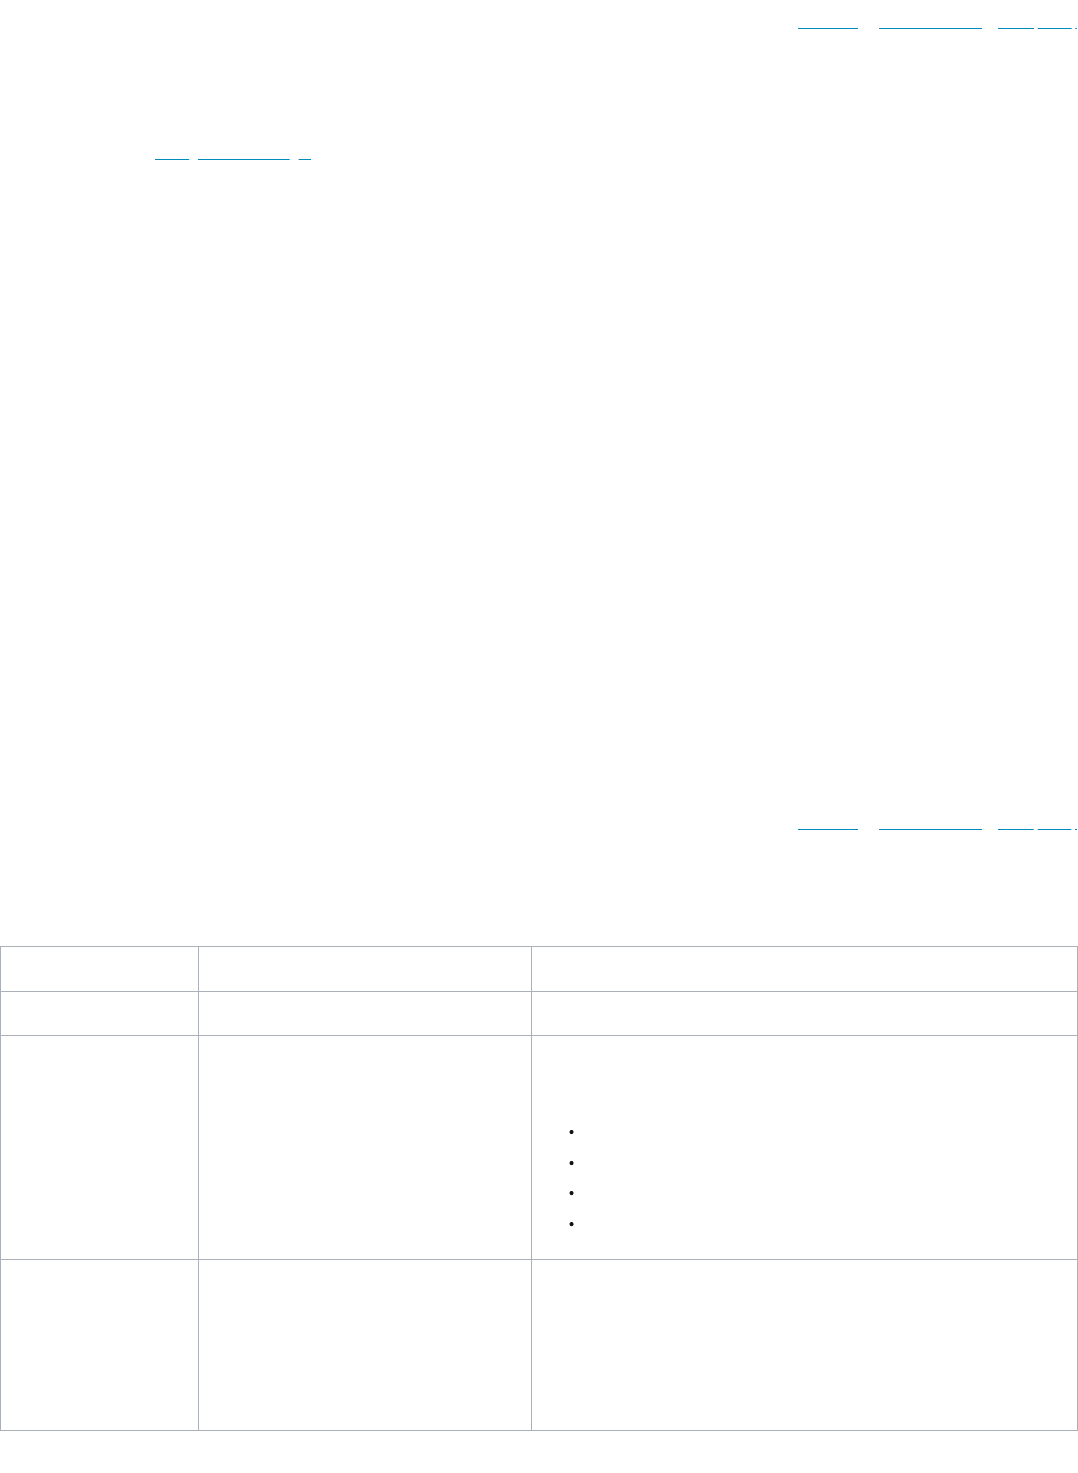
7. To see the changes in Studio you must close the perspective and reopen it.
a. Right-click the blue cloud icon in the upper right corner of Eclipse:
b. From the popup menu, select Close.
c. From the main menu, select Window > Perspective > Open Perspective > Other.
d. In the popup window, select B2C Commerce Development.
Note: You must close the perspective as described in order to see the changes. Opening and closing Eclipse, switching workspaces, or switching perspectives will
not work. Unless you close the perspective as described, you don't see changes from the update in the interface. This might include new types of files to create or
new options for your server connection.
© Copyright 2000-2023, Salesforce, Inc. All rights reserved. Various trademarks held by their respective owners. Show URL Submit Feedback Privacy Policy
1.7. Studio Perspectives
The Salesforce B2C Commerce Development perspective defines a selection of views and their layout within the UX Studio window. While creating a storefront, you will work
primarily in this perspective. However, several perspectives are available.
To change the perspective
3/16/23, 2:11 PM
Legacy Developer Documentation
https://documentation.b2c.commercecloud.salesforce.com/DOC1/advanced/print.jsp?topic=/com.demandware.dochelp/LegacyDevDoc/LegacyDevDoc.html&cp=…
10/158
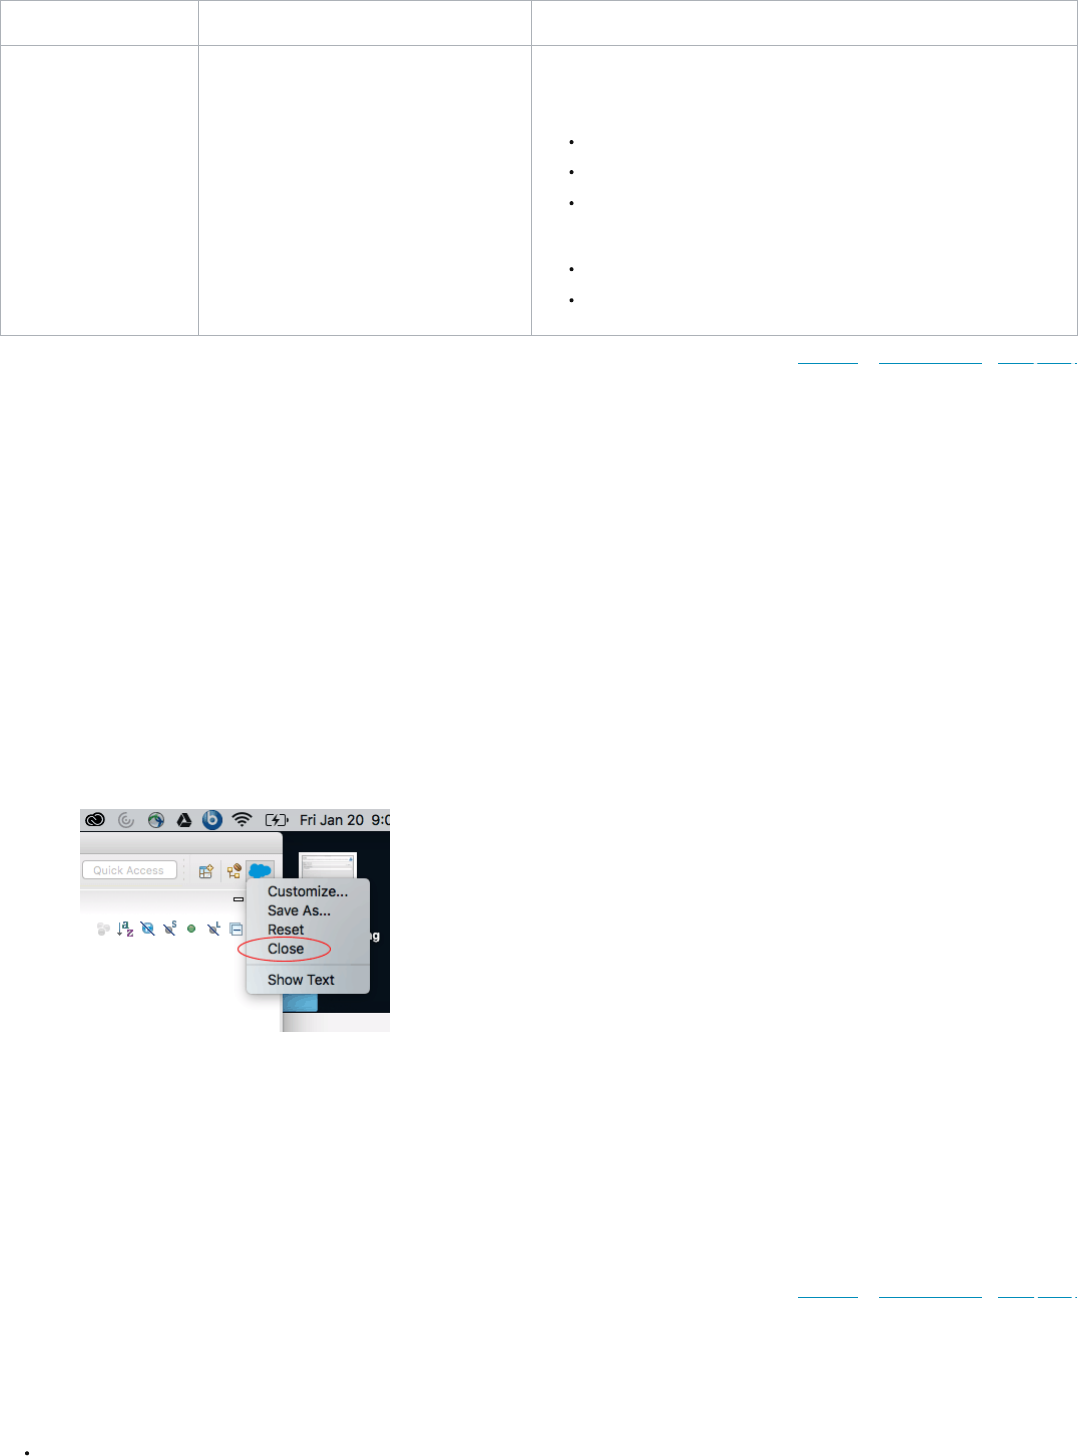
1. Click Window > Perspective > Open Perspective > Other.
2. Select a different perspective.
B2C Commerce Development Perspective
The B2C Commerce Development perspective is initially configured with:
View Use for...
Cartridge Explorer Navigating cartridge contents.
Editor area Editing pipelines, scripts and templates.
Outline
Viewing and navigating pipeline outlines as well as scripts and templates.
In the case of a pipeline, it shows the entire pipeline, which is useful for navigating large pipelines.
Properties Viewing and editing the properties of the currently selected object.
Problems Viewing errors and linking to them in the source.
Console Viewing processing steps.
The Commerce Cloud Development perspective also includes the following views:
View Use for...
Navigator Exploring project file structures. All projects in your workspace are presented here.
Pipelets Providing an alphabetical list of all pipelets, based on filter settings. Click a column to sort by that field.
Pipelines Providing an alphabetical list of all pipelines, based on filter settings. Click a column to sort by that field.
Scripts Providing an alphabetical list of all scripts, based on filter settings. Click a column to sort by that field.
Templates Providing an alphabetical list of all templates, based on filter settings. Click a column to sort by that field.
The Search filter is accessible via the popup menu icon (arrow) in the corner of each view. With this filter, you can find specific items by character, string or string end. You can also
search by name, group, type, path or cartridge, depending on the item.
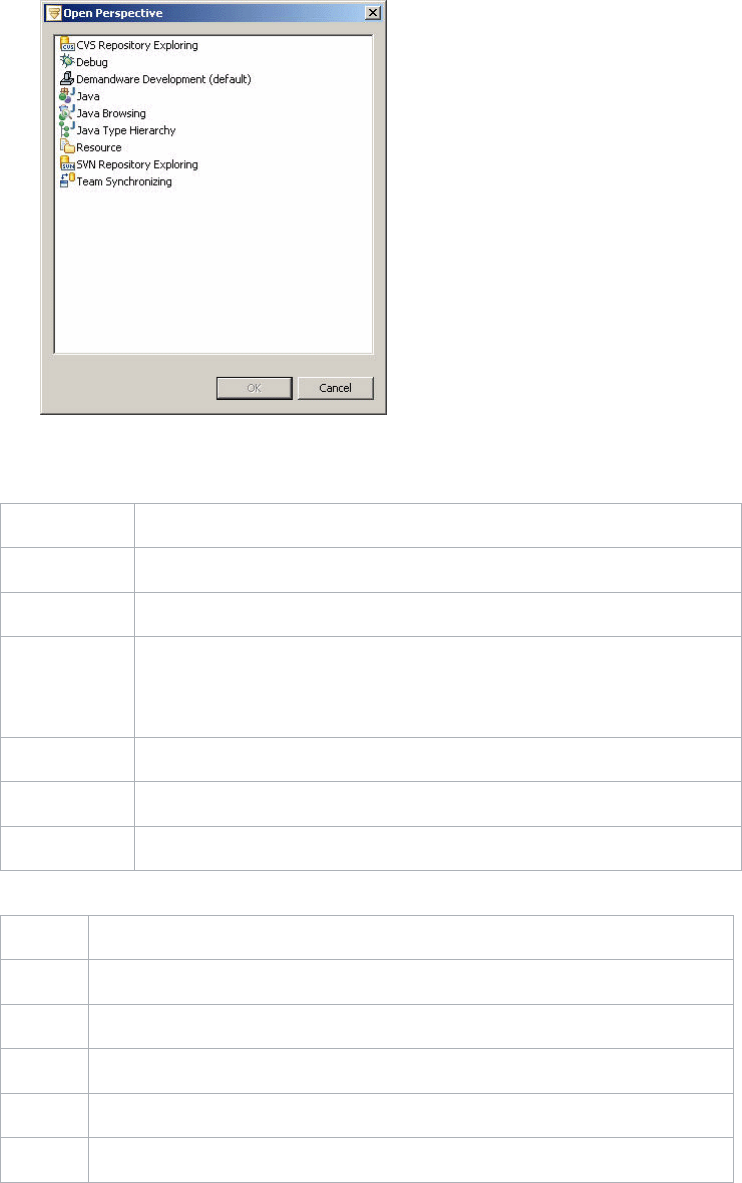
Search Dialog Box
Click the Search > File menu, then click the B2C Commerce Cartridge Search tab to perform a more detailed search.
3/16/23, 2:11 PM
Legacy Developer Documentation
https://documentation.b2c.commercecloud.salesforce.com/DOC1/advanced/print.jsp?topic=/com.demandware.dochelp/LegacyDevDoc/LegacyDevDoc.html&cp=…
11/158
For this dialog box, you can:
Search using an expression.
Search by property or element.
Search all or selected cartridges.
Create a working set, within which to search.
© Copyright 2000-2023, Salesforce, Inc. All rights reserved. Various trademarks held by their respective owners. Show URL Submit Feedback Privacy Policy
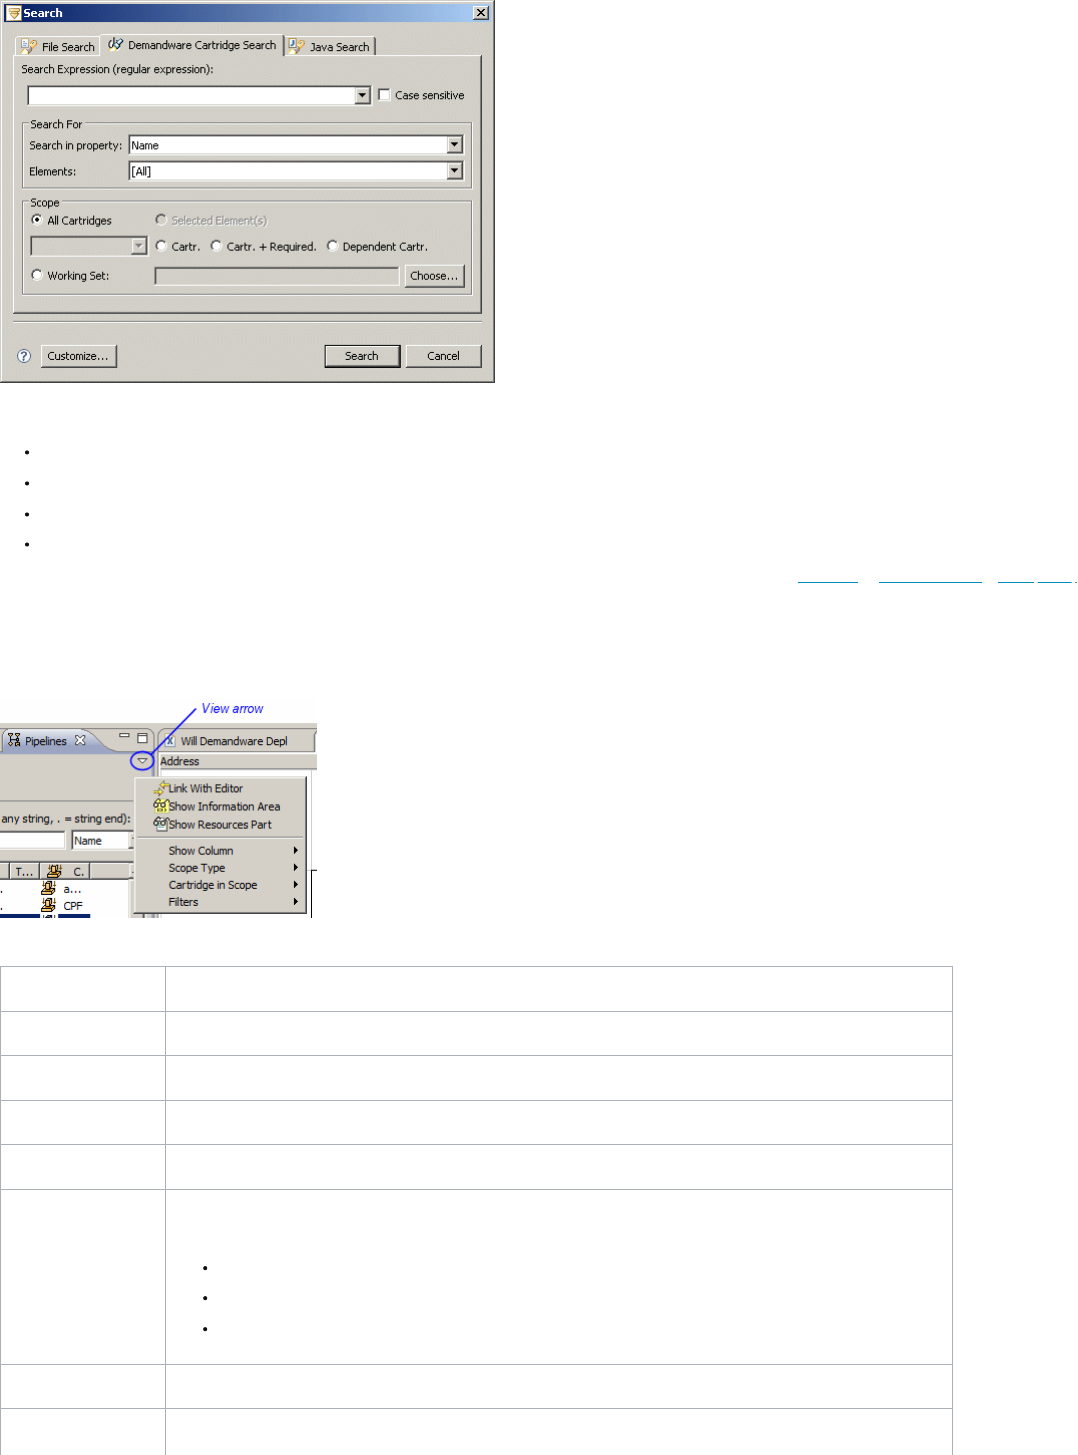
1.8. Configuring Studio Views
You can configure views to show elements based on filter settings. Click the down-arrow in the upper right corner of a view to access these settings.
The settings are as follows:
Setting Description
Link With Editor The navigational view links to the editing view, which helps you keep track of what you are working on. The default is unchecked.
Show Information Area The Information Area (pane) appears below the navigational pane. The default is unchecked.
Show Resource Part A Resources pane appears below the navigational pane, showing the element's path. The default is unchecked.
Show Column You can select the columns that appear in the navigational pane. The default is that all of them appear.
Scope Type
You can specify the cartridges you want to view.
Cartridge - uses the cartridge selected for Cartridge in Scope.
All Cartridges - all cartridges are searched, including API library cartridges
Project Cartridges - only your local project cartridges are searched and API library cartridges are ignored.
Cartridge in Scope You can select one of the cartridges that are available to you, thus helping you focus on a particular area.
Filters You can specify the following filters:
3/16/23, 2:11 PM
Legacy Developer Documentation
https://documentation.b2c.commercecloud.salesforce.com/DOC1/advanced/print.jsp?topic=/com.demandware.dochelp/LegacyDevDoc/LegacyDevDoc.html&cp=…
12/158
Setting Description
Hide Overridden Elements
Hide Invisible Elements
Shortcuts
You can also use these shortcut icons (not all of these icons appear in every view):
Icon Use to . . .
Refresh selected items
Show the property of the selected item in the Property view.
Link the selected object with the Editor area.
Toggle between showing the information area and hiding it.
Toggle between showing resources view and hiding it.
Collapse the navigation tree.
Show the entire tree, with the current selection highlighted in place.
Reset the root back to the original root, with that root highlighted.
Set the current selection as root and shows the tree beneath it.
© Copyright 2000-2023, Salesforce, Inc. All rights reserved. Various trademarks held by their respective owners. Show URL Submit Feedback Privacy Policy
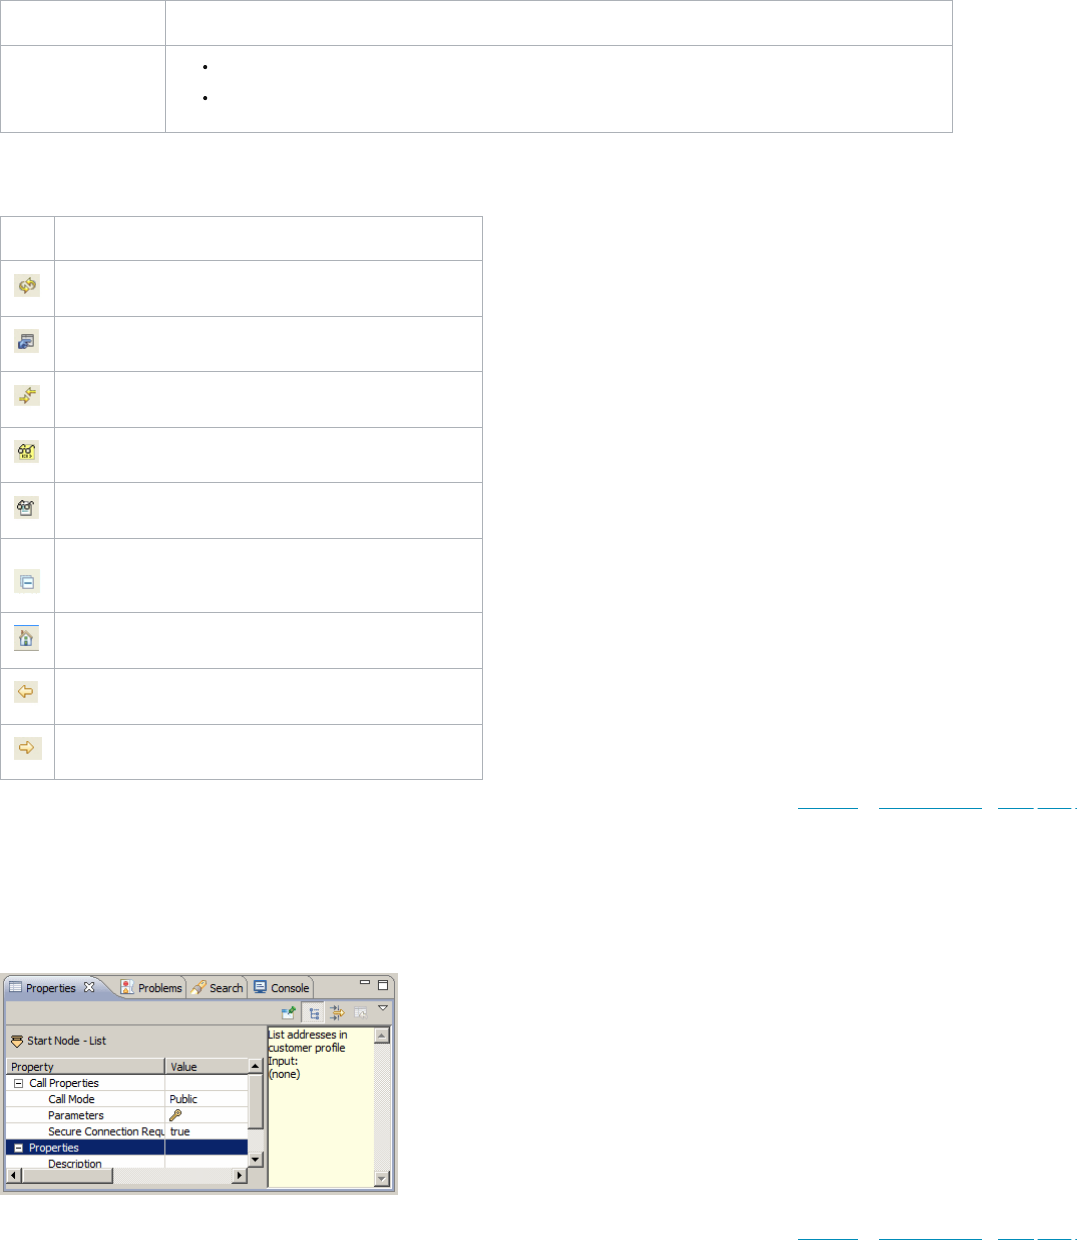
1.8.1. Studio Properties View
The Properties view is where you can view and set properties for templates, scripts, pipelines and pipelets. In this area you can also view the Problems log and Console.
The following is an example of the Properties view for the List pipeline. Click in the Value field to enter or select values.
© Copyright 2000-2023, Salesforce, Inc. All rights reserved. Various trademarks held by their respective owners. Show URL Submit Feedback Privacy Policy
1.8.2. Studio Outline View
The Outline view helps you navigate more quickly to the area you want to investigate or change.
Pipelines
When a pipeline is open in the Editor area, the blue area in the Outline view represents the portion of the pipeline that appears in the Editor area. You can drag the blue area to
change the view.

3/16/23, 2:11 PM
Legacy Developer Documentation
https://documentation.b2c.commercecloud.salesforce.com/DOC1/advanced/print.jsp?topic=/com.demandware.dochelp/LegacyDevDoc/LegacyDevDoc.html&cp=…
13/158
This is an example of a pipeline appearing in its entirety in the Outline view, with the portion being edited indicated by a blue rectangle. Use the icons in the Outline view to render
the editor information differently.
Scripts
When a script is open in the Editor area, its outline is visible in the Outline view. Click a function in the Outline view and the appropriate segment of the script appears in the Editor
area, with the specific function highlighted.
© Copyright 2000-2023, Salesforce, Inc. All rights reserved. Various trademarks held by their respective owners. Show URL Submit Feedback Privacy Policy
1.9. Studio Editor Area
The Editor area is where you create and modify templates, scripts and pipelines.
When you double-click an object in the Cartridge Explorer view, the object opens in the Editor area.
© Copyright 2000-2023, Salesforce, Inc. All rights reserved. Various trademarks held by their respective owners. Show URL Submit Feedback Privacy Policy
1.9.1. Enabling Code Completion for Controllers
To allow for syntax checking and code completion for controllers, you must convert your projects into Tern projects.
Tern is a third-party plugin that supplies code completion and linting.
Convert the Cartridge to a Tern Project
1. Right-click the cartridge in the Eclipse in the Cartridge sidebar.
Note: If you don't see the Cartridge sidebar, change your perspective to the Salesforce B2C Commerce Development perspective.
2. In the popup menu, select Configure > Convert to Tern Project.
Important: Each cartridge in your workspace must be a separate project in order for it to be converted into a Tern project.
3. In the dialog, select the Commerce Cloud module.
If the dialog doesn't appear in the last step, you must make sure that the B2C Commerce API is associated with the cartridge so that content assist works in the Eclipse JavaScript
editor (JSDT).
To associate the B2C Commerce API with the cartridge:
1. Right-click the cartridge in the Eclipse in the Navigation sidebar.
2. In the popup menu, select Properties.
3. Expand Tern node and select Modules.
4. Select the Commerce Cloud checkbox in the Modules list.
5. Click OK.
Enable Linting Support for Tern
3/16/23, 2:11 PM
Legacy Developer Documentation
https://documentation.b2c.commercecloud.salesforce.com/DOC1/advanced/print.jsp?topic=/com.demandware.dochelp/LegacyDevDoc/LegacyDevDoc.html&cp=…
14/158
Note: eslint is the standard linter used by B2C Commerce for the project, but Tern does not support all of the rules used by the project when the linter is run from the
command line, because the version of eslint included with Tern is different from that used from the command line. If you intend to contribute to the SiteGenesis project, use
the command line configuration for eslint.
1. Right-click the Tern project.
2. In the popup menu, select Properties >Tern > Validation.
3. From the list of linters, select the linter you want to use.
© Copyright 2000-2023, Salesforce, Inc. All rights reserved. Various trademarks held by their respective owners. Show URL Submit Feedback Privacy Policy
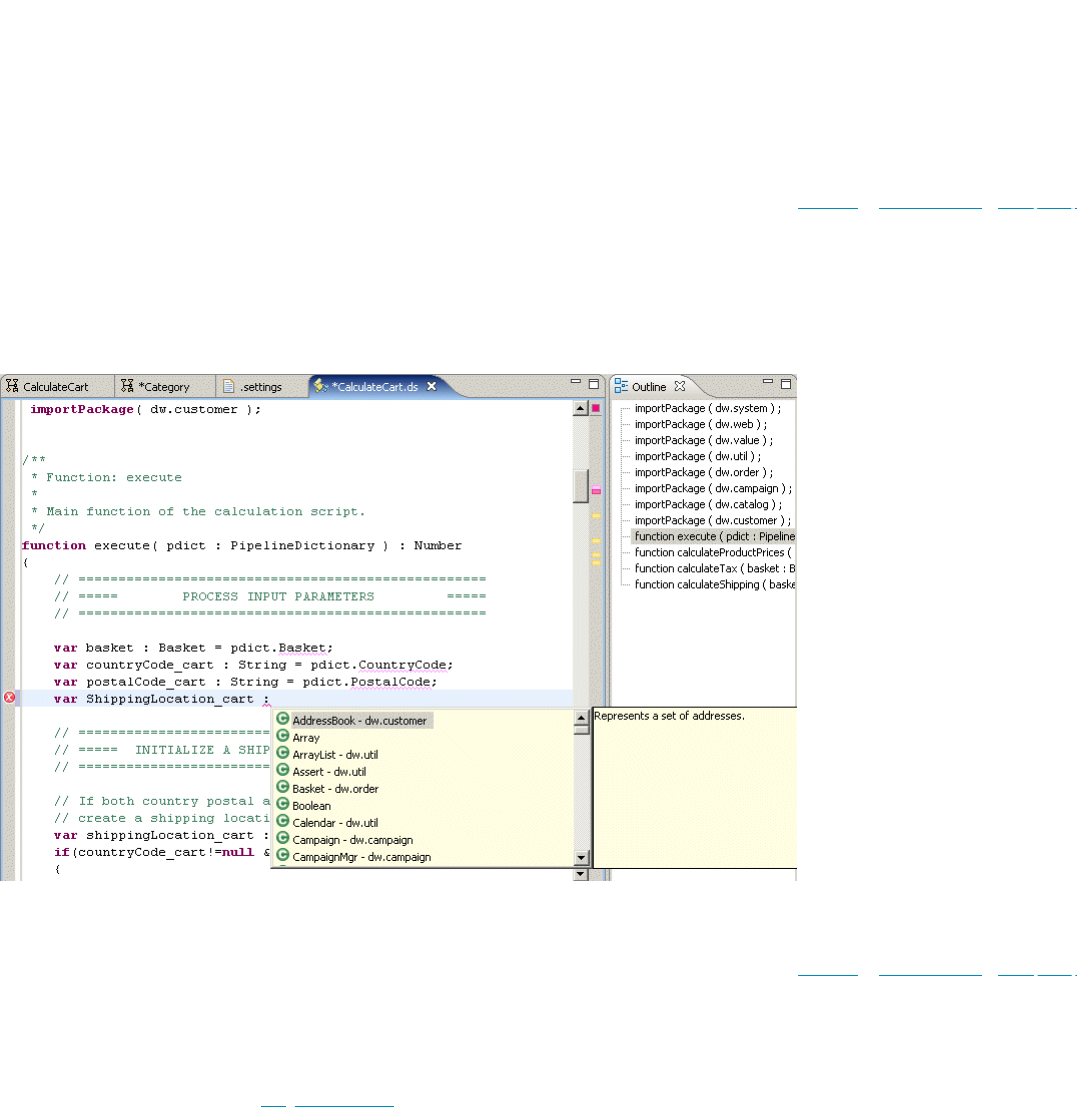
1.9.2. Code Completion/Syntax Highlighting
Salesforce B2C Commerce's script file editor provides syntax highlighting, code completion and code checking.
This graphic is an example of syntax highlighting and code completion.
When we entered a variable in a script (in the above example), the editor provided a list of potential codes to complete the statement. The editor also highlighted the particular line
and marked it with an X, because it did not conform to syntax standards.
© Copyright 2000-2023, Salesforce, Inc. All rights reserved. Various trademarks held by their respective owners. Show URL Submit Feedback Privacy Policy
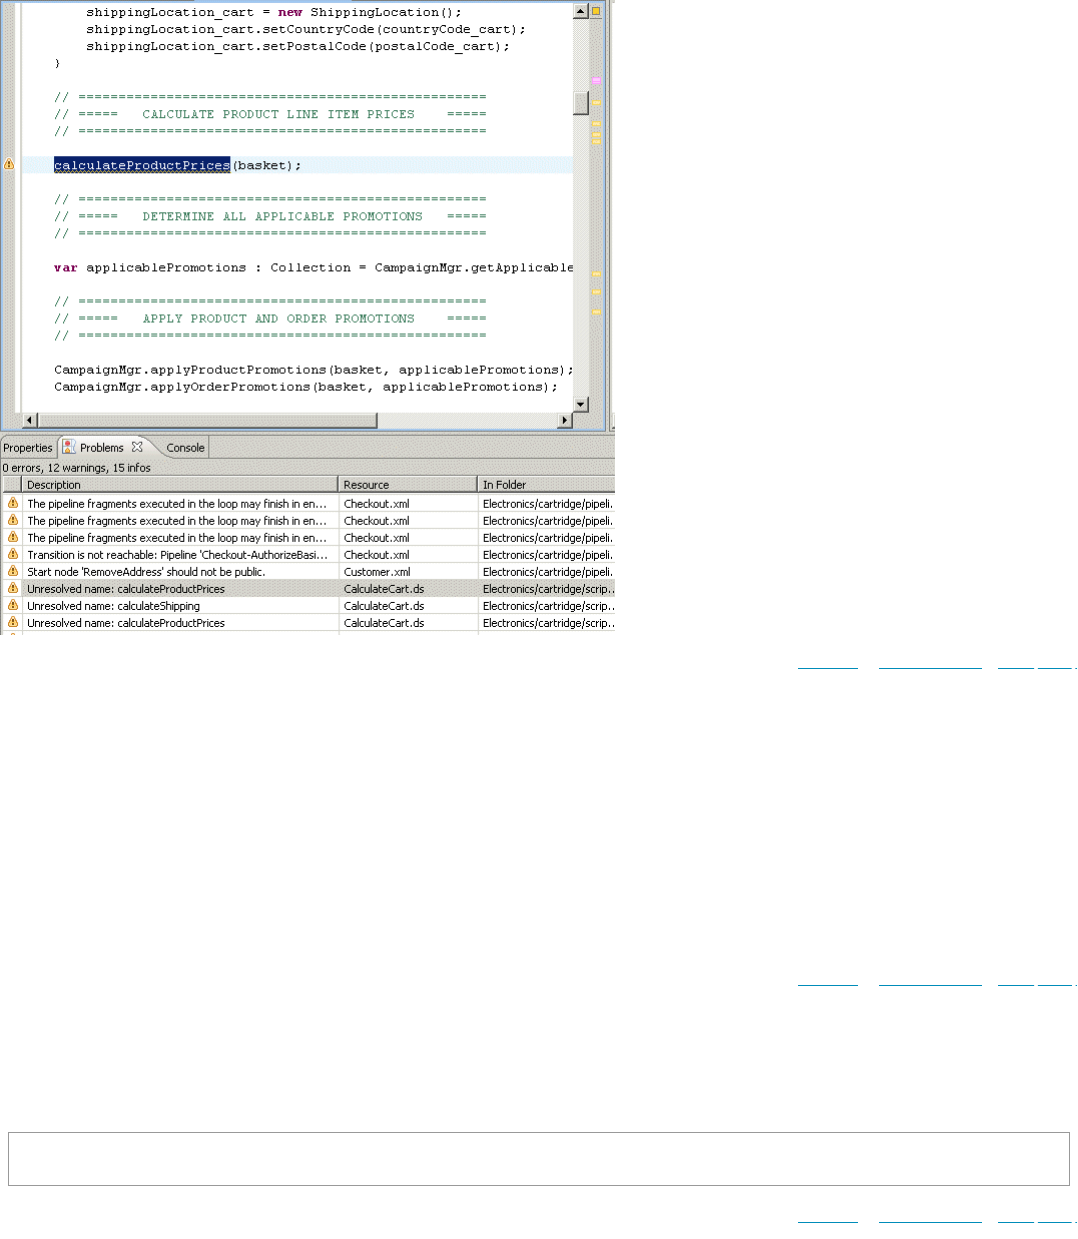
1.9.3. Code Checking
Code checking results appear in the Problems view. Double-click a problem in this view and the specific problem will appear in the editor.
For information on code autocomplete, see Using Tern with Studio
3/16/23, 2:11 PM
Legacy Developer Documentation
https://documentation.b2c.commercecloud.salesforce.com/DOC1/advanced/print.jsp?topic=/com.demandware.dochelp/LegacyDevDoc/LegacyDevDoc.html&cp=…
15/158
© Copyright 2000-2023, Salesforce, Inc. All rights reserved. Various trademarks held by their respective owners. Show URL Submit Feedback Privacy Policy
1.9.4. Enable Content Assist in UX Studio
UX Studio supports content assist in Eclipse for both the B2C Commerce Script API and functions in other JavaScript files, such as controller model scripts. For the Script API, UX
Studio converts cartridges to tern projects by creating a _.tern-project_ file in the cartridge root directory. If you want to use content assist with functions defined in other script files,
you must update the project's properties.
1. Select Properties from the popup menu.
2. Expand the Tern node.
3. Click Script Paths.
4. Add files, folders, and projects. See https://github.com/angelozerr/tern.java/wiki/Tern-Eclipse-IDE for more information on Tern for Eclipse.
© Copyright 2000-2023, Salesforce, Inc. All rights reserved. Various trademarks held by their respective owners. Show URL Submit Feedback Privacy Policy
1.9.5. Form Autocomplete
The UX Studio plugin provides form autocomplete for Salesforce B2C Commerce forms.
To use autocomplete, make sure that you have created a standard xml form that contains the following:
<?xml version="1.0"?>
<form xmlns="http://www.demandware.com/xml/form/2008-04-19" secure="true">
© Copyright 2000-2023, Salesforce, Inc. All rights reserved. Various trademarks held by their respective owners. Show URL Submit Feedback Privacy Policy
1.9.6. Setting Studio Preferences
With UX Studio, you can change preferences at any time.
To specify Studio preferences on Windows, click Window > Preferences, then select UX Studio.
To specify Studio preferences on a Mac, click Window > Preferences, then select UX Studio.
3/16/23, 2:11 PM
Legacy Developer Documentation
https://documentation.b2c.commercecloud.salesforce.com/DOC1/advanced/print.jsp?topic=/com.demandware.dochelp/LegacyDevDoc/LegacyDevDoc.html&cp=…
16/158
Window Examples
Appearance
Define the colors of invisible or overridden elements.
Show pipelet members, show pipeline members, organize members in groups, show display names instead of resource names.
Generation Templates Create, edit or remove templates.
Pipeline Editor
Synchronize the outline view selection with the pipeline editor.
Automatically layout transitions.
Enforce join node usage.
Specify the default zoom level.
Problem Annotations Detect problems during development.
Script Editor Specify language background colors, general, JavaScript and XML styles.
Server Connection Specify the connection timeout and the directories to include in the upload.
In the Preferences page, you can configure the behavior and appearance of the several editors. To find the preferences, enter the name of the editor in the search box at the top of
the page.
Editor Examples
Script
Specify visual details such as:
Displayed tab width (value)
Undo history size (value)
Highlight current line
Show print margin
Show line numbers
Appearance color options
CSS
Select the default operating system whose line delimiter you want to use when creating or saving files:
UNIX
Mac
Windows
No translation
Select the default encoding to apply when creating files:
ISO Latin-1
Central/East European (Slavic)
Southern European
Arabic, Logical
Arabic
Template
Select the default operating system whose line delimiter you want to use when creating or saving files:
UNIX
Mac
Windows
No translation

3/16/23, 2:11 PM
Legacy Developer Documentation
https://documentation.b2c.commercecloud.salesforce.com/DOC1/advanced/print.jsp?topic=/com.demandware.dochelp/LegacyDevDoc/LegacyDevDoc.html&cp=…
17/158
Editor Examples
Select the default encoding to apply when creating files.
Select the encoding to apply when loading files (or check the box to accept workbench encoding).
© Copyright 2000-2023, Salesforce, Inc. All rights reserved. Various trademarks held by their respective owners. Show URL Submit Feedback Privacy Policy
1.10. Troubleshooting Studio
We recommend several tasks to troubleshoot problems with UX Studio.
Update Problems
If you run an update for Studio, but don't see expected changes:
1. From the popup menu, select Close.
2. From the main menu, select Window > Perspective > Open Perspective > Other.
3. In the popup window, select Salesforce B2C Commerce Development.
Note: You must close the perspective as described in order to see the changes. Opening and closing Eclipse, switching workspaces, or switching perspectives will not
work. Unless you close the perspective as described, you don't see changes from the update in the interface. This might include new types of files to create or new
options for your server connection.
Editor Problems
If you experience problems in the editor, such as:
When pasting text in a file or deleting text (for example, the error "Paste did not complete normally. See the log for more information. Reason: Argument not valid" appears).
When entering data into a file, the cursor doesn't move but the characters appear.
Something might have happened on your local machine that causes these problems. Run the clean option In Studio.
DemandwareStudio.exe -clean
If that doesn't help, uninstall and then reinstall Studio.
Error: Pipelet Descriptions and Behavior Don't Match After an Upgrade
When you upgrade UX Studio to the latest version and download the new API, if it appears that a mixture of old pipelet descriptions and new pipelet behavior exist in Studio, run UX
Studio with the -clean option to refresh Studio with the latest pipelets and API calls.
DemandwareStudio.exe -clean
Upload Problems
Auto-Upload automatically Disabled
When UX Studio receives a build request, it determines if the active server has the Auto-Upload option enabled. If so, then cartridge files are uploaded to the server.
Under certain error conditions, auto-upload is automatically disabled so that the error messages are not shown repeatedly. For example, if your server is unreachable, the upload file
operation continually shows an 'unable to connect' error dialog.
Studio disables auto-upload under the following conditions:
studio encounters errors connecting to the server
your API is out-of-date and you choose not to download the new API, then we disable auto-upload. If you eventually download the new API, auto-upload is no longer disabled.
the upload staging directory doesn't exist.
If Studio detects that auto-upload is disabled when an upload is started, it shows a message that lets you enable auto-upload.
Full build after incomplete Build
When a file is changed, UX Studio receives a build event and attempts to push the file to the remote Salesforce B2C Commerce server. If Studio can't push the file because of server
communication issues, Studio flags the build as being incomplete. The next time Studio receives a build event, it performs a full build to ensure that files that were not previously
uploaded are pushed to the server.
See also Troubleshooting Your Server Connection.

3/16/23, 2:11 PM
Legacy Developer Documentation
https://documentation.b2c.commercecloud.salesforce.com/DOC1/advanced/print.jsp?topic=/com.demandware.dochelp/LegacyDevDoc/LegacyDevDoc.html&cp=…
18/158
© Copyright 2000-2023, Salesforce, Inc. All rights reserved. Various trademarks held by their respective owners. Show URL Submit Feedback Privacy Policy
1.11. Upload Cartridges
You can configure a server project to automatically upload cartridges whenever their code is changed. You can also manually upload cartridges to the server. A cartridge can be
associated with multiple server projects, and a server project can be associated with multiple cartridges.
To configure a server project in Studio to automatically upload cartridges, right-click it in the Navigator view, and select Digital Server > Auto-Upload. To upload cartridges manually,
follow these steps.
Note: Cartridge and server configurations do not affect manual uploads. Be careful not to upload a cartridge to the wrong server project.
Note: The name of the directory that contains the cartridges can have no more than 50 characters.
1. In the Navigator view, right-click the server project and select Properties.
2. In the right pane of the Properties dialog, select Project References.
3. In the left pane, select the cartridges to upload.
4. Click OK.
5. On the menu bar, click .
6. Click Upload cartridges.
7. On the Update Server Password dialog, enter the connection settings and click OK.
Related concepts
Code Upload
© Copyright 2000-2023, Salesforce, Inc. All rights reserved. Various trademarks held by their respective owners. Show URL Submit Feedback Privacy Policy
1.12. Import Cartridges into Your Storefront
You can import an existing Eclipse project into your workspace.
This task assumes that the cartridge is an Eclipse project. If it's not, see Add Existing Cartridges to Your Storefront to add the cartridge to your workspace.
1. Click File > Import.
2. Expand General.
3. Click Existing project into workspace, and click Next.
4. Click Select root directory, and navigate to the location of the project you want to import. Select the folder that contains the project files, not the parent folder. For example:
C:\projects\CommerceCloudServer\sources\cartridges\mycartridge.
Note: The folder can only contain one project.
5. Click Finish.
The Salesforce B2C Commerce plugin validates the folder structure of imported cartridges and displays any problems in the Problems tab. Right-click a warning and click Quick Fix (if
available) to fix the problem. If Quick Fix isn’t available, use the information in the warning to fix the structural problem manually.
© Copyright 2000-2023, Salesforce, Inc. All rights reserved. Various trademarks held by their respective owners. Show URL Submit Feedback Privacy Policy
1.13. Add Existing Cartridges to Your Storefront
You can add cartridges provided by Salesforce or Link partners to your workspace.
If you want to import an Eclipse project, see Import Cartridges into Your Storefront.
1. Place the cartridge in the folder where you want to access it. By default, Studio usually creates a projects\server_name\sources\cartridges folder for B2C Commerce
cartridges.
2. In UX Studio, click File > New > Cartridge > .
The Cartridge dialog opens.
3. In the Name field, enter the name of the cartridge.

3/16/23, 2:11 PM
Legacy Developer Documentation
https://documentation.b2c.commercecloud.salesforce.com/DOC1/advanced/print.jsp?topic=/com.demandware.dochelp/LegacyDevDoc/LegacyDevDoc.html&cp=…
19/158
4. For the Location field, browse to the folder containing the cartridge. For example: C:\projects\CommerceCloudServer\sources\cartridges\mycartridge.
5. In the Attach to B2C Commerce Servers field, select the server connection you want to use with this cartridge. Usually, you select the server connection for your storefront’s
Sandbox.
6. Click Finish.
© Copyright 2000-2023, Salesforce, Inc. All rights reserved. Various trademarks held by their respective owners. Show URL Submit Feedback Privacy Policy
1.14. Reassign Cartridges from One Server Connection to Another
You can reassign cartridges between servers as long as they all exist in the same workspace.
Remember that you can only connect to one server at a time.
1. In Eclipse, open the workspace containing the cartridge, new server connection, and old server connection.
2. Add cartridges to a server by following these steps.
a. In the Navigator view, right-click the server connection you want to add cartridges to and select properties.
b. Select the Project References tab.
c. Check the cartridges that you want to add and click OK.
d. Make sure that the cartridges are uploaded to the server. They upload automatically if the server connection you add the cartridges to is your active server. If not,
manually upload the cartridges.
3. Remove cartridges from a server by following these steps.
a. In the Navigator view, right-click the server connection you want to remove cartridges from and select properties.
b. Select the Project References tab.
c. Uncheck the cartridges you want to remove and click OK.
© Copyright 2000-2023, Salesforce, Inc. All rights reserved. Various trademarks held by their respective owners. Show URL Submit Feedback Privacy Policy
1.15. Using a Custom Builder
Starting in 15.1, UX Studio supports custom builders.
A custom builder enables you to manipulate cartridge files after they are built but before they are uploaded to the Salesforce B2C Commerce server. A custom builder calls a runnable
object―executable program, Ant script, or system script file―that is configured as an external tool. A custom builder can be invoked by UX Studio whenever you build any of your
cartridge files. When the custom builder is invoked, it can process the cartridge files in a useful way before they are uploaded.
Custom builders can perform a variety of useful processing tasks, such as:
Merging and minifying JavaScript and CSS files
Executing unit tests
Linting JavaScript files
Generating properties files
Prior to 15.1, UX Studio built cartridge files and uploaded the files directly to the B2C Commerce server. Starting in 15.1, UX Studio is able to temporarily place the files into a special
build directory, allowing a custom builder to manipulate the files before UX Studio uploads them.
How Custom Builders Work
UX Studio supports two build modes:
Full: Indicates that a project was fully built.
Incremental: Indicates that one or more folders or files have changed (new, modified, deleted, moved).
Whenever a full or incremental build is started, UX Studio determines if a custom builder has been configured for the B2C Commerce server. If so,UX Studio:
Copies files and folders to the server's build directory.
Creates a manifest of the build changes and puts it in build directory. This manifest is written to a file named manifest.json.
Invokes the custom builder with the location of build directory, passing this location as an environment variable named DW_BUILD_DIR.
If the custom builder's external tools configuration has the environment variable expression ${env_var:DW_BUILD_DIR} in its arguments list, UX Studio replaces this
expression with the file path of the build directory.
Uploads all files from the build directory to the remote server when the custom builder process completes.

3/16/23, 2:11 PM
Legacy Developer Documentation
https://documentation.b2c.commercecloud.salesforce.com/DOC1/advanced/print.jsp?topic=/com.demandware.dochelp/LegacyDevDoc/LegacyDevDoc.html&cp=…
20/158
If the custom builder reports an error, UX Studio cancels the build operation and reports the error. If the custom builder exceeds the configured timeout value (120 second default),
UX Studio cancels the build operation and reports the error. UX Studio doesn't copy files in the build area back into the Demandare source cartridges.
While the custom builder is running, UX Studio redirects all system.out and system.err messages to the Console view
Structure of the manifest.json file
The manifest.json file is a JSON file that contains three key-value pairs:
Key Value
version Version number of the manifest.
buildDir File path of the build directory.
resources
Array of resources. The structure of the elements in the array depends on whether the build is full or incremental.
For incremental builds, each array element consists of two name-value pairs. The name of the first pair is "operation"; and the value is either "added,"
"changed," or "removed." The name of the second pair is either "file" or "folder"; and the value is the file path of the file or folder.
For full builds, each array element consists of a single name-value pair. The name of the pair is "full," and the value is the name of a cartridge that was built.
Here is a sample manifest.json file for an incremental build:
{
"version": "1.0.0",
"buildDir": "C:\\studio\\workspaces\\luna\\CommerceCloudServer\\customBuild",
"resources": [
{
"operation": "changed",
"file": "\\TestFullBuild\\cartridge\\scripts\\account\\Utils.ds"
},
{
"operation": "changed",
"file": "\\TestFullBuild\\cartridge\\scripts\\cart\\CartUtils.ds"
}
]
}
Here is another sample manifest.json file for a full build:
{
"version": "1.0.0",
"buildDir": "C:\\studio\\workspaces\\luna\\CommerceCloudServer\\customBuild",
"resources": [
{
"full": "Storefront"
},
{
"full": "Storefront_richUI"
}
]
}
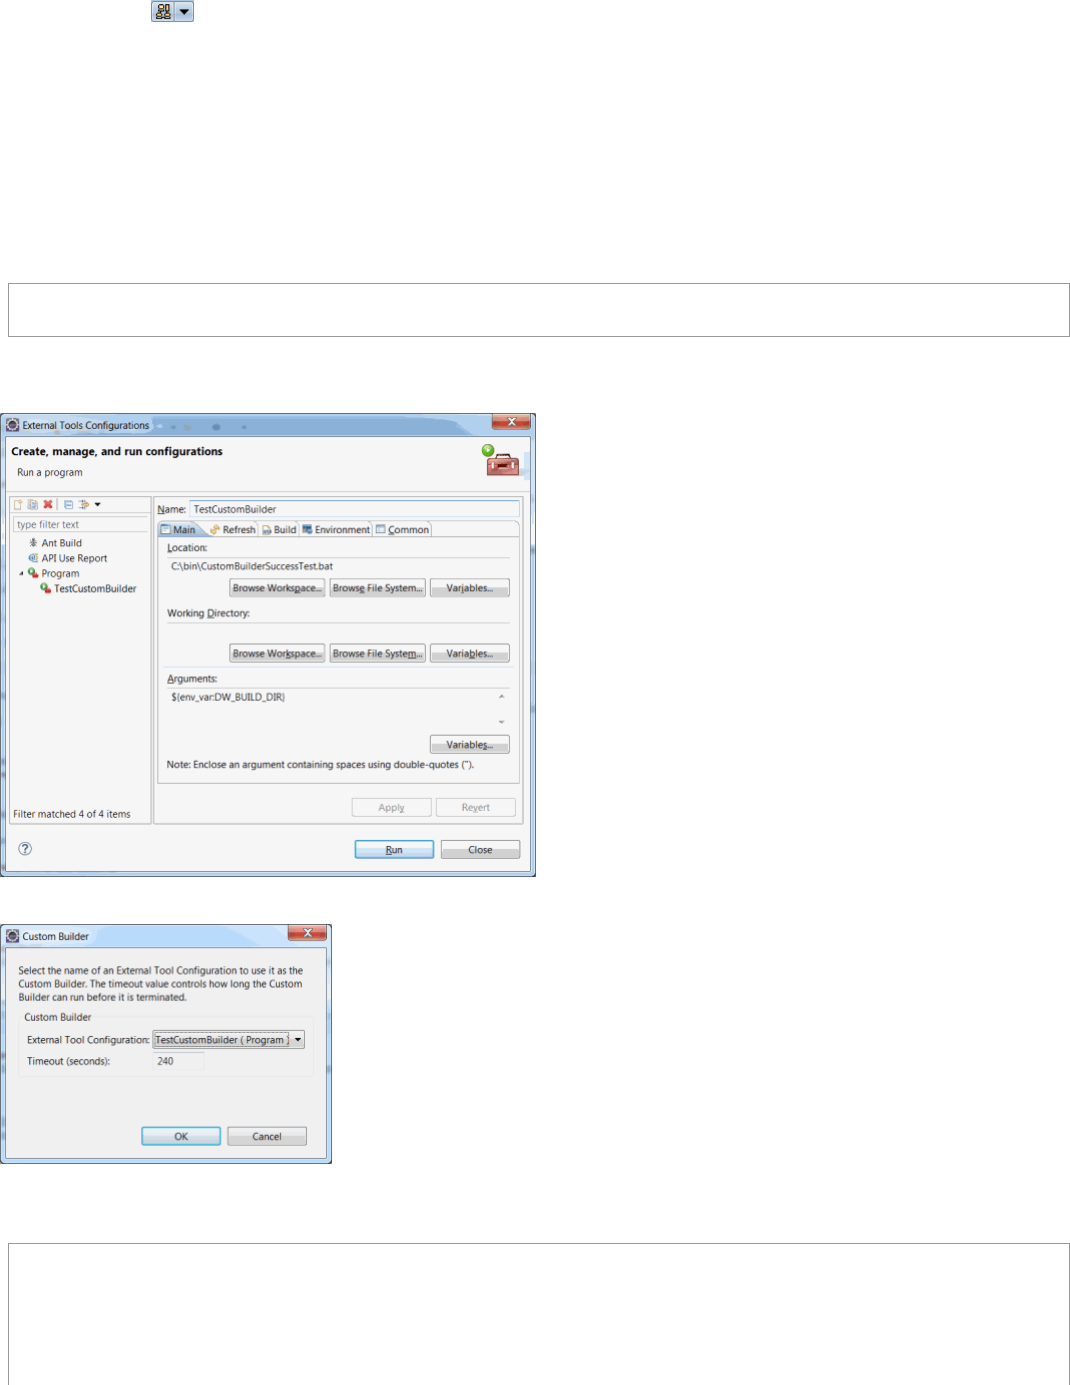
Configuring a Custom Builder
To configure a custom builder, you create two different types of configurations: an external tools configuration, and a custom builder configuration. The external tools configuration
specifies information about the runnable object you want to execute after a build is performed but before the files are uploaded to the B2C Commerce server. The custom builder
configuration specifies which external tools configuration to use as your custom builder. You can create multiple external tools configurations, but you can only use one at a time as a
custom builder.
To create an external tools configuration, perform the following steps:
1. In UX Studio, select Run > External Tools > External Tools Configurations....
2. In the left-hand pane of the External Tools Configurations window, double-click Program.
3. In the Name field, enter the name you want to give the configuration.
4. In the Location field in the Main tab, enter the pathname to a runnable object.
5. In the Arguments field in the Main tab, optionally enter arguments you want passed to the runnable object.
3/16/23, 2:11 PM
Legacy Developer Documentation
https://documentation.b2c.commercecloud.salesforce.com/DOC1/advanced/print.jsp?topic=/com.demandware.dochelp/LegacyDevDoc/LegacyDevDoc.html&cp=…
21/158
If you specify the variable expression ${env_var:DW_BUILD_DIR} as an argument, the expression resolves to the file path of the build directory.
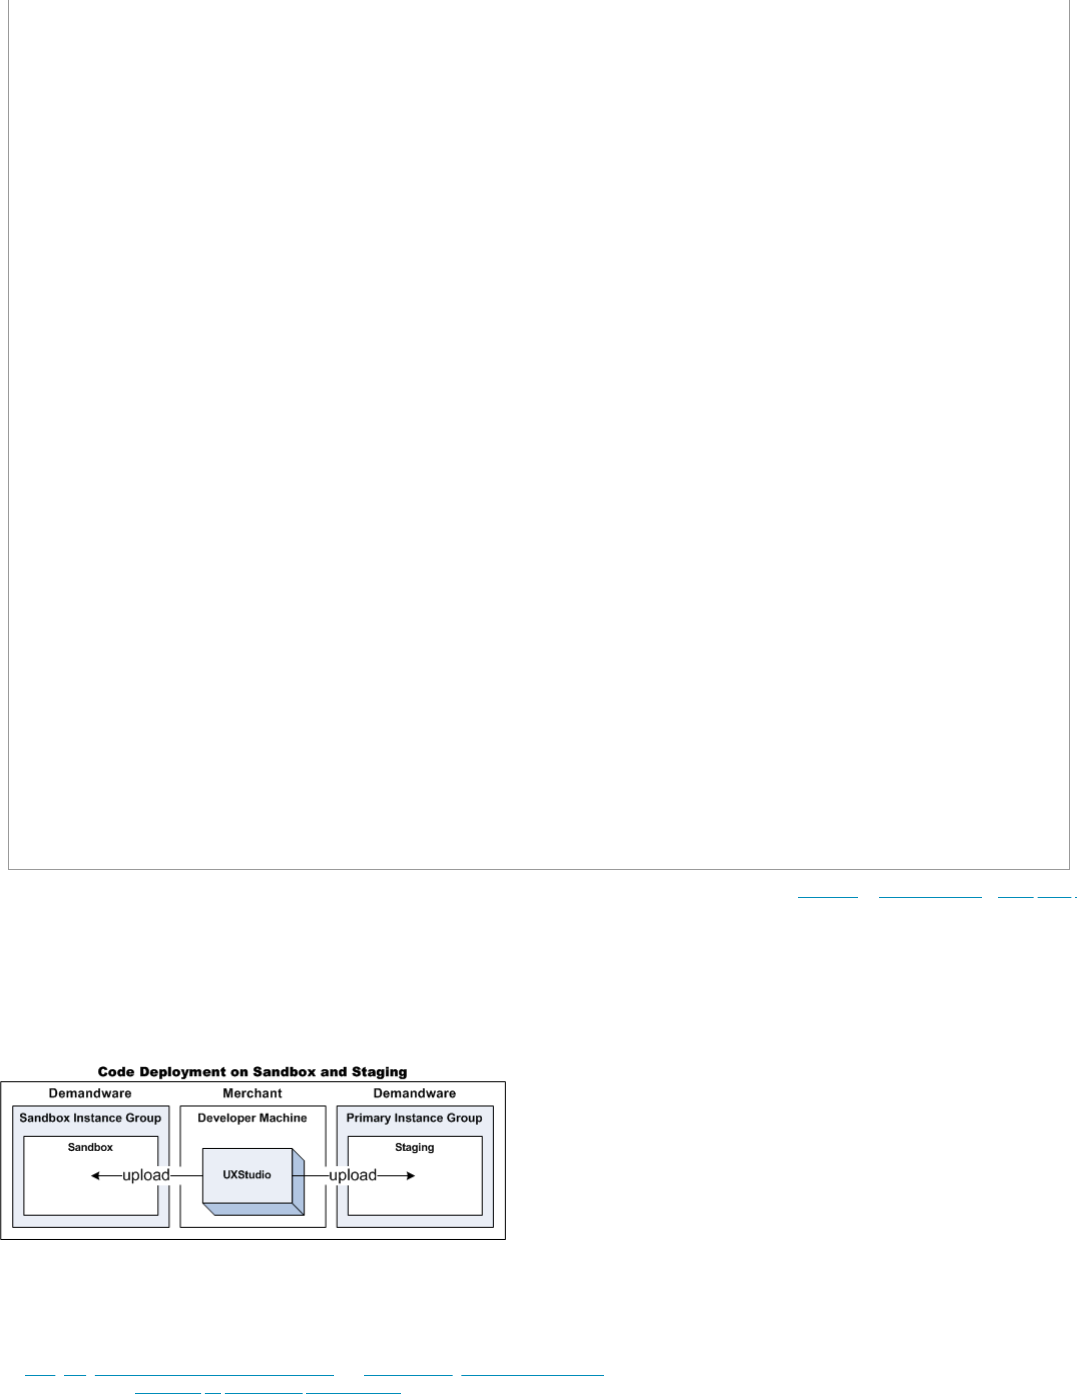
To create a custom builder configuration, perform the following steps:
1. In UX Studio, click on the UX Studio toolbar and select Custom Builder....
2. Click the External Tools Configuration drop-down and select an external tools configuration that you previously created.
3. In the Timeout field, enter a timeout in seconds.
The timeout determines how long your runnable object can execute before it's terminated. The default is 120 seconds.
Custom Builder Example
Suppose you are on a windows machine and you want to use a CustomBuilderTest.bat file as your custom builder's runnable object.
This file contains two lines:
dir /S %DW_BUILD_DIR%
more %DW_BUILD_DIR%\manifest.json
When the custom builder is run, this file recursively lists the files in the server's build directory; it also shows the contents of the manifest.json file.
The following screenshot shows the relevant external tools configuration:
The following screenshot shows the relevant custom builder configuration:
With these configurations in place, UX Studio calls the custom builder whenever you initiate a build action, either full or incremental.
The console output from a sample execution of the CustomBuilderTest.bat file is shown below:
C:\studio>dir /S C:\studio\workspaces\luna\CommerceCloudServer\customBuild
Volume in drive C is OS
Volume Serial Number is 6E76-A54D
Directory of C:\studio\workspaces\luna\CommerceCloudServer\customBuild
01/20/2015 01:05 PM <DIR> .
3/16/23, 2:11 PM
Legacy Developer Documentation
https://documentation.b2c.commercecloud.salesforce.com/DOC1/advanced/print.jsp?topic=/com.demandware.dochelp/LegacyDevDoc/LegacyDevDoc.html&cp=…
22/158
01/20/2015 01:05 PM <DIR> ..
01/20/2015 01:05 PM <DIR> CustomBuilderStorefront
01/20/2015 01:05 PM 195 manifest.json
1 File(s) 195 bytes
Directory of C:\studio\workspaces\luna\CommerceCloudServer\customBuild\CustomBuilderStorefront
01/20/2015 01:05 PM <DIR> .
01/20/2015 01:05 PM <DIR> ..
01/20/2015 01:05 PM <DIR> cartridge
0 File(s) 0 bytes
Directory of C:\studio\workspaces\luna\CommerceCloudServer\customBuild\CustomBuilderStorefront\cartridge
01/20/2015 01:05 PM <DIR> .
01/20/2015 01:05 PM <DIR> ..
01/20/2015 01:05 PM <DIR> scripts
0 File(s) 0 bytes
Directory of C:\studio\workspaces\luna\CommerceCloudServer\customBuild\CustomBuilderStorefront\cartridge\scripts
01/20/2015 01:05 PM <DIR> .
01/20/2015 01:05 PM <DIR> ..
01/20/2015 01:05 PM <DIR> common
0 File(s) 0 bytes
Directory of C:\studio\workspaces\luna\CommerceCloudServer\customBuild\CustomBuilderStorefront\cartridge\scripts\common
01/20/2015 01:05 PM <DIR> .
01/20/2015 01:05 PM <DIR> ..
01/20/2015 01:04 PM 1,634 libStringUtilsExt.ds
1 File(s) 1,634 bytes
Total Files Listed:
2 File(s) 1,829 bytes
14 Dir(s) 343,317,491,712 bytes free
C:\studio>more C:\studio\workspaces\luna\CommerceCloudServer\customBuild\manifest.json
{
"version": "1.0.0",
"buildDir": "C:\\studio\\workspaces\\luna\\CommerceCloudServer\\customBuild",
"resources": [
{
"operation": "changed",
"file": "cartridge\\scripts\\common\\libStringUtilsExt.ds"
}
]
}
© Copyright 2000-2023, Salesforce, Inc. All rights reserved. Various trademarks held by their respective owners. Show URL Submit Feedback Privacy Policy
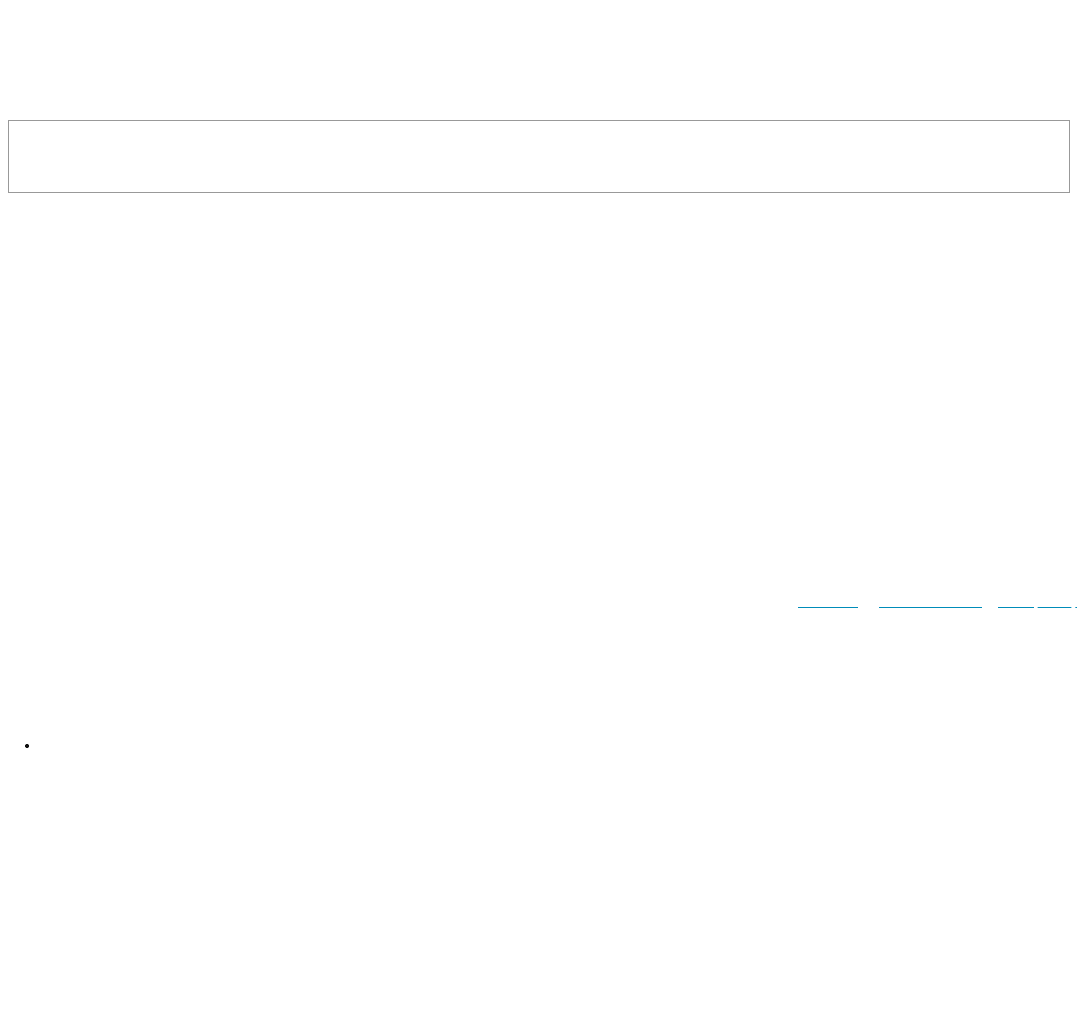
1.16. Code Deployment
When you have finished development in your sandbox, you use UX Studio to upload your code to the sandbox instance.
To transfer your code to a Staging instance, you create a new server connection and upload your code to the staging instance. Your staging server connection should be a secure
connection.
You can deploy code from UX Studio directly to your Sandbox instance, via your server connection.
To manually upload a cartridge:
1. On the Studio toolbar, click B2C Commerce Server and select a connection, and then select Upload Cartridges.
See Configuring Your B2C Commerce Server Connection and Troubleshooting Your Server Connection for information on configuring auto upload. For best practice information on
code deployment, see General Deployment and Replication Details.
Code Versions and the Active Version
3/16/23, 2:11 PM
Legacy Developer Documentation
https://documentation.b2c.commercecloud.salesforce.com/DOC1/advanced/print.jsp?topic=/com.demandware.dochelp/LegacyDevDoc/LegacyDevDoc.html&cp=…
23/158
B2C Commerce lets you have multiple custom code versions uploaded to the system at the same time. The code is arranged in a top-level directory, called Version Directories.
You can name each directory in accordance with your versions, for example, v12 or summer_release.
When developing your storefront, you select one active code version with which to work. Select Administration > Site Development > Code Deployment. Select a version directory
as the active version for a site. All templates, pipelines, scripts and images are taken from this active version. Studio also connects to this version.
B2C Commerce automatically and asynchronously removes the oldest code versions on all instance types. The active code version and the previously active code version are not
included in this process. You can configure the number of retained code version.
You can rollback your storefront to a previous version if necessary; and develop your application with a newer version while maintaining an active storefront on a stable code base.
B2C Commerce no longer lets you upload code using a .zip file containing a distinct code version. Instead, you must upload your cartridge. Most development teams have a regular
method for uploading code to staging.
1. In Studio, right-click your B2C Commerce Server and select B2C Commerce Server > Change Upload Staging Directory.
The Change Upload Staging Directory dialog box appears.
2. In the Target version directory list, select the active version.
Note: The active version is shown under the list box.
Troubleshooting Tip for Code Versioning
If you get the following error when you try to view the storefront, check that you are uploading your cartridge to the current code version.
Technical Page There were technical problems while the request was being processed!
Executed Request:
Default Technical Details: System template default used directly or indirectly in custom site
However, you can also upload a cartridge to the correct version in Studio, usually to your Sandbox.
CAUTION:
Plan to test a new code version first on a Staging instance before moving it to the Production instance.
Code Uploads to an Active/Inactive Version
Best practice is to upload code into an inactive version on a Staging instance and subsequently replicate the code to a Development or Production instance.
Code uploads into an active version are only allowed on Staging, Development, and Sandbox instances. Production instances reject WebDAV based code uploads that occur directly
into the currently active version. Code uploads onto a Production instance can only be to an inactive version.
Code Compatibility Mode
You can also specify the active compatibility mode (API version). B2C Commerce lets you activate a new compatibility mode or revert to the previously active compatibility mode.
You can replicate code to another system. Code Replication transports the active code version from the staging instance to the target production or development instance.
Note: The term Compatibility Mode is interchangeable with the term API Version.
© Copyright 2000-2023, Salesforce, Inc. All rights reserved. Various trademarks held by their respective owners. Show URL Submit Feedback Privacy Policy
1.17. Creating a New Template
You can use UX Studio to create a template.
To create a new template
1. Open UX Studio.
2. Click File > New > ISML template.
3. The dialog box appears.
4. Select the cartridge for which you want to create a template.
5. Click Next.
6. Enter the template name (for example, MyWebFront.isml).
CAUTION:
Template and folder names can't contain spaces.
7. Select or specify a parent folder.
8. Click Finish.
3/16/23, 2:11 PM
Legacy Developer Documentation
https://documentation.b2c.commercecloud.salesforce.com/DOC1/advanced/print.jsp?topic=/com.demandware.dochelp/LegacyDevDoc/LegacyDevDoc.html&cp=…
24/158
An empty editor window appears. (You can set preferences for template generation.)
9. Add basic HTML tags (for example, <HTML>, <HEAD>, <TITLE> and <BODY>).
10. Add text within the <BODY> tags.
11. Include ISML tags.
12. Assign your template to the right pipeline.
13. Test the results in the Salesforce B2C Commerce storefront.
© Copyright 2000-2023, Salesforce, Inc. All rights reserved. Various trademarks held by their respective owners. Show URL Submit Feedback Privacy Policy
2. Site Genesis
SiteGenesis JavaScript Controllers (SGJC) is a demonstration ecommerce reference application that enables you to explore Salesforce B2C Commerce and its capabilities. You can use
it as the basis of your own custom site, although SFRA is recommended for new projects.
Features specific to SGJC can be unfamiliar if storefront is based on an earlier version of SiteGenesis. Most of the features described here focus on reusability of code and can be
useful when migrating your storefront code. .
SiteGenesis uses the following features:
CommonJS Modules and Require
ImportPackage vs. Require
Hooks
Hook Definition
Running Multiple Hooks for an Extension
Error Logging
CommonJS Modules and Require
CommonJS modules let you create scripts with reusable functionality. A module is a .ds or .js file. You can place a module either in a cartridge’s script folder or in a modules
folder that is at the same level as other cartridges. You can access modules that are in your cartridge, in other cartridges, and in the modules folder.
The modules folder is a peer of cartridge folders. Salesforce recommends using it for globally shared modules, such as third-party modules.
+-- modules
+-- mymodule1.js
+-- My_Cartridge_1
+-- cartridge
+-- scripts
+-- mymodule2.js
+-- My_Cartridge_2
+-- cartridge
+-- scripts
+-- mymodule3.js
Accessing Modules
Salesforce B2C Commerce supports CommonJS paths to access modules and relative paths.
Use the following syntax:
~ - the current cartridge name. Example: require ('~/cartridge/scripts/guard')
. - same folder (as with CommonJS). Example: require('./shipping');
.. - parent folder (as with CommonJS). Example: require('../../util')
ImportPackage vs. Require
In previous versions of SiteGenesis, the ImportPackage statement was always used to import B2C Commerce packages into your scripts.
You can also use require to import B2C Commerce script packages. For example: require(‘dw/system/Transaction’)
Salesforce recommends using the require method to import B2C Commerce script packages, or other JavaScript or B2C Commerce script modules instead of ImportPackage.
Important:
Using the require() function to load a module has an impact on performance. To handle a request, a controller is loaded and then executed on a global level, just as
exported methods are executed. When the controller module is initialized, the actual controller function is invoked.
If the dependencies to other modules are initialized on a global level, many modules can be loaded unnecessarily. If possible, place require() statements in the most limited
scope that is appropriate (for example, as local variables within a function body). If your require() statements are placed at a global level, they are loaded for every request.
For example, require() statements at the top of a controller file are loaded with each request. Globally required modules are loaded even if they are not needed in the
current execution context.
3/16/23, 2:11 PM
Legacy Developer Documentation
https://documentation.b2c.commercecloud.salesforce.com/DOC1/advanced/print.jsp?topic=/com.demandware.dochelp/LegacyDevDoc/LegacyDevDoc.html&cp=…
25/158
If all modules execute their require() statements globally, all modules are loaded for every request. This overhead can significantly degrade performance, depending on the
number of modules. We suggest, instead, that you move the require() calls for non-API modules into the function bodies so that they are resolved only when necessary. A
require() isn't an import; it's a real function call. An import in Java, in contrast, is only a compiler directive and has no effect at run time.
Hooks
Hooks configure a piece of functionality to be called at a specific point in your application flow or at a specific event.
There are three types of hooks you can use with SiteGenesis:
OCAPI hooks – B2C Commerce provides extension points that let you automatically call scripts before or after specific OCAPI calls.
B2C Commerce hooks – B2C Commerce provides onSession and onRequest hooks to replace onSession and onRequest pipelines. It also provides hooks for Apple Pay on the
web.
Custom hooks – you can define custom extension points and call them in your storefront code using the B2C Commerce script System package HookMgr class methods.
Hook Definition
The package.json file points to the hook file for a cartridge, using the hooks keyword.
Example: package.json
{
"hooks": "./cartridge/scripts/hooks.json"
}
The hook file defines a uniquely named extension point and a script to run. Hook scripts must be implemented as CommonJS modules. Therefore, the script identifier is a module
identifier and can be a relative path or any other valid module identifier.
Example: hook.json
{
"hooks": [
{
"name": "dw.ocapi.shop.basket.calculate",
"script": "./cart/calculate.js"
},
{
"name": "dw.system.request.onSession",
"script": "./request/OnSession"
},
{
"name": "app.payment.processor.default",
"script": "./payment/processor/default"
}
]
}
This example shows an OCAPI hook, a controller hook, and a custom hook. The OCAPI hook runs a script to calculate the cart. The controller hook calls the OnSession.js script in
the scripts/request directory. You can call the custom hook by using the HookMgr class’s callHook method.
Example: calling a custom hook
return dw.system.HookMgr.callHook('app.payment.processor.default', 'Handle', {
Basket : cart
});
Running Multiple Hooks for an Extension Point
It's possible to register multiple scripts to call for an extension point. However, you can't control the order in which the scripts are called. Also, if you call multiple scripts, only the last
hook called returns a value.
At run time, B2C Commerce runs all hooks registered for an extension point in all cartridges in your cartridge path. It runs them in the order of the cartridges on the path.
Note: Hooks are called in the order of the cartridges on the path. Therefore, if you change the order of the cartridges, you also change the order in which hooks are called.
Error Logging
Controller and script logging is available in the:
Custom error log – this log contains the hierarchy of controller and script functions and line numbers related to exceptions thrown. This log is intended for use by developers to
debug their code.
System error log – this log is primarily useful for Commerce Cloud Support.
Example: Custom error log
3/16/23, 2:11 PM
Legacy Developer Documentation
https://documentation.b2c.commercecloud.salesforce.com/DOC1/advanced/print.jsp?topic=/com.demandware.dochelp/LegacyDevDoc/LegacyDevDoc.html&cp=…
26/158
Error while executing script 'test_cartridge_treatascustom/cartridge/controllers/TestController.js': Wrapped com.demandware.beehive.core.
at test_cartridge_treatascustom/cartridge/controllers/TestController.js:21 (isml)
at test_cartridge_treatascustom/cartridge/controllers/TestController.js:52 (anonymous)
Back to top.
Getting Started with SGJC
For developers, Site Genesis provides sample code—pipelines, scripts, and ISML templates. For merchants, it offers sample configurations for catalogs, categories, and products.
SiteGenesis Modules and Hooks
SiteGenesis and CSS
© Copyright 2000-2023, Salesforce, Inc. All rights reserved. Various trademarks held by their respective owners. Show URL Submit Feedback Privacy Policy
2.1. Getting Started with SGJC
For developers, Site Genesis provides sample code—pipelines, scripts, and ISML templates. For merchants, it offers sample configurations for catalogs, categories, and products.
SGJC Reference Application
The demo instance is available with every realm. Open a browser and enter the URL for your sandbox, replacing the sub-domain name.
demo.web.yourcompanyname.brand.com
Important: Don't store important data on the demo site. The demo sandbox is reinitialized with each release, which erases any data stored on the instance. Therefore, don't
use the demo site for development.
You can get the SiteGenesis code in two ways.
Download the cartridge from Business Manager on your demo instance.
In Eclipse, use the Digital plug-in to create a new storefront cartridge.
You can use the code as the starting point for your own storefront and upload it to your Sandbox instance for customization or development.
CAUTION:
Never import SiteGenesis into an instance in your PIG, but you can import SiteGenesis into each instance in your SIG. However, if you import SiteGenesis into a sandbox
that contains other customized sites, you could overwrite existing attributes and lose data. It is safe to import SiteGenesis into an empty sandbox. If you also want to
import custom sites into the empty sandbox, import SiteGenesis first to retain you custom sites' attributes for your custom sites are retained if there are conflicts, as
your custom attributes will overwrite the imported SiteGenesis custom attributes. If there are conflicts between your attributes and SiteGenesis, your custom attributes
overwrite the imported Site Genesis custom attributes. If this occurs, The Site Genesis site might not function properly, but your customer data is kept intact. After
importing SiteGenesis, you can validate its behavior by comparing it to the site running on the dedicated instance.
Site Genesis Learning Path Resources
A collection of structured resources to get you on your way with Site Genesis.
© Copyright 2000-2023, Salesforce, Inc. All rights reserved. Various trademarks held by their respective owners. Show URL Submit Feedback Privacy Policy
2.1.1. Site Genesis Learning Path Resources
A collection of structured resources to get you on your way with Site Genesis.
Comparing SG vs SFRA (and migration options)
Javascript Controllers Quick Guide
Modules 1 & 2 - Sandbox Setup and UX Studio Installation
Module 3 - Cartridges
Module 4 - Javascript Controllers
Module 5 - ISML (Part 1)
Module 5 - ISML (Part 2)
Module 6 - Content Slots
Module 7 - Scripts
Module 8 - Forms Framework
3/16/23, 2:11 PM
Legacy Developer Documentation
https://documentation.b2c.commercecloud.salesforce.com/DOC1/advanced/print.jsp?topic=/com.demandware.dochelp/LegacyDevDoc/LegacyDevDoc.html&cp=…
27/158
Module 9 - Custom Objects
Module 10 - Data Binding & Explicit Transactions
Student Guide (circa 2017)
© Copyright 2000-2023, Salesforce, Inc. All rights reserved. Various trademarks held by their respective owners. Show URL Submit Feedback Privacy Policy
2.2. SGJC Setup
SiteGenesis is a full-featured demonstration ecommerce site to explore Salesforce B2C Commerce and its capabilities. You can use it as the basis of your own custom site. For
developers, it provides sample code—pipelines, scripts, and ISML templates. For merchants, it offers sample configurations for catalogs, categories, products, and so on.
Topic information:
Download SiteGenesis
Set Up Your Local Machine
Import SiteGenesis Data into an Instance
Build SiteGenesis
Automated Testing
Build JSDoc and the Styleguide
Customize Your Application
Build and Testing Tools
If you are creating a storefront project, choose whether you want to base the project on controllers or pipelines. If you include both options, the controller cartridge is used.
In these examples, demo is the name you gave your storefront cartridge when you created it.
demo.web.yourcompany.demandware.net
Do not store important data on the demo site. The demo sandbox is reinitialized with each release, which erases any data stored on the instance. Therefore, do not use the demo site
for development.
You can also create SiteGenesis storefront cartridges in Eclipse, after you install the B2C Commerce plug-in.
Download SiteGenesis
You can download the source code from GitHub at the Salesforce Commerce Cloud repository for Site Genesis.
Note: If you are updating an existing version of SiteGenesis and want to check the version you have, you can check this in the package.json file.
Set Up Your Local Machine
These instructions assume you are using the MacOS and a bash shell.
1. Expand the downloaded .zip files.
2. From a command-line prompt, navigate to the demandware-sitegenesis-community directory.
3. Download and install Node.js, if it is not already installed. You can test whether the node is installed by entering:
node -v
If node is already installed, this command returns a version number.
Note: B2C Commerce only uses Node.js for npm dependency management.
4. Use npm to install the modules included with SiteGenesis.
npm install
Important: Run this command any time you download a new version of SiteGenesis, because the dependencies included with the application might have changed.
5. Install one of the following build systems (not both) that watches, processes, and concats SASS code.
Gulp
npm install -g gulp
Grunt

3/16/23, 2:11 PM
Legacy Developer Documentation
https://documentation.b2c.commercecloud.salesforce.com/DOC1/advanced/print.jsp?topic=/com.demandware.dochelp/LegacyDevDoc/LegacyDevDoc.html&cp=…
28/158
npm install -g grunt-cli
Upload Code from Your Local Machine to a B2C Commerce Instance
You upload code via a B2C Commerce plug-in to Eclipse.
Note: As of Release 16.1, you must explicitly list the cartridges you want to use. If you are using your demo instance to test your cartridges, We recommend removing the
SiteGenesis cartridges that are added to the cartridge path for demo instances. Don't use demo instances for development.
Import SiteGenesis Data into an Instance
To view products in a SiteGenesis storefront site, you must import the standard SiteGenesis data. The standard data includes product information and images.
If you import the SiteGenesis code without importing the data, a broken footer appears. If you are using SiteGenesis in the same sandbox as your custom site, we recommend
exporting your current site, importing the site data from the demo_data_no_hires_images directory and then importing your site again.
Never import SiteGenesis into an instance in your PIG, but you can import SiteGenesis into each instance in your SIG. However, if you import SiteGenesis into a sandbox that contains
other customized sites, you could overwrite existing attributes and lose data.
It is safe to import SiteGenesis into an empty sandbox. If you also want to import custom sites into the empty sandbox, import SiteGenesis first to retain you custom sites' attributes
for your custom sites are retained if there are conflicts, as your custom attributes will overwrite the imported SiteGenesis custom attributes.
If there are conflicts between your attributes and SiteGenesis, your custom attributes overwrite the imported Site Genesis custom attributes. If this occurs, The Site Genesis site might
not function properly, but your customer data is kept intact. After importing SiteGenesis, you can validate its behavior by comparing it to the site running on the dedicated instance.
Import High-Resolution Data
The standard SiteGenesis import data contains low-resolution images, a catalog, and other data. If you want to view and work with high-resolution data, you can import it from the
SiteGenesis site.
1. Download the high-resolution images from the SiteGenesis space.
2. Upload and import the standard import data. Because the hi-res data does not include most catalog and product data, you must import the basic data first to have all the data
required for the site.
3. Upload and import the hi-res images.
After importing SiteGenesis, you can validate its behavior by comparing it to the site running on the latest version of SiteGenesis, available on GitHub.
Note: Because SiteGenesis is on a different release schedule than B2C Commerce, it is possible that the application you download might be more advanced than the version of
the application available on the demo instance, which always tracks to the latest B2C Commerce release.
Configure SiteGenesis
You can switch some SiteGenesis features on or off in Business Manager.
To use SiteGenesis, you must have cookies enabled in your browser.
If you do not have cookies enabled, you might see entries similar to the following in the error logs.
ERROR PipelineCallServlet|"TypeError: Cannot read property "calloutMsg" from null ([Template:slots/category/TrendingNow:${slotcontent.cal
System Information
Build SiteGenesis
The JavaScript and CSS used in SiteGenesis is modularized. You can compile it into a single app.js and style.css to optimize performance and prevent namespace collisions. If you
don't compile the appropriate files using the build, the storefront does not appear the same, because it does not use JavaScript:
Before Build After Build
Detect File Changes During the Build Process
You can use the SiteGenesis build tools to detect changes to files. The SiteGenesis build compiles all the .css files into the style.css file, and the client-side JavaScript files into the
app.js file. Client-side JavaScript files are in the cartridge scripts/js directory.
To watch files and build if there are changes:
3/16/23, 2:11 PM
Legacy Developer Documentation
https://documentation.b2c.commercecloud.salesforce.com/DOC1/advanced/print.jsp?topic=/com.demandware.dochelp/LegacyDevDoc/LegacyDevDoc.html&cp=…
29/158
1. Open a command-line terminal and navigate to the top level in your SiteGenesis download.
2. Enter the following command:
grunt watch
This command runs the default task in the background and watches for changes in *.scss or *.js files. If changes are detected, the task recompiles the style.css and app.js files. Don't
close the tab or enter other commands in the terminal if you want the build to continue to watch.
Note:
When you use watching to build, Watchify is used instead of browserify for faster bundling by taking advantage of caching. This shouldn't result in any differences in the
resulting compiled files.
Note: To upload the compiled files to your sandbox, you must have Studio open with the style.css and app.js files open.
Build Manually
This section describes all commands in grunt, but similar commands can also be run in gulp.
To run any build command, open a terminal and navigate to the top directory of the SiteGenesis repo. This is the parent directory for the app_storefront_controllers folder.
To perform all compilation tasks for SiteGenesis:
1. Open a command-line terminal, and navigate to the top level in your SiteGenesis download.
2. Enter the following command. You can also use gulp.
grunt build
Summary of build commands
Command Description
grunt Runs grunt in watch mode, compiling changed *.scss files into style.css and *.js files into app.js as needed.
grunt css Compiles the .scss code into the style.css file and runs Auto-Prefix to set vendor prefixes. This task is also run automatically on any .scss file
change by using the gulp watch task.
grunt js Compiles the client-side JavaScript files into the app.js file.
The JavaScript modules rely on Browserify to compile JavaScript code written using the CommonJS modules standard.
The entry point for browserify is app_storefront/cartridge/js/app.js, and the bundled JavaScript is output to
app_storefront/cartridge/static/default/js/app.js.
grunt jshints Runs JSHint on all *.js files.
grunt jscs
Runs jscs on all *.js files.
JSHint detects errors and potential problems in your JavaScript code. This runs jshint on every.js file and creates a report of any problems it
finds. The SiteGenesis team uses this on every commit to check out JavasScript code and we encourage its use by all of our customers and
partners.
grunt --sourcemaps
Creates the source maps for the *.scss and *.js files.
You can create mappings between app.js and source files that, when uploaded, let you set JavaScript breakpoints directly in the source files
(such as pages/account.js) rather than only in the huge app.js file. You set breakpoints in your browser (Chrome, Safari, or Firefox.
Using sourcemaps, you can quickly identify the source JavaScript file the code you are inspecting refers to and debug issues more easily.
Likewise, source files for *.scss files are identified when inspecting elements so that you can quickly identify and modify the relevant *.scss file
while editing the pages in your browser.
SiteGenesis only supports external sourcemaps because Eclipse tends to crash with inline sourcemaps. As a result, if you use Grunt,
sourcemaps are only available when the build steps are run explicitly and a type is specified.
For example: grunt js --sourcemaps.
Note:
Sourcemaps are not enabled if you are using watching to build.
3/16/23, 2:11 PM
Legacy Developer Documentation
https://documentation.b2c.commercecloud.salesforce.com/DOC1/advanced/print.jsp?topic=/com.demandware.dochelp/LegacyDevDoc/LegacyDevDoc.html&cp=…
30/158
Command Description
grunt test:unit Runs all the unit tests in the test/unit directory.
grunt test:application Runs all the application tests in the test/application directory.
grunt test:application
--suite checkout
Runs all the tests in the test/application/checkout directory.
grunt doc
Generates the client-side and server-side documentation and style guide and serves all resources over a static server at port 5000.
The style guide demonstrates all styles used by your project.
To access the generated doc, use http://localhost:5000/
See Build and Testing Tools and consult the README files in the app_storefront_core/cartridge/scss directory and the app_storefront/cartridge/js directory.
Automated Testing
SiteGenesis has a series of application tests and unit tests that are run from the command line using either grunt or gulp. Application tests are used for specific test cases, and unit
tests exercise specific areas of functionality. These tests are enhanced and changed with each release to reflect the features in the application.
The SiteGenesis automated testing strategy is built on a set of tools that include:
Selenium and phantomjs - Selenium server is used for unit tests. phantomjs is an option for running tests. However, we do not guarantee that all tests will pass if using
phantomjs, because phantomjs is used primarily for headless testing, and some tests require the site user interface to run correctly.
Webdriver for multiple browser and headless testing.
Mocha is a JavaScript test framework.
Tests are written in JavaScript and executed via grunt and gulp on the command line of a terminal window.
Directory Structure for Testing
The test directory contains all the files needed to configure and execute these tests.
test
├── README.md
├── application
│ ├── homepage
│ │ └── general.js
│ ├── productDetails
│ │ └── index.js
│ └── webdriver
│ ├── client.js
│ ├── config.json
│ └── config.sample.json
└── unit
└── util
└── index.js
Installing and Configuring the Tests
1. Install all dependencies.
% npm install
2. Install phantomjs and the standalone Selenium driver.
% npm install -g phantomjs
% npm install --production -g selenium-standalone@latest
% selenium-standalone install
Run the Tests
After installing the dependencies, start the Selenium server each time you want to run the tests.
% selenium-standalone start
It's important to keep this command-line instance running in the background. Do not enter other commands or close the terminal.
Unit Tests
3/16/23, 2:11 PM
Legacy Developer Documentation
https://documentation.b2c.commercecloud.salesforce.com/DOC1/advanced/print.jsp?topic=/com.demandware.dochelp/LegacyDevDoc/LegacyDevDoc.html&cp=…
31/158
Run this command to test JavaScript methods without accessing a server. It uses mock data to simulate server responses, which means that the tests execute quickly. They do not
need a browser in which to run.
% grunt test:unit
Application Tests
The application tests require a browser (either a real one or a, headless browser that represents a site in memory, but does not render the user interface). They also contact the server
and compare the HTML generated by a server with the expected responses in the tests.
To run all the application tests:
% grunt test:application
To run just the tests contained in a single subdirectory suite use:
% grunt test:application --suite checkout
Build the Jsdoc and Styleguide
To build a representation of the styles compiled in the style.css:
1. Open a terminal and navigate to the top directory of your repository.
2. Enter:
grunt doc
This starts a server that is used to host the documentation. Don't close the terminal or enter other commands.
3. In your browser, navigate to: http://localhost:5000/.
Development Settings in Business Manager
Caching
You might want to turn off caching for the site you are working on during development. If you are working with SiteGenesis, to disable caching. See also Disabling Page Caching for
Development.
Site URLs
You might want to use the standard B2C Commerce URL syntax in the early phases of development.
1. Select site > Merchant Tools > Site Preferences > Storefront URL.
2. On the Storefront URL Preferences page, make sure the Enable Storefront URLs option is not selected.
This lets you enter a URL such as https://localhost/on/demandware.store/Sites-SiteGenesis-Site/default/Hello-World directly in your browser to test new
controllers or pipelines.
Customizing SiteGenesis Features
When using SiteGenesis as the basis of your storefront application, you might want to take advantage of existing or new features that might not be automatically included in the
storefront. These features, typically configured as custom preferences, include slide show effects, responsive design, and multi-shipping. See Configuring Storefront Preferences.
Country, Locale, and Multicurrency
Analytics Reporting
Inventory
Active Data
Product Reviews
See the SiteGenesis wireframes for application details.
See SiteGenesis and CSS for details on customizing the look and feel of your storefront.
Build and Testing Tools
The following tools can be automatically installed using npm, a feature of node. js.
Tool /
technology
Description
Gulp The gulp.js build system used to watch, process, and concatenate SASS code.
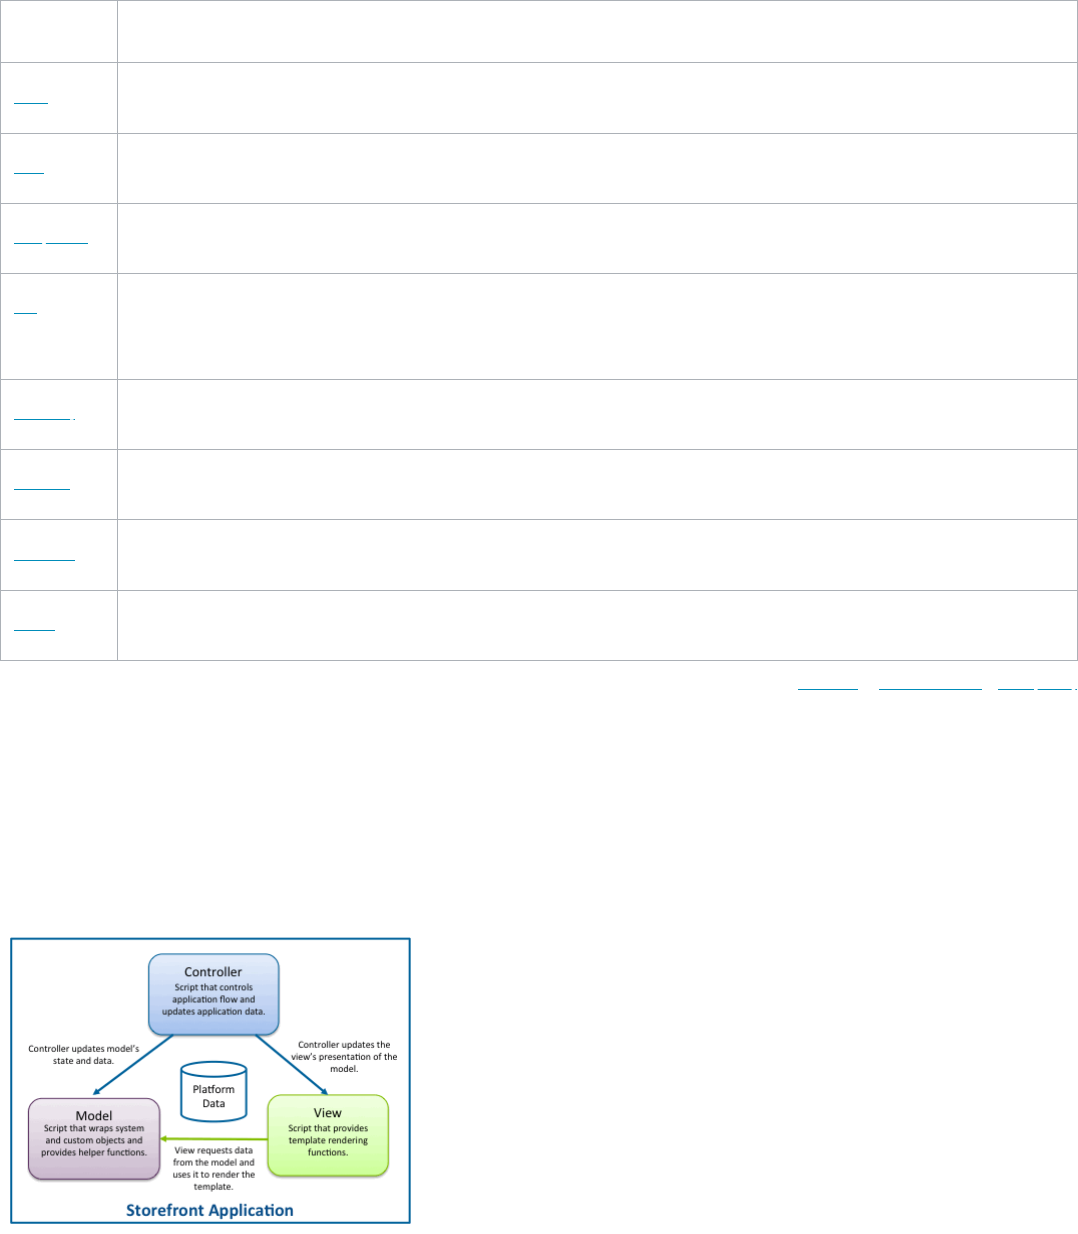
3/16/23, 2:11 PM
Legacy Developer Documentation
https://documentation.b2c.commercecloud.salesforce.com/DOC1/advanced/print.jsp?topic=/com.demandware.dochelp/LegacyDevDoc/LegacyDevDoc.html&cp=…
32/158
Tool /
technology
Description
Grunt
Also a build system, similar to gulp. Parallel SiteGenesis build tasks exist in both gulp and Grunt.
SCSS
SCSS (Sassy CSS) is a syntax used for Sass (Syntactically Awesome StyleSheets), a CSS extension.
Autoprefixer
Compiles and processes SASS files into CSS files.
Jscs Used for code linting and style checking.
Use JSCS to programmatically enforce your programming style guide. This runs jscs on every client-side JavaScript file and creates a report of any problems it
finds. The SiteGenesis team uses this on every commit to check out JavaScript code and we encourage its use by all of our customers and partners.
Browserify
Compiles JavaScript code written in CommonJS standard. Assuming a modular JavaScript architecture.
Selenium
Used for web browser automation.
Webdriver
Used for multiple-browser testing.
Mocha
Used for the test framework.
© Copyright 2000-2023, Salesforce, Inc. All rights reserved. Various trademarks held by their respective owners. Show URL Submit Feedback Privacy Policy
2.3. SiteGenesis JavaScript Controller (SGJC) Model-View-Controller Development Model
SiteGenesis uses the Model-View-Controller (MVC) development model to isolate changes and reuse functionality in the application.
Components
In traditional MVC application design, the model implements functionality for specific problem domains, independent of the user interface. The model directly manages the data,
logic, and rules of the application. A view can be any output representation of information, such as a page, dialog, or message. The third part, the controller, accepts input and
converts it to commands for the model or view.
Controllers
Controllers are the backbone of Salesforce B2C Commerce application development. Controllers define the URL endpoints and process URL parameters or forms and then delegate
to models. Controllers send commands to the model to update the model's state, such as editing a document. It can also send commands to its associated view to change the view's
presentation of the model, such as scrolling through a document.
Models
In traditional MVC, models store the data that is used to populate the view. For applications running on B2C Commerce, you can use the B2C Commerce Script API to access data. For
this reason, B2C Commerce application models do not store system data, but instead provide helper classes.
Most models have the AbstractModel class as a super class. The super class:
3/16/23, 2:11 PM
Legacy Developer Documentation
https://documentation.b2c.commercecloud.salesforce.com/DOC1/advanced/print.jsp?topic=/com.demandware.dochelp/LegacyDevDoc/LegacyDevDoc.html&cp=…
33/158
Provides methods for inheritance.
Provides getValue() and setValue() methods to safely access custom attributes.
Wraps a system object as the .object member of the ProductModel.
For example, consider a ProductModel instance that wraps a dw.catalog.Product object and provides methods to get the bread crumbs or the title of the product detail page.
The dw.catalog.Product object can be accessed as ProductModel.object, because it is the object that ProductModel wraps. Similarly, the CartModel wraps a Basket object,
and the Basket can be accessed as CartModel.object.
Templates use the model rather than containing the logic, making it easier to change behavior across templates. Also, when you call a method on the model instance that the model
does not define, it calls the method of the wrapped instance. This pattern lets you "overload" Commerce Cloud API methods at the model level if needed.
Views
Views get information necessary to render templates. The View.js module adds keys to an object, which are then available in the template via the pdict variable. The View.js
module also renders a given template. While views are mostly used to pass information to a template, they can become a powerful tool in project implementations. You can also add
your own manager classes to the view if necessary.
In addition to the View.js module, there are a few view scripts with extra helper methods for rendering templates with complex objects, such as the cart. These scripts contain
helper methods that are secure, tested, and tested for performance and error handling.
© Copyright 2000-2023, Salesforce, Inc. All rights reserved. Various trademarks held by their respective owners. Show URL Submit Feedback Privacy Policy
2.4. SiteGenesis JavaScript Controllers (SGJC) Standards Compliance
This topic covers the following standards and supported browser versions.
Cookies Notification/Opt-in for European Cookie Law
Browsers
CSS Input Field Types
SiteGenesis and Web Content Accessibility Guidelines (WCAG)
Consent Tracking in SGJC
Downloading a Shopper's Personal Information in SGJC
Cookies Notification/Opt-in for European Cookie Law
European Cookie Law requires websites to notify customers that cookies are being used and how. The SiteGenesis application uses an optional content asset, called cookie_hint,
to contain this notice.
If this asset is... Then...
Missing or offline No notice is given. The cookies are set as they always have been. This approach is used in the USA, for example.
Present and online* The cookie_hint content appears. Clicking I ACCEPT sets the cookies and causes the popup to not appear again.
Note: * If customers want a more relaxed interpretation of the Cookie Law, the can add a Close button. We exclude the Privacy page so that it can be read without seeing the
notification.
Browsers
SGJC officially supports the following browsers, and one version earlier.
Desktop
Chrome 53+
Firefox 49+ (including the latest Extended Support Release (ESR) that is, 45)
Microsoft Edge 38+
Microsoft Internet Explorer 11
Safari 10+
Mobile
iOS 10+: Chrome (most recent)
Safari (most recent)
See Business Manager User Interface.
Supported Browsers Desktop (supporting the latest browser version):

3/16/23, 2:11 PM
Legacy Developer Documentation
https://documentation.b2c.commercecloud.salesforce.com/DOC1/advanced/print.jsp?topic=/com.demandware.dochelp/LegacyDevDoc/LegacyDevDoc.html&cp=…
34/158
Commerce Cloud Store supports the latest version of the browsers listed above, as well as one version earlier. Refer to documentation for more details. The plus(+) sign signifies
support of both major and minor browser releases following the listed browser version. End of Support for Opera As of January 1, 2017, Commerce Cloud will no longer support
Opera due to infrequent client use. We continue to evaluate browser usage throughout 2018, and if we see changes with browser adoption, we consider supporting it. Implications of
These Changes To ensure optimal performance, we encourage all clients to upgrade to a supported browser prior to January 1, 2017. Commerce Cloud continues to test and fix bugs
in all supported browsers. Customers are welcome to use any browser they want, but there can be noticeable performance issues with unsupported browsers. If you encounter any
issues with a supported browser, open a ticket with Commerce Cloud Support.
CSS Input Field Types
The SiteGenesis application supports HTML5 input field types:
color
date
datetime
datetime-local
email
month
number
range
search
tel
time
url
week
Note: Not all of these types are relevant for the SiteGenesis application.
For more information, see http://www.w3schools.com/html/html5_form_input_types.asp.
SiteGenesis and Web Content Accessibility Guidelines (WCAG)
The Web Content Accessibility Guidelines (WCAG) provide a single shared standard for web content accessibility that meets the needs of individuals, organizations, and governments
internationally. WCAG documents explain how to make web content more accessible to people with disabilities. See http://www.w3.org/WAI/intro/wcag.
Note: Salesforce B2C Commerce does not guarantee or certify compliance of SiteGenesis with any WCAG level.
The SGJC application was changed to better conform to the WCAG guidelines. The list of changes shown here is intended to provide examples of how you can make your storefront
application more accessible:
Added context in the titles of category refinements, folder refinements, and price refinements.
Added prefixes in the set/bundle products titles for added context.
Mini cart button has the title Go to Cart and not the same text as the button.
The compare checkboxes on the category landing page product tiles now have unique label text. The unique text appends the product name to the text and visually hides it.
Then, a span was added with just the text "Compare".
Removed the title from the image and added it to the link. The image only requires alt, not a title.
Made the title different and more contextual from the text.
Removed invalid hypertext reference and added visually hidden text.
Added visually hidden label to email form element in demo data.
Removed unnecessary titles from images, added alt where missing, and ensured that previous changes were not affected.
The user-links in headercustomerinfo.isml now include a title that adds more context to the links.
Added visually hidden text to buttons.
Changed titles of color refinement swatches to add more context.
The password reset link now has a title that adds context.
Changed demo data in library.xml for the footer content assets and added (or modified) footer titles.
Store locator and user icons now have titles that add more context.
Product item names in the cart have more contextual titles.
Added visually hidden text to the link of category landing page's slot banner.
Changed the size chart link title to add more context.
3/16/23, 2:11 PM
Legacy Developer Documentation
https://documentation.b2c.commercecloud.salesforce.com/DOC1/advanced/print.jsp?topic=/com.demandware.dochelp/LegacyDevDoc/LegacyDevDoc.html&cp=…
35/158
Made product action titles are different from text and add context.
Changed the title of color and size to add more context.
Added prefixes to titles.
Added visually hidden text to the social sharing links.
Added address and add credit card pages titles have more context.
Added titles to paging.
Product tile titles now contain prefixes for more context.
Removed the invalid hypertext reference error by removing the href attribute.
Breadcrumb titles have a prefix for added context.
The WCAG guidelines followed were:
Level A: 2.4.4 Link Purpose (In Context)
Level AAA: 2.4.9 Link Purpose (Link Only)
The title-related corrections to SiteGenesis use technique H33 (http://www.w3.org/TR/2014/NOTE-WCAG20-TECHS-20140916/H33). The link text is supplemented with the title
attribute to add more context, making it easier for people with disabilities to determine the purpose of the link.
Consent Tracking in SGJC
Commerce Cloud enables merchants to track personal information about their shoppers, and use this information to improve their shoppers’ overall shopping experience. Some
merchants can decide to provide their shoppers a way to deny or grant their consent to such tracking.
This topic describes a sample implementation for consent tracking in SGJC. The purpose of this sample implementation is to suggest how you can implement this capability on a
storefront adapted from SGJC. This sample implementation is meant to be informative, but not prescriptive.
This sample implementation uses:
A content asset for displaying a consent request message to the shopper
A site-specific preference, Tracking, to disable tracking by default
A session-specific flag to allow tracking if the shopper grants consent
More details about the sample implementation are provided later in this document.
Content Asset for the Consent Request Message
To display a consent message to the shopper, the sample implementation uses a content asset whose internal ID is consent_tracking_hint. This content asset contains
meaningless text, which you can replace with your own message.
Site-Specific Preference (Tracking)
The Tracking site preference determines the default tracking behavior for a site. If set to Opt-in, personal information is not tracked by default for all shoppers visiting the site;
otherwise, personal information is tracked.
To set this preference, select Merchant Tools > site > Site Preferences > Privacy.
The sample implementation assumes that the Tracking preference is set to Opt-In.
Session Tracking Flag
The sample implementation presents a consent request message to the shopper, who can choose to allow tracking. If the shopper allows tracking, the sample implementation
enables tracking during the shopper’s session.
You can enable tracking on a session by calling the following method:
dw.system.Session.setTrackingAllowed(boolean) -- If you call this method with a value of true, the method enables tracking for the current session; false, disables
tracking.
You can determine the current value of the tracking flag by calling the following method:
dw.system.Session.isTrackingAllowed() -- This method returns the current state of the session’s tracking flag (true indicates that tracking is enabled; false, disabled).
Extra Implementation Details
The sample implementation uses a server-side endpoint to set the session tracking flag based on the value of a URL parameter. The shopper’s choice to grant or deny consent
determines the value of this parameter.
The server-side endpoint is named Account-consentTracking:
function consentTracking() {
var consent = request.httpParameterMap.consentTracking.value == 'true';
session.custom.consentTracking = consent;
3/16/23, 2:11 PM
Legacy Developer Documentation
https://documentation.b2c.commercecloud.salesforce.com/DOC1/advanced/print.jsp?topic=/com.demandware.dochelp/LegacyDevDoc/LegacyDevDoc.html&cp=…
36/158
session.setTrackingAllowed(consent);
}
The result of the shopper’s decision is stored in the server-side variable session.custom.consentTracking. It is important to communicate the state of this variable with the
client-side code running on your storefront, so the sample implementation places this information in a global location that is accessible to all SGJC-based storefront pages
(footer_UI.isml).
The client-side implementation can check the state of this variable and store it in a client-side variable (consent). The client-side implementation can then use the value of the
variable to determine whether to display the consent request message to the shopper.
Several other changes to the client side complete the sample implementation.
The following properties are added to the ‘resources’ object in the Resource.ds file:
TRACKING_CONSENT: Resource.msg('global.tracking_consent', 'locale', null),
TRACKING_NO_CONSENT: Resource.msg('global.tracking_no_consent', 'locale', null),
The following properties are added to the ‘urls’ object in the Resource.ds file:
consentTracking: URLUtils.url('Page-Show', 'cid', 'consent_tracking_hint').toString(),
consentTrackingSetSession: URLUtils.url('Account-ConsentTracking').toString(),
The client-side variable (consent) is set before app.js is included in the footer_UI.isml template:
<script>var consent = ${session.custom.consentUser};</script>
<script src="../topic/com.demandware.dochelp/LegacyDevDoc/${URLUtils.staticURL('/js/app.js')}"></script>
A consentTracking module is required in app.js:
consentTracking = require('./consentTracking);
...
consentTracking.init();
...
$('.consent-tracking-policy').on('click', function (e) {
e.preventDefault();
consentTracking.show();
});
Lastly, the consentTracking module is implemented:
function getConsent() {
dialog.open({
url: Urls.consentTracking,
options: {
closeOnEscape: false,
dialogClass: 'no-close',
buttons: [{
text: Resources.TRACKING_CONSENT,
click: function () {
$(this).dialog('close');
$.ajax({
type: 'GET',
url: util.appendParamToURL(Urls.consentTrackingSetSession, 'consentTracking', true),
success: function () {
showPrivacyDialog();
},
error: function () {
showPrivacyDialog();
}
})
}
}, {
text: Resources.TRACKING_NO_CONSENT,
click: function () {
$(this).dialog('close');
$.ajax({
type: 'GET',
url: util.appendParamToURL(Urls.consentTrackingSetSession, 'consentTracking', false),
success: function () {
showPrivacyDialog();
},
error: function () {
showPrivacyDialog();
}
})
}
}]
}
});
}

3/16/23, 2:11 PM
Legacy Developer Documentation
https://documentation.b2c.commercecloud.salesforce.com/DOC1/advanced/print.jsp?topic=/com.demandware.dochelp/LegacyDevDoc/LegacyDevDoc.html&cp=…
37/158
function enablePrivacyCookies() {
if (document.cookie.indexOf('dw=1') < 0) {
document.cookie = 'dw=1; path=/';
}
if (document.cookie.indexOf('dw_cookies_accepted') < 0) {
document.cookie = 'dw_cookies_accepted=1; path=/';
}
}
function showPrivacyDialog(){
if (SitePreferences.COOKIE_HINT === true && document.cookie.indexOf('dw_cookies_accepted') < 0) {
// check for privacy policy page
if ($('.privacy-policy').length === 0) {
dialog.open({
url: Urls.cookieHint,
options: {
closeOnEscape: false,
dialogClass: 'no-close',
buttons: [{
text: Resources.I_AGREE,
click: function () {
$(this).dialog('close');
enablePrivacyCookies();
}
}]
}
});
}
} else {
// Otherwise, we don't need to show the asset, just enable the cookies
enablePrivacyCookies();
}
}
var consentTracking = {
init: function () {
if (consent == null && SitePreferences.CONSENT_TRACKING_HINT) { // eslint-disable-line no-undef
getConsent();
}
if (consent != null && SitePreferences.CONSENT_TRACKING_HINT){ // eslint-disable-line no-undef
showPrivacyDialog();
}
},
show: function () {
getConsent();
}
};
module.exports = consentTracking;
Downloading a Shopper's Information in SGJC
When you implement your SGJC-based storefront, consider providing your shoppers with a mechanism to download their data.
Registered users see a Download my data button on the My Account page. When a shopper clicks this button, SGJC downloads a JSON file to the shopper's browser with the
following information:
Profile
Address
Payment instruments
Orders
Wish lists
Gift registries
Shopping lists
The JSON file illustrates the type of information to provide to your shoppers. Your business can provide different data in a different format.
Sample JSON file
This sample file shows the type of information you can provide to the shopper.
{
"profile": {
"birthday": "1988-10-21T00:00:00.000Z",
"companyName": "",
"customerNo": "D00000001",

3/16/23, 2:11 PM
Legacy Developer Documentation
https://documentation.b2c.commercecloud.salesforce.com/DOC1/advanced/print.jsp?topic=/com.demandware.dochelp/LegacyDevDoc/LegacyDevDoc.html&cp=…
38/158
"email": "[email protected]",
"fax": "",
"firstName": "Test1",
"gender": "Female",
"jobTitle": "",
"lastLoginTime": "2018-02-14T20:07:31.074Z",
"lastName": "Doe",
"lastVisitTime": "2018-02-14T20:07:31.074Z",
"phoneBusiness": "",
"phoneHome": "",
"phoneMobile": "",
"preferredLocale": "",
"previousLoginTime": "2015-05-18T20:43:17.000Z",
"previousVisitTime": "2015-05-18T20:43:17.000Z",
"salutation": "",
"secondName": "",
"suffix": "",
"taxID": null,
"taxIDMasked": null,
"taxIDType": null,
"title": "",
"male": false,
"female": true,
"nextBirthday": "2018-10-21T00:00:00.000Z"
},
"addressbook": [
{
"address1": "104 Presidential Way",
"address2": null,
"city": "Woburn",
"companyName": null,
"countryCode": "us",
"firstName": "Test1",
"fullName": "Test1 User1",
"id": "Home",
"jobTitle": null,
"lastName": "User1",
"phone": "781-555-1212",
"postalCode": "01801",
"postBox": null,
"salutation": null,
"secondName": null,
"stateCode": "MA",
"suffix": null,
"suite": null,
"title": null
},
{
"address1": "91 Middlesex Tpke",
"address2": null,
"city": "Burlington",
"companyName": null,
"countryCode": "us",
"firstName": "Jane",
"fullName": "Jane Doe",
"id": "Work",
"jobTitle": null,
"lastName": "Doe",
"phone": "781-555-1212",
"postalCode": "01803",
"postBox": null,
"salutation": null,
"secondName": null,
"stateCode": "MA",
"suffix": null,
"suite": null,
"title": null
}
],
"wallet": [],
"orders": [],
"productList": {
"whishlists": [],
"giftregistries": [],
"shoppinglists": []
},
"thirdpartydata": {}
}
Implementation Details
3/16/23, 2:11 PM
Legacy Developer Documentation
https://documentation.b2c.commercecloud.salesforce.com/DOC1/advanced/print.jsp?topic=/com.demandware.dochelp/LegacyDevDoc/LegacyDevDoc.html&cp=…
39/158
This example conditionally provides a Download my data button in the accountoverview.isml template.
<isif condition="${pdict.downloadAvailable}">
<a class="profile-data-download button"
href="../topic/com.demandware.dochelp/LegacyDevDoc/${URLUtils.url('Account-DataDownload')}"> ${Resource.msg('account.landing.datab
</isif>
When the user clicks the button, the Account-DataDownload controller is called. The Account.js controller file applies the following guard to the datadownload() function,
exporting it as DataDownload.
/** returns customer data in json format.
* @see {@link module:controllers/Account~datadownload} */
exports.DataDownload = guard.ensure(['get', 'https', 'loggedIn'], datadownload);
The body of the datadownload() function is implemented in Account.js as follows.
/**
* Allows a logged in user to download the data from their profile in a json file.
*/
function datadownload() {
var profile = customer.profile;
var profileDataHelper = require('~/cartridge/scripts/profileDataHelper');
let response = require('~/cartridge/scripts/util/Response');
var site = require('dw/system/Site');
var fileName = site.current.name + '_' + profile.firstName + '_' + profile.lastName + '.json';
response.renderData(profileDataHelper.getProfileData(profile), fileName);
return;
}
This function relies on the helper script profileDataHelper.js, which provides several helper functions, such as getWallet(profile), getWishlists(ProductListMgr), and
so on. The helper script exports getProfileData , which calls the helper functions, constructs the JSON string, and returns the result to the shopper's browser.
exports.getProfileData = function (profile) {
var ProductListMgr = require('dw/customer/ProductListMgr');
var downloadJSONObj = {};
downloadJSONObj.profile = getProfile(profile);
downloadJSONObj.addressbook = getAddressBook(profile);
downloadJSONObj.wallet = getWallet(profile);
downloadJSONObj.orders = getOrders(profile);
downloadJSONObj.productList = {
whishlists: getWishLists(ProductListMgr),
giftregistries: getGiftregistries(ProductListMgr),
shoppinglists: getShoppingLists(ProductListMgr)
};
downloadJSONObj.thirdpartydata = {};
return JSON.stringify(downloadJSONObj, null, 2);
};
© Copyright 2000-2023, Salesforce, Inc. All rights reserved. Various trademarks held by their respective owners. Show URL Submit Feedback Privacy Policy
2.5. SiteGenesis Modules and Hooks
There are a number of features specific to SiteGenesis that you might not be familiar with if your storefront is based on SiteGenesis Pipelines (SGPP). Most of the features described
here focus on reusability of code and can be useful when migrating your storefront code.
SiteGenesis uses the following features:
CommonJS Modules and Require
ImportPackage vs. Require
Hooks
Hook Definition
Running Multiple Hooks for an Extension
Error Logging
CommonJS Modules and Require
CommonJS modules let you create scripts with functionality that can be reused by multiple controllers. A module is a .ds or .js file and is usually stored in a cartridge in the script
folder or in a modules folder at the same level as a cartridge. You can access modules in your cartridge, other cartridges, and the modules folder.
The modules folder is a peer of cartridge folders. Salesforce recommends using it for globally shared modules, such as third-party modules.
3/16/23, 2:11 PM
Legacy Developer Documentation
https://documentation.b2c.commercecloud.salesforce.com/DOC1/advanced/print.jsp?topic=/com.demandware.dochelp/LegacyDevDoc/LegacyDevDoc.html&cp=…
40/158
+-- modules
+-- mymodule1.js
+-- My_Cartridge_1
+-- cartridge
+-- scripts
+-- mymodule2.js
+-- My_Cartridge_2
+-- cartridge
+-- scripts
+-- mymodule3.js
SFRA provides a server module in the modules folder. This name is reserved for this module and editing the server module voids any promise of backward compatibility or
support from Commerce Cloud.
See also Using Salesforce B2C Commerce Script Modules
Accessing Modules
Commerce Cloud B2C Commerce supports CommonJS require syntax to access modules and relative paths.
Use the following syntax:
Syntax Use Example
~ Specifies the current cartridge name. require ('~/cartridge/scripts/cart')
. Specifies the same folder (as with CommonJS). require('./shipping');
.. Specifies the parent folder (as with CommonJS). require('../../util')
*/ Searches for the module in all cartridges that are assigned to the current site from the beginning of the
cartridge path. The search is done in the order of the cartridges in the cartridge list. This notation makes it
easier to load modules for a logical name if you don't know what cartridge is the first in the cartridge path
for a site to contain the module. For example, you can have multiple plugin cartridges that each have a
copy of the module. This lets you add new plugins and always use the module that is first in the cartridge
path.
var m =
require('*/cartridge/scripts/MyModule');
ImportPackage vs. Require
In previous versions of SiteGenesis, the ImportPackage statement was used to import B2C Commerce packages into scripts used by pipeline script nodes.
You can also use require to import B2C Commerce script packages. For example: require(‘dw/system/Transaction’)
Salesforce recommends using the require method to import B2C Commerce script packages, or other JavaScript or B2C Commerce script modules instead of ImportPackage.
Important:
Using the require() function to load a module has an impact on performance. To handle a request, a controller is loaded and then executed on a "global level", just as exported
methods are executed. When the controller module is initialized, the actual controller function is invoked. If the dependencies to other modules are all initialized on the global
level (like the require() calls are at the beginning of the controller file) and not on a function level (as local variables within a function body) there can be more modules loaded
than are actually needed by the used function. For example, if there are several cases in the business logic of the controller and only one case is followed for a specific request,
it doesn't make sense to load the modules for the other cases, as they are never used.
If all modules execute their requires globally, this ends up in practically all modules being loaded on every request. This can significantly degrade performance, depending on
the number of modules. It's therefore suggested to move the require() calls for non-API modules into the function bodies so that they are resolved lazily and only when they
are really needed. A require() isn't an import, it's a real function call,. An import in Java, in contrast, is only a compiler directive and doesn't have any effect at run time.
Hooks
Hooks configure a piece of functionality to be called at a specific point in your application flow or at a specific event.
There are three types of hooks you can use with SiteGenesis:
B2C Commerce hooks – B2C Commerce provides onSession and onRequest hooks to replace onSession and onRequest pipelines. It also provides hooks for Apple Pay on the
Web.
OCAPI hooks – B2C Commerce provides extension points that let you automatically call scripts before or after specific OCAPI calls. These hooks are defined by Commerce
Cloud. They are called
Custom hooks – you can define custom extension points and call them in your storefront code using the B2C Commerce script System package HookMgr class methods. You can
then access these hooks in either OCAPI or your storefront code. This makes them useful for functionality in a multichannel set of applications based on the same site.
Hook Definition
The package.json file points to the hook file for a cartridge, using the hooks keyword.
Example: package.json
The package.json file defines where the hooks file is located and what it is named.
3/16/23, 2:11 PM
Legacy Developer Documentation
https://documentation.b2c.commercecloud.salesforce.com/DOC1/advanced/print.jsp?topic=/com.demandware.dochelp/LegacyDevDoc/LegacyDevDoc.html&cp=…
41/158
{
"hooks": "./cartridge/scripts/hooks.json"
}
The hook file defines a uniquely named extension point and a script to run. Hook scripts must be implemented as CommonJS modules, so the script identifier is a module
identifier and can be a relative path or any other valid module identifier.
Example: hook.json
This file defines a dw.ocapi.shop.basket.calculate hook that calls the calculate.js script.
{
"hooks": [
{
"name": "dw.ocapi.shop.basket.calculate",
"script": "./cart/calculate.js"
},
{
"name": "dw.system.request.onSession",
"script": "./request/OnSession"
},
{
"name": "app.payment.processor.default",
"script": "./payment/processor/default"
}
]
}
This example shows an OCAPI hook, a controller hook, and a custom hook. The OCAPI hook runs a script to calculate the cart. The controller hook calls the OnSession.js script in the
scripts/request directory. The custom hook can be called if you use the System package HookMgr class callHook method
Example: calling a custom hook
This is the code that calls the hook from calculate.js.
return dw.system.HookMgr.callHook('app.payment.processor.default', 'Handle', {
Basket : cart
});
Running Multiple Hooks for an Extension Point
It's possible to register multiple modules to call for an extension point in a single hooks.json file. However, you can't control the order in which the modules are called. Also, if you call
multiple modules, only the last hook called returns a value. All of the modules are called, regardless of whether any of them return a value.
At run time, B2C Commerce runs all hooks registered for an extension point in all cartridges in your cartridge path, in the order of the cartridges on the path. So if each cartridge
registers a module for the same hook, the modules are called in cartridge path order of the cartridges they are registered in.
Note: Because hooks are called in the order of the cartridges on the path, if you change the order of the cartridges, you also change the order in which hooks are called.
Error Logging
Controller and script logging is available in the:
Custom error log – this log contains the hierarchy of controller and script functions and line numbers related to exceptions thrown. This is intended for use by developers to
debug their code.
System error log – this is primarily useful for Commerce Cloud Support.
Example: Custom error log
Error while executing script 'test_cartridge_treatascustom/cartridge/controllers/TestController.js': Wrapped com.demandware.beehive.core.
at test_cartridge_treatascustom/cartridge/controllers/TestController.js:21 (isml)
at test_cartridge_treatascustom/cartridge/controllers/TestController.js:52 (anonymous)
Back to top.
© Copyright 2000-2023, Salesforce, Inc. All rights reserved. Various trademarks held by their respective owners. Show URL Submit Feedback Privacy Policy
2.6. SiteGenesis and CSS
Salesforce B2C Commerce storefront pages are created using ISML templates, CSS, and B2C Commerce forms, resulting in HTML that is rendered on the browser. Use these
technologies to customize the look and feel of your storefront, as follows:
Technology Use for...
Templates Formatting live data within regular HTML code
3/16/23, 2:11 PM
Legacy Developer Documentation
https://documentation.b2c.commercecloud.salesforce.com/DOC1/advanced/print.jsp?topic=/com.demandware.dochelp/LegacyDevDoc/LegacyDevDoc.html&cp=…
42/158
Technology Use for...
Cascading Style Sheets (CSS) Web page layout and definition and page element styling
Forms Data read, write and validation.
Note: See the SiteGenesis wireframes to understand how the SiteGenesis application works.
Working with Templates
The SiteGenesis application uses ISML files (templates) to define a framework for different page layouts, thus acting as the template that defines the basic structural page. The
page/template structure consists of CSS containers and structural elements.
Containers: set the width, margin and padding. They form the structural base for a specific page layout.
Structural elements: define the main wireframe layout of the page.
Page type Structure
The SiteGenesis page type structure enables you to dynamically load CSS. Each set of page type files have the following naming convention:
pt_[page_type].isml
For example, pt_giftregistry_UI.isml, pt_giftregistry_VARS.isml, and pt_giftregistry.isml.
The pt_[page_type]_UI.isml and pt_[page_type]_VARS.ism templates in the SiteGenesis Storefront Core cartridge are intentionally empty. They act as place holders for a
template with the same name (pt_[page_type].isml) at a parent level in the cartridge path.
pt_xxx_UI.isml is injected into pt_xxx.isml, in the <head> element, to enable custom cartridges to add script and css dependencies.
pt_xxx_VARS.isml is injected into pt_xxx.isml, after the footer element (within the <body> element, but near the end), for adding <script> elements that are loaded
after the markup is loaded.
For example, compare pt_giftregistry_VARS.isml in the SiteGenesis Storefront Core cartridge against the completed file in the SiteGenesis Storefront cartridge.
To see how SiteGenesis uses custom CSS files in searches, see the following templates, located within the core cartridge/templates/default/search:
pt_contentsearchresult_UI.isml
pt_contentsearchresult_VARS.isml
pt_productsearchresult_UI.isml
pt_productsearchresult_VARS.isml
Working with CSS
These are the standard SiteGenesis application CSS files, located in the Storefront Core cartridge (static/default/css):
normalize.css: overall page element styling, for font size and margins, for example.
print.css: styling for print output using normalize.css and style.css
style.css: specific page styling of UI elements for standard PC browser pages.
style-responsive.css: specific page styling of UI elements for responsive design pages.
To work with B2C Commerce CSS, you will need:
The storefront running with Business Manager
UX Studio connected to a server instance, with the SiteGenesis application and the APIs downloaded.
A SCSS tool such as Gulp or Grunt
A CSS editing tool
Stylesheets
SiteGenesis stylesheets are written in SCSS, a syntax that is a superset of CSS. Existing CSS is valid SCSS.
SCSS authoring is meant to be used with a build tool, such as gulp. When compiled, the SCSS is output as CSS in the static/default/css folder.
Note: SCSS (Sassy CSS) is a syntax used for Sass (Syntactically Awesome StyleSheets), a CSS extension. See http://sass-lang.com/guide
SCSS Variables
Using SCSS variables, SiteGenesis styles such as color, font size, and font family are parameterized according to the style guide shown when executing the command:

3/16/23, 2:11 PM
Legacy Developer Documentation
https://documentation.b2c.commercecloud.salesforce.com/DOC1/advanced/print.jsp?topic=/com.demandware.dochelp/LegacyDevDoc/LegacyDevDoc.html&cp=…
43/158
gulp styleguide
The CSS variable files are located in the app_storefront_core/cartridge/scss folder as scss files.
CSS Design Best Practices
Consider these CSS design best practices:
Include as little browser specific code as possible. If browser-specific code is required, avoid CSS hacks and use the specific browser's best practice for addressing any issues.
See components/browsertoolscheck.isml, which is used in every page to render warning messages if certain functionality that is necessary to use the website (such as cookies
and JavaScript) is disabled in the client browser.
Separate the CSS that controls page structure (header, footer) from the CSS that controls the styling of page elements (cart, products, forms). This makes it easier to change
page design.
The first step in a new implementation is typically to change the page structure.
Third party script Libraries
B2C Commerce supports separate skinning for third party script libraries (such as jQuery) and visual features such as carousels, accordions, and tabs. B2C Commerce CSS supports
the reusable component model of the SiteGenesis application. For example, page styling elements can appear in multiple places across a site, providing an easy way to override only
those areas you want to change.
CSS Inheritance
CSS inheritance is a key concept used in B2C Commerce, whereby style sheet definitions along a linear processing path overwrite some or all of the previous definitions. For example,
a general style sheet defines page layout and styling for a generic page. These styles are overwritten for specific portions of the page as data is entered and processed.
Note: B2C Commerce supports the standard CSS specifications, which are maintained by the World Wide Web Consortium (W3C).
The CSS style sheets used in the SiteGenesis application provide a good starting point for storefront customization and can help you understand how CSS works within the B2C
Commerce environment. CSS files be specified in two places: in Business Manager and within the application cartridge.
CSS called from Business Manager
In Business Manager, you can configure custom CSS files for library folders, content assets, categories, and products. These CSS files are dynamically loaded when a storefront visitor
searches either for content assets or products; they are not loaded outside of the context of a search result. When a product is found in a search, the CSS files for all of its ancestor
categories (if any) are loaded, in addition to the CSS file specified for the product (if any). Similarly, when a content asset is found in a search, the CSS files for all of its ancestor library
folders (if any) are loaded, in addition to the CSS file specified for the content asset (if any).
This approach gives you flexibility in deciding where in the hierarchy you want to configure your custom CSS files. For example, if you know that all content assets in a library folder
should be rendered using the same custom CSS file, then you can specify the CSS file at the library folder level, instead of at the content asset level. Dynamically loaded CSS files are
loaded in parent-to-child order, with the child loaded last. This means that all of the category CSS files are loaded before the product CSS file, and all of the library folder CSS files are
loaded before the content asset CSS file.
CSS Called from the Cartridge
In Studio, start by looking at the CSS files located in the SiteGenesis Application cartridge. All CSS files not managed with Business Manager are referenced within the
htmlhead.isml, an ISML code snippet that is included within the header of a SiteGenesis application page type rendering template.
Note: htmlhead.isml is located at templates/default/components/header within the SiteGenesis Storefront Core cartridge.
CSS Modularization
SIteGenesis uses SASS to organize CSS, in part because the syntax for SASS supports variables (which we wanted for parameratizing our colors, font collections, etc) and nesting.
There is a new directory to hold all the *.scss files in the app_storefront/cartridge/default directory (app_storefront_core/cartridge/default in versions before 15.7) We use the SCSS
file format but the SASS pre-processing tools - this can be slightly confusing if you're looking for *.sass files (which we don't support). If you look in app_storefront/cartridge directory,
you'll also see scss support for additonal locales (French, Italian, Chinese, and Japanese). These directories are intended to hold any locale-specific modifications that you need to
override the default stying. The names of the files generally correspond to the names of the pages or modules that they support and it should be fairly intuitive to find what you're
looking for. _breadcrumbs.scss supports the breadcrumb styling in all the pages, _minicart.scss contains all the styling information related to the minicart. In addition to the module-
specific styling, there are some global parameters, such as colors, that are stored in _variables.scss. One of the goals of the modularization effort was to remove any hard-coded values
in the style files and centralize them in _variables.scss.
Other CSS Benefits - the SiteGenesis Styleguide
The SiteGenesis Styleguide is created with the goal of helping designers and developers in defining and understanding a common visual language used for their ecommerce
application. It includes design elements such as colors, typography and icons as well as more complex UI components such as the product tile or navigation menu. In order to
generate the styleguide for your application, go to the command line and run: % grunt styleguide. This will set up a static web server (by default at http://localhost:8000) that shows
the living styleguide. This styleguide imports the Sass styles in app_storefront. This way, any update to the application's style will be reflected in the styleguide. The SiteGenesis
Styleguide is written using ampersand (http://ampersandjs.com/) and handlebars (http://handlebarsjs.com/) for those users who want to extend it or see how it was constructed.
© Copyright 2000-2023, Salesforce, Inc. All rights reserved. Various trademarks held by their respective owners. Show URL Submit Feedback Privacy Policy
2.7. Migrating Your Storefront to SGJC Controllers
If you are migrating a storefront based on the SiteGenesis Pipelines (SGPP), some code changes are necessary.
To migrate your storefront, perform the following steps:

3/16/23, 2:11 PM
Legacy Developer Documentation
https://documentation.b2c.commercecloud.salesforce.com/DOC1/advanced/print.jsp?topic=/com.demandware.dochelp/LegacyDevDoc/LegacyDevDoc.html&cp=…
44/158
Create a Controller
Copy Portions of SiteGenesis
Add Your Cartridge to the Cartridge Path
Converting Scripts
Converting Pipelines
Converting Templates
Maintaining Integrations
Note: Job pipelets do not have script equivalents, so do not need to be migrated.
This topic assumes that you downloaded Eclipse and installed the Salesforce B2C Commerce plugin. It also assumes that you already uploaded your storefront to your Sandbox
instance and included it on the cartridge path.
Create a Controller Cartridge
Controller cartridges always override Pipeline cartridges. If controllers and their exported methods match the names of pipelines and their start nodes, the controllers are used
instead of the pipelines. You can selectively override storefront functionality by creating a controller cartridge and adding more functionality to it over time.
It's also possible to add controllers in the same cartridge as pipelines. However, this approach does not offer the fallback option to remove the cartridge from the path so you can
compare pipeline and controller functionality. It also does not let you fallback to the pipeline functionality by simply removing the controller cartridge from the path.
1. Create an empty cartridge.
a. In Eclipse, select File > New > Digital Cartridge.
b. To connect your cartridge to your server, follow the rest of the steps.
2. Right-click the cartridge folder in the Navigation tab and select New > Folder.
3. For the Folder Name, enter controllers
Copy Portions of the Latest Version of SiteGenesis to Your Controller Cartridge
Salesforce recommends copying the following folders and files from the app_storefront_controllers cartridge to your cartridge as a first step, before converting your pipelines.
Note: If your application is based on the latest version of SGJC, you can choose to not copy these files. Instead, you can put the app_storefront_controllers cartridge in
your cartridge path.
/scripts/request – the OnRequest.ds and onSession.ds scripts replace onRequest and onSession pipelines.
/scripts/util – Class.ds supports prototyping and inheritance.
/scripts – Contains a series of useful .ds and .json files:
app.ds – lets you get any controller, model, or view.
guard.ds – lets you restrict access to public controller functions.
meta.ds – used to retrieve and set page metadata information
object.ds – utility functions for managing and extending objects.
hooks.json – file to configure hooks for your storefront. Hooks can point to any JavaScript or B2C Commerce script that you want to require for reuse in other scripts.
You can also create this file with any name, as long as the package.json for your cartridge points to it.
view.ds – lets you define and initialize parameters relevant to rendering a template.
Add Your Controller Cartridge to the Cartridge Path in Business Manager
1. Select Administration > Sites > Manage Sites.
2. Select SiteGenesis or your site and click the Settings tab.
3. Add your_cartridge to the list of cartridges.
Note: It does not matter where you put the cartridge on the path, controller cartridges always override pipeline cartridges.
4. Click Apply.
Converting Scripts
Instead of using script nodes to call scripts, controllers require scripts as CommonJS modules. Controllers either call the scripts directly or call the script methods directly. Therefore,
you must convert existing scripts into CommonJS modules.
Note: B2C Commerce also recommends removing script logic in ISML templates, which currently can't be run through the script debugger. Instead, you can create CommonJS

3/16/23, 2:11 PM
Legacy Developer Documentation
https://documentation.b2c.commercecloud.salesforce.com/DOC1/advanced/print.jsp?topic=/com.demandware.dochelp/LegacyDevDoc/LegacyDevDoc.html&cp=…
45/158
modules that can be referenced via a require statement in the isscript tag. This approach lets you set breakpoints in the script file and debug the logic in the debugger.
Migrating from B2C Commerce script to JavaScript Files
While it is not necessary to convert your existing .ds files into .js files, you can do so to take advantage of a preferred editing tool.
Note:
Previous versions of SiteGenesis included all server-side B2C Commerce script files with the .ds extension and client-side JavaScript with the .js extension.
Currently, SGJC only has legacy script files that use the .ds extension. Most script (script, controller, model, and view) files now use the .js extension. These .js files function
identically to .ds files, can be called from pipelines, and can be edited in the B2C Commerce eclipse plugin or in other IDEs.
The folder in which the .js file is placed indicates whether it is a server-side or client-side script. Files in the top-level js folder (as seen in the app_storefront_core cartridge) are
client-side scripts. All other files are server-side scripts.
Example: JavaScript module that works with both pipelines and controllers:
//input parameters used by script nodes
* @input Basket : dw.order.Basket
* @input ValidateTax : Boolean
* @output BasketStatus : dw.system.Status
* @output EnableCheckout : Boolean
*/
function execute (pdict) { //called by pipelines and calls validate function
validate(pdict);
return PIPELET_NEXT;
}
/**
* Function: validate
*
* Main function of the validation script.
*
* @param {dw.system.PipelineDictionary} pdict
* @param {dw.order.Basket} pdict.Basket
* @param {Boolean} pdict.ValidateTax
* @returns {dw.system.Status}
*/
//The validate function is called directly by controllers
function validate(pdict) {
var Status = require('dw/system/Status'); //require is inside the function,
var basket = pdict.Basket;
// type: Boolean
var validateTax = pdict.ValidateTax;
...
}
Converting Pipelines
Pipelines are converted to controllers.
Note: There are several utility pipelines, such as the Error pipeline, that you can convert before migrating more specific pipelines.
1. Identify a pipeline with a public start node to convert.
Note: For a pipeline to be successfully converted, all public start nodes in the pipeline must be converted. You can't convert only part of a pipeline.
2. Identify all of the variables used in the pipeline and their assigned values. This step helps to identify the correct scoping for variables.
3. Create functions for each subpipeline.
a. Require the appropriate script modules when they are needed in the application logic. Calling the require method can impact performance (unlike an importPackage
directive). Therefore, Salesforce recommends loading modules selectively. Place the require method call within the narrowest scope possible.
b. Replace all pipelets with script methods, except where pipelets do not have an equivalent script method. If a pipelet does not have an equivalent, use the
dw.system.Pipelet method to call the pipelet.
c. Control access to private subpipeline functions. You can control access by using guards or by creating a public property for your function and setting it to false.
d. Remember to resolve variables for each request.
e. Render a template and handle any return values cleanly.
4. Call the subpipeline functions.
3/16/23, 2:11 PM
Legacy Developer Documentation
https://documentation.b2c.commercecloud.salesforce.com/DOC1/advanced/print.jsp?topic=/com.demandware.dochelp/LegacyDevDoc/LegacyDevDoc.html&cp=…
46/158
Important:
Always completely convert a controller before uploading it to your instance.
B2C Commerce checks for the existence of a controller on the cartridge path before checking for a pipeline. However, B2C Commerce does not check for the existence of the
function or subpipeline. If you call a controller function that does not exist, the call results in an error. If you partially convert a pipeline to a controller, any subpipelines that are
not converted throw errors.
For example, suppose that you have a pipeline MySale with subpipelines Start and Convert. Further suppose that you create a controller MySale with a Start function but
no Convert function. In this example, calling MySale-Convert causes an error, even if you have both the pipeline and controller on the cartridge path.
Converting Templates
You don’t have to modify templates. However, you can consider removing script logic from your templates. This aids reusability and a cleaner separation of view and model
functionality.
Note: You can use the require method in isscript tags to include script functionality. This approach lets you set breakpoints for debugging.
Maintaining Integrations
Many partner cartridges were created with pipelines and there is no way to call a pipeline from a controller by design. Therefore, you can either keep existing integrations in your
pipeline cartridge or you can rewrite them to use controllers.
Assessing Your Migration
Because controllers and pipelines share a similar URL structure, all of the performance assessment and troubleshooting tools for pipelines can be used for controllers. For example,
you can use the Pipeline Profiler.
© Copyright 2000-2023, Salesforce, Inc. All rights reserved. Various trademarks held by their respective owners. Show URL Submit Feedback Privacy Policy
2.7.1. Pipeline to Controller Conversion
Pipeline building blocks are available in the pipeline editor in Studio.
Icon Component Description Conversion
Transition
Control flow: creates a transition between two nodes and configures
transactions.
Transactions determine whether the transition starts, ends, or saves a
transaction.
Begin Transaction: marks the nodes that make up a
transaction
Commit Transaction: commits the transaction to the database
Rollback Transaction: rolls back the previous transaction
Transaction Save Point: saves the transaction
Control flow: standard JavaScript application control flow, in which one
function calls another, in a controller.
Transactions: for explicit transactions that have begin, commit, rollback,
and save point transitions, require dw/system/Transaction and use the
begin, commit, and rollback methods. In controllers, you can create a
copy of objects before entering the transaction if you want to simulate a
save point.
Text Toole
Enables you to add text inside pipeline that is visible in the pipeline
editor
Use the JSDoc comments in the file to document usage for your controller.
You can also build out your custom JSDoc using the SiteGenesis build. See
also Building JSDoc and the Styleguide.
Start Node
A pipeline can have multiple start nodes. Each start node begins a
different logic branch and must have a unique name.
Call Mode: accessibility of the start node
Public: can be called via HTTP and via call or jump nodes
Private: can be called via call or jump nodes only
Secure Connection required:
true: incoming request must be https.
false: incoming request can be http.
Name: name used to execute the pipeline.
A controller is a CommonJS module with exposed functions that can be
called. Each exposed function serves the same purpose as a start node.
Call Mode and Secure Connection required: guards replace public and
private call modes. Guards can restrict access to controllers based on
protocol, HTTP method, or authorized login.
Name: The name of an exposed function. For example, if the Home
pipeline has a Show start node, the equivalent Home controller exposes a
Show function.
3/16/23, 2:11 PM
Legacy Developer Documentation
https://documentation.b2c.commercecloud.salesforce.com/DOC1/advanced/print.jsp?topic=/com.demandware.dochelp/LegacyDevDoc/LegacyDevDoc.html&cp=…
47/158
Icon Component Description Conversion
Call Node
Jump Node
A call node calls a pipeline workflow and returns to the current
workflow.
A jump node calls a pipeline workflow and does not return to the
current workflow.
Description: description for other developers using the pipeline.
Dynamic: select false to specify a pipeline directly or true to specify a
dictionary item containing the pipeline.
Pipeline: pipeline name or Pipeline Dictionary item name
A controller is a CommonJS module and can require other modules and
call their functions.
Note: It's not recommended that controllers call each other,
because controller functionality is meant to be self-contained (to
avoid circular dependencies). Sometimes, however, such as calling
non-public controllers during the checkout process, it is
unavoidable.
Script Node
Calls a custom script
Configuration: specify how you want a script node to behave.
OnError: PIPELET_ERROR or exception
Script File: the Salesforce B2C Commerce script file to execute
Timeout in seconds for this script. The default is 30 seconds
within storefront requests and 15 minutes within jobs. The
maximum upper limit when executing within a job is 60
minutes. The maximum upper limit when executing within a
storefront request is 5 minutes.
Transactional: true or false
A controller is a CommonJS module and can require other modules and
call their functions. To call a script function directly, the script must be
modified to be a CommonJS module so it can be required.
OnError: Use standard JavaScript handling and the B2C Commerce Logger
class to write to B2C Commerce logs.
Timeout: a controller as a whole has a timeout of 5 minutes. You can use
standard JavaScript mechanisms to detect a long-running script, such as a
break loop.
Transactional: you can wrap the execution of a function from a script by
requiring dw/system/Transaction and using the wrap method.
Eval Node
Assign Node
Eval nodes evaluate an expression, resulting in an error, an exception,
or Dictionary output.
Assign nodes assign values to new or existing Pipeline Dictionary
entries, using up to 10 configured pairs of dictionary-input and
dictionary-output values.
Standard variable declaration and assignment in JavaScript replaces both
eval and assign nodes.
Decision Node
Join Node
Loop Node
Provides conditional branch in workflow
Comparison operator: comparison operator (for example,
expression)
Decision Key: the Pipeline key to compare, typically to determine if
its content is null.
Join nodes provide a convergence point for multiple branches in
workflow
Loop nodes provide for an iterative process
Iterator Definition:
Element Key: name of the Pipeline Dictionary item that holds
the current element
Iterator Key: name of the Pipeline Dictionary item to be used
as the iterator
Use standard JavaScript for control flow in a controller.
Interaction
Node
Specifies the page template used to show resulting information
Dynamic Template:
If set to true, uses a template expression to identify a dynamic
template to use. This approach allows you to assign different
templates for different product types.
Use the View.js helper class or the other view classes provided in the
scripts directory to render templates and catch rendering errors.
Dynamic Template:
Use standard JavaScript to control which ISML template is rendered.
Interaction
Continue
Node
Processes a template based on user action via a browser. Usually, this
approach is used for forms. The template must reference a form
definition that defines storefront entry fields and buttons.
Call Properties:
Secure Connection required:
Use controllers to define the logic used when rendering the form and
handling form actions.
Secure Connection required: Guards replace public and private call
modes. Guards can restrict access to controllers based on protocol, HTTP
method, or authorized login.
Dynamic Template:
3/16/23, 2:11 PM
Legacy Developer Documentation
https://documentation.b2c.commercecloud.salesforce.com/DOC1/advanced/print.jsp?topic=/com.demandware.dochelp/LegacyDevDoc/LegacyDevDoc.html&cp=…
48/158
Icon Component Description Conversion
true: incoming request must be https.
false: incoming request can be http.
Dynamic Template:
If set to true, uses a template expression to identify a dynamic
template to use. This approach lets you assign different templates for
different product types.
Use standard JavaScript to control which ISML template is rendered.
Stop Node
Functions as an emergency break, comparable with an exception
within pipelets.
If you want to stop all pipelines, use a stop node. Avoid using stop
nodes in production.
Name: external name
Use standard JavaScript to control flow.
End Node
Finishes the execution of the current pipeline
Name: must be unique within the pipeline. The calling pipeline can
use and end node to dispatch flow after a call.
The value of the name property is returned to the calling node. If
there is a transition off the calling node of the same name, that
transition is followed. End node names can be evaluated at the call
node to implement error handling.
If you choose to call a pipeline from a controller, the end node name is
returned to you. Otherwise, you can replace an end node name with a
variable.
© Copyright 2000-2023, Salesforce, Inc. All rights reserved. Various trademarks held by their respective owners. Show URL Submit Feedback Privacy Policy
2.7.2. TLS Browser Detection
As of Jan 31, 2016, support for browsers that can only process HTTPS calls with TLS 1.0 or less will be discontinued by Salesforce B2C Commerce. Customers with out-of-date
browsers will not be able to reach any page on the B2C Commerce storefront that uses HTTPS, including account, basket, and other pages used for checkout. If customers attempt to
access these pages, they will receive a server error page. Pages for the storefront that are available via HTTP are still accessible to the customer.
For additional information, see TLS 1.0 Removal Customer Impact and Removal of TLS 1.0 - What Impact Will This Have?.
B2C Commercee recommends two approaches to informing the customer that they have an out of date browser:
Use Approach 1 if you want to inform customers if they are using an old browser before the Jan 31 deadline and you want to track the browsers or TLS level of customers who are
warned.
Use Approach 2 if you want to show a warning message only after support is removed and don't want to call any external tools.
Approach 1: Use an External Tool to Warn Customer About Browser TLS Support
Use an external tool to help your storefront determine the exact TLS support level of the customer's browser and show them customized messages to let them know that they will be
affected when support is removed for out-of-date browsers.
Because a client storefront can't detect the TLS level set in a browser, this approach relies on external TLS detection services offered by:
How's My SSL (Howsmyssl.Com)
Qualys SSL Labs (Ssllabs.Com)
These tools make an HTTPS request sent to the browser, and evaluate the header of the response to determine the actual level of TLS support available in that browser. You can see
the changes in the SiteGenesis code to implement the external tool in this Commit.
Feature Logic
Check the browser to see if a cookie (`dw_TLSWarning`) is set.
1. If it's set and it's false, then this browser was tested and doesn't need a warning box shown
2. If it's set and it's true, then this browser was tested and does need a warning box shown (it failed the test)
3. If it isn't set, then the browser isn't yet tested. In this case, check the USER AGENT of the browser to see if this is one of the identified browsers that should be tested. If it is an
out-of-date browser, call out to one of the external services to check the TLS level
If you could check the actual TLS level and it passes, set the cookie to false
If you could check the actual TLS level and it failed, show the warning and set the cookie to true
If you could not check the TLS level (the service is down or timed-out), then assume that because the browser itself is out-of-date, show the warning and set the cookie
to true.
3/16/23, 2:11 PM
Legacy Developer Documentation
https://documentation.b2c.commercecloud.salesforce.com/DOC1/advanced/print.jsp?topic=/com.demandware.dochelp/LegacyDevDoc/LegacyDevDoc.html&cp=…
49/158
Note: This logic makes sure there are no unnecessary calls to the external TLS evaluation service. The code only checks externally if it has not checked before and the browser is
out-of-date.
Feature Implementation
The files added or changed for the implementation are:
app_storefront_controllers/cartridge/controllers/TLS.js - changed to allow tracking.
app_storefront_core/cartridge/js/app.js - the tls.js file is loaded into the storefront client in the init() method of app.js. If your implementation doesn't have an
app.js, make sure that the tls.js file is loaded in the init() method of your main client-side *.js file.
app_storefront_core/cartridge/js/tls.js - When a warning is indicated, the routine in tls.js that shows the warning is called showWarning(). Our implementation
causes a message to be inserted into an omnipresent, but generally hidden <div> called browser-compantibility-alert.
Note: You might wish to modify this routine to show the message elsewhere, pop up a dialog box.
app_storefront_core/cartridge/scripts/util/Resource.ds - changed to allow tracking.
app_storefront_core/cartridge/scss/default/_slots.scss - contains the SASS CSS styling information for our warning box (if you implemented your storefront on
an older version of SiteGenesis, you might not have this file - you will want to edit whatever file contains your CSS information.
app_storefront_core/cartridge/templates/resources/locale.properties - contains the warning message for localization
app_storefront_pipelines/cartridge/pipelines/TLS.xml - changed to allow tracking.
Out-of-Date Browser List
The list of out-of-date browsers can be customized. The list implemented in SiteGenesis is based on information in the Qualys SSL Labs Client List and includes the browsers listed in
the following table.
Internet Explorer Android Safari
MSIE 6.0
MSIE 7.0
MSIE 8.0
MSIE 9.0
MSIE 10.0
Android 2.3.7
Android 4.0.4
Android 4.1.1
Android 4.2.2
Android 4.3
Safari 5.1.9/OSX 10.6.8
Safari 6.0.4/OSX 10.8.4
Tracking Statistics
The implementation of tracking in the Resource.ds, TLS.xml, and TLS.js files lets you track the number and type of out-of-date browser visits by your customers. The code calls dummy
pipelines upon detection of a bad TLS level or an out-of-date browser. These pipeline calls can then be referenced in the Business Manager using the Pipeline Profiler so that B2C
Commerce clients can compile reports of the numbers and types of detected/reported occurrences. There is a performance impact to this reporting technique, so it can be
eliminated if there are any concerns about this particular implementation approach.
Approach 2: Request CSS from HTTPS
Request some CSS via HTTPS and show a warning if HTTPS is not supported. There are several advantages to this approach:
simple to implement
does not rely on any third party products
checks the capacity of TLS itself, instead of other information and thus works even in unknown browser/OS situations
However, you can't track the actual TLS level and USER AGENT of browser s being used by your customers.
This approach only works after the support for older browsers is removed. You can't use this approach before support is removed to warn customers, because HTTPS is available at
that point.
In app_storefront_core/cartridge/templates/default/components/browsertoolcheck.isml:
<div class="browser_compatibility_alert" id="http_support_alert">${Resource.msg('https.not.supported', 'components',null)}</div>
In app_storefront_core/cartridge/templates/resources/components.properties.
https.not.supported=HTTPS Not Supported. Please upgrade your browser to the latest version.
In app_storefront_core/cartridge/static/default/css/https_support.css. Previously, this was located in the rich_UI cartridge.
https_support_alert {display:none}

3/16/23, 2:11 PM
Legacy Developer Documentation
https://documentation.b2c.commercecloud.salesforce.com/DOC1/advanced/print.jsp?topic=/com.demandware.dochelp/LegacyDevDoc/LegacyDevDoc.html&cp=…
50/158
In app_storefront_core/cartridge/templates/default/components/header/htmlhead_UI.isml. Previously, this was located in the rich_UI cartridge.
<link rel="stylesheet" type="text/css" href="../topic/com.demandware.dochelp/LegacyDevDoc/${URLUtils.httpsStatic('/https_support.css')}"
© Copyright 2000-2023, Salesforce, Inc. All rights reserved. Various trademarks held by their respective owners. Show URL Submit Feedback Privacy Policy
2.7.3. Configuring Storefront Preferences
Any new site includes several optional features configured as custom preferences, such as slide show effects, responsive design, and multi-destination shipping.
1. Select site > Merchant Tools > Site Preferences > Custom Preferences > Storefront Configs.
2. On the Custom Site Preferences page, select the instance type (if you are changing the type).
The instance type is applied immediately. This affects other Business Manager modules with settings that are specific to a selected instance type.
Sandbox / Development
Staging
Production
3. Enter the tag that will be used by the storefront application as a Google verification tag.
This is the Google tag used to verify the site.
4. Enter the email addresses to be sent the build notifications, separated by a semi-colon.
This enables you to send email notification to one or more email addresses when a new build is available.
5. Select TLS if you want a TLS check to occur based on whether or not a cookie ('dw_TLSWarning') has been set on the browser.
6. Select the default country code for store searches.
7. Enter a customer service email address for automated replies.
8. Specify if you want to disable responsive web design, which is enabled by default.
9. Specify if you want to enable automatic scrolling to the next and previous page (infinite scrolling), instead of navigation controls such as first, next, previous, last, and page
numbers.
10. Specify if you want to enable your storefront application to ship to multiple locations.
11. Specify if you want to enable in-store pickup. If you enable this feature, you can also specify the following:
Default country code
Store lookup unit: kilometers or miles (default)
Store lookup maximum distance: NONE, 50, 75, 100, 150, 200
If you also enable multi-ship, the storefront behavior will change.
See Understanding in-Store Pickup.
12. Enter the default list price book ID to be used by the storefront.
13. Enter the rate limiter threshold value (integer greater than zero).
This number represents the number of times failures for Logins, GiftCert Balances, and Order Tracking requests are allowed before showing a CAPTCHA-style popup rate
limiter.
14. Select the slide show effect you want to use for your carousel.
See http://jquery.malsup.com/cycle/browser.html for a complete list of visual effects.
15. Specify the store lookup maximum distance: None or 50 to 200.
16. Specify the store lookup unit of measure: None, kilometers (km), or miles (mi).
17. Click Apply to save your changes.
© Copyright 2000-2023, Salesforce, Inc. All rights reserved. Various trademarks held by their respective owners. Show URL Submit Feedback Privacy Policy
2.7.4. Categories Don't Show in Storefront
When categories don't appear in the storefront, you need to do some troubleshooting.
3/16/23, 2:11 PM
Legacy Developer Documentation
https://documentation.b2c.commercecloud.salesforce.com/DOC1/advanced/print.jsp?topic=/com.demandware.dochelp/LegacyDevDoc/LegacyDevDoc.html&cp=…
51/158
Have you created a category structure in the storefront catalog for your site?
Are the categories on line?
Do the categories contain available products?
Is the Show in Menu Navigation option enabled for the category?
In SiteGenesis, you must enable the category system object showInMenu attribute for a specific catalog for categories to appear in the storefront. You enable the attribute in Business
Manager.
1. Select site > Merchant Tools > Products and Catalogs > Catalogs.
2. On the Catalogs page, find the catalog with your site listed in the Site Assignments column. This is the storefront catalog. The SiteGenesis storefront catalog is storefront-
catalog-en.
3. Click Edit for the storefront catalog.
4. On the Catalog page General tab, click the Category Attributes tab.
5. On the Catalog page Category Attribute tab, in the custom section, make sure that the Show in Menu Navigation box is checked.
6. If you are developing your own site, you must create an attribute similar to the showInMenu attribute for the category system object that is used by SiteGenesis. If you search in
the SiteGenesis cartridges for showInMenu, you can see how to implement the attribute in your code.
© Copyright 2000-2023, Salesforce, Inc. All rights reserved. Various trademarks held by their respective owners. Show URL Submit Feedback Privacy Policy
2.7.5. Cookies Notification/Opt-in for European Cookie Law
European Cookie Law requires websites to notify customers that cookies are being used and how. The SiteGenesis application uses an optional content asset, called cookie_hint,
to contain this notice.
If this asset is... Then...
Missing or offline No notice will be given. The cookies will be set as they always have been. This is used in the USA, for example.
Present and online* The cookie_hint content will appear. Clicking I ACCEPT sets the cookies and causes the popup to not appear again.
Note: *Customers can also add a Close button if they want a more relaxed interpretation of the Cookie Law. We exclude the Privacy page so that it can be read without seeing
the notification.
© Copyright 2000-2023, Salesforce, Inc. All rights reserved. Various trademarks held by their respective owners. Show URL Submit Feedback Privacy Policy
2.7.6. SiteGenesis and Web Content Accessibility Guidelines (WCAG)
The Web Content Accessibility Guidelines (WCAG) provide a single shared standard for web content accessibility that meets the needs of individuals, organizations, and governments
internationally. WCAG documents explain how to make web content more accessible to people with disabilities.
See http://www.w3.org/WAI/intro/wcag.
Note: Salesforce B2C Commerce doesn't guarantee or certify compliance of SiteGenesis with any WCAG level.
The SiteGenesis application was changed to conform to these guidelines. The list of changes shown here is intended to provide examples of how you can make your storefront
application more accessible:
Added context in the titles of category refinements, folder refinements, and price refinements.
Added prefixes in the set/bundle products titles for added context.
Mini cart button has the title Go to Cart and not the same text as the button.
The compare checkboxes on the category landing page product tiles now have unique label text. This was done by appending the product name to the text and visually hiding
it. Then, a span was added with just the text "Compare".
Removed the title from the image and added it to the link. The image only requires alt, not a title.
Made the title different and more contextual from the text.
Removed invalid hypertext reference and added visually hidden text.
Added visually hidden label to email form element in demo data.
Removed unnecessary titles from images, added alt where missing, and ensured that previous changes were not affected.
The user-links in headercustomerinfo.isml now include a title that adds more context to the links.
Added visually hidden text to buttons.
3/16/23, 2:11 PM
Legacy Developer Documentation
https://documentation.b2c.commercecloud.salesforce.com/DOC1/advanced/print.jsp?topic=/com.demandware.dochelp/LegacyDevDoc/LegacyDevDoc.html&cp=…
52/158
Changed titles of color refinement swatches to add more context.
The password reset link now has a title that adds context.
Changed demo data in library.xml for the footer content assets and added/modified footer titles.
Store locator and user icons now have titles that add more context.
Product item names in the cart have more contextual titles.
Added visually hidden text to the link of category landing page's slot banner.
Changed the size chart link title to add more context.
Made product action titles are different from text and add context.
Changed the title of color and size to add more context.
Added prefixes to titles.
Added visually hidden text to the social sharing links.
Added address and add credit card pages titles have more context.
Added titles to paging.
Product tile titles now contain prefixes for more context.
Removed the invalid hypertext reference error by removing the href attribute.
Breadcrumb titles have a prefix for added context.
The WCAG guidelines followed were:
Level A: 2.4.4 Link Purpose (In Context)
Level AAA: 2.4.9 Link Purpose (Link Only)
The above title-related corrections to SiteGenesis use technique H33 (http://www.w3.org/TR/2014/NOTE-WCAG20-TECHS-20140916/H33), where the link text is supplemented
with the title attribute to add more context, making it easier for people with disabilities to determine the purpose of the link.
© Copyright 2000-2023, Salesforce, Inc. All rights reserved. Various trademarks held by their respective owners. Show URL Submit Feedback Privacy Policy
2.7.7. SiteGenesis Features
SiteGenesis includes several optional features configured as custom preferences, such as slide show effects, responsive design, and multi-destination shipping.
Configuring Features in Business Manager
1. Select site > Merchant Tools > SitePreferences > Custom Preferences > Storefront Configurations.
2. On the Custom Site Preferences page, select the instance type (if you are changing the type).
Note: The instance type is applied immediately. The instance type affects other Business Manager modules with settings that are specific to a selected instance type.
Sandbox / Development
Staging
Production
3. Enter the default list price book ID to be used by the storefront.
4. Specify if you want to disable responsive design, which is enabled by default.
5. Enter the tag to be used by the storefront application as a Google verification tag.
Note: This tag is the Google tag used to verify the site.
6. Enter the email addresses to be sent the build notifications, separated by semi-colons.
Note: This syntax enables you to send email notification to one or more email addresses when a new build is available.
7. Select the slide show effect you want to use for your carousel.

3/16/23, 2:11 PM
Legacy Developer Documentation
https://documentation.b2c.commercecloud.salesforce.com/DOC1/advanced/print.jsp?topic=/com.demandware.dochelp/LegacyDevDoc/LegacyDevDoc.html&cp=…
53/158
Note:
See Http://Jquery.Malsup.Com/Cycle/Browser.Html for a complete list of visual effects.
8. Specify if you want to enable automatic scrolling to the next and previous page (infinite scrolling). You can choose this behavior instead of navigation controls such as first,
next, previous, last, and page numbers.
9. Specify if you want to enable your storefront application to ship to multiple locations.
10. Specify if you want to enable in-store pickup. If you enable this feature, you can also specify the following:
Default country code
Store lookup unit: kilometers or miles (default)
Store lookup maximum distance: NONE, 50, 75, 100, 150, 200
Note:
If you also enable multi-ship, the storefront behavior changes.
See Understanding in-Store Pickup.
11. Specify if you want to enable the AddThis widget.
a. Enable the AddThis widget.
b. Enter the AddThis version number.
c. Enter the application ID that you want to use with AddThis Connect.
d. Specify if you want the AddThis script to assume it has been added to the page after the DOM (browser - document object module) is ready.
Note: Enable if you want to dynamically add the AddThis capability to a page after the DOM has finished loading.
12. Enter a customer service email address for automated replies.
13. To save your change, click Apply.
© Copyright 2000-2023, Salesforce, Inc. All rights reserved. Various trademarks held by their respective owners. Show URL Submit Feedback Privacy Policy
2.7.7.1. SiteGenesis Locale and Multicurrency
The SiteGenesis EMEA site uses a country list in the header of the main page to set the language and currency for the site. The country is listed in each language that has a locale
enabled for the site. For example, if both fr_BE and nl_BE are enabled locales, then Belgium is listed in both French and Dutch.
Note: The standard SiteGenesis site does not support multiple locales or currencies.
Selecting a country from the list switches the site locale and changes the currency.
A customer can change the country at any point when using the site, but only on the home page of the site. This behavior is intentional, to prevent the customer from changing the
currency in the checkout process. However, if the customer clicks to the home page and changes the country, the price is shown in the new currency in the basket. Changing the
country is supported by default only for the main page, but the country selector can be enabled for any page on the site.
Application Country Selector and Multicurrency
To add a locale to the SiteGenesis EMEA site:
1. Select Administration > Global Preferences > Locales. Add the new locale.
Alternatively, in the demo_data_no_hires_images folder that contains the demo data, edit the preferences.xml file ActiveLocales preference to include the new
locale. Upload the change to the demo data.
2. Select Administration > Site Preferences > Locales. Enable the locale.
3/16/23, 2:11 PM
Legacy Developer Documentation
https://documentation.b2c.commercecloud.salesforce.com/DOC1/advanced/print.jsp?topic=/com.demandware.dochelp/LegacyDevDoc/LegacyDevDoc.html&cp=…
54/158
3. In the app_storefront_core cartridge, edit the countries.json file to include the information for the new locale.
Note: If you add a locale, you have to change code for it to be reflected on the site. If you remove a locale, you do not have to change code to have it reflected on the site.
Simply disabling the locale in the site preferences removes it from the site.
The country selector only appears on the home page. This location prevents consumers from price-shopping by currency and makes it unnecessary to check the locale for each
request. You enable the country selector on other pages using the showCountrySelector flag to true.
The implementation of the country selector:
1. In the demo_data_no_hires_images folder, review:
Folder File Description
/sites/SiteGenesisEMEA preferences.xml Sets the ActiveLocales preference, which sets the locales used by the storefront. Change this preference to add a
locale after configuring it in Business Manager. However, if you remove a locale in Business Manager, you do not
have to remove it from the ActiveLocales preference.
2. In the app_storefront_core cartridge, review the following SiteGenesis files for the country selector implementation:
Folder File Description
cartridge (at the top level) countries.json Maps countries to locales. If you are adding a locale, you must edit this file.
scripts/util Countries.ds getCountries gets the countries to appear.
scripts/util URL.ds Generates the current URL in the current locale.
scripts/checkout countryselector.isml Template for the country selector. Requires the showCountrySelector flag to be set to true in the
decorator template.
content/home/pt_storefront pt_storefront.isml Sets
pdict.showCountrySelector = true
This flag adds the country selector to the page.
3. In the app_storefront_core cartridge, review the following SiteGenesis files for multicurrency implementation:
Folder File Description
cartridge (at the top level) countries.json Maps countries to locales. If you are adding a locale, you must edit this file.
scripts/util Countries.ds getCountries gets the countries to appear.
scripts/util URL.ds Generates the current URL in the current locale.
scripts/checkout countryselector.isml Template for the country selector. Requires the showCountrySelector flag to be set to true in the
decorator template.
content/home/pt_storefront pt_storefront.isml Sets
pdict.showCountrySelector = true
This flag adds the country selector to the page.
4. In the app_storefront_core cartridge, review the following SiteGenesis files that implement multicurrency:
Cartridge File
pipelines Currency.xml
scripts/checkout CalculatePaymentTransactionTotals.ds
scripts/checkout CreateGiftCertificatePaymentInstrument.ds
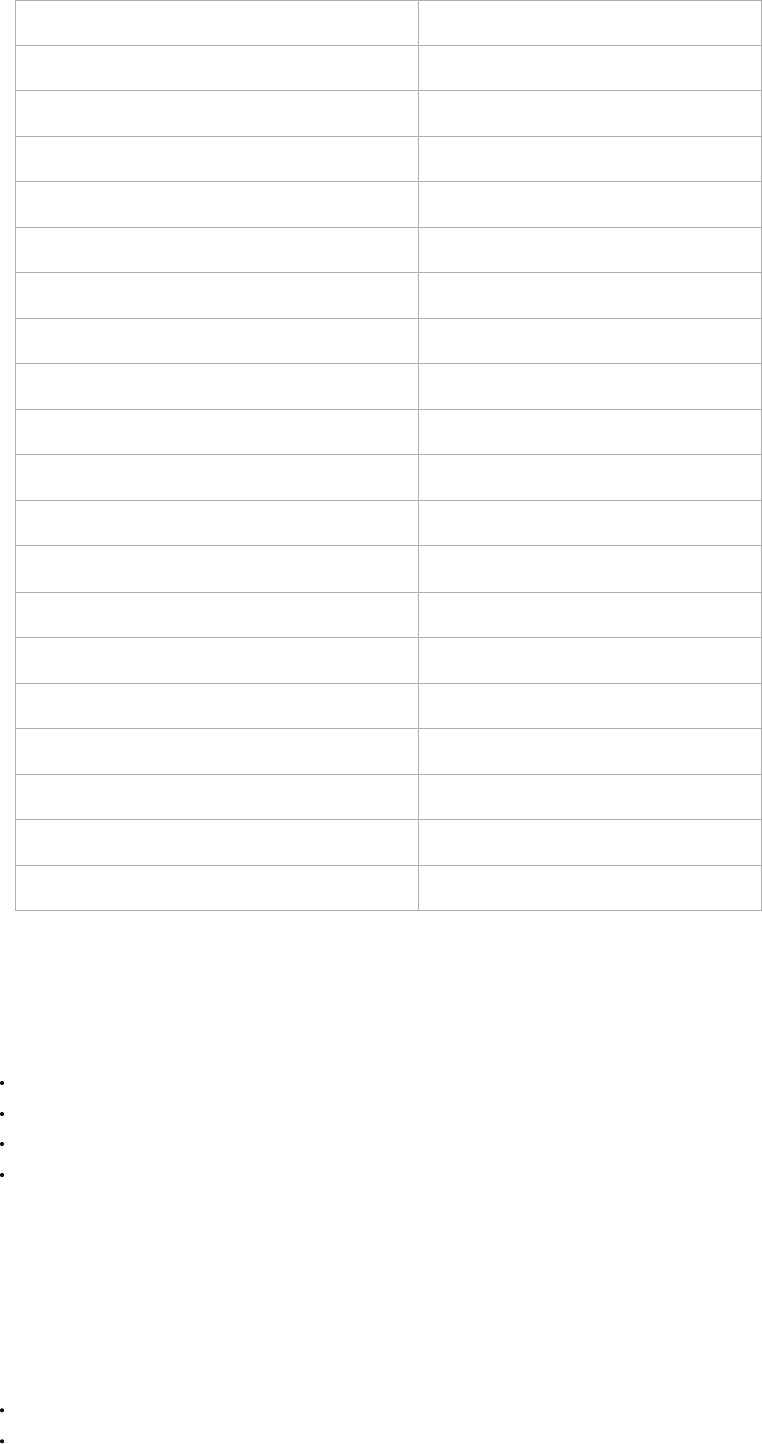
3/16/23, 2:11 PM
Legacy Developer Documentation
https://documentation.b2c.commercecloud.salesforce.com/DOC1/advanced/print.jsp?topic=/com.demandware.dochelp/LegacyDevDoc/LegacyDevDoc.html&cp=…
55/158
Cartridge File
scripts/checkout PreCalculateShipping.ds
scripts/checkout/storepickup InStoreShipments.ds
scripts/giftcert CreateGiftCertificatePaymentInstrument.ds
scripts/product ProductUtils.ds
static/default/css style.css
templates/default/checkout/billing billing.isml
templates/default/checkout/shipping shippingmethods.isml
templates/default/checkout/shipping/multishipping multishippingshipments.isml
templates/default/checkout/shipping/storepickup instoremessages.isml
templates/default/components/header headercustomerinfo.isml
templates/default/components/header multicurrency.isml
templates/default/components/order ordertotals.isml
templates/default/product productdetail.isml
templates/default/product producttile.isml
templates/default/product/components displayliproduct.isml
templates/default/product/components pricing.isml
templates/default/product/components standardprice.isml
templates/resources checkout.properties
templates/resources components.properties
5. Select Administration > Locales, configure the desired locales.
Multicurrency Configuration for SiteGenesis EMEA
Currencies
SiteGenesis EMEA supports four currencies:
EUR - Euro
JPY - Japanese Yen
CNY - Chinese Yuan
GBP - British Pound Sterling. This currency is the default currency for the site.
Price Books
Business Manager: site > Products and Catalogs > Price Books. Price books: *-sales-prices and *-list-prices for each currency)
Each currency has two price books: list and sales. The lower price of list or sales appears as the effective price for a selected currency. If a price is missing from a price book for the
selected currency, N/A appears for the price.
Option Prices
Product option prices change when a different currency is selected. SiteGenesis supports two sets of option definitions: USD and EUR.
If an option (or option price) is not defined for one option in a set of options for a selected currency, then that specific option does not appear in the option dropdown.
If an entire set of options (or prices for an entire set of options) is not defined for a selected currency, then the entire option dropdown does not appear for that currency.

3/16/23, 2:11 PM
Legacy Developer Documentation
https://documentation.b2c.commercecloud.salesforce.com/DOC1/advanced/print.jsp?topic=/com.demandware.dochelp/LegacyDevDoc/LegacyDevDoc.html&cp=…
56/158
Price refinement Buckets
Price refinement buckets change when a different currency is selected. SiteGenesis provides price refinement buckets in USD and EUR. The price refinement bucket shows the
currency symbol for the selected currency.
If price refinements are enabled for a specific category, and not defined for a specific currency, then a single default range appears as the bucket.
The low value is the price of the lowest priced product in the category.
The high value is the price of the highest priced product in the category. All ranges are in the specified currency.
Promotions
SGJC contains the following promotions, which use a currency qualifier:
Business Manager: site > Online Marketing > Campaigns. Campaign: multicurrency demo.
Business Manager: site > Online Marketing > Promotions. Promotions: 25GBP-off-dresses and 15EUR-off-dresses.
Certain promotion types are applicable to a selected currency. Non-currency based promotions (for example, 15% off) apply without adding a currency qualifier to the promotion.
Customer Groups
The currency associated with a country can trigger dynamic customer groups.
Gift Certificates
A gift certificate can be issued in a selected currency, and the currency can still be changed once it is added to the cart. When checkout begins, however, the customer can't change
the currency or the gift certificate value.
When a customer checks a gift certificate balance, SGJC returns the balance with the currency symbol of the gift certificate when it was created. This action occurs regardless of the
currency selected in the header.
Gift Certificates can only be redeemed for the currency in which they were issued. If the customer enters a valid gift certificate number using the wrong currency, an error message
appears.
Shipping Methods
Business Manager: site > Merchant Tools > Ordering > Shipping Methods.
Only the defined and enabled shipping methods for a specific currency appear when a currency is selected. SiteGenesis provides different shipping methods for all supported
currencies. SiteGenesis includes currency-specific shipping methods because a shipping method can have only one currency defined.
Wish List or Gift Registry
Wish list and gift registry items reflect the price of the selected currency. If the currency is not defined in the price book for an item, the price appears as N/A.
Taxes
Tax rules for multicurrency/multiple-country scenarios are based on the existing tax feature. SiteGenesis EMEA is configured as taxation = GROSS. Any EUR priced items have gross
calculation, unlike standard SiteGenesis, which uses net calculation.
Payments
SGJC accepts payment in the selected currency. Although Salesforce B2C Commerce enhancements allow the qualification (or disqualification) of payment types based on the
currency selected, this behavior is not implemented in SGJC.
Order History
Orders are saved in the currency in which they were placed, and appear with that currency (using the respective symbol) in the Business Manager Ordering module and in SiteGenesis
(regardless of the currency selected). See Managing Orders.
Zero (0) Shipping Costs
SiteGenesis uses a custom attribute on a shipping method to support a 0 shipping cost for multicurrency. These files use this attribute:
Cartridge Folder File
SiteGenesis Storefront Core cartridge templates/default/checkout/shipping/multishipping multishippingshipments.isml
templates/default/checkout/shipping/storepickup instoremessages.isml
templates/default/checkout/shipping shippingmethods.isml
templates/default/checkout/shipping/storepickup InStoreShipments.ds
This feature is supported by the shipment object's Boolean attribute storePickupEnabled. This attribute determines if the shipping method appears as an in-store shipping method.
The cost is set in Business Manager, with the default values set to 0.00 for the 005 and EUR005 shipping methods.
Related Links

3/16/23, 2:11 PM
Legacy Developer Documentation
https://documentation.b2c.commercecloud.salesforce.com/DOC1/advanced/print.jsp?topic=/com.demandware.dochelp/LegacyDevDoc/LegacyDevDoc.html&cp=…
57/158
Configuring Storefront Preferences
Managing Orders
© Copyright 2000-2023, Salesforce, Inc. All rights reserved. Various trademarks held by their respective owners. Show URL Submit Feedback Privacy Policy
2.7.7.2. SiteGenesis JavaScript Controller (SGJC) Cart Calculation
The SiteGenesis application uses the Open Commerce API cart so that OCAPI applications (such as DSS) can use the SiteGenesis pipelines without having to reconcile two separate
carts.
The calculate cart functions are located in a JavaScript module, calculate.js, which is referenced (via the OCAPI hook mechanism) by the CalculateCart.ds script file. You can
use OCAPI for any customization or link integration done in the script version of calculate cart.
Note: Prior to Release 15.1, there were two versions of CalculateCart, a Salesforce B2C Commerce script version (js) and an OCAPI version (java).
Cart Pipeline
The Cart.xml pipeline processes the cart, which shows promotions along with any prices. The Cart-Calculate subpipeline calls the cart/CalculateCart.ds script before
returning to the calling subpipeline. If the basket is null, a new basket is created using GetBasket. This pipeline includes a private start node (Calculate), a call node (Cart-
GetExistingBasket), two pipelets (Assign and Script) and two end nodes. The Script pipelet executes the cart/CalculateCart.ds script file.
For more information about the cart calculation hook, see the current version of the OCAPI documentation.
© Copyright 2000-2023, Salesforce, Inc. All rights reserved. Various trademarks held by their respective owners. Show URL Submit Feedback Privacy Policy
2.7.7.3. SiteGenesis CAPTCHA and Rate Limiting
The SiteGenesis application rate limiting feature tracks the number of failures for specific functions taking place within a session, for example, login, gift card balance, and order
tracking access attempts. When SiteGenesis pipelines (and controllers) are called too many times in a session, a CAPTCHA appears that requires human intervention, and slows down
any brute force attack.
Schedule the retry value in Business Manager.
Related Links
Implementing Forgot Passwords
© Copyright 2000-2023, Salesforce, Inc. All rights reserved. Various trademarks held by their respective owners. Show URL Submit Feedback Privacy Policy
2.7.7.4. SiteGenesis Content Sharing
SiteGenesis Pipelines (SGPP) and JavaScript Controller (SGJC) use the content library SitegenesisSharedLibrary. However, you can import another site into SiteGenesis to showcase
that two sites can use the same content library.
The steps to install a second site(SiteGenesisCollections) and the cartridge that goes with it can be found in the GitHub repository
(https://github.com/SalesforceCommerceCloud/sg-dev-tools) under the directory 'content-sharing-cartridge'.
The altered meta data files include:
sg20_demo_data_no_hires_images/libraries/SitegenesisSharedLibrary/library.xml
sg20_demo_data_no_hires_images/sites/SiteGenesis/preferences.xml
The moved content files include:
static/default/css/aboutus.css
static/default/images/gift-certificates.png
static/default/images/logviewer_ico.gif
static/default/images/myaccount*.png
static/default/images/open_orders_ico.gif
static/default/images/payment_methods_ico.gif
static/default/images/product_set_ico.gif
static/default/images/roles_ico.gif
static/default/images/users_ico.gif
images in static/default/images/stores
images in static/default/images/Cart
images in static/default/images/Landing
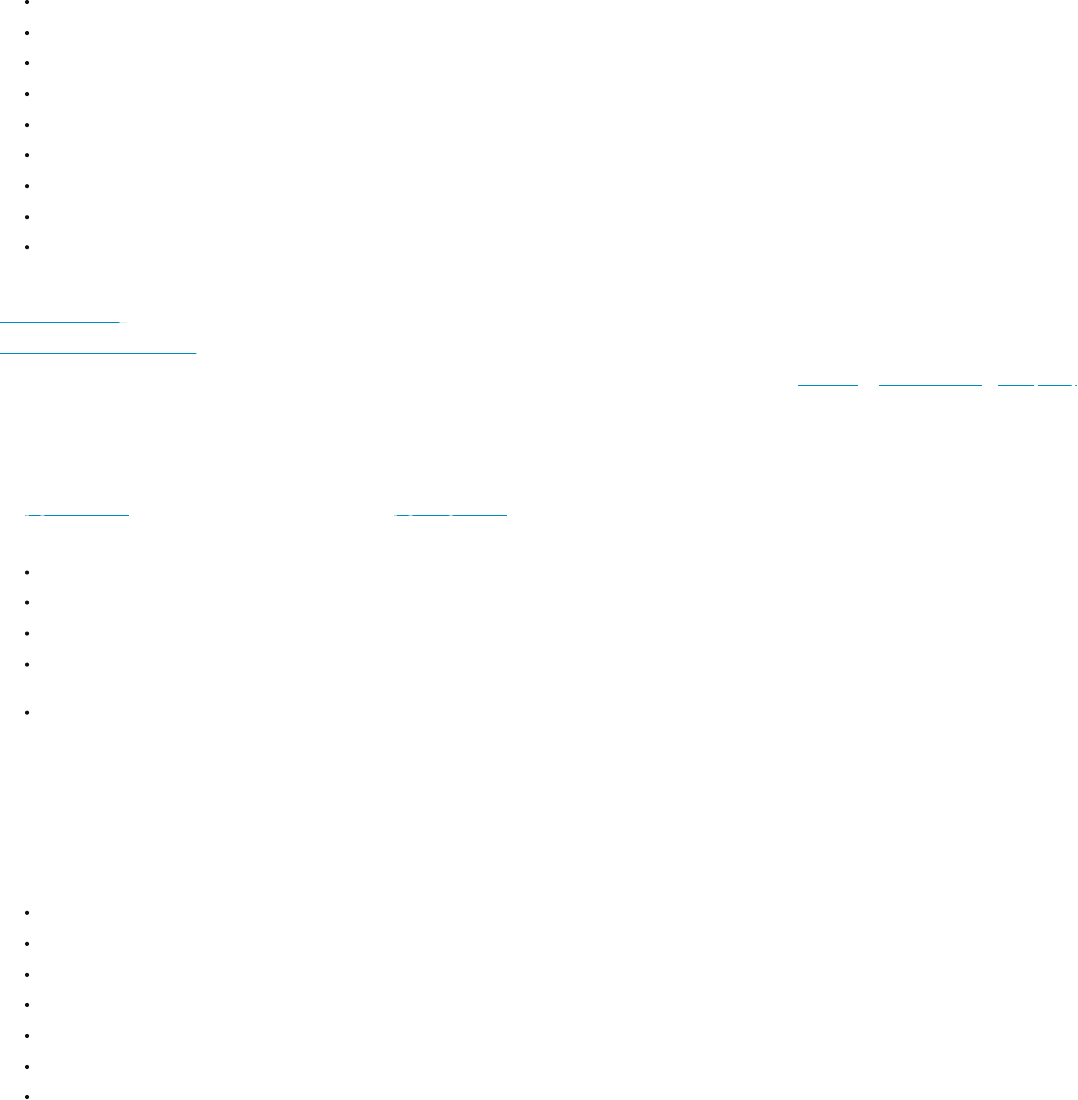
3/16/23, 2:11 PM
Legacy Developer Documentation
https://documentation.b2c.commercecloud.salesforce.com/DOC1/advanced/print.jsp?topic=/com.demandware.dochelp/LegacyDevDoc/LegacyDevDoc.html&cp=…
58/158
images in static/default/images/asSeenIn
images in static/default/images/buyingGuides
images in static/default/images/flash
images in static/default/images/homepage
images in static/default/images/slot/landing
images in static/default/images/slot/sub_banners
images in static/default/images/slots/categorylandinglowerbanners
images in static/default/images/slots/categorylandingmainbanners
Related Links
Active Merchandising
Checklist for Active Merchandising
© Copyright 2000-2023, Salesforce, Inc. All rights reserved. Various trademarks held by their respective owners. Show URL Submit Feedback Privacy Policy
2.7.7.5. SiteGenesis Dynamic Payment Processing
The SiteGenesis application supports dynamic payment processing, which makes it easy for you to add new payment methods to your storefront application.
The payment method is what is offered to the customer, while the payment processor is what integrates with a payment provider. The SiteGenesis application uses a generic approach
to payment authorization that:
Reduces the amount of code changes required to the storefront implementation itself for a new payment processor
Relies on integration logic in components outside of the storefront cartridge
Supports the independence of storefront business logic and payment integration components
Supports the rapid plug-in of payment provider specific logic into existing SiteGenesis storefront business logic without changing SiteGenesis code, for example, for payment
LINK cartridges
Enables better updatability of payment LINK cartridges
To integrate a new payment processor, start by creating a new payment type by selecting site > Ordering > Payment Processors | Payment Methods. Next, integrate the payment
processing methodology into your application using the SiteGenesis code as an example. SiteGenesis provides a generic pipeline-structure that is called in COBilling and
COPlaceOrder (in the SiteGenesis Storefront Core cartridge) for handling and authorizing the selected payment method, thus avoiding a static verification of the selected method.
The actual reference from the selected payment method to the integration code is payment processor specific and not payment method specific.
Existing Sample Pipelines
You can use existing sample pipelines for preexisting payment processors such as:
BASIC_CREDIT
BASIC_GIFT_CERTIFICATE
CYBERSOURCE_BML
CYBERSOURCE_CREDIT
PAYPAL_CREDIT
PAYPAL_EXPRESS
VERISIGN_CREDIT
This sample code merely illustrates the pattern of payment integration. These pipelines provide no real integration into external payment systems, such as PayPal or Cybersource.
However, existing integration code (either from LINK cartridges or custom integration logic) can be easily migrated into the above pattern to be called appropriately by the
SiteGenesis storefront
Example: Integration of Payment on Delivery
In Business Manager:
1. Create a new payment processor
2. Create a new payment method (or reuse an existing one) and assign the new payment processor.
In Studio:
1. Create a new provider specific pipeline (with the name {PaymentProvider}.xml).
2. Add and implement the start node Handle with the provider / method specific form validation and payment instrument creation:

3/16/23, 2:11 PM
Legacy Developer Documentation
https://documentation.b2c.commercecloud.salesforce.com/DOC1/advanced/print.jsp?topic=/com.demandware.dochelp/LegacyDevDoc/LegacyDevDoc.html&cp=…
59/158
3. Add and implement the start node Authorize with the provider / method specific payment authorization logic.
Relates Links
Managing Payment Methods
Managing Payment Processors
© Copyright 2000-2023, Salesforce, Inc. All rights reserved. Various trademarks held by their respective owners. Show URL Submit Feedback Privacy Policy
2.7.7.6. SiteGenesis Gift Registry and Wish List Features
If you want to add gift registry functionality to an existing site, you need to understand how this functionality works within the SiteGenesis application, specifically with gift registry
and wish list specific templates and pipelines.
Products are added to a wish list or gift registry on the product details page and the Quickview page (see the SiteGenesis Wireframes).
1. Start by comparing the SiteGenesis application against your application to identify the storefront changes needed.
2. Modify the account-landing content asset (or your application's equivalent) to include an Add to Gift Registry or Add to Wish list link.
3. Modify your existing files so they perform like SiteGenesis relative to the following files, which are located in the SiteGenesis Storefront Core cartridge, unless indicated
otherwise:
Option Description
Form definitions
cart.xml Specifies action: addToGiftRegistry and addToWishList.
product.xml Specifies action: addtogiftregistry and addtowishlist.
productlists.dita Contains the form for the gift registry.
profile.xml Registers a customer.
sendtofriend.xml Contains the form for sending an email to a friend.
Pipelines
Cart.xml Handles GiftRegistry-ReplaceProductListItem and Wishlist-
ReplaceProductListItem in the AddProduct Start node (from gift registry or
wish list page). This is used only for the simple UI.
GiftRegistry.xml Contains workflows that enable customers to create and maintain one or more gift
registries.
GiftRegistryCustomer.xml Renders a public gift registry, which can be accessed by people other than the
owner.
Wishlist.xml Contains workflows that enable a customers to create and maintain a wish list.
ProductList.xml Provides utility workflows associated with product lists such as a wish list or a gift
registry
Script
productlist/GenerateShipmentName.ds Generates a shipment name for a shipment representing a product list. Generally,
a product list of type Gift Registry is given a name when the registry is created.
However, a product list of type Wish List is not always given a name. Also, there
might be more than one product list with the same name, though they represent
two different owners. For example, you could have two different gift registries
called 'My Wedding'. To generate a name, this script uses the list name first, then
the list name and the owner's name if there is already a shipment using that name,
and finally the owner's name and the type of product list if the product list doesn't
have a name. This script also assigns the ID to the list as its name if the list doesn't
have a name.
Static Files path: static/default
css/style.css Provides styling for gift registry and wish list search.

3/16/23, 2:11 PM
Legacy Developer Documentation
https://documentation.b2c.commercecloud.salesforce.com/DOC1/advanced/print.jsp?topic=/com.demandware.dochelp/LegacyDevDoc/LegacyDevDoc.html&cp=…
60/158
Option Description
css/style-responsive.css Provides styling for gift registry and wish list search for responsive design.
app.js Binds handlers to AddtoCartDisabled, AddtoCartEnabled events for
disabling/enabling wishlist/gift registry links (located in the SiteGenesis Storefront
cartridge).
Templates
checkout/cart/cart.isml Processes a gift registry shipment.
components/header/header.isml Links to the gift registry and wish list from the header.
product/compare/compareshow.isml Provides Add products to the gift registry and Add products to the wish list buttons
within product compare.
product/components/displayliproduct.isml Shows the gift registry or wish list customer if the list item is in the gift registry.
product/product.isml Provides an Add to Registry button to the product detail page. Performs a remote
include of the Product-Detail, and must reside in that related template.
Resource files path: templates/resources
account.properties Contains messages specific for ISML files in the templates/default/account
directory.
components.properties Contains messages specific for ISML files in the templates/default/components
directory.
forms.properties Contains messages specific for ISML files in the forms directory.
product.properties Contains messages specific for ISML files in the templates/default/product
directory.
4. Add the SiteGenesis gift registry files.
Option Description
Form definitions
forms/default/giftregistry.xml Metadata for the gift registry form.
Pipelines
GiftRegistry.xml Contains a set of workflows that let you create and maintain one or more gift
registries.
GiftRegistryCustomer.xml Renders a public gift registry, which can be accessed by people other than the
owner.
Scripts path: scripts/account/giftregistry
AssignEventAddresses.ds Assigns the addresses used for the gift registry event. There are two addresses: the
address to use before the event occurs and the address to use after the event
occurs. You can create new addresses. This script uses form object definitions and
form value definitions defined in the giftregistry.xml form.
AssignPostEventShippingAddress.ds Assigns the form values of the address before event to the address after event. This
script uses form object definitions and form value definitions defined in the
giftregistry.xml form.
CopyAddressFormFields.ds Copies the gift registry event address form fields, clears the form, and copies the
values back to the form. This is done to maintain the state of the form when
creating a new gift registry and the customer clicks the Previous button.
InitializeAddressOptionsd.ds Initializes the selected radio buttons for the addresses used for the event's before
and after shipping addresses.

3/16/23, 2:11 PM
Legacy Developer Documentation
https://documentation.b2c.commercecloud.salesforce.com/DOC1/advanced/print.jsp?topic=/com.demandware.dochelp/LegacyDevDoc/LegacyDevDoc.html&cp=…
61/158
Option Description
UpdaterRegistryAddress.ds Ensures that shipments representing gift registries have an address in place.
Because a gift registry shipping address can change based on the date of the gift
registry event, this ensures that the address that appears on the summary page is
the up-to-date address.
Templates path: account/giftregistry
addresses.isml Provides the second step of the gift registry creation logic: participant addresses,
and provides address-related gift registry actions such as address changes.
eventparticipation.isml Provides the first step of the gift registry creation logic: event participants.
giftregistryconfirmation.isml Provides the third step of the gift registry creation logic: the final confirmation.
giftregistrylanding.isml Creates the gift registry landing page, which provides search and account create
facilities.
giftregistryresults.isml Shows the results of the gift registry search.
giftregistrysearch.isml Shows the form to search the gift registry.
navigation.isml Shows the form navigation buttons for the gift registry.
pt_giftregistry.isml Provides the page type (decorator template) file for gift registry display.
purchases.isml Shows the gift registry purchases form.
refreshregistry.isml Intentionally empty.
registry.isml Renders the gift registry form and provides basic actions such as item updates and
publishing.
registrycustomer.isml Renders a public gift registry, which can be accessed by people other than the
owner.
registrylist.isml Shows the current gift registries and enables the creation of a new registry.
registryselect.isml Selects a gift registry from a list of gift registries, for example, found by the registry
search.
5. Add the SiteGenesis wish list files:
Option Description
Form definitions
wishlist.xml Metadata for the wish list form.
Pipelines
Wishlist.xml Contains a set of workflows that let you create and maintain a customer's wish list.
Templates path: account/wishlist
pt_wishlist.isml Provides the page type (decorator template) file for the wish list display.
refreshwishlist.isml Empty file.
wishlist.isml Renders the wish list page.
wishlistlanding.isml Contains the login form specific for the wish list.
wishlistresults.isml Shows the wish list search results.
3/16/23, 2:11 PM
Legacy Developer Documentation
https://documentation.b2c.commercecloud.salesforce.com/DOC1/advanced/print.jsp?topic=/com.demandware.dochelp/LegacyDevDoc/LegacyDevDoc.html&cp=…
62/158
Option Description
wishlistsearch.isml Shows the form to search the wish list.
6. Add this script: scripts/account/wishlist/SetShippingAdress.ds.
7. Use these API classes:
ProductList
ProductListItem
ProductListItemPurchase
ProductListMgr
ProductListRegistrant
© Copyright 2000-2023, Salesforce, Inc. All rights reserved. Various trademarks held by their respective owners. Show URL Submit Feedback Privacy Policy
2.7.7.7. SiteGenesis Forgot Password
SiteGenesis resets passwords using an email. On the My Account Login page, the customer clicks Forgot Password? A new window opens, asking for the customer's email address.
When the customer enters an email address and then clicks Send, Salesforce B2C Commerce:
1. Validates that the input is a syntactically valid email address. If not, shows a message to the customer to enter another email.
2. Retrieves the Customer object with the given login. If the customer isn't found, shows an error: "No matching email address was found."
3. Calls the API to generate a reset-password code for the Customer. This will be valid for 30 minutes and will invalidate any previously generated code.
4. Constructs an email with a hyperlink back to the current site, containing the token in the querystring. The email is generated by a simple template that is stored in SiteGenesis.
5. Sends the email to the address stored in the customer profile.
6. Show a message to the customer: "Thanks for submitting your email address. We've sent you an email with the information needed to reset your password. The email might
take a couple of minutes to reach your account. Check your junk mail to ensure you receive it." (See Security Considerations below.)
When the customer receives the email and follows the link, the SiteGenesis Account pipeline is triggered, which calls the ValidateResetPasswordToken pipelet to find the customer
associated with the token on the querystring. There are two cases:
If the customer isn't found, or if the token is expired, B2C Commerce redirects to a page where a customer can request another password-reset.
If the customer is found and token is valid, B2C Commerce shows a window (modifiable template) prompting the customer to enter their new password twice.
When customer submits the form, the following occurs:
1. The pipeline validates the token again. (It might have expired in the meantime.) If the token is expired, B2C Commerce redirects to a page where a customer can request
another password-reset.
2. The pipeline calls the API to set the customer password using the token. In this process, the token is compared with the token stored in the Customer record. If the token is
invalid or expired, or the password isn't valid according to site rules, then B2C Commerce shows an error message.
3. If successful, the customer is logged in with the new password, B2C Commerce sends an email to the customer that the password has changed, and shows a confirmation
page.
Security Considerations
Several customer-facing account management and authentication components request user email addresses and report to the customer whether or not these addresses are valid
user names. An attacker could use one of these pages to enumerate valid user names, which in turn facilitates password brute-forcing or phishing attacks.
To address this concern in SiteGenesis, the Account-PasswordResetDialog shows the same message whether or not the email address exists in the customer records.
The following common message appears:
Thanks for submitting your email address. We’ve sent you an email with the information needed to reset your password. The email might take a couple of minutes to reach your
account. Check your junk mail to ensure you receive it.
Update Password Page Where the Customer Must Enter Old and New Password
The SetCustomerPassword pipelet optionally validates the customer's existing password before setting a new password. You can use this to implement an Update Password page
where the user must enter both the new and the existing password for security reasons. The SetCustomerPassword pipelet uses the parameter VerifyOldPassword.
If this parameter is set to true, the pipelet verifies the value of the OldPassword input parameter.
If this parameter is set to false (default), the OldPassword parameter is ignored.
The following SiteGenesis Core cartridge files provide this feature:
pipelines
templates
3/16/23, 2:11 PM
Legacy Developer Documentation
https://documentation.b2c.commercecloud.salesforce.com/DOC1/advanced/print.jsp?topic=/com.demandware.dochelp/LegacyDevDoc/LegacyDevDoc.html&cp=…
63/158
resource bundles
pipelets
Pipelines
Use the Account.xml pipeline to implement forgot password.
Templates
Use these templates:
File Description
account/login/logininclude.isml Contains a link to the forgot your password window.
account/password/requestpasswordreset_confirm.isml Page that shows a confirmation when the password is successfully reset.
account/password/requestpasswordreset.isml Asks for an email address and sends an email when the user clicks Submit.
account/password/requestpasswordresetdialog.isml Asks for an email address and sends an email when the user clicks Submit. Similar to
requestpasswordreset.isml, but renders as a popup window instead of a top-level page.
account/password/setnewpassword_confirm.isml Shows a confirmation when the password is successfully reset.
account/password/setnewpassword.isml Page for entering a new password after following the link in the email.
mail/passwordchangedemail.isml Email that is sent when the customer successfully resets the password.
mail/resetpasswordemail.isml Email that is sent asking the customer to reset the password.
Resource Bundles
Use this resource bundle
account.properties: contains password-related text strings.
Pipelets
These pipelets perform the Forgot Password and general password functionality:
GenerateResetPasswordToken: generates a random token that can be used for resetting the password of the passed customer.
ResetCustomerPassword: generates a random password and assigns it to the supplied customer.
ResetCustomerPasswordWithToken: set the password of the specified customer to the specified value.
SetCustomerPassword: assigns the specified password to the specified customer profile.
ValidateResetPasswordToken: validates that the passed token created by a previous call to GenerateResetPasswordToken is valid.
Related Links
See the B2C Commerce API documentation.
See the SiteGenesis Wireframes for page layout details.
© Copyright 2000-2023, Salesforce, Inc. All rights reserved. Various trademarks held by their respective owners. Show URL Submit Feedback Privacy Policy
2.7.7.8. SiteGenesis Passwords
This topic describes how to create secure passwords for SiteGenesis Pipelines (SGPP) and SiteGenesis JavaScript Controllers (SGJC).
Salesforce B2C Commerce has changed the platform requirements for password account creation as part of an ongoing effort to help our customers improve site security.
As of 17.4, if you create a new customer list, by default, the platform requires a password that has:
at least eight characters
at least one uppercase character
at least one lowercase character
at least one number
no spaces

3/16/23, 2:11 PM
Legacy Developer Documentation
https://documentation.b2c.commercecloud.salesforce.com/DOC1/advanced/print.jsp?topic=/com.demandware.dochelp/LegacyDevDoc/LegacyDevDoc.html&cp=…
64/158
no special characters
You can now set password requirements in Business Manager. This means that you don't have to create a regex in your code to change your password requirements for each password
form. Instead, you can set them in Business Manager for each customer list and reference them in your SiteGenesis code.
Migrating to More Secure Passwords
If your site is built on SGPP or SGJC, B2C Commerce recommends that you upgrade the security of your storefront passwords. You can do this by making sure your SiteGenesis
password validation code has requirements at least as strong as those set for your customer list or by changing your code to reference the customer list requirements. The
recommended password requirements are best practice to protect your customers.
Configure Customer Security Settings
Configure the customer security settings on the Customer List page:
1. Password minimum length: 8
2. Enforce letters in passwords (including case sensitivity): true
3. Enforce numbers in passwords: true
4. Enforce special characters in passwords: true
5. Maximum age of passwords: (any value).
These settings are also modifiable via customer list import. Audit and security log entries are written when any security setting changes. If you have existing customer lists, the settings
on those customer lists are not changed by this new feature. However, any new customer lists are affected by this change.
Note: Customer lists created by the platform after a db-init use the new requirements by default. If you have not migrated to more secure password validation, you must import
the desired settings.
Important:
SiteGenesis does not include the default password requirements in the code for SGPP or SGJC, so you must add it if your storefront site is based on either of these versions of
SiteGensis.
Salesforce recommends that you use the configurable, server-side validation available through the B2C Commerce Script API and inform the user about the configured
settings. If you do not, your account creation form might error out and not let new accounts be created.
Update Storefront Forms for Pipelines or Controllers
In the /Templates/Default/Account/User/Registration.isml File
Find the passwordconfirm field:
<isinputfield formfield="${pdict.CurrentForms.profile.login.password}" type="password" dynamicname="true" attributes="${autocomplete_attr
Add the following code for the field, so that the customer gets feedback on how they need to change their password so that it can pass the validation:
<div class="form-row label-inline form-indent">
<isinclude template="account/passwordhint"/>
</div>
<isif condition="${!(customer.authenticated && customer.registered)}">
<isinputfield formfield="${pdict.CurrentForms.profile.login.passwordconfirm}" type="password" dynamicname="true" attributes="${autocomp
<isif condition="${pdict.passwordnomatch && pdict.passwordnomatch == true}">
<div class="error">
<div class="form-caption error-message">${Resource.msg('profile.passwordnomatch','forms',null)}</div>
</div>
</isif>
Find the field for the profile login password and add validation.
<isinputfield formfield="${pdict.CurrentForms.profile.login.currentpassword}" type="password" dynamicname="true" attributes="${autocomple
<isif condition="${pdict.passwordisbad && pdict.passwordisbad == 'true'}">
<div class="error">
<div class="form-caption error-message">${Resource.msg('profile.currentpasswordnomatch','forms',null)}</div>
</div>
</isif>
<isinputfield formfield="${pdict.CurrentForms.profile.login.newpassword}" type="password" dynamicname="true" attributes="${autocomplete_a
<div class="form-row label-inline form-indent">
<isinclude template="account/passwordhint"/>
</div>
<isinputfield formfield="${pdict.CurrentForms.profile.login.newpasswordconfirm}" type="password" dynamicname="true" attributes="${autocom
<isif condition="${pdict.passwordnomatch && pdict.passwordnomatch == 'true'}">
<div class="error">
<div class="form-caption error-message">${Resource.msg('profile.passwordnomatch','forms',null)}</div>
</div>
</isif>
<iselse/>

3/16/23, 2:11 PM
Legacy Developer Documentation
https://documentation.b2c.commercecloud.salesforce.com/DOC1/advanced/print.jsp?topic=/com.demandware.dochelp/LegacyDevDoc/LegacyDevDoc.html&cp=…
65/158
Add a new script to validate the password form field.
The example below is named CustomerPasswordValidator.ds.
/**
* CustomerPasswordValidator.ds
*
* This script gets a submitted password
*
* @input customterPasswordFormField : dw.web.FormField the password field being tested
*/
importPackage( dw.web );
exports.validateCustomerPassword = function( customterPasswordFormField : FormField )
{
var customerMgr = require('dw/customer/CustomerMgr');
var isAcceptable = customerMgr.isAcceptablePassword(customterPasswordFormField.value);
return isAcceptable;
}
Updating Pipelines
To update your forms to accommodate the new password requirements, you must edit the following SiteGenesis files in the app_storefront_core cartridge, or the equivalent
functionality in your custom code:
If you are using pipelines, in the /pipelines/Account.xml file:
1. Find the Assign node that is directly before the decision node for logging in a new customer.
2. Add a passwordisbad property and assign a default value of false to the property.
3. Find the transition out of the InvalidateFormElement and add an Assign element that includes the passwordisbad property and assigns true as the value.
Updating Controllers
If you are using controllers, in the controllers/Account.js file:
Edit the EditProfile Function
In the editProfile() function, add passwordnomatch and passwordisbad keys with values from the HTTPParameterMap to the data model.
app.getView({
passwordnomatch: request.httpParameterMap.passwordnomatch,
passwordisbad: request.httpParameterMap.passwordisbad,
bctext2: Resource.msg('account.user.registration.editaccount', 'account', null),
Action: 'edit',
ContinueURL: URLUtils.https('Account-EditForm')
}).render('account/user/registration');
}
Edit the EditForm Changepassword Action
In the editForm() function, for the handleForm function changepassword action, add a currentPasswordIsValid variable and a newPasswordsMatch variable with a default
value of true.
changepassword: function () {
var isProfileUpdateValid = true;
var hasEditSucceeded = false;
var currentPasswordIsValid = true;
var newPasswordsMatch = true;
var Customer = app.getModel('Customer');
Set the currentPasswordIsValid variable or newPasswordsMatch variable to false if the customer profile is invalid and true if it's valid and the profile edit succeeds:
if (!Customer.checkUserName()) {
app.getForm('profile.customer.email').invalidate();
isProfileUpdateValid = false;
currentPasswordIsValid = false;
}
if (app.getForm('profile.login.newpassword').value() !== app.getForm('profile.login.newpasswordconfirm').value()) {
isProfileUpdateValid = false;
newPasswordsMatch = false;
}
if (isProfileUpdateValid) {
hasEditSucceeded = Customer.editAccount(app.getForm('profile.customer.email').value(), app.getForm('profile.login.newpassword').value
if (!hasEditSucceeded) {
currentPasswordIsValid = false;
}
3/16/23, 2:11 PM
Legacy Developer Documentation
https://documentation.b2c.commercecloud.salesforce.com/DOC1/advanced/print.jsp?topic=/com.demandware.dochelp/LegacyDevDoc/LegacyDevDoc.html&cp=…
66/158
}
if (isProfileUpdateValid && hasEditSucceeded) {
response.redirect(URLUtils.https('Account-Show'));
} else {
if (!currentPasswordIsValid) {
response.redirect(URLUtils.https('Account-EditProfile', 'invalid', 'true', 'passwordisbad', 'true'));
} else if (!newPasswordsMatch) {
response.redirect(URLUtils.https('Account-EditProfile', 'invalid', 'true', 'passwordnomatch', 'true'));
}
}
Edit the EditForm Error Action
In the editForm() function, for the handleForm function error action, add additional error handling if the password doesn't meet the requirements.
error: function () {
// first, make sure current password is good
if (app.getForm('profile.login.currentpassword').value()) {
var Customer = app.getModel('Customer');
var validPassword = Customer.checkPassword(app.getForm('profile.login.currentpassword').value());
if (!validPassword) {
response.redirect(URLUtils.https('Account-EditProfile', 'invalid', 'true', 'passwordisbad', 'true'));
}
}
var complianceErrors = false;
if (app.getForm('profile.login.password').value() && !app.getForm('profile.login.password').object.valid) {
app.getForm('profile.login.password').invalidate();
complianceErrors = true;
}
if (app.getForm('profile.login.newpassword').value() && !app.getForm('profile.login.newpassword').object.valid) {
app.getForm('profile.login.newpassword').invalidate();
complianceErrors = true;
}
if (app.getForm('profile.login.newpasswordconfirm').value() && !app.getForm('profile.login.newpasswordconfirm').object.valid) {
app.getForm('profile.login.newpasswordconfirm').invalidate();
complianceErrors = true;
}
if (complianceErrors) {
response.redirect(URLUtils.https('Account-EditProfile', 'invalid', 'true'));
}
}
Edit the SetNewPasswordForm Error Action
In the setNewPasswordForm() function, for the handleForm function error action, render the setnewpassword page for the form.
error: function () {
app.getView({
ContinueURL: URLUtils.https('Account-SetNewPasswordForm')
}).render('account/password/setnewpassword');
},
In the startRegister() function, add passwordnomatch with a value from the HTTPParameterMap to the data model.
app.getView({
passwordnomatch: request.httpParameterMap.passwordnomatch,
ContinueURL: URLUtils.https('Account-RegistrationForm')
}).render('account/user/registration');
Edit the RegistrationForm Error Action
In the registrationForm() function, for the handleForm function error action, validate the profile login password and render the setnewpassword page for the form.
app.getForm('profile').handleAction({
error: function () {
// Profile Password field validation
if (app.getForm('profile.login.password').value() && !app.getForm('profile.login.password').object.valid) {
app.getForm('profile.login.password').invalidate();
}
if (app.getForm('profile.login.passwordconfirm').value() && !app.getForm('profile.login.passwordconfirm').object.valid) {
app.getForm('profile.login.passwordconfirm').invalidate();
}
app.getView({
ContinueURL: URLUtils.https('Account-RegistrationForm')
}).render('account/user/registration');
},
3/16/23, 2:11 PM
Legacy Developer Documentation
https://documentation.b2c.commercecloud.salesforce.com/DOC1/advanced/print.jsp?topic=/com.demandware.dochelp/LegacyDevDoc/LegacyDevDoc.html&cp=…
67/158
Edit the RegistrationForm Confirm Action
In the registrationForm() function, for the handleForm function confirm action, if the profile login isn't valid, set passwordsmatch to false, set passwordnomatch to true,
and render the registration page.
confirm: function () {
var email, emailConfirmation, orderNo, profileValidation, password, passwordConfirmation, existingCustomer, Customer, target;
var passwordsmatch = true;
...
if (password !== passwordConfirmation) {
app.getForm('profile.login.passwordconfirm').invalidate();
profileValidation = false;
passwordsmatch = false;
}
...
if (!profileValidation) {
if (!passwordsmatch) {
app.getView({
passwordnomatch: true,
ContinueURL: URLUtils.https('Account-RegistrationForm')
}).render('account/user/registration');
© Copyright 2000-2023, Salesforce, Inc. All rights reserved. Various trademarks held by their respective owners. Show URL Submit Feedback Privacy Policy
2.7.7.9. SiteGenesis Infinite Scrolling
Infinite scrolling is a unique visual effect on the storefront that makes it easier for merchants to promote products and information. With infinite scrolling, when the product grid
appears, and the customer scrolls down to the bottom of the page, a new page is automatically appended after the existing page.
The product grid no longer shows navigation aids such as the sort by option or the number of items per page option. But you can still change the number of products that appear
horizontally (3 or 1); beside which you will see the number of results (for example, 41 Results). When each subsequent page is appended to the first page, the added pages remain as
one long page. Scrolling backwards doesn't have the same visual effect.
Note: This isn't enabled in SiteGenesis, as it isn't considered best practice. This is both because of performance implications and business analysis of preferred user experience.
You must enable SiteGenesis infinite scroll in Business Manager.
© Copyright 2000-2023, Salesforce, Inc. All rights reserved. Various trademarks held by their respective owners. Show URL Submit Feedback Privacy Policy
2.7.7.10. SiteGenesis Mini Images Code Example
You can have code that finds matching detail images.
This snippet iterates through all mini images and finds matching detail images, for example, when a customer clicks a mini image.
var p : Product;
var m = p.getImages( 'swatch' );
var d = p.getImages( 'large' );
for( var i = 0; i < m.size(); i++ )
{
// explicit bounce checks have to be implemented in JS manually
var swatchImage = m[i];
var largeImage = d[i];
}
© Copyright 2000-2023, Salesforce, Inc. All rights reserved. Various trademarks held by their respective owners. Show URL Submit Feedback Privacy Policy
2.7.7.11. SiteGenesis Promotions
The Salesforce B2C Commerce promotion feature is implemented in the SiteGenesis application.
Element Files Comments
Pipeline
Cart.xml
Processes the cart, which shows promotions along with any prices. The Cart-
Calculate subpipeline calls the cart/CalculateCart.ds script before
returning to the calling subpipeline.
COShipping.xml Processes customer shipping details. Uses checkout/shipping/singleshipping to
check for shipping promotions. Calls checkout/shipping/shippingmethodsjson
for the shipping method.
COShipping-RequiresMultiShipping.xml Handles shipping orders to multiple locations with multiple shipping methods.
Uses checkout/shipping/multishippingshipments to check for shipping
3/16/23, 2:11 PM
Legacy Developer Documentation
https://documentation.b2c.commercecloud.salesforce.com/DOC1/advanced/print.jsp?topic=/com.demandware.dochelp/LegacyDevDoc/LegacyDevDoc.html&cp=…
68/158
Element Files Comments
promotions.
Product.xml Processes the product details and shows them on the storefront. It uses
product/product.isml, which includes promotions in the generated
information.
Script
cart/CalculateCart.ds Implements a typical shopping cart calculation algorithm. You can customize
this code to meet your specific needs and requirements. This script does the
following:
1. Determine the prices of products contained in the cart.
2. Determine the shipping cost for the shipments of the cart.
3. Determine the tax rates of all line items of the cart.
4. Determines and applies all types of promotions.
5. Calculates the totals of shipments as well as the cart.
cart/CheckForNewBonusDiscountLineItem.ds See SiteGenesis Choice of Bonus Product Implementation.
cart/GetBonusDiscountLineItem.ds See SiteGenesis Choice of Bonus Product Implementation.
cart/ParseBonusProductsJSON.ds See SiteGenesis Choice of Bonus Product Implementation.
cart/RemoveBonusDiscountLineItemProducts.ds See SiteGenesis Choice of Bonus Product Implementation.
cart/ValidateCartForCheckout.ds
Implements a typical shopping cart checkout validation against specific
conditions:
If the total price is not N/A
If products are still in site catalog and online
Product availability
This script validates product availability for all products.
Templates
checkout/billing/billing.isml
Shows the bonus product alert on the Billing page.
checkout/cart/bonusdiscountlineitems.isml Shows the select bonus product message.
checkout/cart/cart.isml Embeds promotions on the cart page within the price column.
checkout/cart/minicart.isml Shows the bonus product alert.
checkout/summary/summary.isml Shows bonus items and coupons in the summary.
checkout/shipping/multishipping/multishippingshipments.isml Visualizes the second step of the multi shipping checkout scenario. It renders a
list of all shipments (created by distinct shipping addresses) and provides a
shipping method selection per shipment. It shows all applicable shipping
promotions.
checkout/shipping/singleshipping.isml Visualizes the second step of the single shipping checkout scenario. It renders a
list of all shipments (created by distinct shipping addresses) and provides a
shipping method selection per shipment.
components/order/orderdetails.isml Implements the isorderdetails custom tag. Renders the order details. If it's a
bonus product, renders the word Bonus.
components/order/orderdetailsemail.isml Implements the isorderdetailsemail custom tag. Renders the order details in the
email. If it's a bonus product, renders the word Bonus.
product/components/bonusproduct.isml Is the rendering template for a bonus product.
3/16/23, 2:11 PM
Legacy Developer Documentation
https://documentation.b2c.commercecloud.salesforce.com/DOC1/advanced/print.jsp?topic=/com.demandware.dochelp/LegacyDevDoc/LegacyDevDoc.html&cp=…
69/158
Element Files Comments
product/bonusproductgrid/bonusproductgrid.isml Is the main template that shows all bonus products used in the bonus product
window.
product/components/ subbonusproduct/subbonusproduct.isml Renders any subproduct of a bundle or product set. Used in the
product/components/bonusproduct.isml template.
product/bonusproductjson.isml Renders a bonus discount line item in JSON format. Not used in any template.
Resource
files
checkout.properties
product.properties
locale.properties
CSS style.css Contains promotion-related style definitions (static/default/css) for bonus
products lists and bonus line items.
Related Links
See the SiteGenesis Wireframes and Functional Specifications for additional details.
See the B2C Commerce API documentation.
© Copyright 2000-2023, Salesforce, Inc. All rights reserved. Various trademarks held by their respective owners. Show URL Submit Feedback Privacy Policy
2.7.7.11.1. SiteGenesis Choice of Bonus Product Discount Implementation
Review the files within the latest version of the SiteGenesis application to implement the choice of bonus product discount feature within your storefront application.
Note: The example implementation of Bonus Choice relies on jQuery UI, a separate library from jQuery, if you copy code verbatim, make sure you include it in your templates.
Note: As SiteGenesis changes, the files names used to implement this feature might change as well.
Pipelines
Cart.xml - required start nodes:
AddProduct – check to see if a product that was added triggers a bonus product.
AddBonusProduct – add bonus product to cart.
AddBonusProductBundle – add a subproduct to the bonus product bundle.
NewBonusDiscountLineItem – when adding a new product to the cart, check to see if it has triggered a new bonus discount line item
Product.xml - required start nodes:
AddBonusProduct – adds a bonus product.
GetBonusProducts – Renders a list of bonus products for a bonus discount line item.
JavaScript
The app.js file is located in the SiteGenesis Storefront cartridge. This file handles how the storefront processes user interface elements such as page and product navigation, swatch
hover, zoom, image display, page cache initialization, the email subscription box, animation, sliders, carousel scrolling, tool tip display, site currency code/symbols, buttons, and links.
This file also handles handles the core processing of the bonus product window for selection and adding to the cart of bonus items. Search on the term "bonus" in this file to view
how bonus items are handled.
Salesforce B2C Commerce Script
The following B2C Commerce script files, located in the Storefront Core cartridge, process choice of bonus product discounts.
cart/GetBonusDiscountLineItem.ds – gets a bonus discount line item by UUID. Used in the following pipelines:
Product-GetBonusProducts
Cart-AddBonusProduct
cart/ParseBonusProductsJSON.ds – converts an HTTP parameter map to a JSON object. Used in the Cart-AddBonusProduct pipeline.

3/16/23, 2:11 PM
Legacy Developer Documentation
https://documentation.b2c.commercecloud.salesforce.com/DOC1/advanced/print.jsp?topic=/com.demandware.dochelp/LegacyDevDoc/LegacyDevDoc.html&cp=…
70/158
cart/RemoveBonusDiscountLineItemProducts.ds – deletes all products associated with a bonus discount line item. Used in the Cart-AddBonusProduct pipeline.
cart/CalculateCart.ds – when a customer selects bonus products, these products appear in the cart beneath the corresponding bonus discount line item.
For a free bonus product discount, the word BONUS appears.
For the defined price choice of products discount, the prices appear.
Note: To implement a defined price choice of products discount, you must change all your application display logic that assumes bonus products are free.
Templates
The following templates, located in the Storefront Core cartridge, process bonus products:
checkout/billing/billing.isml – accesses the resource: billing.bonusproductalert.
checkout/cart/bonusdiscountlineitems.isml – accesses the resource: product.selectbonusproduct.
checkout/cart/cart.isml – handles order bonus products, skips bonus discount line items for display cart line items, and shows bonus discount line items. Accesses the
resources: cart/updatebonusproducts.
When a bonus discount applies in the basket, SiteGenesis will show a line item in the cart even before customer selects bonus products. When the customer has selected
bonus products and closed the bonus selection page, the selected items appear at the bottom of the cart grouped together with the line item representing the discount itself.
An Update Bonus Products button appears allowing the customer to change their selection.
checkout/cart/minicart.isml – shows the minicart, including bonus items.
checkout/components/minilineitems.isml – implements the custom tag isminilineitems, which shows the line items in the minicart.
checkout/summary/summary.isml – visualizes the last step of the checkout, the order summary page prior to the actual order placing. It shows the complete content of the
cart including product line items, bonus products, redeemed coupons and gift certificate line items.
components/order/orderdetails.isml – renders the order details. If it's a bonus product, renders the word Bonus.
components/order/orderdetailsemail.isml – renders the quantity in the email. If it's a bonus product, renders the word Bonus.
product/components/bonusproduct.isml – renders a bonus product. Used in the product/bonusproductgrid.isml template.
SiteGenesis provides a link to a bonus selection page where the customer can choose bonus products. On this page, the bonus products to choose from are in the main list
view and the selected products are listed at the bottom of the page. The customer can select products in the list view by entering a quantity, and configuring the product (for
variation products, option products, and bundles), and then clicking Select. The selected products at the bottom have remove links.
The page shows the number of bonus items allowed and the currently selected number. The page prevents the customer from selecting more than the maximum allowed.
The customer must click the Add to Cart button to add the products to the cart, after which the window closes and the cart page appears.
product/bonusproductgrid/bonusproductgrid.isml – is the main rendering template that shows all bonus products used in the bonus product dialog. While it might
be necessary to use the jQuery UI, if you are going to use an alternative method, you will likely need to delete that styling.
product/components/ subbonusproduct/subbonusproduct.isml – renders any subproduct of a bundle or product set. Used in the
product/components/bonusproduct.isml template.
product/bonusproductjson.isml – renders a bonus discount line item in JSON format. Not used in any template.
product/pt_productdetails.isml – provides messaging that is similar to product bonus discount messaging. If a product is in the qualifying product list or the bonus
product list of a given promotion, the promotion appears on the product details page. This means that the API method PromotionPlan.Collection
getProductPromotions(Product product) returns a promotion if the product is on the qualifying list of the promotion, or if the promotion contains a choice of bonus
products discount that grants the product as a bonus.
A message appears telling the customer that a bonus promotion is currently active. The customer can click Select Bonus Product(s) or No Thanks.
The following template is located in the Storefront Rich UI cartridge:
resources/appresources.isml – moves product constants, resource, and messages from product.isml to a common template, and adds new bonus product messages.
Resource Files
These resources are used to show bonus product messages:
checkout.properties
billing.bonusproductalert=You are eligible for a bonus product.
Click the "Select" button to return to the cart to select your products or "No Thanks"
to continue placing the order.
cart.bonusmaxitems=This discount entitles you to {0} bonus item(s).
cart.bonusnumselected=You have selected {0} item(s).
cart.updatebonusproducts=Update Bonus Products
cart.updatebonusproduct=Update Bonus Product
cart.selectbonusproducts=Select Bonus Products
cart.selectbonusproduct=Select Bonus Product
product.properties
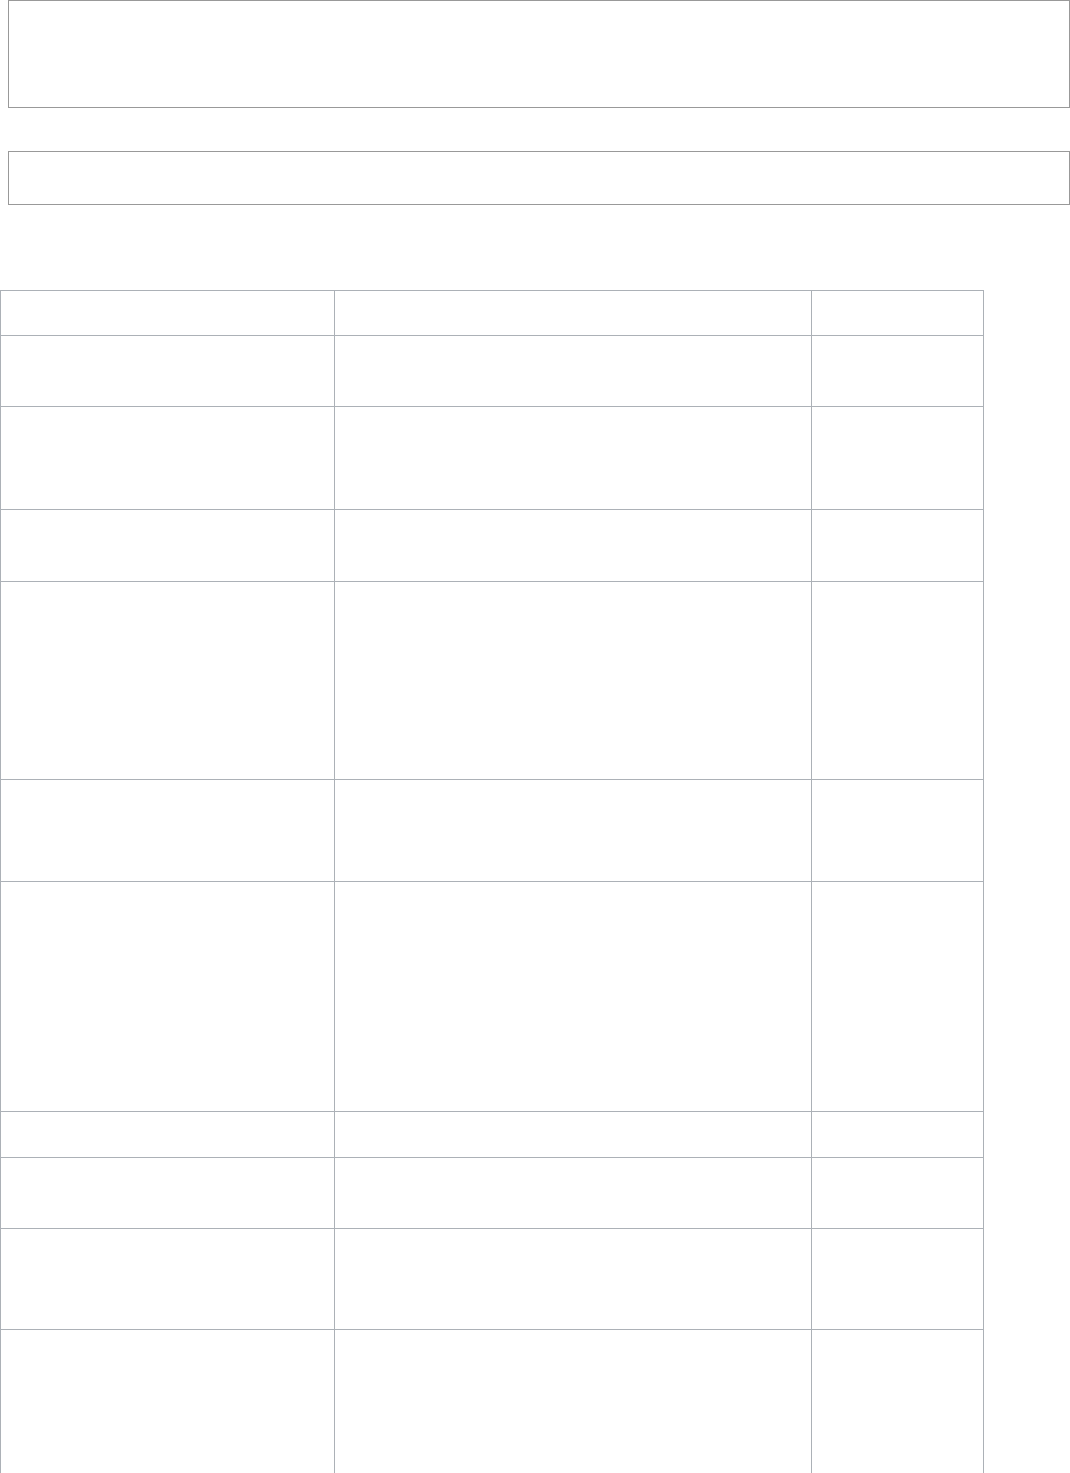
3/16/23, 2:11 PM
Legacy Developer Documentation
https://documentation.b2c.commercecloud.salesforce.com/DOC1/advanced/print.jsp?topic=/com.demandware.dochelp/LegacyDevDoc/LegacyDevDoc.html&cp=…
71/158
product.bonusproducts=Bonus Product(s)
product.bonusproduct=Bonus Product
product.bonusproducttext=Select 1 or more, Bonus Products:
product.bonusproductsmax=The maximum number of bonus products have been selected. Remove one in order to add additional bonus products.
product.bonusproductalert=You are eligible for a bonus product(s).
locale.properties
global.bonus=Bonus
global.bonusitem=Bonus Item
Resource.Msg Calls Within Templates
The following table shows the resource.msg keys that are referenced in the following templates:
Template Resource.msg key Resource file
checkout/billing.isml
billing.bonusproductalert checkout.properties
checkout/cart/bonusdiscountlineitem.isml
product.selectbonusproduct
product.bonusproducts
product.properties
checkout/cart/bonusdiscountlineitem.isml
global.nothanks
locale.properties
checkout/cart/cart.isml
checkout/components/minilineitems.isml
checkout/summary/summary.isml
components/order/orderdetails.isml
components/order/ordetailsemail.isml
global.bonus locale.properties
checkout/cart/cart.isml
global.applied
global.notapplied
locale.properties
checkout/cart/cart.isml
cart.updatebonusproducts
cart.updatebonusproduct
cart.selectbonusproducts
cart.selectbonusproduct
cart.bonusmaxitems
cart.bonusnumselected
checkout.properties
checkout/cart/minicart.isml product.bonusproductalert product.properties
product/components/bonusproductgrid.isml product.selectbonusproducts
product.properties
none
The following key is in the resource file, but not referenced by a template:
global.bonusitem
locale.properties
none
The following keys are in the resource file, but not referenced by a template:
product.bonusproduct
product.bonusproducttext
product.bonusproductsmax
product.properties
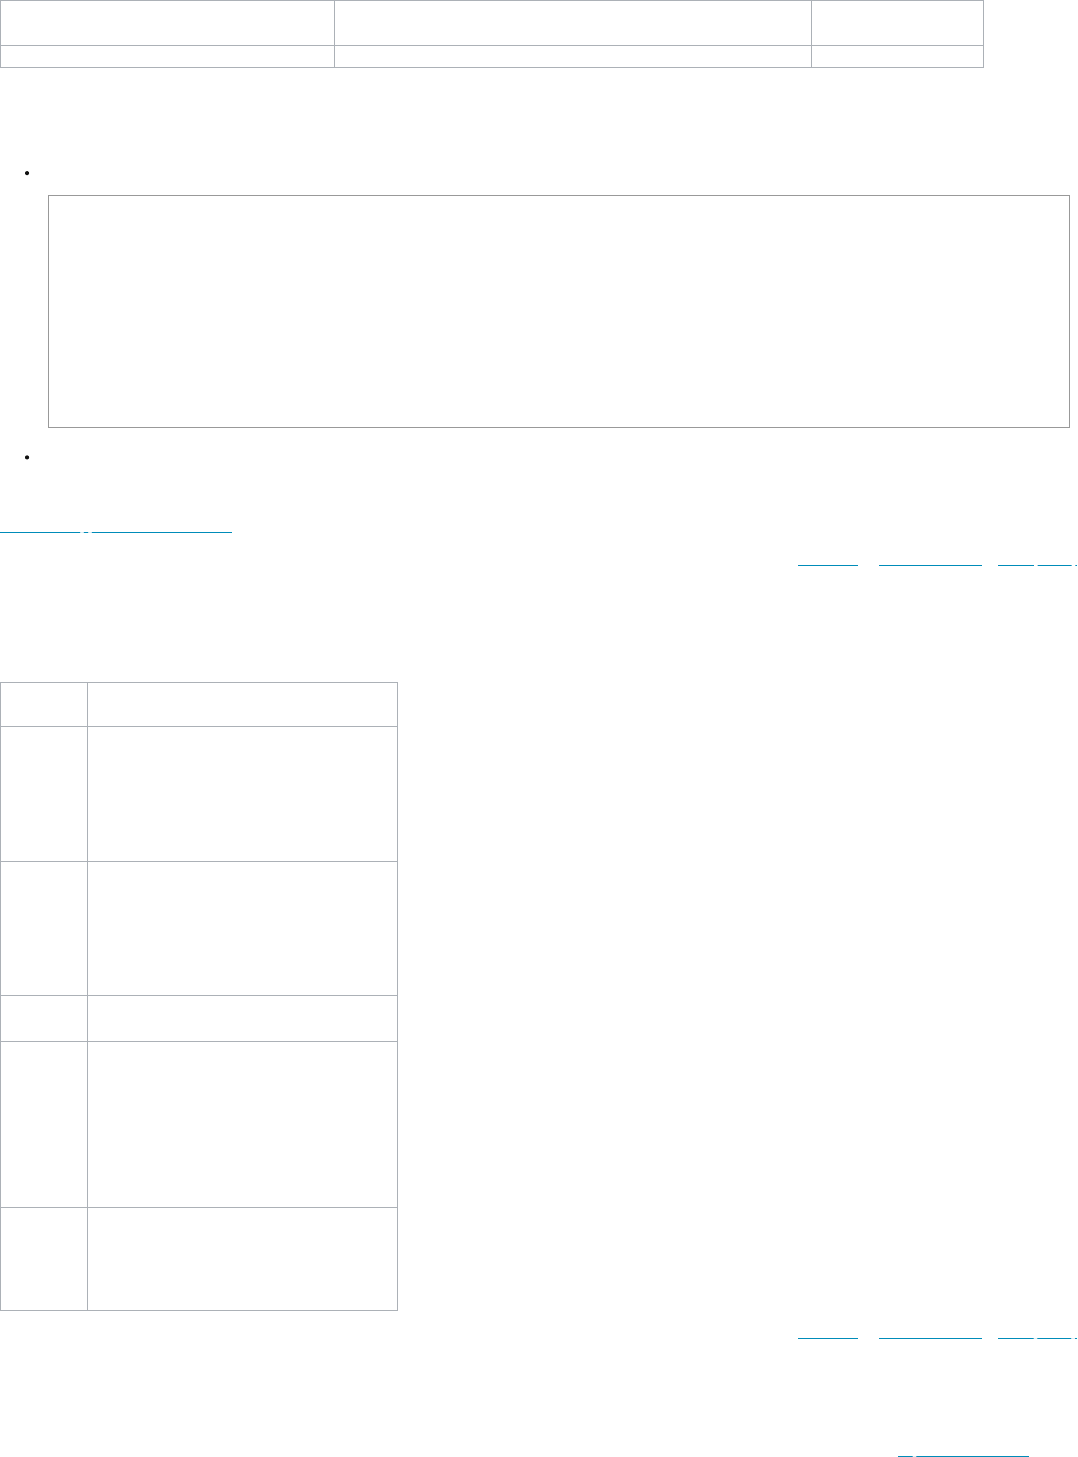
3/16/23, 2:11 PM
Legacy Developer Documentation
https://documentation.b2c.commercecloud.salesforce.com/DOC1/advanced/print.jsp?topic=/com.demandware.dochelp/LegacyDevDoc/LegacyDevDoc.html&cp=…
72/158
Template Resource.msg key Resource file
CSS
In style.css, search for:
Bonus Products section
/* bonus products */ /* ------------------------------------- */
.select-bonus-btn,
.no-bonus-btn{float:left;margin:0 5px 0 0;}
.buttonbar{margin:11px 0;overflow:hidden;width:336px;}
.bonus-product-list
.bonus-product-item{border-bottom:1px solid #E0E0E0;clear:both;}
.bonus-product-list
.product-name{float:none;margin:1em 0;}
.bonus-product-list
.product-add-to-cart button{float:left;margin-top:24px;}
.bonus-product-list-footer{clear:both;}
.bonus-product-list-footer button{float:right;}
.cart-promo lines (there are two)
Related Links
SiteGenesis Application for Promotions
© Copyright 2000-2023, Salesforce, Inc. All rights reserved. Various trademarks held by their respective owners. Show URL Submit Feedback Privacy Policy
2.7.7.11.2. SiteGenesis Coupons
The coupon feature is implemented in the SiteGenesis application as follows. Review each file to understand how the SiteGenesis application handles coupons.
Element Description
Form
billing.xml
billingcoupon.xml
cart.xml
Pipeline
Cart.xml
COBilling.xml
COSummary.xml
Script cart/ValidateCartForCheckout.ds
Template
checkout/billing/billing.isml
checkout/billing/couponapplyjson.isml
checkout/cart/cart.isml
checkout/summary/summary.isml
Resources
checkout.properties
forms.properties
© Copyright 2000-2023, Salesforce, Inc. All rights reserved. Various trademarks held by their respective owners. Show URL Submit Feedback Privacy Policy
2.7.7.11.3. SiteGenesis Source Codes
This topic applies to the Business Manager Historical reports. The Business Manager Historical reports are retired. As of January 1, 2021, the reports are no longer populated. Use the
historical reports to review metrics published before January 1, 2021. To access current data with advanced analytics and reporting capabilities, use the Reports & Dashboards.
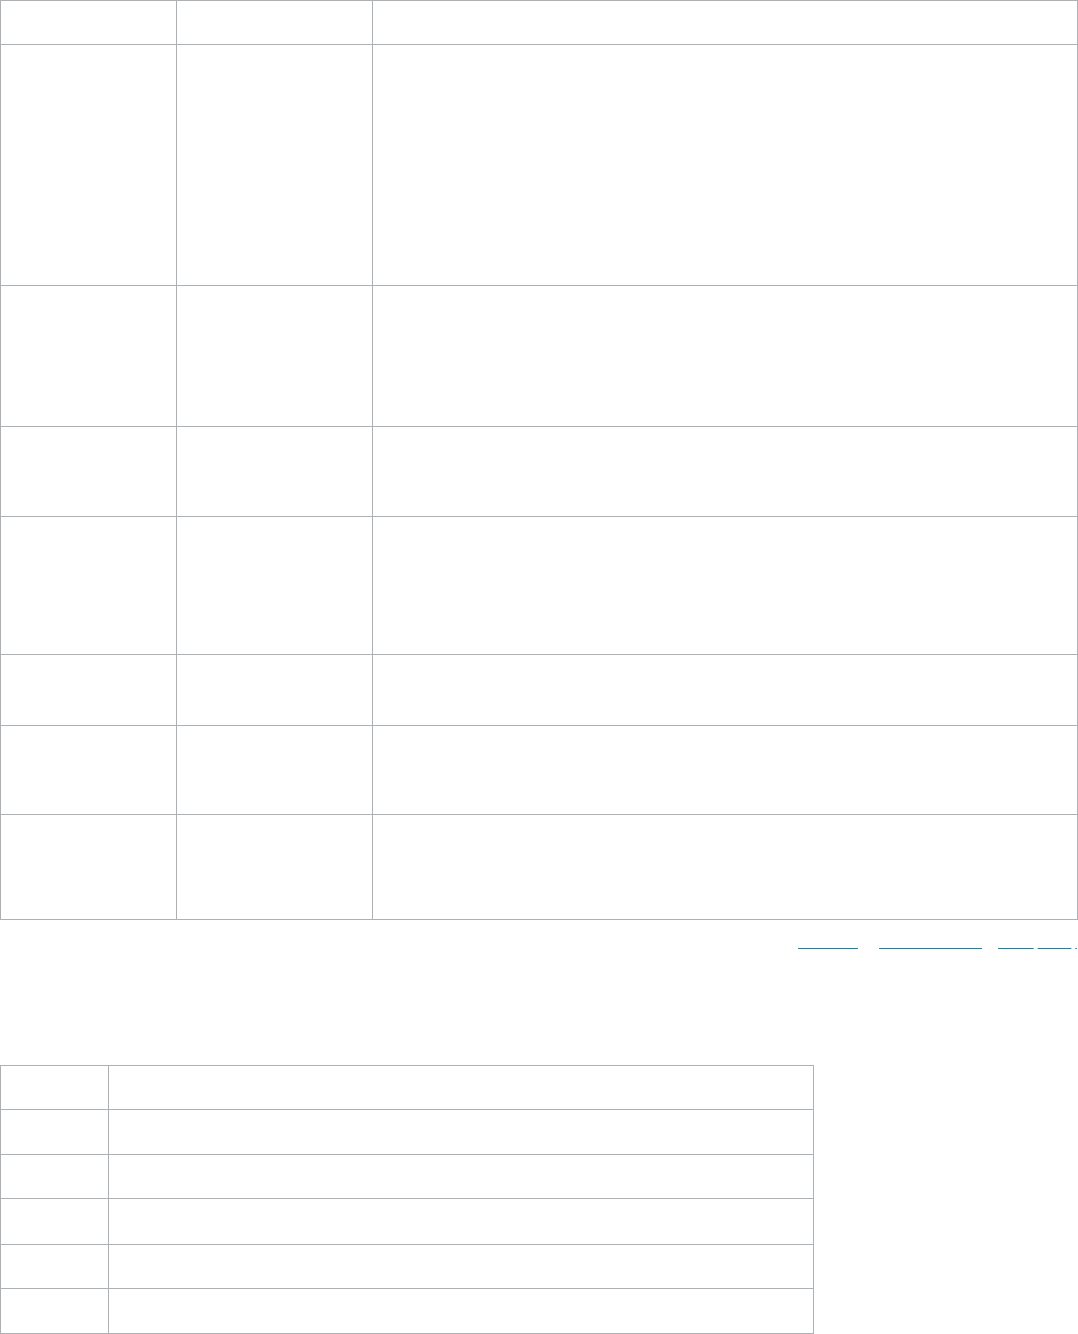
3/16/23, 2:11 PM
Legacy Developer Documentation
https://documentation.b2c.commercecloud.salesforce.com/DOC1/advanced/print.jsp?topic=/com.demandware.dochelp/LegacyDevDoc/LegacyDevDoc.html&cp=…
73/158
The source code feature is implemented in the SiteGenesis application as follows.
Path Name Description
Pipelines/Application SourceCodeRedirect.xml
This pipeline retrieves the redirect information from the last processed SourceCodeGroup (active or inactive).
If none exists, the redirect information is retrieved from the source-code preferences, based on the active/inactive
status of the SourceCodeGroup. The redirect information is then resolved to the output URL, and the next
connector is returned. If the redirect information can't be resolved to a URL, or there is an error retrieving the
preferences, then the error connector is returned.
The common/redirect interaction node links to util/redirect/redirect.isml (see below), which is a
placeholder for a reporting entry in case a source code is available. This template includes
util/reporting/ReportSourceCodes.isml (see below), which reports the use of a source code if it is
appropriate.
Pipelines/Application OnSession.xml
This pipeline is called for every new session. You can use this pipeline to select promotions or price books based
on source codes in the initial URL.
Important: For performance reasons, keep this pipeline short.
Templates/checkout/cart minicart.isml
This template includes util/ReportBasket.isml (see below), which in turn includes
util/ReportSourceCodes.isml (see below) to keep track of source code data.
Templates/util redirect.isml
This template creates a reporting entry for source codes. The source code entry page is a special pipeline that
performs a redirect at the end of using this template. Salesforce B2C Commerce only creates a log entry if a source
code is available in the session.
The template includes util/ReportSourceCodes.isml (see below) to keep track of source code data.
Templates/util/reporting ReportBasket.isml
This template includes util/ReportSourceCodes.isml (see below) to keep track of source code data.
Templates/util/reporting ReportOrder.isml
This template logs information about an order. It includes util/ReportSourceCodes.isml (see below) to
report on source code data.
Templates/util/reporting ReportSourceCodes.isml
This template must be placed on every page that can be a redirect result of a source code incoming to the
session/visit. It can also be placed on every page or, as shown in the SiteGenesis application, as part of the
minicart, which is part of every page.
© Copyright 2000-2023, Salesforce, Inc. All rights reserved. Various trademarks held by their respective owners. Show URL Submit Feedback Privacy Policy
2.7.7.12. SiteGenesis Recommendations
Product recommendations are implemented in the SiteGenesis application as follows:
Element Description
API None for this feature.
Pipelines None for this feature.
Resource files The header values (for example, "You Might Also Like") are defined within the product.properties resource file.
Scripts None for this feature.
Templates The /templates/default/slots/recommendation/product_1x4_recomm.isml template shows recommendations.
Explicit recommendations are implemented in the SiteGenesis application as follows:
3/16/23, 2:11 PM
Legacy Developer Documentation
https://documentation.b2c.commercecloud.salesforce.com/DOC1/advanced/print.jsp?topic=/com.demandware.dochelp/LegacyDevDoc/LegacyDevDoc.html&cp=…
74/158
Element Description
API
dw.catalog.Recommendation,
dw.catalog.Category
Properties: allRecommendations : Collection (Read Only); orderableRecommendations : Collection (Read Only) ; recommendations : Collection (Read
Only)
Methods: getAllRecommendations() : Collection; getAllRecommendations(type : Number ) : Collection; getOrderableRecommendations() : Collection;
getOrderableRecommendations(type : Number ) : Collection; getRecommendations() : Collection; getRecommendations(type : Number ) : Collection
Pipelines None for this feature.
Resource
files
The header values (for example, "You Might Also Like") are defined within the product.properties resource file.
Scripts None for this feature.
Templates The product/component/recommendations.isml template shows recommendations and is included by the product/components/productdetail.isml
template.
Related Links
SiteGenesis Application Recommendation Examples
© Copyright 2000-2023, Salesforce, Inc. All rights reserved. Various trademarks held by their respective owners. Show URL Submit Feedback Privacy Policy
2.7.7.12.1. SiteGenesis Recommendation Examples
The SiteGenesis application demonstrates the following use cases:
Use Case Example
Product recommendations appear beneath the You Might Also Like: header on the
product details page for the Ruffle Front V-Neck Cardigan (Item# 25518837).
View the product Ruffle Front V-Neck Cardigan (Item# 25518837) in the SiteGenesis
English site.
Up to three recommended product images appear on the product details page. If
there are more than three recommended products, the customer can scroll to view
three products at a time.
View the product Sony Bravia® N-Series 26" LCD High Definition Television (Item#
sony-kdl-26n4000) in the SiteGenesis English site.
The customer can view Featured Products on the Cart page after adding any product
to the cart.
View the cart page after adding any product to the cart. This implementation doesn't
use the recommendations elements described in the SiteGenesis application with
recommendations.
This implementation uses the global cart-footer slot.
Related Links
SiteGenesis Application with Recommendations
© Copyright 2000-2023, Salesforce, Inc. All rights reserved. Various trademarks held by their respective owners. Show URL Submit Feedback Privacy Policy
2.7.7.13. SiteGenesis Responsive Design
SiteGenesis provides the screen resolution modes for responsive web design (RWD):
Small - viewport < 480px
Medium - 480px < viewport < 768px
Large - 768px < viewport < 960px
Standard - viewport >= 960px
The following features were implemented in SiteGenesis to support RWD:
HTML5 - see section below

3/16/23, 2:11 PM
Legacy Developer Documentation
https://documentation.b2c.commercecloud.salesforce.com/DOC1/advanced/print.jsp?topic=/com.demandware.dochelp/LegacyDevDoc/LegacyDevDoc.html&cp=…
75/158
Semantically accurate markup - see section below
Enhanced SEO capabilities - include updated site content structure and document outline
Screen reader (accessibility) - see section below
Optimized style sheets
Layout specific style sheets – based on screen size
Streamlined JavaScript that takes advantage of the latest methodologies
You can enable or disable RWD in SiteGenesis via Business Manager site preferences. See Configuring Storefront Preferences.
Zoom
The SiteGenesis zoom functionality checks for viewport size and disables zoom with viewports less than 960px. For IE8 and IE9 browsers, use matchMedia polyfill
(https://github.com/paulirish/matchMedia.js/).
HTML5
These HTML features are implemented in SiteGenesis:
Structural, semantic document outline (for example, header, nav, and footer)
Data tag attributes (data-image-src=”path”)
Graceful handling/fallback on browsers that don't support HTML5
These HTML features are available but not implemented:
Geo-locatation
Video and audio support
Local storage
New/refined semantic elements (for example, figure, new form controls, article, and aside)
SVG graphics rendering
Web Workers (background js scripts)
Semantically Accurate Markup
Proper semantics let page content be accurately represented, converting the current web of unstructured documents into a web of data. Developers need to understand the markup
requirements, and choose tags carefully. Some examples/pitfalls:
Don't use <strong> to make something bold. The <strong> tag is intended to show content that is of strong importance. When this tag is applied, search engines and screen
readers will add weight to the content, which might not be what you want.
Headings outline the document, and relate it to other content. Do not use <h1>,<h2>,<h3> tags for appearance only. These tags should only be used to mark content that
starts true sections of content.
Use lists. When marking up a list of content such as links (nav), products, options, or any related content, use <UL>,<OL>,<DL> tags.
Use tables for tabular data and not for layout.
Screen Reader (Accessibility)
SiteGenesis supports Screen Reader (WCAG, WAI, Section 508) as follows:
Level 1 compliant
Level 2 & 3 compliance depends on changes in rules
Note: Salesforce B2C Commerce doesn't guarantee or certify compliance of SiteGenesis with any WCAG level.
© Copyright 2000-2023, Salesforce, Inc. All rights reserved. Various trademarks held by their respective owners. Show URL Submit Feedback Privacy Policy
2.7.7.14. SiteGenesis Search
The SiteGenesis application implements both keyword search and category page navigation. It includes examples of most search features, including the ability to show content assets
that are search term specific. The SiteGenesis application uses recursive search for category navigation and keyword searches.
Related Links
Search Triggered Banner
SiteGenesis Search Pipelines
SiteGenesis Search Scripts

3/16/23, 2:11 PM
Legacy Developer Documentation
https://documentation.b2c.commercecloud.salesforce.com/DOC1/advanced/print.jsp?topic=/com.demandware.dochelp/LegacyDevDoc/LegacyDevDoc.html&cp=…
76/158
Result Attributes in the Search Grid
Result Attributes in Product Detail Pages
Refinement Bar Customizations
Manually Changing Search Attributes and Settings
SiteGenesis Search Properties Files
© Copyright 2000-2023, Salesforce, Inc. All rights reserved. Various trademarks held by their respective owners. Show URL Submit Feedback Privacy Policy
2.7.7.14.1. SiteGenesis Search Triggered Banner
In the SiteGenesis application, you can define flexible banners on the search results page that are triggered when the customer enters certain search terms in the search field.
SiteGenesis allows you to highlight sitewide information in a banner when a user searches for products. You can choose to display a search result banner that is displayed whenever a
customer uses the search function, or a keyword banner that is specific to the keyword a user searches for.
To display a search result banner, you must add a content slot to the site search page template.
With a keyword banner, if the customer enters television, a special television banner appears on the search results page because there’s a related content asset, as follows:
id=keyword_television.
When the search term (keyword) matches the ID of the content asset, Salesforce B2C Commerce shows the banner related to the content asset instead of the banner assigned in the
global slot, which typically occurs. The content asset containing the banner must be in the Search Banner library folder.
To use a keyword triggered banner, you must use the Keyword Merchandising Banner cartridge.
To create a keyword search triggered banner:
1. In Business Manager, navigate to Merchant Tools > Content > Library Folder.
2. If the SearchBanner folder doesn’t exist, click New, and use the following configuration settings:
Name: Search Banner
ID: Search Banner
Select Online.
3. Select the SearchBanner folder, and click New.
4. Configure the keyword and assign the banner with the following settings:
ID: keyword_<search term>
Name: The search term used in the ID.
Select Online and Searchable.
5. However you assign banners, assign the banner to the content asset in the body and click Apply.
6. In Business Manager, navigate to Merchant Tools > Search > Search Index, and rebuild your product and content index.
In your storefront, searching for the term specified early now displays the assigned banner along with the results.
© Copyright 2000-2023, Salesforce, Inc. All rights reserved. Various trademarks held by their respective owners. Show URL Submit Feedback Privacy Policy
2.7.7.14.2. SiteGenesis Search Pipelines
The SiteGenesis Search pipeline, located in the Storefront Core cartridge, contains the following subpipelines that set the processing behavior:
Search-Show: renders a full featured product search result page. If the http parameter format is set to ajax when the Search pipeline is called, only the product grid is
rendered instead of the full page. Search-Show?cgid=1234 is used for categories
Search-ShowContent: renders a full featured content search result page. Search-ShowContent?fdid=1234 is used for folders.
Search-GetSuggestions: determines search suggestions based on a given input and renders the JSON (JavaScript Object Notation) response for the list of suggestions.
Search-ShowProductGrid: renders the partial content of the product grid of a search result as rich html.
GetProductResult: executes a product search and puts the ProductSearchResult into the pipeline dictionary for convenient reuse. This is also used in the Product pipeline
for product navigation via the Next and Previous buttons.
SearchGetContentResult: executes a content search and puts the ContentSearchResult into the pipeline dictionary.
The following pipelines are also affected by Salesforce B2C Commerce search functionality:
Link-Category: creates the links for a specific category and jumps to the Search-Show pipeline.
Home-Show: all of the search pipelines link to this subpipeline if there is no search query in the search box.
Page-Show: uses search URLs for content pages and jumps to the Search-GetContentResult pipeline.
3/16/23, 2:11 PM
Legacy Developer Documentation
https://documentation.b2c.commercecloud.salesforce.com/DOC1/advanced/print.jsp?topic=/com.demandware.dochelp/LegacyDevDoc/LegacyDevDoc.html&cp=…
77/158
Product-Show: uses search URLs for products.
Related Links
SiteGenesis Application Search Implementation
© Copyright 2000-2023, Salesforce, Inc. All rights reserved. Various trademarks held by their respective owners. Show URL Submit Feedback Privacy Policy
2.7.7.14.3. SiteGenesis Search Scripts
The following scripts in the scripts/search directory are called/used in the Search pipeline:
GetProductID.ds
ProductGridUtils.ds (invoked from GetProductID.ds)
© Copyright 2000-2023, Salesforce, Inc. All rights reserved. Various trademarks held by their respective owners. Show URL Submit Feedback Privacy Policy
2.7.7.14.4. Result Attributes in the Search Grid
The attributes for products that you appear in the search grid can influence customer interest in a product. The image and relevant information for a product are important to
consider. The attributes shown in the search result grid for keyword search are set by the producttile.isml template.
Price and Price Range Attributes
When showing a price range for a sliced variation in your ISML template, use the ProductSearchHit class ispriceRange(), getMinPrice(), and getMaxPrice() methods to
get price ranges, because ProductSearchHit returns price ranges for the current search result.
If you are showing a search result for a base product, you can use the getMinPrice() and getMaxPrice() methods of the ProductSearchHit class to provide a price range for all
variations that are part of the base product.
Related Links
SiteGenesis Application Search Implementation
© Copyright 2000-2023, Salesforce, Inc. All rights reserved. Various trademarks held by their respective owners. Show URL Submit Feedback Privacy Policy
2.7.7.14.5. Result Attributes in Product Detail Pages
The primary category you select for an item determines the breadcrumb for the search result of the product or content detail page. If no primary category is set for a product, the
classification is used to determine the category links.
For example, if a customer searches for boots and selects a man's boot from the results, the breadcrumb for the result shouldn't point to a category that is too broad, such as shoes,
or one that isn't applicable, such as women's shoes.
The classification you select determines the attributes shown for the result. If no classification value is set, the attribute value is taken from the primary category.
© Copyright 2000-2023, Salesforce, Inc. All rights reserved. Various trademarks held by their respective owners. Show URL Submit Feedback Privacy Policy
2.7.7.14.6. Refinement Bar Customization
You can customize the refinement bar to change the order in which results appear, the look and feel of the search refinement bar, or how many refinements a customer can select
simultaneously.
Changing the Order in Which Search Refinements Appear
When creating refinements, you set the order in which the entries within the refinements appear by selecting one of the following sorts:
Sort by Value Name: sorts the categories in the category refinement according to their display name. Merchants also configure the sort direction (ascending/descending).
Sort by Value Count: sorts the categories in the category refinement according to the number of products found in each category. This is the number of products the search
result would be refined to in case the customer selected this category as refinement. Merchants can also configure the sort direction (ascending/descending).
Sort by Category Position: sort the categories in the category refinement by category position, the refinements' explicitly defined positions within the parent category.
You can define search result refinements within a specific category in the storefront, such as category refinements, price refinements or attribute refinements.
Example
The following example shows the results of the three sorting modes. Assume that the Site Catalog, with sorted subcategories is as follows:
Women's Clothing
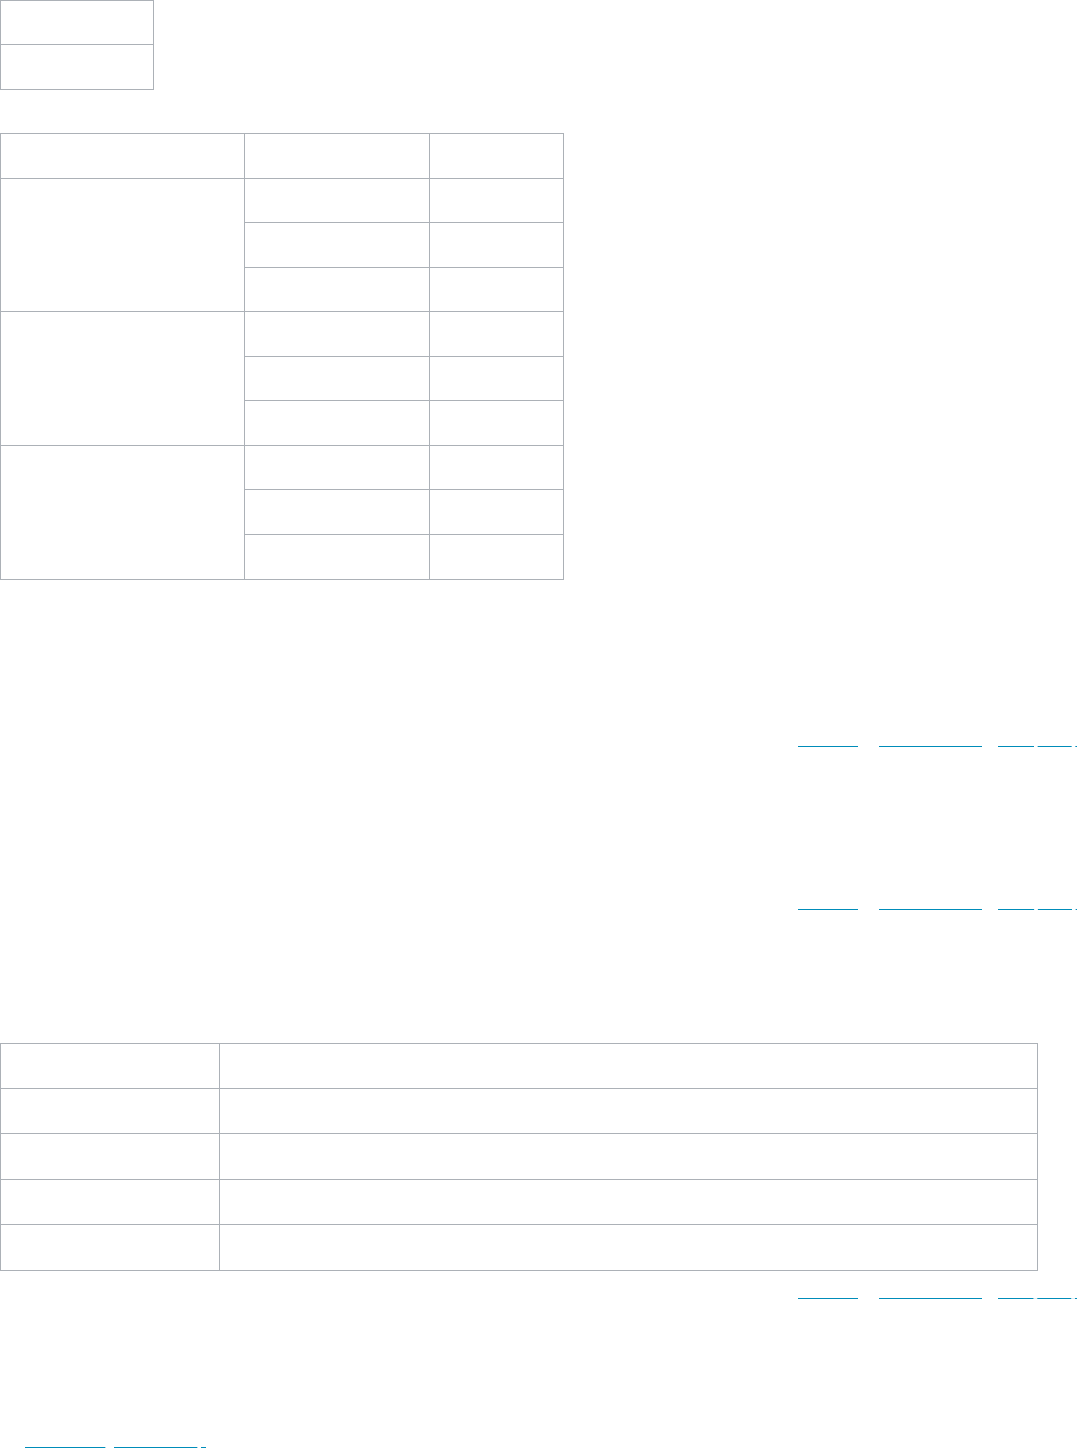
3/16/23, 2:11 PM
Legacy Developer Documentation
https://documentation.b2c.commercecloud.salesforce.com/DOC1/advanced/print.jsp?topic=/com.demandware.dochelp/LegacyDevDoc/LegacyDevDoc.html&cp=…
78/158
Women's Accessories
Women's Jewelry
The customer searches for "silver".
If the category refinement is... Then the sorted order is... The hit count is...
Sorted by Value Name (alphabetical) Women's Accessories (56)
Women's Clothing (235)
Women's Jewelry (12)
Sorted by Value Count Women's Clothing (235)
Women's Accessories (56)
Women's Jewelry (12)
Sorted by Category Position Women's Clothing (235)
Women's Jewelry (12)
Women's Accessories (56)
Changing the Appearance of the Refinement Bar
Developers can change the appearance of the refinement bar using the productsearchrefinebar.isml template. Developers can change the placement of the refinement bar by
editing any of the pagetype templates that wrap the search results: pt_contentsearchresult.isml or pt_productsearchresult.isml.
The standard search refinements are available for all categories. In addition, you can add up to five search refinements per category and inherit refinements from parent categories.
The most significant restriction on the number of search refinements you choose to have is the amount of page space you want to devote to the refinement bar.
© Copyright 2000-2023, Salesforce, Inc. All rights reserved. Various trademarks held by their respective owners. Show URL Submit Feedback Privacy Policy
2.7.7.14.7. Manually Changing Search Attributes and Settings
During development, it is useful to test your search attribute and settings changes. The quickest way to do this is to change the values manually, rebuild the indexes manually, and
observe the effects of the changes. Although it's possible to do this by changing the feed and importing it, this is less efficient.
© Copyright 2000-2023, Salesforce, Inc. All rights reserved. Various trademarks held by their respective owners. Show URL Submit Feedback Privacy Policy
2.7.7.14.8. SiteGenesis Search Properties Files
As part of internationalizing your user interface, you can set the text strings that appear in the storefront. Use resource files to internationalize these strings for search. The SiteGenesis
application currently includes only English resource files, which are located in the SiteGenesis Storefront Core cartridge.
Resource file Description
forms.properties Sets the text strings for the search forms.
pagecomponents.properties Sets the text strings for several page components, including sorting options.
product.properties Sets the text strings for multiple product templates, including product not found, product comparisons, and recommended products.
search.properties Sets the text strings for Search pipeline output templates. This includes the text strings for spelling suggestions.
© Copyright 2000-2023, Salesforce, Inc. All rights reserved. Various trademarks held by their respective owners. Show URL Submit Feedback Privacy Policy
2.7.7.15. SiteGenesis in-Store Pickup
You can implement store pickup in your application by using the functionality available in the SiteGenesis application in combination with Business Manager site preferences and the
multi-inventory functionality.
See Understanding in-Store Pickup for conceptual material and file-level details.

3/16/23, 2:11 PM
Legacy Developer Documentation
https://documentation.b2c.commercecloud.salesforce.com/DOC1/advanced/print.jsp?topic=/com.demandware.dochelp/LegacyDevDoc/LegacyDevDoc.html&cp=…
79/158
1. Configure Business Manager to support in-store pickup via custom site preferences.
See Configuring Storefront Preferences.
The behavior of this feature changes if you also select the Enable MultiShipping site preference.
2. Configure individual variation products to allow in-store pickup.
See Add, Modify, and Edit Products Manually and use the In-store pickup setting.
3. Associate stores with inventory lists.
See Associating a Store with an Inventory List.
4. Add the shipping method 005 in Business Manager, if it is not there already.
See Creating Shipping Methods.
The shipment object's Boolean attribute storePickupEnabled determines if the shipping method appears as an in-store shipping method. The cost is set in Business Manager,
with the default values set to 0.00 for the 005 and EUR005 shipping methods.
5. Change your storefront application to function like the SiteGenesis application, as follows:
a. Change/add Business Manager system object attributes.
b. Change/add storefront user interface files.
c. Change/add storefront business logic
See Understanding in-Store Pickup.
© Copyright 2000-2023, Salesforce, Inc. All rights reserved. Various trademarks held by their respective owners. Show URL Submit Feedback Privacy Policy
2.7.7.15.1. Understanding in-Store Pickup
In-store pickup helps merchants differentiate from their competition or remain competitive. Their customers might want to receive an item right away, and not wait for shipment. For
example, a customer might need an outfit to wear to an unexpected event, but doesn't have the time to shop around or wait for shipment. Shopping online and then picking up the
item is the fastest and most efficient way for them to meet their obligations. Another customer doesn't want to pay shipping costs for a bulky item, such as a piece of furniture or an
appliance, because the customer has a ready means of transportation. Providing in-store pickup as a shipment option gives customers a a great deal of flexibility.
Salesforce B2C Commerce provides in-store pickup functionality via a combination of Business Manager and API capability, as demonstrated in the SiteGenesis application. See
Implementing in-Store Pickup for complete instructions.
SiteGenesis in-Store Pickup Functionality
The following SiteGenesis in-store pickup functionality is described in more detail in the SiteGenesis Wireframes: In-Store Pickup and the Functional Specifications.
Product Details and Quickview Pages
On the product details and Quickview pages, the customer can identify where a particular product is located by clicking the Check store availability link.
Upon clicking this link, a window opens where the customer can enter a zip code, typically their home location. The list of stores that appear are based on a configured
distance and inventory availability for each listed store.
The customer can select a preferred store. They can also click the Change location link and enter a new zip code to get a different list of stores.
When the user has selected a preferred store, the product details page is updated to show the availability status of the item in the preferred store beneath the standard
availability. The customer can click the See more / See less links to see a complete list of the store availability results from the last zip code search.
Cart Page
When the customer adds an item to the basket, the default inventory list is assigned to the line item on the cart page. The customer can specify for each item if the item is to be
designated for home delivery or in-store pickup on the Delivery Options column.
The In Store Pickup radio button is disabled unless a pickup location with the appropriate availability is assigned to the option. If the customer selected a preferred store on the
product details page, this is the default assignment for the option unless a pickup location is already assigned to the line item.
You can change the location of the line item's In Store Pickup option per line item by clicking the appropriate Select Store link in the dialog box that appears when the
customer clicks the Select Store link within the cart. You can also set the preferred zip code from this dialog box. The ability of the customer to select the store for in store pick
up is determined by the configured availability for the line item.
Checkout Pages
When multi-shipping is enabled, if at least one item is set to the in-store pickup delivery option, the multi-shipping checkout process is used.
Items with the In Store Pickup delivery option show the address of the store selected for pickup. Any items that do not have this option selected must have a shipping
address assigned to them.
After the customer has assigned any required shipping addresses, they are navigated to the shipping methods page. All items to be shipped to a specific location or picked up
at a specific address are merged into appropriate shipments. The customer can add a short message for the store regarding pickup time or any further requests (included in
the order export).
If a shipment has the In Store Pickup delivery option selected, there is no need to select a shipping method. The (zero cost) shipping method for store pickup is
automatically assigned and shown for those shipments.
With normal Home Delivery shipments, the customer must select a shipping method.
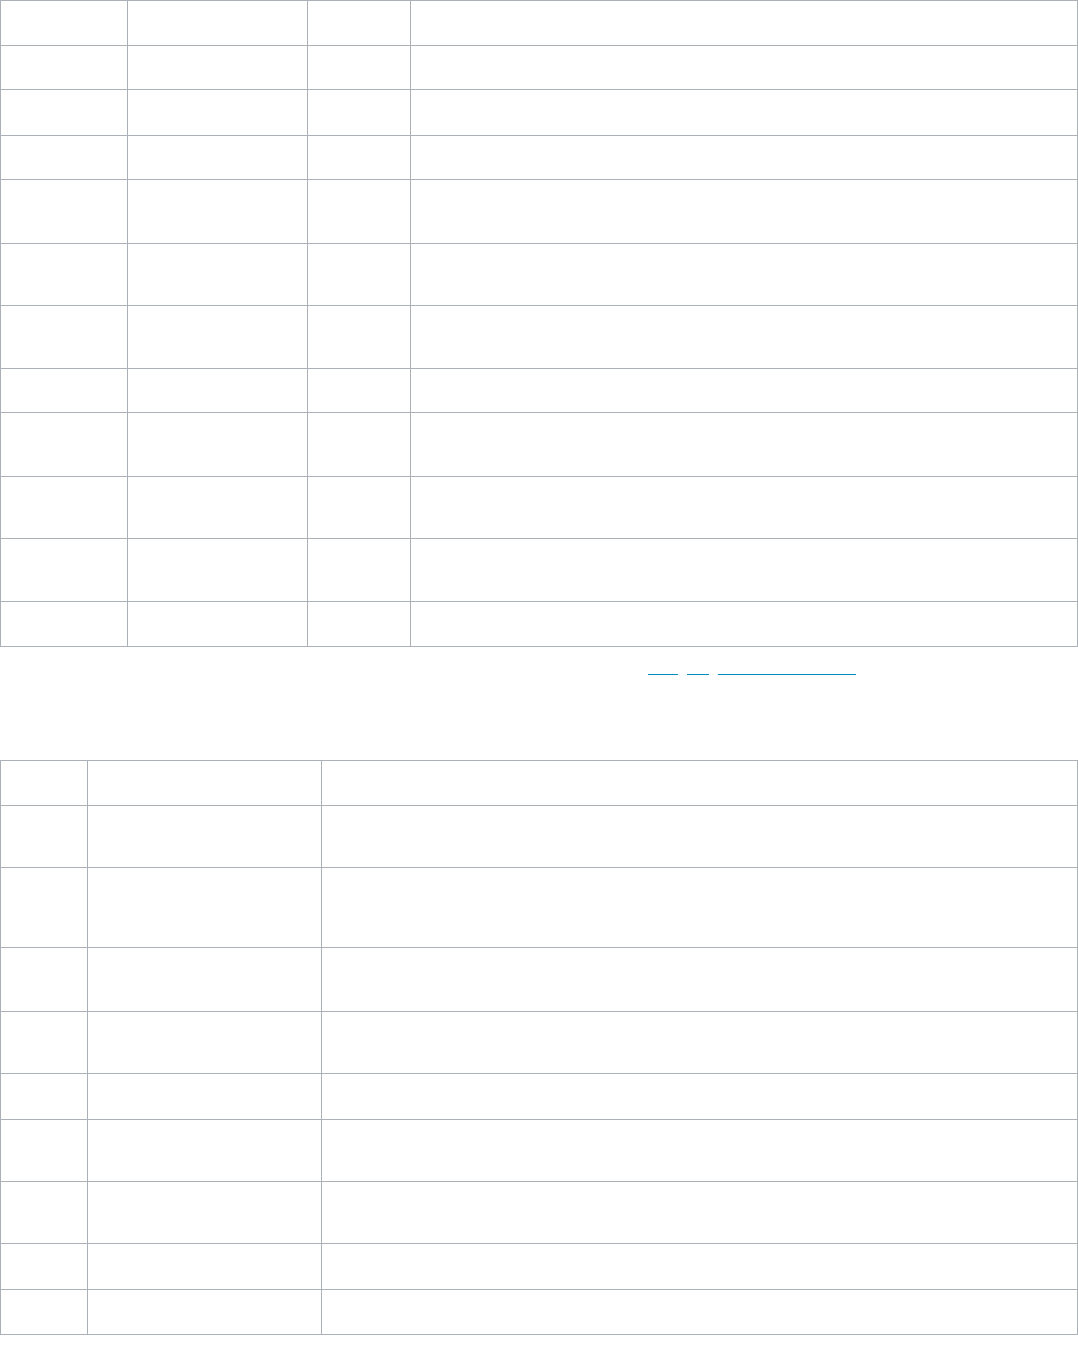
3/16/23, 2:11 PM
Legacy Developer Documentation
https://documentation.b2c.commercecloud.salesforce.com/DOC1/advanced/print.jsp?topic=/com.demandware.dochelp/LegacyDevDoc/LegacyDevDoc.html&cp=…
80/158
When multi-shipping isn't enabled, the customer can have multiple in store shipments, but all the other physical shipments are designated for one delivery. The shipments are
grouped on the single shipping page, where the customer can enter a message for each shipment.
System Object Attributes
The following system object attributes (in Business Manager) are used to implement the in-store pickup feature:
System Object Attribute ID Type Description
Product availableForInStorePickup boolean Inventory lists for stores (brick and mortar) are associated with this product.
ProductLineItem fromStoreId string Links the store to the productlineitem for grouping shipments in the checkout process.
Shipment fromStoreId string Maps the shipment to a brick and mortar store.
Shipment shipmentType string When this equals instore, the checkout flow assigns the shipping method (005), which has a no shipping
charge.
Shipment storePickupMessage string Text used by the customer to send a message to the brick and mortar store about the shipment. This is
reflected in the order export.
SitePreferences countryCode enum-of-
string
Default country code.
SitePreferences enableStorePickUp Boolean Toggles the availability of the in-store pickup feature in the store front.
SitePreferences storeLookupUnit enum-of-
string
Kilometer or Miles (default) - used to find the store near the zip code specified by the customer.
SitePreferences storeLookupMaxDistance enum-of-
string
Selected distance used to find the store near the zip code specified by the customer.
Store countryCodeValue string Used to create the shipment address in the basket from the Store object. The value is based on the values
found in the form files (in the cartridge).
Store inventoryListID string Links the inventory list to the store object that represents the brick and mortar store.
You can configure the above Site Preference attributes in the Business Manager Site Preferences module. See Configuring Storefront Preferences.
Storefront User Interface
The following SiteGenesis cartridge files are used to implement the in-store pickup user interface, including templates, resource files, JavaScript files, stylesheets and images:
File type File Description
template cart.isml Based on the value of the site preference for in-store pickup, this template shows a fourth column containing a radio
button for in-store line items.
productcontent.isml Based on the value of the site preference for in-store pickup, this template shows a block on the product details page for
showing the Check Availability link, the stores near the customer, and the availability of that product based on the entered
zip code.
appresources.isml Contains pipeline calls needed within app.js, and the js object userSettings, which is used to hold the zip code and
preferred store that were stored in the session object.
coreresetstore.isml Used if the correct resource can't be found. It renders a full page that enables the customer to select the preferred store
that is to be stored in the session object.
coreshowselectedstore.isml It renders a full page that shows the stores that can be selected based on the zip code entered by the customer.
corezipcode.isml It renders a full page that enables the customer to select a zip code that will be used to determine which stores can be
used as locations for in-store pickup
deliveryoptions.isml Included on the cart page. It renders the radio buttons for assigning the line item as part of an in-store pickup or home
delivery.
getprefferedstore.isml Renders the response from the request for getting/setting the preferred store using Ajax.
getzipcode.isml Renders the response from the request for getting/setting the zip code to the session objects using Ajax.

3/16/23, 2:11 PM
Legacy Developer Documentation
https://documentation.b2c.commercecloud.salesforce.com/DOC1/advanced/print.jsp?topic=/com.demandware.dochelp/LegacyDevDoc/LegacyDevDoc.html&cp=…
81/158
File type File Description
instoremessage Renders the text boxes for in-store pickup when in the middle of the single shipping checkout using Ajax.
minishipments.isml Contains a label for in-store pickup that is part of the order.
orderdetails.isml Contains a label for in-store pickup, and shows the shipping cost.
orderdetailsemail.isml Contains a label for in-store pickup.
multishippingshipments.isml Contains code that shows a store message text box for in-store pickup orders and appropriate labels.
multishippingaddresses.isml Shows in-store pickup orders with the address assigned when the customer is in the multi shipping checkout flow.
shippingmethods.isml Contains logic to skip any shipping method with the ID of 005 to prevent the customer from selecting another shipping
method for in-store pickup items.
singleshipping.isml
Conditionally shows the address form field when there is at least one physical shipment meant for home delivery.
Shows the store messages text boxes for each shipment meant for in-store pickup.
storeinventory.isml Renders the response from the request for which stores have available inventory for the given SKU.
properties checkout.properties Contains text related to in-store pickup.
forms.properties Contains text related to in-store pickup.
storepickup.properties Contains text related to in-store pickup.
JavaScript app.js Contains functionality related to in-store pickup. The functionality is also controlled by the site preference for the
app.storeinventory object.
css style.css Contains in-store pickup related styles
Business Logic
The following SiteGenesis cartridge files are used to implement the in-store pickup business logic, including pipelines, form definitions, and B2C Commerce script files:
File type File Description
xml
(meta)
catalog.xml Contains the availableForInStorePickup attribute for certain products (men’s pants).
inventory_store_german_store.xml Store inventory list for demo purposes
inventory_store_store[1 ...
11].xml
Store inventory lists for demo purposes
system-objecttype-extensions.xml Contains attributes for the product, Store, SitePreferences, Shipment, and ProductLineItem objects.
shipping.xml Includes the shipping method Store Pickup (id=’005’), which has a shipping cost of $0.
stores.xml
Contains values for the following custom attributes:
countryCodeValue: contains the country codes found in the form.xml files (for example, ‘US’)
inventoryListId: links the store to an inventory list by its ID
forms multishipping.xml Contains rules for bind the in-store message to the multi-shipping form.
singleshipping.xml Contains logic to bind the in-store message to the single shipping form.
pipelines COshipping.xml
Contains logic to handle the store message form, and to configure the shipments that are intended for in-store
pickup, via the following subpipelines:

3/16/23, 2:11 PM
Legacy Developer Documentation
https://documentation.b2c.commercecloud.salesforce.com/DOC1/advanced/print.jsp?topic=/com.demandware.dochelp/LegacyDevDoc/LegacyDevDoc.html&cp=…
82/158
File type File Description
CoShipping-UpdateInStoreMessage
COShipping-InStoreFormInit
StoreInventory.xml Handles the requests for setting the preferred store, determines the stores available based on the entered zip code
and the selected product, and handles setting the line item back to regular home delivery.
script CheckStoreInLineItems.ds When the cart is being update with a new quantity, checks the item quantity against the inventory record of a
particular store (using the storeID).
checkout/Utils.ds Copies a store address into a shipping address. (this.storeAddressTo)
GetPhysicalShipments.ds Contains logic to not count in-store pickups as physical shipments when determining if the checkout should be
using multi-shipping or not.
InitSessionAddressBook.ds Contains logic to prevent the store addresses from being added to the multi-shipping session addresses.
InStoreShipments.ds Scans the basket and consolidates items that are going to the same store. It also creates shipments with the
appropriate shipment type and method for the rest of checkout.
InventoryLookup.ds Looks up the store inventory of the product.
MergeQuantities.ds Contains logic to preserve the in-store pickups when the basket is being recreated from within the multi-shipping
checkout process.
SeperateQuantities.ds Contains logic to prevent the splitting of in-store pickups from within the multi-shipping checkout process.
SetStoreInLineItem.ds Binds the line item with a store for an in-store pickup.
Utils.ds Provides utility functions for the in-store pickup feature.
Related Links
SiteGenesis in-Store Pickup
© Copyright 2000-2023, Salesforce, Inc. All rights reserved. Various trademarks held by their respective owners. Show URL Submit Feedback Privacy Policy
2.7.7.16. SiteGenesis Taxes
SiteGenesis is a net taxation application, and thus supports only net taxation. The SiteGenesisGlobal site supports gross taxation because this is a VAT-type tax. It isn't currently
possible to support both taxation types in a single site.
© Copyright 2000-2023, Salesforce, Inc. All rights reserved. Various trademarks held by their respective owners. Show URL Submit Feedback Privacy Policy
2.8. Common Page Components
In addition to the development components, the SiteGenesis application pages include other components, from which you can customize your storefront. They include:
Page Component Description
Page types
(pt_<name>.isml)
Page types define a framework for different page layouts, in effect acting as a page template. Some examples are:
Cart
Category
Checkout
Compare
Contentsearchresult
Customerservice
Productdetails
You can add additional page types as needed by creating pt_<name>.css files that define the look and feel of your customized page (for example,
fonts, colors and display properties).
3/16/23, 2:11 PM
Legacy Developer Documentation
https://documentation.b2c.commercecloud.salesforce.com/DOC1/advanced/print.jsp?topic=/com.demandware.dochelp/LegacyDevDoc/LegacyDevDoc.html&cp=…
83/158
Page Component Description
See SiteGenesis and CSS.
Business Manager
content assets
Business Manager content assets are the portion of storefront pages (for example, HTML snippets and images) that must be regularly updated to
keep the site fresh. This information is accessible via Business Manager because merchants and other business-level users must be able to update it
without learning Studio or having to deploy
cartridge code.
See Content.
Static (or resource) files
Include CSS, image and JavaScript files. They are stored in Salesforce B2C Commerce's shared file system. To reference these files, specify the path
and filename.
See SiteGenesis and CSS and B2C Commerce JavaScript.
When supporting multiple locales, each locale will have its own subdirectory.
See Localization.
Hyperlinks
Common storefront hyperlinks either link within a site to product, category, cart, checkout or content pages; or link to external sites. Because most
B2C Commerce pages are dynamically generated, hyperlinks to these pages do not directly reference a specific HTML page. Instead, they trigger
pipelines that generate the storefront pages as a response.
Use the dw.web.URLUtils class to dynamically generate a URL inside a link, using the protocol that triggered the pipeline (HTTP, HTTPS)
See the API documentation for more information.
Related Links
Development Components
Content
SiteGenesis and CSS
B2C Commerce JavaScript
Localization
© Copyright 2000-2023, Salesforce, Inc. All rights reserved. Various trademarks held by their respective owners. Show URL Submit Feedback Privacy Policy
2.9. Development Components
Within Studio, you can create and modify the following elements of your application:
Element Description
What Is a
Cartridge?
Application code container.
Controllers or
Pipelines
Controllers are recommended
Pipelines are deprecated for application logic. However, you might need to create them for jobs.
If you are maintaining a legacy Salesforce B2C Commerce storefront, you might need to create or edit pipelines for application logic or integration of third
party systems.
Scripts
Scripts let you use our standard API to interact with objects in the storefront, such as products, customers and baskets.
B2C Commerce development components that can make JavaScript calls include the following:
In a Pipeline: Use an EVAL pipelet to evaluate an expression; use the Script pipelet to execute scripts (.ds files); or call a standard pipelet for common
business processes.
In a Template: Access a business process via an <isscript> tag, or wherever B2C Commerce server-side JavaScript APIs are used.
See the B2C Commerce script programming and API documentation for more information.
3/16/23, 2:11 PM
Legacy Developer Documentation
https://documentation.b2c.commercecloud.salesforce.com/DOC1/advanced/print.jsp?topic=/com.demandware.dochelp/LegacyDevDoc/LegacyDevDoc.html&cp=…
84/158
Element Description
Templates
Templates define how data and page information is transformed into dynamic, HTML-based web pages that are rendered on the browser using:
CSS for page layout and styling.
The B2C Commerce Forms Model for data display and verification.
For example, the cart template in the SiteGenesis Application defines how the cart page appears, which includes basket contents, shipping types, product
variations, availability, promotions and shipping and tax calculations. This template uses the <isscript> statement to run through odd/even row colors.
Templates are created using the Internet Store Markup Language (ISML), a B2C Commerce proprietary extension to HTML.
Forms
B2C Commerce forms let you control how customer-entered values are validated by the system and rendered on the browser. Use B2C Commerce forms for
all HTML form-based processing.
For example, B2C Commerce forms let you specify that zip code data must be entered as a precise series of integers; while name and address information
must be entered as strings.
© Copyright 2000-2023, Salesforce, Inc. All rights reserved. Various trademarks held by their respective owners. Show URL Submit Feedback Privacy Policy
2.10. Import Reference Application Data into a Sandbox
Reference application data (for example, SFRA or SGJC data) are usually imported only into sandboxes. If you need to import reference application data into a Staging instance for
testing purposes, export RefArch, RefArchGlobal, SiteGenesis, or SiteGenesisGlobal as a site from a sandbox and import it to the Staging instance using Site Import/Export.
If you want to import SFRA data, see Importing SFRA Data into an Instance.
If you want to import SGJC data, perform the following steps:
1. Login to Business Manager with the username and password you used to create a server connection.
2. Select Administration > Site Development > Site Import and Export.
3. In the Import section, select SiteGenesis Demo Site, and click Import.
When the import is complete, the Success status is shown. It's safe to ignore warnings. If you get an Error status, contact Commerce Cloud Support.
© Copyright 2000-2023, Salesforce, Inc. All rights reserved. Various trademarks held by their respective owners. Show URL Submit Feedback Privacy Policy
2.11. SGJC Forms
You can create HTML forms in Salesforce B2C Commerce using our templates and controllers. Using form definitions, you can also persist form data during a session and store it in
system objects or custom objects.
When creating forms, consider the following:
Creating a Simple Form
Localizing Forms
Hiding Form Fields
Validating Form Data
Saving Form Data
Clearing or Refreshing Forms
Prepopulating Form Data
Sharing Data Between Forms
Securing Forms
Dynamic/Multi-Part Forms
Embedded and Nested Forms
Creating a Simple Form
This example shows a very simple form, with a text field to input a nickname, a submit button, and a cancel button. After the form is submitted, another page is rendered that shows
the nickname entered in the previous form.
The example uses four files, HelloForm.js (controller), helloform.isml (ISML template for the empty form), helloformresult.isml (ISML template for the results of the form)
and helloform.xml (form definition). The controller renders the empty form and handles the actions triggered in the form. The diagram describes the interaction between the files.
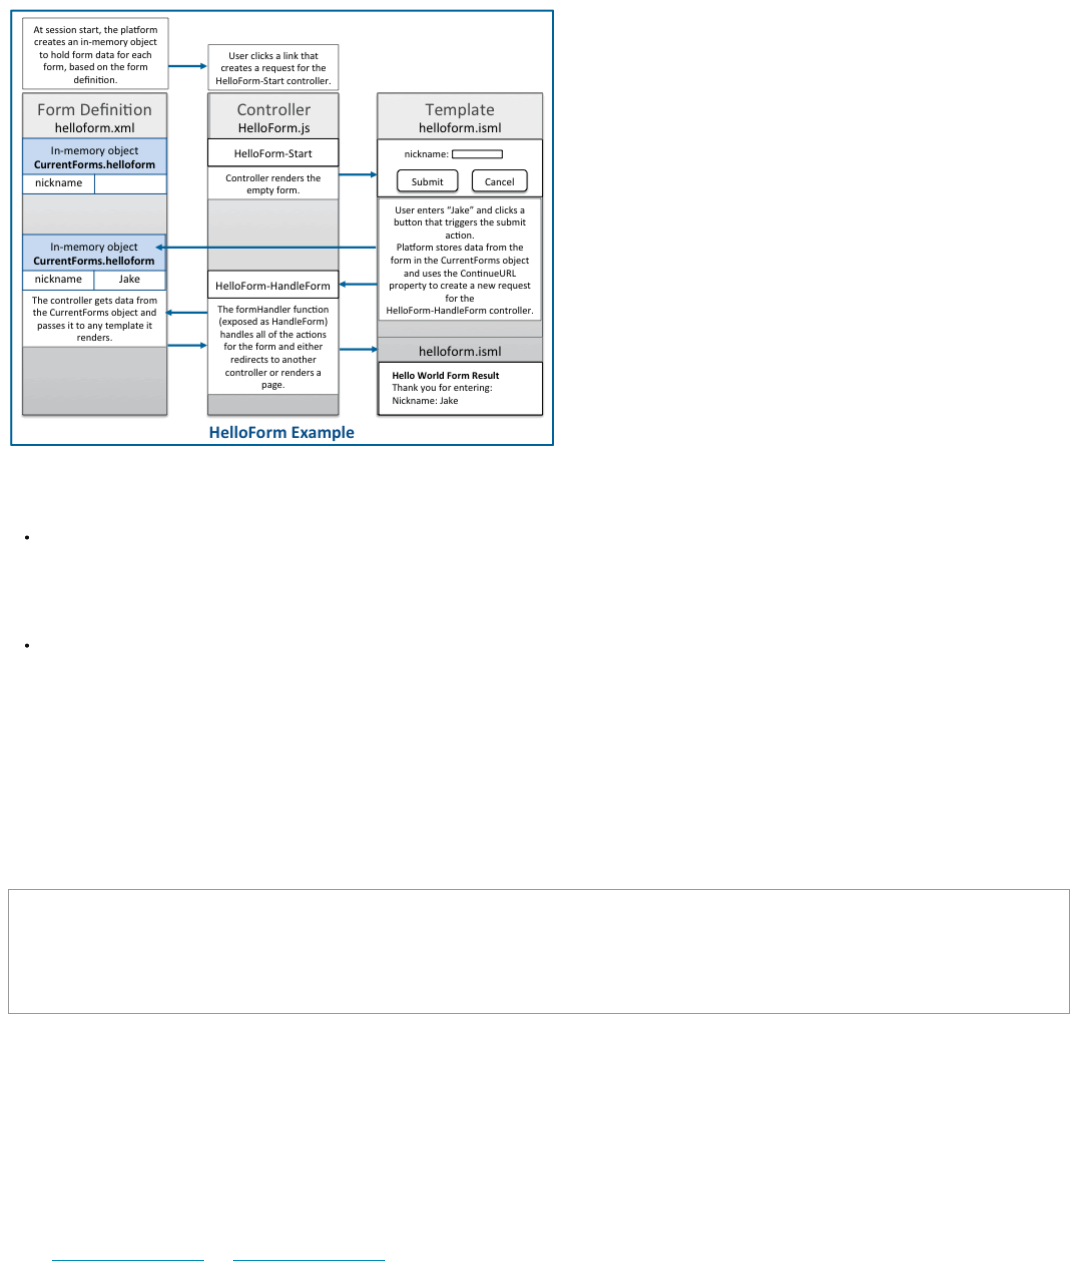
3/16/23, 2:11 PM
Legacy Developer Documentation
https://documentation.b2c.commercecloud.salesforce.com/DOC1/advanced/print.jsp?topic=/com.demandware.dochelp/LegacyDevDoc/LegacyDevDoc.html&cp=…
85/158
The code for the example is included in the following sections.
In this example, the following is expected to happen:
The user clicks a link that creates a request for the HelloForm-Start controller. When the session starts, B2C Commerce creates the in-memory object to hold form data for
each form, based on the helloform.xml form definition. The in-memory object that is created is empty until form data is entered and an action is triggered.
The controller renders the helloform.isml template that contains the empty form.
The user enters "Jake" into the input field and clicks a button that triggers the submit action or the cancel action.
B2C Commerce stores data from the form in the CurrentForms.helloform object. When any action is triggered, B2C Commerce uses the ContinueURL property passed to
the template to create a new request for the HelloForm-HandleForm controller function. All parameters from the current request are appended onto the new request. The
handleForm function, which is exposed as HandleForm, handles each of the possible actions that a user can trigger for the form. The controller executes different code,
depending on the action that was triggered in the form. In this example, it renders the helloformresult.isml page if the submit button was clicked and redirects to the
home page if the cancel button was clicked.
Form Definition
The first thing you create for a form is the form definition. The form definition describes the data you need from the form, the data validation, and the system objects you want to
store the data in. This is a simple example, and only has one input field and two buttons. This doesn't validate or store data permanently.
helloform.xml
<?xml version="1.0"?>
<form xmlns="http://www.demandware.com/xml/form/2008-04-19">
<field formid="nickname" label="Nickname:" type="string" mandatory="true" max-length="50" />
<action formid="submit" valid-form="true"/>
<action formid="cancel" valid-form="false"/>
</form>
In-memory form Object
The form definition determines the structure of the in-memory form object. The in-memory form object persists data during the session, unless you explicitly clear the data.
Data from the form is accessible in templates using the pdict variable, but only if the session.CurrentForms object is passed to the template by the controller when it's rendered.
If you get a view and use it to render the template, the View.js class automatically passes in all session and request objects.
There is only one copy of the in-memory object for a specific form definition at any time. This means that if you want to reuse the form, (for example, to save multiple addresses to an
address book), you must clear the object before populating it with new form data.
Note: Data stored in the CurrentForms object doesn't persist past the session, unless you use binding to add it to a system or custom object.
See also Form Definition Elements and What Is a Form Definition.
Controller
As a best practice, Salesforce recommends using the same controller that renders the form to also handle the actions from the form.
The controller in this example exposes two functions: a Start function that renders an empty form and a HandleForm function that handles any submit and cancel actions triggered
by the form.

3/16/23, 2:11 PM
Legacy Developer Documentation
https://documentation.b2c.commercecloud.salesforce.com/DOC1/advanced/print.jsp?topic=/com.demandware.dochelp/LegacyDevDoc/LegacyDevDoc.html&cp=…
86/158
The Start function gets a view, because the View.js module makes it easy to pass custom objects to the template and handles any rendering errors. The view also passes through any
custom properties and adds them to the pdict variable for the template. The ContinueURL that is passed is used by the template to determine what to call when the form is
submitted. In this case, it calls the function that handles the form actions.
The handleForm function uses the FormModel.js module handleAction function to handle the actions of the form. It passes a JSON object to the handleAction function in
which each triggeredAction for the form is associated with an anonymous function that is executed by the handleAction function.
The cancel action clears the form and redirects the user to the Home-Show controller. The submit action renders the helloformresult.isml template.
HelloForm.js
'use strict';
/**
* Controller example for a product review form.
*/
/* Script Modules */
var app = require('app_storefront_controllers/cartridge/scripts/app');
var guard = require('app_storefront_controllers/cartridge/scripts/guard');
var ISML = require('dw/template/ISML');
var URLUtils = require('dw/web/URLUtils');
function start() {
app.getView({
ContinueURL: URLUtils.https('HelloForm-HandleForm')
}).render('helloform');
}
function handleForm() {
app.getForm('helloform').handleAction({
cancel: function () {
app.getForm('helloform').clear();
response.redirect(URLUtils.https('Home-Show'));
},
submit: function () {
app.getView().render('helloformresult');
}
});
}
/** Shows the template page. */
exports.Start = guard.ensure(['get'], start);
exports.HandleForm = guard.ensure(['post'], handleForm);
See also Using API Form Classes.
Template
In this example, helloform.isml is the empty form rendered for the user and the helloformresult.isml is the page that shows previously entered data.
Helloform.isml
The form action uses the URLContinue property that is passed to it by the controller.
This form includes the app_storefront_core cartridge modules folder, because it lets you use custom tags provided by SiteGenesis, including the isinputfield tag. The custom
module that supports the isinputfield tag is defined in the inputfield.isml file. This module generates HTML for input fields used in a form. Generating the HTML instead of
hard coding it in the template makes coding faster, improves coding consistency, and lets you change the input type in one place and have the changes immediately adopted across
your site.
The form field is tied to the form definition through the formfield attribute value, which references the field formid defined in the form definition.
<!--- TEMPLATENAME: helloform.isml --->
<iscontent type="text/html" charset="UTF-8" compact="true" />
<isinclude template="util/modules"/> //generates isinputfield tag html
<h1>Hello World Form</h1>
<form action="${URLUtils.httpsContinue()}" method="post" class="form-horizontal" id="HelloForm">
<fieldset>
<isinputfield formfield="${pdict.CurrentForms.helloform.nickname}" type="input"/>
</fieldset>
<fieldset>
<button type="submit"
name="${pdict.CurrentForms.helloform.submit.htmlName}"
value="submit">Submit</button>
<button type="cancel"
name="${pdict.CurrentForms.helloform.cancel.htmlName}"
value="submit">Cancel</button>
</fieldset>
</form>
3/16/23, 2:11 PM
Legacy Developer Documentation
https://documentation.b2c.commercecloud.salesforce.com/DOC1/advanced/print.jsp?topic=/com.demandware.dochelp/LegacyDevDoc/LegacyDevDoc.html&cp=…
87/158
Helloformresult.isml
This template prints out the form field label and data stored from the form.
<!--- TEMPLATENAME: helloform.isml --->
<iscontent type="text/html" charset="UTF-8" compact="true" />
<!doctype html>
<head></head>
<body>
<h1>Hello World Form Result</h1>
<p>Thank you for entering: </p>
<p>${pdict.CurrentForms.helloform.nickname.label} ${pdict.CurrentForms.helloform.nickname.value}</p>
</body>
</html>
Back to top.
Localizing Forms
Changing form structure and fields for different Locales
You can change the structure of a form depending on the locale. For example, you might want to include different address fields, such as state or province, depending on the country.
To localize the form structure, you can create different form definitions for each locale. These form definitions have the same name, but a different structure or different fields for
different locales.
To do this, in your cartridge, create a forms/default folder for the standard locale and then separate folders that are named for each locale of the form. Store a different form
definition in each locale folder. If a locale doesn't have a separate folder, the default form definition is used.
forms
default
billingaddress.xml
it_IT
billingaddress.xml
ja_JP
billingaddress.xml
Localizing Strings Within Forms
All form strings can be replaced with resource strings. Resource strings for forms are located by default in the forms.properties file for your cartridge and referenced from the form
definition file. Add files with the name forms_locale_.properties to add localized strings. For example, add a forms_it_IT.properties file for an Italian version of the same
properties. If you have different fields for the form, depending on the locale, make sure the strings for those fields are included in the localized version of the properties files.
Example: Localizing Labels and Error Messages
The following form definition file defines a form to enter contact information. This example doesn't show the entire form definition, just some of the fields that use localized strings
for labels and error messages. You can find this file as the contactus.xml form in the SiteGenesis app_storefront_core cartridge.
<?xml version="1.0"?>
<form xmlns="http://www.demandware.com/xml/form/2008-04-19">
<field formid="firstname" label="contactus.firstname.label" type="string" mandatory="true" binding="firstName" max-length="50"/>
<field formid="lastname" label="contactus.lastname.label" type="string" mandatory="true" binding="lastName" max-length="50"/>
<field formid="email" label="contactus.email.label" type="string" mandatory="true" parse-error="contactus.email.parse-error" />
The label and error strings in bold reference the properties set in the forms.properties file, which contains entries like the following for the default site locale:
##############################################
# Template name: forms/contactus
##############################################
contactus.firstname.label=First Name
contactus.lastname.label=Last Name
contactus.email.label=Email
contactus.email.parse-error=The email address is invalid.
The form is localized in the forms_it_IT.properties file, (along with the other locale-specific forms_locale_.properties files), with entries like the following:
##############################################
# Template name: forms/contactus
##############################################
contactus.firstname.label=Nome
contactus.lastname.label=Cognome
contactus.email.label=Email
contactus.email.parse-error=L'indirizzo email non è valido.
Back to top.
Hiding Form Fields
You can use isinputfield type="hidden" tag or input type="hidden" to hide form fields in templates. In most cases, hidden input fields are not saved to the CurrentForms
object, so isinputfield isn't used.
i i
3/16/23, 2:11 PM
Legacy Developer Documentation
https://documentation.b2c.commercecloud.salesforce.com/DOC1/advanced/print.jsp?topic=/com.demandware.dochelp/LegacyDevDoc/LegacyDevDoc.html&cp=…
88/158
Validating Form Data
Validation on form data is configured in the form definition. B2C Commerce runs the validation for any action where the valid-form attribute is set to true. For example:
<action formid="send" valid-form="true"/>
Validation by Attribute
The attributes set on the form field are used for validation. In the following example, the mandatory attribute requires a value for the field, the regexp attribute determines the
content of the field, and the max-length attribute sets the maximum length of the data for the field.
Note: The max-length attribute is only used for validation of strings. For other field types it's only used to format the field length and not to validate data.
<field formid="email" label="contactus.email.label" type="string" mandatory="true" regexp="^[\w.%+-]+@[\w.-]+\.[\w]{2,6}$" max-length="50
Errors shown for attribute validation:
default error for form invalidation: value-error attribute message appears.
mandatory flag invalid: missing-error attribute message appears.
entered value invalid: parse-error attribute message appears.
Validation by Function
You can also use the validation attribute to specify a function to run to validate form data. You can run these validations on container elements, such as form or group, or on
individual fields.
<field formid="password"
label="label.password"
type="string"
range-error="resource.customerpassword"
validation="${require('~/cartridge/scripts/forms/my_custom_script.ds').my_custom_validation(formfield);}"
You can also selectively invalidate form elements using the InvalidateFormElement pipelet in pipelines or the invalidateFormElement function in the FormModel or any model
that requires it. If any element in a form is invalid, the whole form is invalid. However, in your form definition you can create error messages that are specific to a field. See the
example of range-error, which points to a resource string with a message for the customer on why the field is invalid.
See also Form Validation
Back to top.
Saving Form Data
If you define form fields in a form definition and reference the form definition field IDs in your template, data saved to those fields is persisted for the length of the session, unless the
form or field is explicitly cleared or the data is replaced.
To save data from a form to a custom object or a system object:
In a form definition, configure a binding between the form field and the system or custom object attribute where you want it to be stored.
In a controller, you call the dw.web.FormGroup class copyTo method in a transaction to copy data from the form to the system or custom object where you want to store the
data.
Note: If you use app.getForm to get a FormModel, the form model copyTo method wraps the object update in a transaction and logs any errors that occur while
updating the object. If you use dw.web.FormGroup directly, you must make sure to call the copyTo method inside a transaction.
The following form definition creates a binding between an email input field and an email attribute for an object. The binding attribute specifies the name of the attribute.
<?xml version="1.0"?>
<form xmlns="http://www.demandware.com/xml/form/2008-04-19">
<!-- the binding attribute binds the emailAddress inputfield to the email attribute-->
<field formid="emailAddress" label="email" type="string" mandatory="true" binding="email" regexp="^[\w.%+-]+@[\w.-]+\.[\w]{2,6}$"
<action formid="submit" valid-form="true"/>
<action formid="cancel" valid-form="false"/>
</form>
The following controller uses the copyTo method to save the data in the form to the B2C Commerce object. The copyTo method must be used in a transaction for the save to work
successfully.
function handleForm() {
app.getForm('testform2').handleAction({
cancel: function () {
app.getForm('testform2').clear();
response.redirect(URLUtils.https('TestForm2-Start'));
},
3/16/23, 2:11 PM
Legacy Developer Documentation
https://documentation.b2c.commercecloud.salesforce.com/DOC1/advanced/print.jsp?topic=/com.demandware.dochelp/LegacyDevDoc/LegacyDevDoc.html&cp=…
89/158
submit: function (formgroup) {
// formgroup must be declared, but it's actually passed in by the FormModel handleAction method.
// get the login value to look up the customer. This is hardcoded for example purposes.
var lastlogin = "[email protected]";
//retrieve the customer by login
var mycust = retrieveCustomerByLogin(lastlogin);
// copy the form data to the customer object
dw.system.Transaction.wrap(function () {
formgroup.copyTo(mycust.profile);
});
app.getView({
LastLogin: lastlogin,
Customer: mycust,
}).render('test/testformresult2');
}
});
}
function retrieveCustomerByLogin(login) {
var customerByLogin = CustomerMgr.getCustomerByLogin(login);
if (customerByLogin === null) {
return null;
}
return customerByLogin;
};
See also Object Binding with Forms
Back to top.
Clearing or Refreshing Forms
Because form data persists in the CurrentForms object for each form during the session, if you need to reuse a form, such as an address form, you must clear the data from the form
object before reuse. You can clear the entire form, but not specific elements in the form. However, you can set the form value for a specific field to an empty string or default value to
indirectly clear it.
In controllers, you can use the FormModel.js clear method or the dw.web.FormElement.clearFormElement() method
Example: clearing the form using a FormModel
This example gets the profile form and clears it.
app.getForm('profile').clear();
Prepopulating Form Data
You can prepopulate forms with information from system objects, custom objects, and in-memory form data.
To Get Data from System Objects
You can use either the dw.web.FormGroup .copyTo method or the FormModel.js copyTo method to get data from an existing form object. You can also use the metadata
attributes for a system or custom object to prefill form data.
See also Extracting Form Field Parameters from Metadata.
To Get Data from Other Forms
You can use either the dw.web.FormGroup class .copyFrom method or the FormModel.js copyFrom function to get data from an existing form object. In most cases, if you have
used app.getForm to get a copy of a form model, it makes more sense to use the function. You can also transfer form data from one form to another directly. In the following
example, if a customer has decided to use the shipping address for billing, the values from one form are copied to the other.
if (app.getForm('singleshipping').object.shippingAddress.useAsBillingAddress.value === true) {
app.getForm('billing').object.billingAddress.addressFields.firstName.value = app.getForm('singleshipping').object.shippingAddress
app.getForm('billing').object.billingAddress.addressFields.lastName.value = app.getForm('singleshipping').object.shippingAddress.
app.getForm('billing').object.billingAddress.addressFields.address1.value = app.getForm('singleshipping').object.shippingAddress.
app.getForm('billing').object.billingAddress.addressFields.address2.value = app.getForm('singleshipping').object.shippingAddress.
app.getForm('billing').object.billingAddress.addressFields.city.value = app.getForm('singleshipping').object.shippingAddress.addr
app.getForm('billing').object.billingAddress.addressFields.postal.value = app.getForm('singleshipping').object.shippingAddress.ad
app.getForm('billing').object.billingAddress.addressFields.phone.value = app.getForm('singleshipping').object.shippingAddress.add
app.getForm('billing').object.billingAddress.addressFields.states.state.value = app.getForm('singleshipping').object.shippingAddr
app.getForm('billing').object.billingAddress.addressFields.country.value = app.getForm('singleshipping').object.shippingAddress.a
app.getForm('billing').object.billingAddress.addressFields.phone.value = app.getForm('singleshipping').object.shippingAddress.add
}
However, using the copyTo function can be much more efficient, especially if you have bindings.
To Copy Values from One Object to Another
To copy values from one custom object to another, don't use the dw.web.FormGroup copyFrom() and copyTo() methods. This code doesn't work:
3/16/23, 2:11 PM
Legacy Developer Documentation
https://documentation.b2c.commercecloud.salesforce.com/DOC1/advanced/print.jsp?topic=/com.demandware.dochelp/LegacyDevDoc/LegacyDevDoc.html&cp=…
90/158
var testObject = { mykey: "myvalue", mykey2 : "myvalue2" };
var output = {};
app.getForm( 'test' ).copyFrom( testObject );
app.getForm( 'test' ).copyTo( output );
Logger.info( JSON.stringify( output ) );
Instead, use Javascript to directly copy the values, as in this example:
let testObject = { name:"default name", subject:"default subject", message:"default message" };
let output = {};
Object.keys( testObject ).forEach( function( key ) {
output[key] = testObject[key];
});
Sharing Data Between Forms
Reusing form Definitions
The form you create in your template can contain fields from multiple form definitions. The same fields can be reused in other forms as many times as needed. This can be useful for
prepopulating form data that the customer has already entered. For example, address or payment preference data.
Using form Metadata
You can use the metadata entered for a custom or system object in Business Manager to determine form definition information. This lets you manage data attributes in one place
without having to change code. For example, if you wanted to let merchants change the labels on form fields, you could include label as a metadata attribute and reference it.
See Extracting Form Field Parameters from Metadata
Back to top.
Securing Forms
CSRF (Cross-Site Request Forgery) protection Framework
Use the new CSRF framework to add fields that are protected from request forgery.
For more information, see Cross Site Request Forgery Protection.
Deprecation of SFF (Secure Form Framework)
Prior to B2C Commerce 16.3, the main mechanism for securing form data was the secure form framework, which is being deprecated in 16.3. The CSRF Framework provides the
following benefits over the SFF:
1. SFF could only be used on ISML forms that were based on form definitions. With the CSRF framework any request can be CSRF protected, including anchor links.
2. CSRF framework is easier to maintain, with fewer setup steps and files to touch.
3. Customer developers are in complete control of when, where, and how to implement CSRF Protection with the backing of an adversarial review to ensure the framework’s
security.
4. Because even dynamic forms can be cached and secured, more forms can now be protected without concerns about performance degradation.
Back to top.
Dynamic/Multi-Part Forms
The isdynamicform tag can be used to generate dynamic forms. The code generated by the tag is controlled by the dynamicform.isml template and the dynamicForm.js script.
Embedded and Nested Forms
B2C Commerce supports forms that are embedded or nested in other forms. However, it's not recommended as a best practice.
Back to top.
© Copyright 2000-2023, Salesforce, Inc. All rights reserved. Various trademarks held by their respective owners. Show URL Submit Feedback Privacy Policy
2.11.1. What Is a Form Definition
When working with Salesforce B2C Commerce forms, you define form properties and data validation within an XML-based form definition (model). Form definitions are stored in the
forms folder of a cartridge (cartridge/forms/default). Within a pipeline, you use form pipelets to create in-memory data constructs based on one or more form definitions.
The form.xsd schema file (XSD), which identifies the allowed elements and attributes for form files, is included in the general schema .zip file provided by B2C Commerce.
Use this file as a guideline for defining your form definitions.
The Pipeline Dictionary stores per session key value pairs using elements of the form definition as the keys and consumer input data as the values. You can also use forms just for
rendering. They don't need to contain consumer input data.
There is only one form instance for each form definition per session. The system stores this information in the Pipeline Dictionary using the value CurrentForms to provide access to
these form instances. You can reference a form within a template or script via its definition name, which is derived from its file name. You can access all form fields as alias
expressions and as B2C Commerce script expressions; and use these expressions to copy (via binding) the value of a field directly into a business object.
3/16/23, 2:11 PM
Legacy Developer Documentation
https://documentation.b2c.commercecloud.salesforce.com/DOC1/advanced/print.jsp?topic=/com.demandware.dochelp/LegacyDevDoc/LegacyDevDoc.html&cp=…
91/158
Form definitions
Describe the form data entry parameters.
Let you declare form parameters as mandatory or optional.
Support regular expression-based rules that can be used to determine if the content submitted by the client is valid.
Starting in 15.8, you can specify a custom validation function for form fields. For more information, see Field Form Element.
Are stored in XML files in a cartridge.
Can define dynamic or hard-coded data representation.
Can be taken directly from the metadata system.
Form objects (in
memory)
Contain all information necessary for form display (for example, name, value, label, description and error message).
Handle the formatting (for example, numeric values are reformatted after validation in the correct format).
Represent the HTTP form data submitted by a client browser.
Provide a container for multiple form parameters submitted by a client.
Are stored in session memory.
Can be bound with business objects and stored on a server.
Can be derived from B2C Commerce metadata via the object-def and attribute-def form field attributes. See Extracting Form Field Parameters
from Metadata.
Refer to a form instance by the form definition's XML file name, as follows:
CurrentForms.<formname>.<field(s)>
These are some sample expressions:
name="${pdict.CurrentForms.cart.CalculateTotal.htmlName}"/>
<isif condition="${pdict.CurrentForms.checkout.selectedpm.options.CreditCard.checked}">
© Copyright 2000-2023, Salesforce, Inc. All rights reserved. Various trademarks held by their respective owners. Show URL Submit Feedback Privacy Policy
2.11.2. Object Binding with Forms
Object binding lets you associate one or more business objects with a Salesforce B2C Commerce form instance and associate form elements with specific business object properties.
By using object binding, you can easily transfer business object values into ISML pages for rendering in a user's browser; and you can also easily update business objects with values
submitted by a customer. To use object binding, you:
1. Create a form definition where form elements identify business object properties using the binding attribute.
2. Use the UpdateFormWithObject pipelet to associate a business object with an in-memory instance of the form definition.
3. Use tags in your ISML page to access the in-memory form instance and corresponding business object properties.
4. Use the UpdateObjectWithForm pipelet to update the business object with values submitted by a customer from their browser.
Example: Profile Form Definition
For example, the profile form definition in the SiteGenesis application contains a group definition called customer. This group contains field definitions that represent properties in
the Profile business object. The following field definition from the customer group indicates that the firstname field is bound to the firstName property in a business object:
<group formid="customer">
<field formid="firstname" label="forms.profile.001" type="string" mandatory="true" binding="firstName" max-length="50"/>
</group>
Using Pipelets to Bind Objects
In practice, the firstname form field is used to interact with the firstName property of the Profile object. For the actual field-to-object binding to occur, you use the
UpdateFormWithObject pipelet. This pipelet attaches the business object to the customer group element and binds the field elements to specific form properties. When using the
UpdateFormWithObject pipelet in a pipeline, you must specify the business object to use and the form you want to update. In the SiteGenesis application, the Account-EditProfile
pipeline populates the customer group with the Profile business object using these expressions:
CurrentForms.profile.customer - identifies the form element to update.
CurrentCustomer.profile - identifies the business object to use.
Both CurrentForms and CurrentCustomer are stored in the Pipeline Dictionary.
Templates
3/16/23, 2:11 PM
Legacy Developer Documentation
https://documentation.b2c.commercecloud.salesforce.com/DOC1/advanced/print.jsp?topic=/com.demandware.dochelp/LegacyDevDoc/LegacyDevDoc.html&cp=…
92/158
p
In the ISML page, the firstname field is used to access the value of the Profile.firstName property:
<isinputfield formfield="${pdict.CurrentForms.profile.customer.firstname}" type="input">
When the ISML page appears in the browser, the firstName property is rendered as an HTML input field. After the user changes the input field value and submits the page to the
server, the Forms Framework uses the UpdateObjectWithForm pipelet to copy the values in the form instance to the corresponding business object using the same binding attribute.
Binding Collections
The firstname form field definition is a simple example of how a single field can be bound to specific business object property. You can also use object binding to bind a collection of
objects to a collection of form instances via the < list> form element.
For example, the following < list> element definition is from the cart form definition:
<list formid="coupons"></list>
As you can see, the coupons list doesn't use the binding attribute. But when you use the UpdateFormWithObject pipelet with a collection and a list, the pipelet creates a list element
instance for every business object in the collection and binds a business object to each list element instance. From an expression perspective, the individual list item instances are
represented as a numbered array. For example, if there are three Coupon business objects there would be an array of coupons list element instances, as follows:
CurrentForms.cart.coupons[0]
the first coupon
CurrentForms.cart.coupons[1]
the second coupon
CurrentForms.cart.coupons[2]
the third coupon
As with all object-to-form bindings, the object can be accessed in the form using the .object identifier. To access the Coupon business object bound to the second coupons list
instance, use the following expression:
CurrentForms.cart[1].object
Binding Within Nested Lists
Like the firstname form field definition, the coupons list definition illustrates simple object binding. However, the Forms Framework lets you create nested form element definitions
and use object binding to access business objects and their values. For example, the following list element definition is from the cart form definition:
<list formid="shipments">
<list formid="items" binding="productLineItems">
<field formid="quantity" type="number" binding="quantityValue" format="0.#"/>
</list>
...
</list>
The shipments list contains a child list called items, which has a binding to the property productLineItems. The child list items contains a field definition with a binding to
quantityValue. To populate the items list, pass a collection of objects to the shipments list, where the business objects in the collection have a productLineItems property.
For example, the Cart-PrepareView pipeline in the SiteGenesis application uses the UpdateFormWithObject pipelet to populate the shipments list with the expression
Basket.shipments, which returns a collection of Shipment objects. Because the Shipment.productLineItems property returns a collection of ProductLineItem business objects,
B2C Commerce can bind a ProductLineItem business object to each instance in the items list. Furthermore, because the ProductLineItem business object has a quantityValue
property, the pipelet is able to populate the quantity field in each list item instance. If we had a basket that represented two shipments, and each shipment had a one product line
item, the in-memory form list would resemble the following:
CurrentForms.cart.shipments[0]
The first shipment
CurrentForms.cart.shipments[0].items[0]
The first ProductLineItem in the first shipment
CurrentForms.cart.shipments[0].items[0].quantity
The field containing the value of the quantityValue property in the first ProductLineItem field
CurrentForms.cart.shipments[1]
The second Shipment
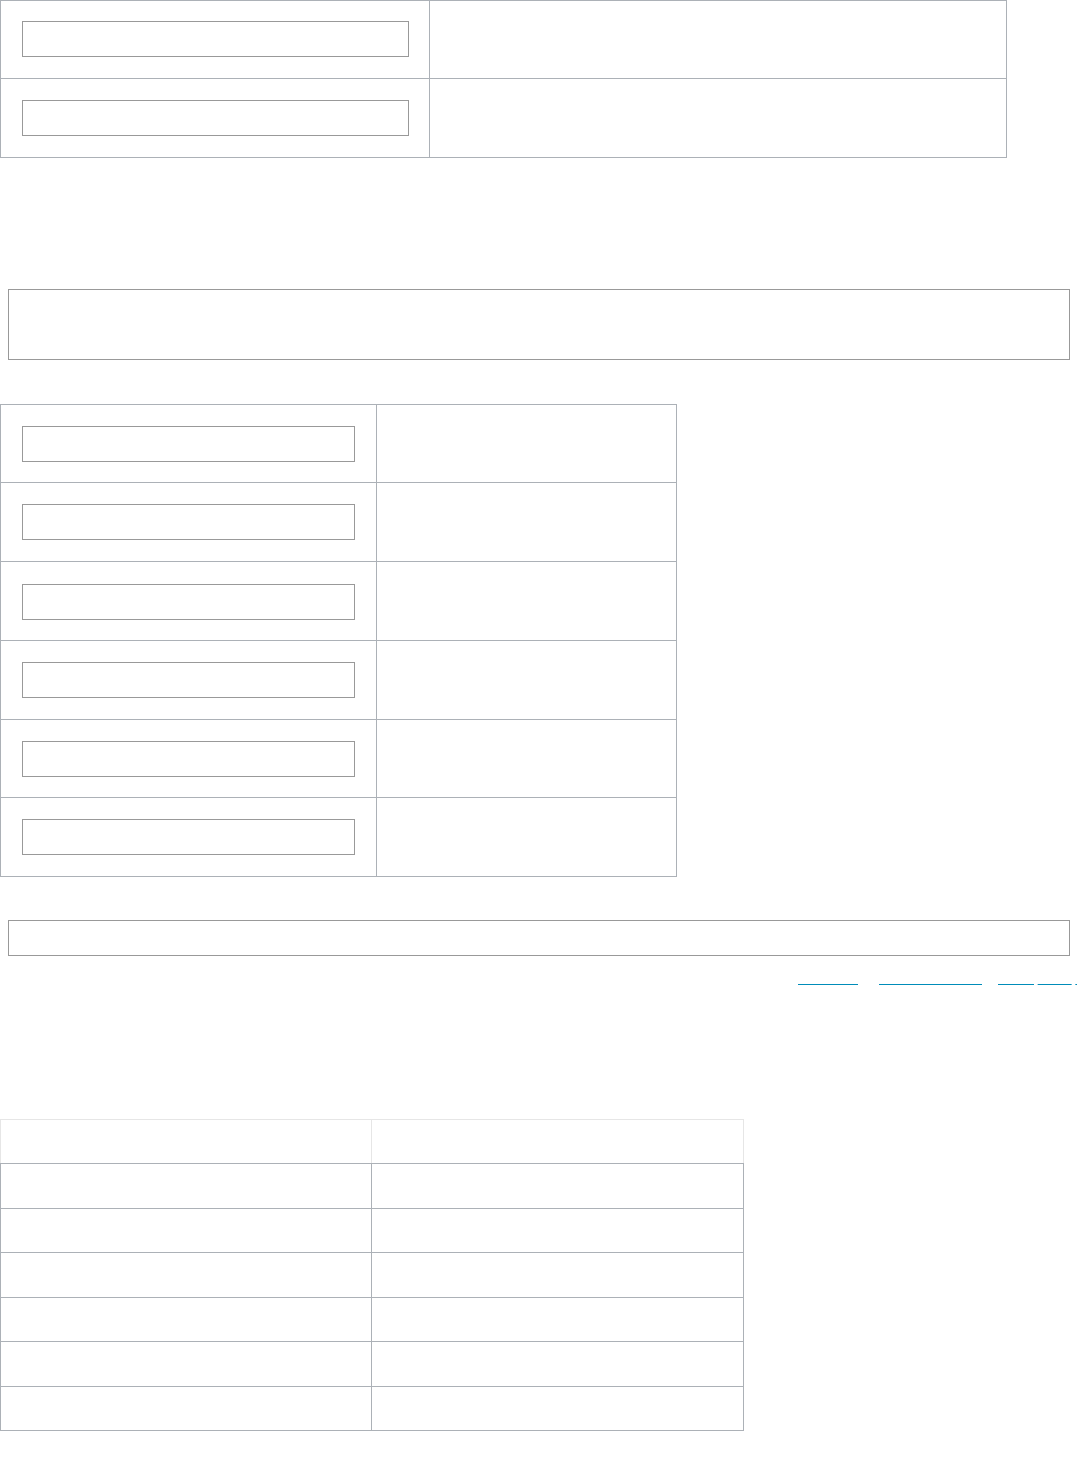
3/16/23, 2:11 PM
Legacy Developer Documentation
https://documentation.b2c.commercecloud.salesforce.com/DOC1/advanced/print.jsp?topic=/com.demandware.dochelp/LegacyDevDoc/LegacyDevDoc.html&cp=…
93/158
CurrentForms.cart.shipments[1].items[0]
The first ProductLineItem in the second shipment
CurrentForms.cart.shipments[1].items[0].quantity
The field containing the value of the quantityValue property in the first ProductLineItem field
Triggered Actions
So far, all of these examples have shown how B2C Commerce and pipelets bind objects to forms and fields to object properties. In addition, you can use action elements to easily
identify which object is associated with the triggered action. In B2C Commerce, the triggered action represents the HTML action that caused an HTML form to be posted to the server.
For example, in the SiteGenesis application, the coupons list in the cart form contains an action element:
<list formid="coupons">
<action formid="deleteCoupon" valid-form="false"/>
</list>
When B2C Commerce populates the list with a collection of coupons, the corresponding in-memory array would resemble the following:
CurrentForms.cart.coupons[0]
the first coupon
CurrentForms.cart.coupons[0].deleteCoupon
the action associated with the first coupon
CurrentForms.cart.coupons[1]
the second coupon
CurrentForms.cart.coupons[1].deleteCoupon
the action associated with the second coupon
CurrentForms.cart.coupons[2]
the third coupon
CurrentForms.cart.coupons[2].deleteCoupon
the action associated with the first coupon
When an action is actually triggered in the browser, you can easily access the object associated with the action using the following expression:
TriggeredAction.object
© Copyright 2000-2023, Salesforce, Inc. All rights reserved. Various trademarks held by their respective owners. Show URL Submit Feedback Privacy Policy
2.11.3. Extracting Form Field Parameters from Metadata
You can use the Salesforce B2C Commerce metadata system instead of the explicitly setting values in the XML form definition. If multiple fields refer to the same meta data, they can
be managed from one central place. You can extract the following form field parameters from the B2C Commerce metadata system:
Parameter Description
field ID ID from the attribute definition
field type (see the next table) Type from the attribute definition
field label Display name from the attribute definition
field description Description from the attribute definition
field min and max length String settings from the attribute definition
field min and max value Number range from the attribute definition

3/16/23, 2:11 PM
Legacy Developer Documentation
https://documentation.b2c.commercecloud.salesforce.com/DOC1/advanced/print.jsp?topic=/com.demandware.dochelp/LegacyDevDoc/LegacyDevDoc.html&cp=…
94/158
Parameter Description
field regular expression Regular expression for strings from the attribute definition
field mandatory Flag from the attribute definition
Field types can be as follows:
Field type Description
string field Metadata type string, text, html, set of string
int field Metadata type int, set-of-int
number field Metadata type number
boolean field Metadata type boolean
string field with option list Enum-of-string
int field from option list Enum-of-int
If the business object attribute is an enum-of-int or enum-of-string, then the field is handled as a select box and pre-populated with the values defined in the metadata.
If a field is associated with a metadata definition, the binding is automatically set to that attribute.
Using Metadata Extraction Attributes
Use the object-def attribute with the form, formgroup and list elements. The value of object-def must be the name of a system business object, for example, CustomerAddress, or the
name of a custom business object prefixed with Custom, for example, Custom.MyObject.
For individual fields, use the attribute-def attribute, which must refer to the name of an attribute in the metadata definition. The attribute can be a common name, for example,
name, or it can refer to a custom attribute, for example, custom.myvalue. A field that references an attribute definition must be embedded in a form group (or a form or a list), which
is associated with an object type.
Example
In this example, the merchant is extracting customer address information for existing customers.
<form object-def="CustomerAddress">
<field attribute-def="firstName"/>
<field attribute-def="lastName" label="forms.orderaddress.003"/>
<!-- overwrite label --> <field attribute-def="address1" mandatory="false"/>
<!-- overwrite mandatory flag --> <field attribute-def="address2"/>
</form>
© Copyright 2000-2023, Salesforce, Inc. All rights reserved. Various trademarks held by their respective owners. Show URL Submit Feedback Privacy Policy
2.11.4. Form Element Naming Conventions
Form element names are referenced one way in Salesforce B2C Commerce (in a template or a pipeline) and appear in a different way in the rendered HTML.
In a form In HTML
The first identifier is CurrentForms. The first identifier is dwfrm, which is used to identify POST values related to this form instance.
The second identifier is the name of the form. The second identifier is the name of the form.
Each subsequent identifier within the name is separated by a point (.). Each subsequent identifier within the name is separated by an underscore (_).
Subsequent identifiers form a path expression to the fields in the form. Subsequent identifiers form a path expression to the fields in the form.
In the case of a list, the < list> element is used. In the case of a list, the index number of the list item is inserted as the identifier.
This is how names appear in templates:
CurrentForms.NewAddress.Street
CurrentForms.AddressBook.addresses.city
This is how names appear in HTML:
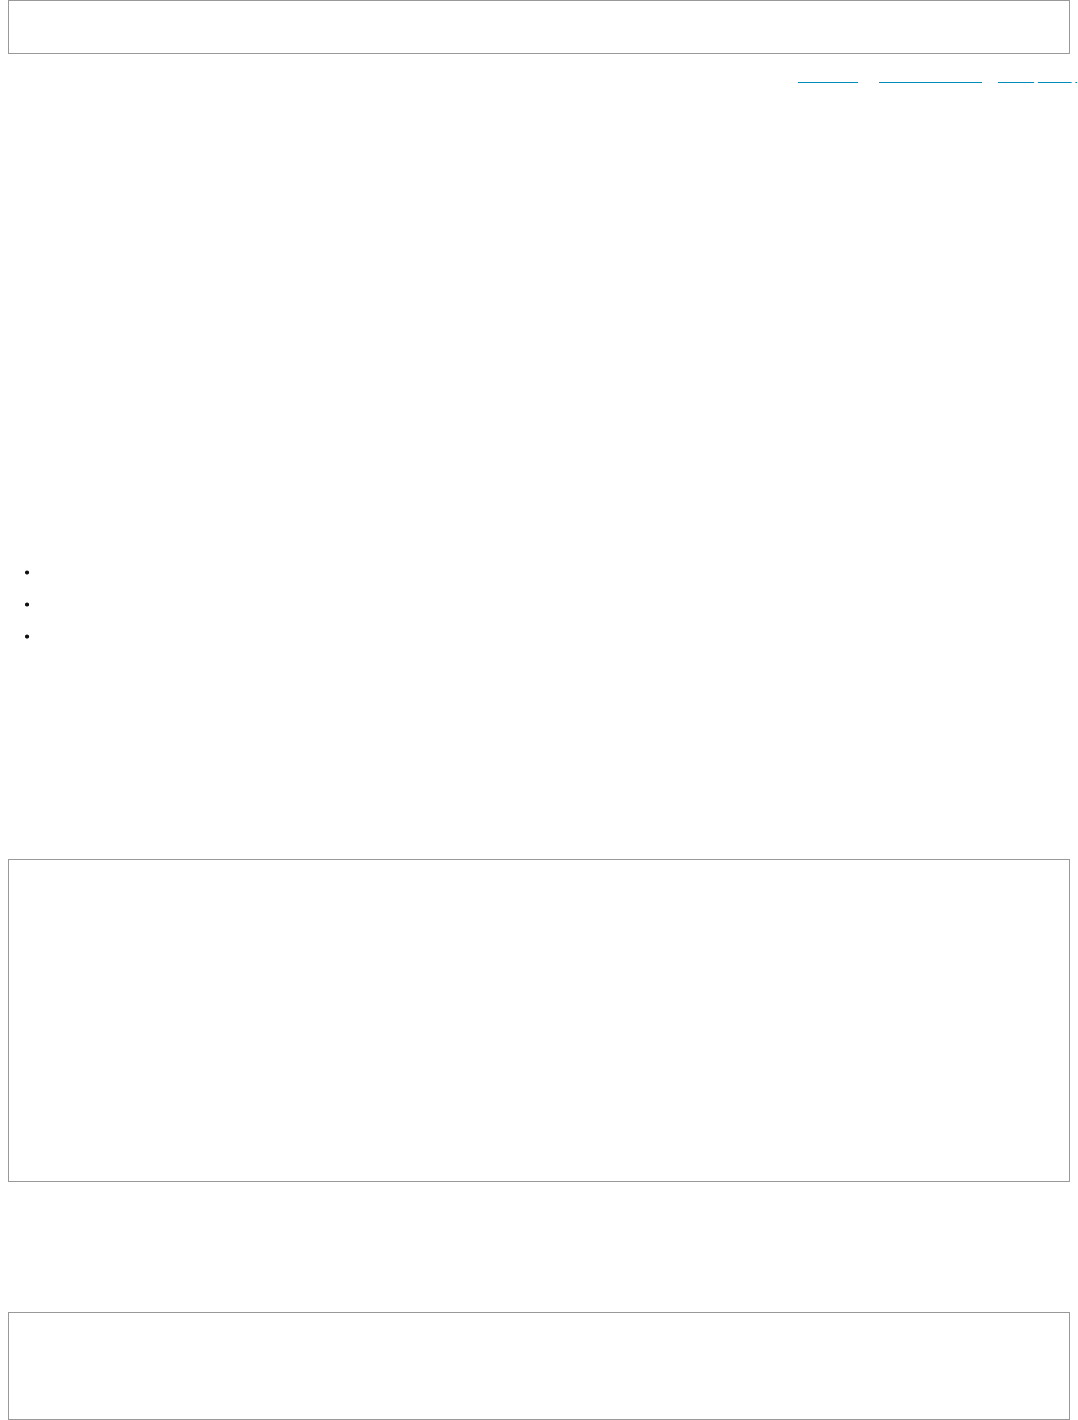
3/16/23, 2:11 PM
Legacy Developer Documentation
https://documentation.b2c.commercecloud.salesforce.com/DOC1/advanced/print.jsp?topic=/com.demandware.dochelp/LegacyDevDoc/LegacyDevDoc.html&cp=…
95/158
dwfrm_NewAddress_Street
dwfrm_AddressBook_addresses_0_city ( 0 represents an index position)
© Copyright 2000-2023, Salesforce, Inc. All rights reserved. Various trademarks held by their respective owners. Show URL Submit Feedback Privacy Policy
2.11.5. Cross Site Request Forgery Protection
Cross Site Request Forgery (CSRF) is a class of security vulnerabilities that affect the authenticity of requests. This type of attack occurs when a victim is tricked into clicking on a
malicious link that is usually sent via email or on a website. This link forces the victim's browser to make a request to another site to execute an unwanted action. This requires the
victim to be authenticated on the other site. For example:
1. Customer logs into banking application to check a balance.
2. Customer receives email with a link to win some prize.
3. Customer clicks link.
4. Customer’s browser actually makes a request to the banking application to perform a transfer of funds from the victim’s bank account to the attacker’s bank account.
5. Customer might or might not immediately know that this action took place.
An attacker might be able to force a victim to buy unwanted items, ship baskets to another address, or change user passwords.
Salesforce B2C Commerce Protection Against CSRF
The CSRF protection API uses a Synchronizer Token pattern, which generates a token that is inserted into the HTML page sent to a user. When the user submits content from the
page, the server is configured to look for and validate that token. If the token fails to validate, the request should be rejected.
The API is exposed via dw.web.CSRFProtection. This class contains three methods:
getTokenName() – returns the expected parameter name as a string that maps to a CSRF Token.
generateToken() – securely generates a Token string for the current user. Tokens are unique per call to generateToken.
validateRequest() – examines a user’s current request to determine if the request contains a valid CSRF Token. A Token is valid if it was generated for this user’s session in
the last 60 minutes.
The CSRFProtection class is used for forms, AJAX, or anywhere a developer needs to protect a request made to the B2C Commerce server.
Using CSRF with Controllers
The best practice for CSRF in SGJC controllers is to include it when handling a specific form action. It's action-specific, because not all actions submit data and require CSRF
protection. It also provides better performance, by not requiring the package for every possible action for the form. This mechanism is best practice for controllers, as it avoids issues
with caching in templates. However, you can still use the template mechanism for CSRF described later in this topic.
To add CSRF for an action, include the CSRFProtection class and call the validateRequest method. If the validation fails, log the customer out and render an error template. An
example is available in the Cart.js controller for the addCoupon action.
formResult = cartForm.handleAction({
//Add a coupon if a coupon was entered correctly and is active.
'addCoupon': function (formgroup) {
var CSRFProtection = require('dw/web/CSRFProtection');
if (!CSRFProtection.validateRequest()) { //validate the request
app.getModel('Customer').logout(); //log the customer out
app.getView().render('csrf/csrffailed'); //render an error template
return null;
}
var status;
var result = {
cart: cart,
EnableCheckout: true,
dontRedirect: true
};
Note: You might see CSRF in guards in SGJC. However, this is part of a legacy implementation of CSRF and is no longer functionally useful.
Using CSRF Protection for Forms Without Page Caching
Add the following to the ISML template:
<form action="${URLUtils.*}" method=POST>
…
<input type=”hidden” name=”${dw.web.CSRFProtection.getTokenName()}” value=”${dw.web.CSRFProtection.generateToken()}”/>
<input type=”submit” value=”Send Protected Request”/>
</form>
For pipelines, add a script node to the pipeline that the form action points to. For example, if the form action points to COBilling-UpdateAddressDetails, the first node in that pipeline
must validate the CSRF Token, which can be done with a simple script. The script must contain code similar to:

3/16/23, 2:11 PM
Legacy Developer Documentation
https://documentation.b2c.commercecloud.salesforce.com/DOC1/advanced/print.jsp?topic=/com.demandware.dochelp/LegacyDevDoc/LegacyDevDoc.html&cp=…
96/158
if( !CSRFProtection.validateRequest() ){
return PIPELET_ERROR;
}
return PIPELET_NEXT;
Using CSRF with Cached Forms
In order to make the content cacheable, the server must not place the CSRF token in the ISML template. Instead, an AJAX callback is used to retrieve a CSRF token for the current
session, then JavaScript inserts the token into any necessary HTML location.
Create a CSRF Token Generation Endpoint
First create a pipeline or controller called CSRF-TokenGeneration that must be accessed over HTTPS to protect against malicious interception. It accepts a request and returns a
JSON object containing the token name and token value. It has the form:
{“csrf_token_name”: ${dw.web.CSRFProtection.getTokenName()}”,
“csrf_token_value”: ${dw.web.CSRFProtection.generateToken()}”}
Create a JavaScript module that can be used to make the AJAX call and insert the returned token into a form by id, with code similar to the following example:
function getAndInsertCSRFToken(formid){
$(document).ready(function(){
$.ajax(
{
url: '${URLUtils.url("CSRF-GetToken")}',
context: document.body,
dataType: 'json',
success: function(data, status){
insertCSRFForm(data, formid);
},
error: function(xhr, status, error){
alert('error' + error);
}
}
);
});
}
function insertCSRFForm(csrfjson, formid){
var csrf_name = csrfjson.csrf_token_name;
var csrf_value = csrfjson.csrf_token_value;
var form = document.getElementById(formid);
var inputfield = document.createElement("input");
inputfield.type = "text";
inputfield.name = csrf_name;
inputfield.value = csrf_value;
var children = form.children;
form.insertBefore(inputfield, children[children.length-1]);
}
Insert the CSRF token via JavaScript.
Add CSRF Tokens to forms via JavaScript calls.
<script src='${URLUtils.staticURL("csrfhelpers.js")}'></script>
<body onload=” getAndInsertCSRFToken(‘csrf_test_js’)”>
<form action="${URLUtils.httpContinue()}" id="csrf_test_js">
<input type="text" name="foo" value="bar"/>
<input type="submit" value="Dynamic Submit"/>
</form>
</body>
This example loads the ISML page, executes the AJAX call, pulls in a token, and inserts the token into the csrf_test_js form. Because the form is populated with the token at run
time, the page contents might be cached.
Best Practice Recommendations for CSRF
Salesforce recommends the following best practices:
Only use POST methods over HTTPS.
By design, the CSRF Protection Framework only examines request content and only requires session information and the CSRF Token to validate. This means that HTTP
requests, including GET methods, are allowed to have CSRF Tokens. It should be considered best practice to only use POST methods over HTTPS, because browser and server
logs store GET request content and attackers might easily intercept HTTP requests.
Return the customer to the home page if validateRequest() returns false.
The validateRequest() method returns a boolean value indicating validation success or failure. Best practice is to show a message to users indicating that a potentially malicious
event was detected and stopped. Your application can log out the user, return the user to the home page, or send a message to an administrator. Salesforce recommends at
3/16/23, 2:11 PM
Legacy Developer Documentation
https://documentation.b2c.commercecloud.salesforce.com/DOC1/advanced/print.jsp?topic=/com.demandware.dochelp/LegacyDevDoc/LegacyDevDoc.html&cp=…
97/158
least returning a user to the home page of the site.
Handle CSRF token timeout.
CSRF Tokens are good for the life of the session, or 60 minutes, whichever comes first. This is important to note, because some users use multiple browser tabs to get work
done. If an old tab is left open for more than 60 minutes and contains a CSRF Protected request, that request fails if it's made after the timeout expires.
Properly validate and encode all user input.
CSRF is a defense-in-depth strategy. All CSRF protection schemes can be defeated using Cross Site Scripting (XSS) attacks. Customer developers need to properly validate and
encode all user input so that their storefronts are not exposed to CSRF threats. XSS defeats CSRF protections by stealing the token and inserting it into the malicious link. This
would validate the request and let it pass through successfully.
Related concepts
Cross-Site Request Forgery
© Copyright 2000-2023, Salesforce, Inc. All rights reserved. Various trademarks held by their respective owners. Show URL Submit Feedback Privacy Policy
2.11.6. Form Validation
During form validation, Salesforce B2C Commerce checks HTML form field values provided by the customer to ensure that they are valid. You can control how B2C Commerce
performs form validation by modifying the corresponding form definition. The form definition determines which fields are validated and how they are validated. If a field value
entered by the customer doesn't meet the constraints in the form definition (for example, the entered string is too short), B2C Commerce flags it as a form violation.
Form validation doesn't occur automatically, but is instead controlled by the form action that is fired. For example, the billing form definition contains a general save action:
<action formid="save" valid-form="true"/>
With valid-form set to true, the form is validated.
The type of validation that occurs depends on how you construct the form definition. There are two validation mechanisms: built-in and custom.
Custom Form Validation
You can define custom validation functions for <field> elements and form container elements, such as <form>, <group>, <list>, and <include>. If you define a custom
validation function for a form element, B2C Commerce executes that function instead of applying built-in validation.
Custom Data
You can provide custom data during form validation in validation scripts. This data is looped through the validation process and is still accessible when rendering the validation
results. This enables you to implement a more sophisticated feedback for the customer. For example, you might want to provide customers with detailed error messaging during
address form group validation using data provided by an address validation service or even providing a did you mean alternative for incorrect entries.
This is a general example:
exports.validateMyGroup = function( group : FormGroup )
{
...
var data = new HashMap();
data.put("my_data_1", "some message");
data.put("my_data_2", 4711);
var formElementValidationResult = new
FormElementValidationResult(false, 'my.error', data);
...
return formElementValidationResult;
}
See the B2C Commerce API documentation on these classes:
dw.web.FormElementValidationResult: getData() and addData(Object key, Object value) methods
dw.web.FormElement
FormElementValidationResult: getValidationResult() method
Built-in Form Validation
Built-in form validation is based on attribute settings for field definitions. For example, if an email field is marked mandatory="true", B2C Commerce marks the field as invalid if the
customer doesn't submit a value. See Field Form Element.
Validation Properties and Flags
When a customer submits a form, field values (strings) are sent electronically and then converted to the appropriate types as defined in the respective form definition.
When an action directs B2C Commerce to validate a form, B2C Commerce submits the form, validate the values entered and update the following flags:
1. If a field is valid, the system:
a. Sets the valid property to "true".
3/16/23, 2:11 PM
Legacy Developer Documentation
https://documentation.b2c.commercecloud.salesforce.com/DOC1/advanced/print.jsp?topic=/com.demandware.dochelp/LegacyDevDoc/LegacyDevDoc.html&cp=…
98/158
b. Sets the value property with the parsed value.
c. Reformats the parsed value as specified in the form definition.
d. Sets the htmlValue property with the string representation of the formatted value.
2. If the field is invalid, the system:
a. Sets the valid property to "false".
b. Sets the value property to null.
3. For the action itself, the system:
a. Sets the fired flag to true.
b. Updates the form's valid firedAction and triggeredAction properties.
Note: If an inner form definition (called by an < include>) is invalid, the surrounding form definition is also invalid.
Custom Validation Functions
You can configure custom validation functions not only for form fields (<field>) but also for form container elements (<form>, <group>, <list>, and <include>).
The first example shows a custom validation function configured for a <field> element:
<field formid="password"
label="label.password"
description="resource.customerpassword"
type="string"
mandatory="true"
range-error="resource.customerpassword"
validation="${require('~/cartridge/scripts/forms/my_custom_script.ds').my_custom_validation(formfield);}"
/>
The next example shows two custom validation functions configured for two different container elements (<form> and <group>):
<form xmlns="http://www.demandware.com/xml/form/2008-04-19"
validation="${require('~/cartridge/scripts/forms/MyCustomValidator.ds').validateThis(formgroup);}">
...
<group formid="myGroup"
validation="${require('~/cartridge/scripts/forms/MyCustomValidator.ds').validateThat(formgroup);}">
...
</group>
...
</form>
In both examples, the validation attribute specifies the function to be called, and the system expects the validation function to return an appropriate value. Validation functions can
return a boolean value or a dw.web.FormElementValidationResult object.
Error Messages
A form definition can specify multiple error messages for each form field (for example, "value-error", "range-error", "missing-error" or "parse-error"). B2C Commerce validates the user
entry and exposes one of these error messages in the FormField.error attribute, depending on which validation condition was not satisfied.
Note:
Starting in 15.8, it's possible to validate a field using a custom validation function. When you specify a custom validation function for a given field definition, you should only
specify a range-error message. For more information, see Field Form Element.
The order of validation and corresponding error messages is as follows.
1. B2C Commerce removes white space characters and parses the user entry into a native data type. If the parsing fails, B2C Commerce sets "parse-error". If a regular expression
was specified, B2C Commerce applies it. If the match fails, the result is a "parse-error".
2. If the field was marked as "mandatory" but there is no entry, the result is a "missing-error".
3. If the field has min/max or minlength/maxlength checks and the entry fails either, the result is a "range-error".
4. If a form field is invalidated programmatically, either by calling the invalidateFormElement() method or the InvalidateFormElement pipelet, the result is a "value-error".
Field error attributes maintain an order of precedence, as follows:
1. Missing-error
2. Parse-error
3. Range-error
4. Value-error
The FormElement.invalidateFormElement(error : String) method lets you specify an error message.
3/16/23, 2:11 PM
Legacy Developer Documentation
https://documentation.b2c.commercecloud.salesforce.com/DOC1/advanced/print.jsp?topic=/com.demandware.dochelp/LegacyDevDoc/LegacyDevDoc.html&cp=…
99/158
You can specify a form-error attribute in a form group. B2C Commerce sets "form-error" when the form group is invalidated programmatically.
Note: Applying invalidateFormElement() to a form group just sets the error message. The isValid() method continues to return the validation status of the child
elements.
© Copyright 2000-2023, Salesforce, Inc. All rights reserved. Various trademarks held by their respective owners. Show URL Submit Feedback Privacy Policy
2.11.7. Using API Form Classes
Salesforce B2C Commerce forms rely on the dw.web.Form API classes, which access an in-memory form instance.
PI Class Form Definition Element
Form none
FormAction <action>
FormElement none
FormField <field>
FormFieldOption <option>
FormFieldOptions <options>
FormGroup <group>
FormList <list>
FormListItems none
Forms none
See the API documentation.
© Copyright 2000-2023, Salesforce, Inc. All rights reserved. Various trademarks held by their respective owners. Show URL Submit Feedback Privacy Policy
2.11.8. Form Definition Elements
Form definitions are XML files that define to Salesforce B2C Commerce how browser input and action fields should behave. A form element <form> is a top level group of fields,
represented by the dw.web.Form API class.
Attribute Description
error Error text, which can be shown if the form is invalid. Show the error using the .properties techniques described earlier.
formid
Derived from the file name of the form definition.
Don't modify this value. It's system generated.
form-
error
The error message to use for form container. If the container is considered invalid, this is the error message that is set on the container. See the pipelet
invalidateFormElement.
object-
def
The value of object-def must be the name of a business object, for example, CustomerAddress, or the name of custom business object that is prefixed with
Custom (for example, Custom.MyObject).
secure Boolean value indicating whether or not the form should use the Secure Form Framework (SFF). SFF has been deprecated; leave this value at its default of false.
Use Cross Site Request Forgery Protection (CSRF) instead.
validation B2C Commerce script expression that resolves to a custom validation function provided by a B2C Commerce Script Module. The referenced function can return a
dw.web.FormElementValidationResult object. The form-error attribute specifies a generic error message that is used whenever your validation function
returns false (that is, if the FormElementValidationResult.isValid() method evaluates to false). The validation attribute was added in version 16.1.
A form definition can contain one or more elements:
<Action>
3/16/23, 2:11 PM
Legacy Developer Documentation
https://documentation.b2c.commercecloud.salesforce.com/DOC1/advanced/print.jsp?topic=/com.demandware.dochelp/LegacyDevDoc/LegacyDevDoc.html&cp…
100/158
<Field>
<Option>
<Options>
<Group>
<Include>
<List>
Example one: built-in validation
This form definition references the system object CustomerAddress, and for each CustomerAddress, the firstName, lastName, address1, and address2.
<form object-def="CustomerAddress">
<field attribute-def="firstName"/>
<field attribute-def="lastName" label="forms.orderaddress.003"/><!-- overwrite label -->
<field attribute-def="address1" mandatory="false"/> <!-- overwrite mandatory flag -->
<field attribute-def="address2"/>
</form>
Example two: custom validation function
This form definition specifies the validation attribute on the form element:
<form xmlns="http://www.demandware.com/xml/form/2008-04-19"
validation="${require('~/cartridge/scripts/forms/CustomerAddressValidator.ds').validateCustomerAddress(formgroup);}"
form-error="customeraddress.validation.general.error"
>
...
</form>
The custom validation function might look something like this:
importPackage(dw.web);
exports.validateCustomerAddress = function(customerAddressForm: FormGroup) {
// Add your custom validation logic here. Make sure you
// construct a FormElementValidationResult object as
// your return value.
return formElementValidationResult;
}
© Copyright 2000-2023, Salesforce, Inc. All rights reserved. Various trademarks held by their respective owners. Show URL Submit Feedback Privacy Policy
2.11.8.1. Action Form Element
The <action> element lets you specify a possible action for the form, for example, the Apply button. It is represented by the dw.web.FormAction API class.
Attribute Description
formid The identifier of the action.
label An optional descriptive label for the field. This field can be a key.
valid-form Controls if the form is validated: "true" or "false".
description Describes what the action does.
binding Used to associate an object with an action. For example, in a list, each row can have a delete button. The binding helps identify which delete button was clicked.
validation Salesforce B2C Commerce script expression that resolves to a custom validation function provided by a B2C Commerce Script Module. The referenced function
must return a dw.web.FormElementValidationResult object. The validation attribute was added in version 16.1.
Certain ID values are reserved, such as "continue" and "delete". For example, the following not compiles:
<action formid="continue" valid-form="true"/>
Example
This shows the action element, calculateTotal in the cart form, which represents the Calculate Total button on the browser.
3/16/23, 2:11 PM
Legacy Developer Documentation
https://documentation.b2c.commercecloud.salesforce.com/DOC1/advanced/print.jsp?topic=/com.demandware.dochelp/LegacyDevDoc/LegacyDevDoc.html&cp…
101/158
<action formid="calculateTotal" valid-form="false"/>
© Copyright 2000-2023, Salesforce, Inc. All rights reserved. Various trademarks held by their respective owners. Show URL Submit Feedback Privacy Policy
2.11.8.2. Field Form Element
The <field> element lets you define form fields and how they are validated. It's represented by the dw.web.FormField API class.
Attribute Description
formid The identifier of the field.
type The value type of the field. Supported types are: string, integer, number, boolean and date. There are optional attributes if the type is date (for example,
timezoned is a Boolean).
label An optional descriptive label for the field. This field can be a key.
mandatory Flag, whether the field is mandatory. ("true" or "false") The default is "false".
min-length For string fields, the minimum allowed length.
max-length For string fields, the maximum allowed length.
masked The number of characters that are unmasked (left to right). For example, when masking social security numbers (USA) five characters are usually masked, with
the last (right-most) four visible.
description Optional descriptive text for the user interface, such as "The password must have a minimum of 6 characters." (key or string).
missing-
error
Optional error text for the user interface if the required value is missing. For example, "The SSN must contain 9 characters." This field can be a key. This attribute
can't be used with the validation attribute.
parse-error Optional error text for the user interface when the entered value is in an incorrect format. This field can be a key. This attribute can't be used with the validation
attribute.
range-error Optional error text for the user interface when the entered information is out of range. (min-length, max-length, min or max). This field can be a key. This
attribute can be used with the validation attribute.
validation Salesforce B2C Commerce script expression that resolves to a custom validation function provided by a B2C Commerce Script Module. The referenced function
must return a boolean value: true indicates the field is valid; false, invalid. The range-error attribute, when used with the validation attribute, doesn't necessarily
specify an out-of-range error. Instead, the range-error attribute specifies a generic error message that is used whenever your validation function returns false,
regardless of the reason why it returns false. See Custom Validation Function Example. This attribute was added in version 15.8.
value-error Optional error text for the user interface when the entered value is unacceptable. This field can be a key. This attribute can't be used with the validation attribute.
format Formatting information on how to convert the value into a string representation.
binding If a business object is assigned to the field, the property name to read the value out of the business object or to set. Also used by the UpdateForm pipelets.
default-
value
The field's default value.
whitespace Declares if white space characters should be removed at the beginning and end for string data. Possible values are "none" or "remove". The default is "none".
min For integer, number and date: minimum value.
max For integer, number and date: maximum value.
default-
value
The default value of the field.
options List of option elements (values and labels). For example, selection of the month.
Note: A <field> element can contain <options> element children.
Field error attributes maintain an order of precedence, as follows:
1. Missing-error
3/16/23, 2:11 PM
Legacy Developer Documentation
https://documentation.b2c.commercecloud.salesforce.com/DOC1/advanced/print.jsp?topic=/com.demandware.dochelp/LegacyDevDoc/LegacyDevDoc.html&cp…
102/158
2. Parse-error
3. Range-error
4. Value-error
Note: Starting in version 15.8, if you use the validation attribute to specify a custom validation function, this precedence is ignored: only the range-error message is used.
The following are optional attributes based on the type attribute:
Type
attribute
Attribute Description
string regexp A regular expression for validation of strings.
date timezoned The date is set by the system as GMT. Customers typically enter information in the site's time zone. But, birthdays for example, are not in a
time zone. Having a date field set to a time means it's "timezoned". Thus, timezoned="true" if the site time zone is used; and
timezoned="false", when GMT, the system default, is used. The possible values are: "true" or "false".
integer or
number
min/max The minimum and maximum values of the field. If min is greater than max, min value is set equal to max value.
value numeric.
date value now or any valid date represented as a string based on the current date format.
boolean checked-
value
Lets you map a string value to a boolean field when it's selected. For example, if you are rendering a radio button, but want to use a string
value instead of "true". The checked-value indicates what is "true" for this button.
unchecked-
value
Lets you map a string value to a boolean field when it isn't selected. For example, if you are rendering a radio button, but want to use a string
value instead of false. Used to map something other than "true" or "false" to a boolean field.
See Form Validation.
Example
In this example from the cart form, the quantity field is bound to the quantityValue. It's a number field that is in this format: 0.#.
<field formid="quantity" type="number" binding="quantityValue" format="0.#"/>
In this example, the couponCode field is of type string and isn't mandatory.
<field formid="couponCode" type="string" mandatory="false"/>
Custom Validation Function Example
Starting in version 15.8, you can validate fields using a custom validation function. The following field definition shows how you can reference a custom validation function when
setting the validation attribute:
<field formid="password"
label="label.password"
description="resource.customerpassword"
type="string"
mandatory="true"
range-error="resource.customerpassword"
validation="${require('~/cartridge/scripts/forms/my_custom_script.ds').my_custom_validation(formfield);}"
/>
The custom validation function might look something like this:
// my_custom_script.ds
importPackage( dw.web );
exports.my_custom_validation = function( customterPasswordFormField : FormField )
{
// Add your validation logic here
return...; // Must return boolean
}
© Copyright 2000-2023, Salesforce, Inc. All rights reserved. Various trademarks held by their respective owners. Show URL Submit Feedback Privacy Policy
2.11.8.3. Option Form Element

3/16/23, 2:11 PM
Legacy Developer Documentation
https://documentation.b2c.commercecloud.salesforce.com/DOC1/advanced/print.jsp?topic=/com.demandware.dochelp/LegacyDevDoc/LegacyDevDoc.html&cp…
103/158
The <option> element lets you specify allowable choices for a field, which can be represented in a drop down, for example. It's represented by the dw.web.FormOption API class.
Attribute Description
optionid The identifier of the option.
value The option's value.
label The option label value. This field can be a key.
default The option's default value.
This element must be a child of <options>, with the following structure:
<options>
<option>
<option>
<option>
</options>
The following example specifies a list of identifying password questions in the profile form:
<field formid="question" label="forms.profile.018" type="string" mandatory="false" binding="passwordQuestion">
<options>
<option optionid="MothersMaidenName" value="Mother's Maiden Name" label="forms.profile.019"/>
<option optionid="MakeOfFirstCar" value="Make of First Car" label="forms.profile.020"/>
<option optionid="FavouritePetsName" value="Favourite Pet's Name" label="forms.profile.021"/>
<option optionid="FathersFirstName" value="Father's First Name" label="forms.profile.022"/>
<option optionid="PlaceOfBirth" value="Place of Birth" label="forms.profile.023"/>
</options>
</field>
Object Binding
You can also define option data dynamically by binding methods to an object within the form definition. For example, you could modify the previous profile form to dynamically
create a list of password question via a custom business object. In the Business Manager, you would create a custom object and then add the questions as attributes. In Studio, you
would modify the form so that it binds a passwordQuestion method to the custom object, as follows.
<field formid="question" label="Password Question" type="string" mandatory="false" binding="passwordQuestion">
<options optionid-binding="UUID" value-binding="UUID" label-binding="question"/>
</options>
</field>
See Object Binding with Forms.
© Copyright 2000-2023, Salesforce, Inc. All rights reserved. Various trademarks held by their respective owners. Show URL Submit Feedback Privacy Policy
2.11.8.4. Options Form Element
The <options> element lets you specify a number of options within the context of a field. It must be a child of <field>. This element is represented by the dw.web.FormOptions API
class.
Attribute Description
optionid-binding Identifies the binding method to use when getting and setting option ID values.
value-binding The values of the option that are allowed, bound to an object.
label-binding The option label presented on the browser, bound to an object.
The previous attributes are similar to the <option> attributes, but they can be bound to an object.
Example
This example (also used for <option>) specifies a list of identifying password questions in the profile form:
<field formid="question" label="Password Question" type="string" mandatory="false" binding="passwordQuestion">
<options>
<option optionid="MothersMaidenName" value="Mother's Maiden Name"/>
<option optionid="MakeOfFirstCar" value="Make of First Car"/>
<option optionid="FavoritePetsName" value="Favorite Pet's Name"/>
<option optionid="FathersFirstName" value="Father's First Name"/>
<option optionid="PlaceOfBirth" value="Place of Birth"/>
3/16/23, 2:11 PM
Legacy Developer Documentation
https://documentation.b2c.commercecloud.salesforce.com/DOC1/advanced/print.jsp?topic=/com.demandware.dochelp/LegacyDevDoc/LegacyDevDoc.html&cp…
104/158
</options>
</field>
In the previous example, the options are hard coded. You can also build this information dynamically by binding metadata to objects, which represent that data as in-memory tables.
Using the example, the SiteGenesis application currently hardcodes country abbreviations in the customeraddress form, as follows:
<field formid="country" label="forms.country" type="string" mandatory="true" binding="countryCode"
missing-error="forms.customeraddress.country.missing-error">
<options>
<option optionid="" label="forms.customeraddress.selectone" value=""/>
<option optionid="US" label="country.unitedstates" value="US"/>
<option optionid="DE" label="country.germany" value="DE"/>
<option optionid="CA" label="country.canada" value="CA"/>
</options>
</field>
With object binding, the pipeline could instead perform within a loop, a dynamic get to a country object as follows, picking up new countries as they are supported by the storefront.
<field formid="country" label="forms.country.countries" type="string" mandatory="true" binding="countryCode">
<options optionid-binding="UUID" value-binding="UUID" label-binding="country"/>
</options>
See Object Binding with Forms.
© Copyright 2000-2023, Salesforce, Inc. All rights reserved. Various trademarks held by their respective owners. Show URL Submit Feedback Privacy Policy
2.11.8.5. Group Form Element
The <group> element is a container in which you can define other form elements. It also acts as a property to which to which you can map a business object. When you define form
elements in a group, you can refer to the group and then an element within it from a pipelet or a script. The <group> element is represented by the dw.web.FormGroup API class.
Attribute Description
formid The identifier of the group (required).
binding If a business object is assigned to the group, the property name to read the value out of the business object or to set. Also used by the pipelets
UpdateFormWithObject and UpdateObjectWithForm.
description Optional descriptive text for the user interface. For example, "Address Information".
form-error The error message to use for group container. If the container is considered invalid, this is the error message that is set on the container. See the pipelet
invalidateFormElement.
object-def The value of object-def must be the name of a business object, for example, CustomerAddress, or the name of custom business object that is prefixed with
Custom (for example, Custom.MyObject).
validation Salesforce B2C Commerce script expression that resolves to a custom validation function provided by a B2C Commerce Script Module. The referenced function
can return a dw.web.FormElementValidationResult object. The form-error attribute specifies a generic error message that is used whenever your validation
function returns false (that is, if the FormElementValidationResult.isValid() method evaluates to false). The validation attribute was added in version
16.1.
The <group> element can contain:
Other <group> elements
<field> elements
<action> elements
<include> elements
<list> elements
Example:
The following shows a group element in the paymentinstruments form:
<group formid="creditcards">
<list formid="storedcards">
<include formid="card" name="creditcard"/>
<action formid="remove" label="forms.paymentinstruments.001" valid-form="false"/>
</list>
<include formid="newcreditcard" name="creditcard"/>
<action formid="create" valid-form="true"/>
</group>
3/16/23, 2:11 PM
Legacy Developer Documentation
https://documentation.b2c.commercecloud.salesforce.com/DOC1/advanced/print.jsp?topic=/com.demandware.dochelp/LegacyDevDoc/LegacyDevDoc.html&cp…
105/158
© Copyright 2000-2023, Salesforce, Inc. All rights reserved. Various trademarks held by their respective owners. Show URL Submit Feedback Privacy Policy
2.11.8.6. Include Form Element
The <include> element lets you build re-usable form definitions and then share them among other form definitions and templates. When you specify an <include> element in a form
definition, you can access the included form and its properties within a template as if they were part of the enclosing form. For example, with address information, instead of defining
the same set of fields in multiple places, you can define the form once and reuse it.
The <include> element is represented by the dw.web.FormGroup API class.
Attribute Description
formid The identifier of the form.
name The name of the form to include.
binding If a business object is assigned to the Field, the property name to read the value out of the business object or to set. Also used by the pipelets UpdateFormWith
Object and UpdateObjectWithForm.
validation Salesforce B2C Commerce script expression that resolves to a custom validation function provided by a B2C Commerce Script Module. The referenced function
can return a dw.web.FormElementValidationResult object. The validation attribute was added in version 16.1.
Examples
This is an example of calling a form within a form using an <include> element (in the billing form):
<!-- fields for CreditCard selection -->
<include formid="creditcard" name="creditcard"/>
<list formid="creditcards">
<include formid="card" name="creditcard"/>
<action formid="usethiscard" label="Use this credit card" valid-form="false"/>
</list>
The billing form uses the credit card fields as defined in the credit card form to create an ordered list of credit card information.
This is a snippet of the creditcart form:
<field formid="type" label="forms.creditcard.type.label" type="string" mandatory="true" binding="creditCardType"
missing-error="forms.creditcard.type.missing-error">
<options>
<option optionid="Visa" value="Visa" label="creditcard.visa"/>
<option optionid="American Express" value="Amex" label="creditcard.amex"/>
<option optionid="Master" value="Master" label="creditcard.mastercard"/>
<option optionid="Discover" value="Discover" label="creditcard.discover"/>
</options>
</field>
This is a snippet of the ISML template (checkout.billing) that renders the credit card information in the context of the billing page.
<select name="${pdict.CurrentForms.billing.paymentMethods.creditCardList.htmlName}">
<option value="" selected="selected">
${Resource.msg('forms.checkout.creditcardlist.select','forms',null)}</option>
<isif condition="${empty(pdict.AvailableCreditCards)}">
<option value="">
${Resource.msg('forms.checkout.creditcardlist.nocards','forms',null)}
</option>
<iselse>
<isloop items="${pdict.AvailableCreditCards}" var="creditCardInstr">
<option value="${creditCardInstr.UUID}">(<isprint value="${creditCardInstr.creditCardType}">)
<isprint value="${creditCardInstr.maskedCreditCardNumber}"> -
${Resource.msg('forms.checkout.creditcardlist.expiration','forms',null)}
<isprint value="${creditCardInstr.creditCardExpirationMonth}" formatter="00" />.
<isprint value="${creditCardInstr.creditCardExpirationYear}" formatter="0000" />
</option>
</isloop>
</isif>
</select>
This is the generated HTML code (click View > Source on the browser):
<div id="paymentmethods">
<div class="paymentmethods">
<label for="is-CreditCard">Credit Card:</label>
<input id="is-CreditCard" type="radio" value="CreditCard"
name="dwfrm_billing_paymentMethods_selectedPaymentMethodID" checked="checked"/>

3/16/23, 2:11 PM
Legacy Developer Documentation
https://documentation.b2c.commercecloud.salesforce.com/DOC1/advanced/print.jsp?topic=/com.demandware.dochelp/LegacyDevDoc/LegacyDevDoc.html&cp…
106/158
<label for="is-PayPal">Pay Pal:</label>
<input id="is-PayPal" type="radio" value="PayPal" name="dwfrm_billing_paymentMethods_selectedPaymentMethodID"/>
<label for="is-BML">Bill Me Later:</label>
<input id="is-BML" type="radio" value="BML" name="dwfrm_billing_paymentMethods_selectedPaymentMethodID"/>
</div>
When you have included one form within another, you can reference the included form's fields using the basic tree structure, for example:
billing_paymentMethods_selectedPaymentMethodID.
© Copyright 2000-2023, Salesforce, Inc. All rights reserved. Various trademarks held by their respective owners. Show URL Submit Feedback Privacy Policy
2.11.8.7. List Form Element
The <list> element lets you generate a list within a form, so that the contained fields appear more than once. It can be a list of anything, including an <include>. All contained fields
are automatically grouped together to form a complex data structure.
Salesforce B2C Commerce automatically generates the required number of fields and binds objects to those fields. For each element in a collection, B2C Commerce generates a set
of fields representing each collection element.
This element is represented by the dw.web.FormList API class.
Attribute Description
formid The identifier of the list (required).
binding
The method that acts on the business object.
For example, in the following xml:
<list formid="products" binding="products">
<field formid="name" type="string" binding="name"/>
B2C Commerce binds the products method to the designated business object (for example, productlineitem), then for that object, binds the name method to
the designated business object (for example, productlineitem.name).
selectmany-
fieldid
When a list is represented by an HTML table and a column contains checkboxes, the selectmany-fieldid attribute tells B2C Commerce which of the fields is used
to represent that selection checkbox. B2C Commerce then provides direct access to all selected objects.
Note: selectmany-fieldid and selectone-fieldid are mutually exclusive.
selectone-
fieldid
When a list is represented by an HTML table and a column is a radio button, the selectone-fieldid attribute tells the framework which field is used to map the
boolean state of the radio buttons.
Note: selectmany-fieldid and selectone-fieldid are mutually exclusive.
form-error The error message to use for the form container. If the container is considered invalid, this is the error message that is set on the container. See the
invalidateFormElement pipelet.
object-def The value of object-def must be the name of a business object, for example, CustomerAddress, or the name of custom business object that is prefixed with
Custom (for example, Custom.MyObject).
validation B2C Commerce script expression that resolves to a custom validation function provided by a B2C Commerce Script Module. The referenced function can return
a dw.web.FormElementValidationResult object. The form-error attribute specifies a generic error message that is used whenever your validation function
returns false (that is, if the FormElementValidationResult.isValid() method evaluates to false). The validation attribute was added in version 16.1.
Note: A list is a group. It can contain the same type of objects that a group can contain.
Example:
The following shows a list element in the compare form:
<list formid="products" binding="products">
<action formid="addtocart" valid-form="false"/>
<action formid="addtowishlist" valid-form="false"/>
<action formid="remove" valid-form="false"/>
</list>

3/16/23, 2:11 PM
Legacy Developer Documentation
https://documentation.b2c.commercecloud.salesforce.com/DOC1/advanced/print.jsp?topic=/com.demandware.dochelp/LegacyDevDoc/LegacyDevDoc.html&cp…
107/158
This form definition defines a product along with the name field and three actions (represented on the browser page as buttons). For each product line item, the following elements
will exist:
Addtocart button
Addtowishlist button
Remove button
Object Binding
In the previous example, the options are hard-coded. You can also build this kind of information dynamically by binding methods to objects to represent the data as in-memory
tables.
The Cart-PrepareView pipeline in the SiteGenesis application uses object binding, as follows:
1. Decision Node: The system checks to see if the basket is empty.
2. Pipelet: UpdateFormwithObject: This pipelet iterates over the shipments section (shown here) of the cart form metadata (cart form), to bind that metada to an object.
< !-- shipments -->
< list formid="shipments">
<!-- products -->
<list formid="items" binding="productLineItems">
<field formid="quantity" type="number" binding="quantityValue" format="0.#"/>
<action formid="editLineItem" valid-form="false"/>
<action formid="deleteProduct" valid-form="false"/>
<action formid="addToWishList" valid-form="false"/>
<action formid="addToGiftRegistry" valid-form="false"/>
For each productLineItem, it:
a. Gets the contents of the productLineItem business object (< list formid="items" binding="productLineItem">) using the getproductLineItem method.
b. Gets the contents of the quantityValue business object (<field formid="quantity" type="number" binding="quantityValue" format="0.#"/>) using the getquantityValue
method.
c. Provides for the four actions.
3. Pipelet: UpdateFormWithObject: This pipelet refreshes the coupon information.
4. Script: Cart.ValidateCartForCheckout: This script implements a typical shopping cart checkout validation.
5. Script: Assign. This script assigns the coupon status.
© Copyright 2000-2023, Salesforce, Inc. All rights reserved. Various trademarks held by their respective owners. Show URL Submit Feedback Privacy Policy
2.11.9. Developing Forms with Pipelines
With Salesforce B2C Commerce, you can define how ecommerce forms, such as customer address entries, are processed. This includes validation, manipulation and extraction.
1. Open Studio.
2. Describe the form fields, validation rules, and other metadata for the form in an XML-based form definition file.
A form field definition can also reference metadata in B2C Commerce.
3. Create a template that uses the form definition and associated metadata to assemble the form.
4. Write a pipeline that:
a. Initializes the form data via a pipelet.
b. Creates the in-memory form instance via a pipelet (using the form definition).
c. Renders the ISML template with an Interaction Continue node (referencing the data in the in-memory form instance).
d. Validates the entered data.
e. Exits with a transition based on a named action (as defined in the form definition).
f. Processes the form data returned from the Interaction Continue node.
5. Integrate these changes into an existing application. For example, if you create a new subpipeline, you must modify an existing subpipeline to call it.
See also How Pipelines Process Forms and B2C Commerce Forms Components

3/16/23, 2:11 PM
Legacy Developer Documentation
https://documentation.b2c.commercecloud.salesforce.com/DOC1/advanced/print.jsp?topic=/com.demandware.dochelp/LegacyDevDoc/LegacyDevDoc.html&cp…
108/158
© Copyright 2000-2023, Salesforce, Inc. All rights reserved. Various trademarks held by their respective owners. Show URL Submit Feedback Privacy Policy
2.11.9.1. How Pipelines Process Forms
When the data structure is populated (via a pipelet), it can be acted upon (controller) by the various components of the affected pipeline (template, form-specific pipelet or script) to
render the data on a browser (view) or save it to a database.
The following diagram illustrates the flow of information to and from the:
Page in the browser
In-memory data structure created by a pipelet as defined by the form definition
Application
© Copyright 2000-2023, Salesforce, Inc. All rights reserved. Various trademarks held by their respective owners. Show URL Submit Feedback Privacy Policy
2.11.9.2. Salesforce B2C Commerce Forms Components
When using B2C Commerce forms, you work with the following key components:
Component Use this to...
Business Objects Access data dynamically, as opposed to using hard-coded data.
Form Definition Define form elements, actions and data validation.
Template Render in-memory form instance data on a browser, and process actions
Script Process in-memory form instance data, for example, save it to a database.
Resource File Define locale-specific browser messages.
Form Pipelets Clear, create or extract an in-memory form instance as defined by form definitions.
Interaction Continue Nodes Call a template that renders in-memory form data on a browser, and pass processing to named actions.
Interaction node Call a template that accesses an in-memory form instance.
Transitions Move processing to the next step upon the execution of a named form action in a pipeline

3/16/23, 2:11 PM
Legacy Developer Documentation
https://documentation.b2c.commercecloud.salesforce.com/DOC1/advanced/print.jsp?topic=/com.demandware.dochelp/LegacyDevDoc/LegacyDevDoc.html&cp…
109/158
When you have added/modified these components to include your customized forms, you must integrate your changes into the existing application. For example, if you create a new
subpipeline, you need to modify an existing template (by adding a new link) to call it.
See Form Components Working Together or the Forms Tutorial, or details on how to do this.
© Copyright 2000-2023, Salesforce, Inc. All rights reserved. Various trademarks held by their respective owners. Show URL Submit Feedback Privacy Policy
2.11.9.2.1. Using Business Objects with Forms
With Salesforce B2C Commerce forms, you can create in-memory form instances that access and manipulate object data. You can define custom business objects in the Business
Manager. You can also view the elements of standard business objects, some of which are modifiable.
For example, you might want your customers to be able to request a catalog or have emails sent to them. To do this, you would define catalogSendand emailSendattributes for the
Profilebusiness object.
1. Select Administration > Site Development > System Object Types, open the Profile object.
2. Click the Attribute Definitions tab.
3. Add the attributes catalogSendand emailSendas Boolean.
4. Continue with this example: Creating a Form Definition.
© Copyright 2000-2023, Salesforce, Inc. All rights reserved. Various trademarks held by their respective owners. Show URL Submit Feedback Privacy Policy
2.11.9.2.2. Creating a Form Definition
Use a form definition to define the browser form elements, including actions and how they are validated. The form definition provides Salesforce B2C Commerce with rules on how
to populate the in-memory data that is rendered on the browser.
The SiteGenesis application comes with a set of form definitions, contained in the forms folder.
1. Open Studio.
2. Create a form definition with your storefront's cartridge structure, for example, sendstuff.xml, as follows:
<?xml version="1.0"?>
<form>
<field formid="catalog" label="forms.sendstuff.010" type="boolean" binding="profile.catalogSend" />
<field formid="email" label="forms.sendstuff.011" type="boolean" binding="profile.emailSend" />
<action formid="apply" valid-form="true" />
</form>
This form definition specifies the two optional fields as boolean and an Apply button.
3. Continue with this example: Using Forms in Templates.
© Copyright 2000-2023, Salesforce, Inc. All rights reserved. Various trademarks held by their respective owners. Show URL Submit Feedback Privacy Policy
2.11.9.2.3. Using Forms in Templates
Templates provide the page display logic. Use templates to process form field elements or actions as entered in the browser. Templates use:
Form definition references to the in-memory form instances
The Pipeline Dictionary to transport the data to and from the browser
1. Refer to the example data in Creating a Form Definitions.
2. Create a template sendstuff.isml. This template uses form data object references to render browser entry details and validate customer entry for the following checkbox
fields:
catalogSend
emailSend
3. Enter these lines in the template header:
<isdecorate template="pagetypes/pt_service">
<iscontent type="text/html" charset="UTF-8" compact="true">
4. Enter these lines, which includes the util/modules template, which processes < isinputfield> calls.
3/16/23, 2:11 PM
Legacy Developer Documentation
https://documentation.b2c.commercecloud.salesforce.com/DOC1/advanced/print.jsp?topic=/com.demandware.dochelp/LegacyDevDoc/LegacyDevDoc.html&cp…
110/158
<isinclude template="util/modules">
<div id="service">
5. Enter these lines, which defines browser message display.
<h1>${Resource.msg('user.sendstuff.010','user',null)}</h1>
<div class="editprofile">
<h2>${Resource.msg('user.sendstuff.011','user',null)}</h2>
<form action="${URLUtils.httpsContinue()}" method="post" id="apply">
<h3>${Resource.msg('user.sendstuff.012','user',null)}</h3>
6. Enter the following lines. The isinputfield tag renders an input field using the field definitions in sendstuff form. When the HTML form is submitted, the user values are
accessible from the CurrentForms.sendstuff object in the Pipeline Dictionary.
The < isinputfield> element renders input fields in SiteGenesis.
<div id="sendstuff">
<fieldset>
<table class="simple">
<tr><isinputfield formfield="${pdict.CurrentForms.sendstuff.email}" type="checkbox"></tr>
<tr><isinputfield formfield="${pdict.CurrentForms.sendstuff.catalog}" type="checkbox"></tr>
</table>
</fieldset>
</div>
7. Enter the following lines, which represent a browser action (button).
<h3>${Resource.msg('user.sendstuff.012','user',null)}</h3>
<div id="editprofile">
<fieldset>
<input class="image imageright"
type="image"
name="${pdict.CurrentForms.sendstuff.apply.htmlName}"
value="Edit"
src="../topic/com.demandware.dochelp/LegacyDevDoc/${URLUtils.staticURL('/i
</fieldset>
</div>
</form>
</div>
</div>
...
</isdecorate>
8. Continue with this example: Using Form Pipelets.
These are other examples of how Salesforce B2C Commerce forms are accessed in templates.
<input> Element
Reads the coupon code.
<input type="text" class="couponinput" name="${pdict.CurrentForms.cart.couponCode.htmlName}"
alt="${Resource.msg('cart.entercouponcode','checkout',null)}"/>
<isif> Element
Checks if the current customer is registered.
<isif condition="${pdict.CurrentCustomer.registered}">
<isprint> Element
Prints the phone number portion of the address.
<isprint value="${pdict.Address.phone}">"
<isinputfield> Element
Reads the first name from the customer address.
<isinputfield formfield="${pdict.CurrentForms.profile.address.firstname}" type="input">
<isloop> Element
Loop reads product options from the form.
<isloop items="${lineItem.optionProductLineItems}" var="oli">
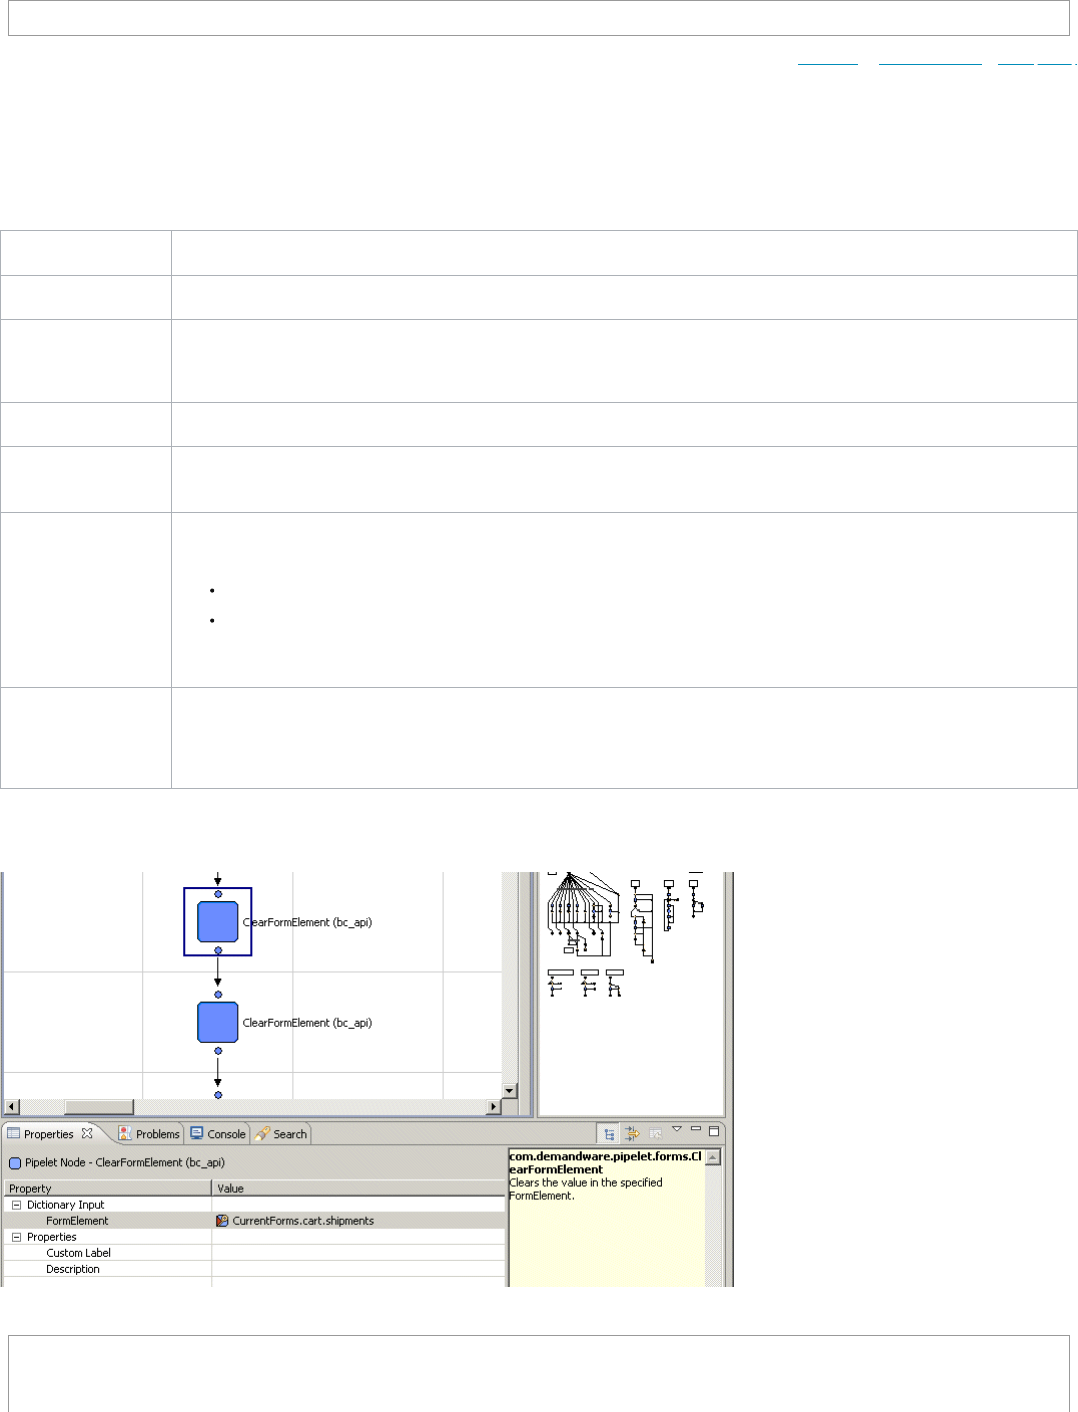
3/16/23, 2:11 PM
Legacy Developer Documentation
https://documentation.b2c.commercecloud.salesforce.com/DOC1/advanced/print.jsp?topic=/com.demandware.dochelp/LegacyDevDoc/LegacyDevDoc.html&cp…
111/158
<select element>
Displays select box for "edit addresses" for the Wish List page.
<select class="selectbox" name="editAddress" id="editAddress">
© Copyright 2000-2023, Salesforce, Inc. All rights reserved. Various trademarks held by their respective owners. Show URL Submit Feedback Privacy Policy
2.11.9.2.4. Using Form Pipelets
Use form pipelets to create, clear and manipulate in-memory form instances. While templates and scripts access the data in the form instances for browser display, data manipulation
or database storage, form pipelets access in-memory form instances via the Pipeline Dictionary object: CurrentForms.
These are the form pipelets:
Pipelet Description
AcceptForm Causes the values contained in the form instance to be transferred to the object that is bound to the form instance via the Pipeline Dictionary.
ClearFormElement Clears the values in an entire form instance or a field, depending on the expression passed to the pipelet. For example, Current.Forms.giftcert
resets all fields in the giftcert data element, while C urrentForms.giftcert.email resets only the email portion of the giftcert
element.
InvalidateFormElements Invalidates (makes false) the specified form element, then sets the form element's error message to the appropriate value.
SetFormOptions Clears a form field's options, then sets the options from a map of name/value pairs contained in the Options input parameter. The Begin and
End values specify which elements in Options to use.
UpdateFormWithObject
Creates an in-memory form instance using the attributes described in the form definition. The pipelet has two input parameters:
A path expression to a form group or form list item within the in-memory data structure
A path expression to the business object
The pipelet binds the method listed in the form definition to the object specified as an output parameter when calling the pipelet.
UpdateObjectWithForm
Updates the specified business object with the corresponding property values contained in the in-memory form instance.
This pipelet has the same two input parameters (as UpdateFormWithObject), both of which are required.
Example
The following shows the ClearFormElement pipelet (in the cart pipeline) and the expression used to identify which form element to clear, in this case, shipments.
This is the shipments portion of the cart form.
<!-- shipments -->
<list formid="shipments">
<!-- products -->
3/16/23, 2:11 PM
Legacy Developer Documentation
https://documentation.b2c.commercecloud.salesforce.com/DOC1/advanced/print.jsp?topic=/com.demandware.dochelp/LegacyDevDoc/LegacyDevDoc.html&cp…
112/158
<list formid="items" binding="productLineItems">
<field formid="quantity" type="number" binding="quantityValue" format="0.#"/>
<action formid="editLineItem" valid-form="false"/>
<action formid="deleteProduct" valid-form="false"/>
<action formid="addToWishList" valid-form="false"/>
<action formid="addToGiftRegistry" valid-form="false"/>
</list>
<!-- gift certificates -->
<list formid="giftcerts" binding="giftCertificateLineItems">
<action formid="deleteGiftCertificate" valid-form="false"/>
</list>
</list>
The ClearFormElement pipelet resets the in-memory form instance that is created based on this portion of the form:
All parsed values (value properties) are set to their defaults (if default values are defined).
All string representations are set to an empty string.
All bound objects are removed.
All list elements are cleared.
Continue with this example: Using Interaction Continue Nodes with Forms.
© Copyright 2000-2023, Salesforce, Inc. All rights reserved. Various trademarks held by their respective owners. Show URL Submit Feedback Privacy Policy
2.11.9.2.5. Using Interaction Continue Nodes with Forms
Use interaction nodes and interaction continue nodes to render information on a browser. In ISML templates, you reference in-memory form instances created by form pipelets (as
defined by form definitions). Use Interaction Continue nodes to process form actions via action transitions.
Processing form actions requires three elements:
The action element within the form definition (for example, <action formid=" deleteGiftCertificate " valid-form="false"/> in the cart form definition).
The transition name from the interaction continue node to the next node (for example, the deleteGiftCertificate transition in the Cart-AddProduct pipeline).
Reference to the action in the template.
CAUTION:
All three components (form definition, transition from interaction continue and template) must use the same name for the action to work (for example,
deleteGiftCertificate).
The following snippet from the cart template shows where the template processes the button for the deleteGiftCertificate action.
<button class="textbutton" type="submit" value="${Resource.msg('global.remove','locale',null)}"
name="${GiftCertificate.deleteGiftCertificate.htmlName}">
<span>${Resource.msg('global.remove','locale',null)}</span></button>
Interaction Continue nodes wait for user input, with the system maintaining the state. Upon user input, the system checks whether an action was fired. If it was, the flow continues
with the specific steps related to the action via the appropriate transition. If the user has submitted form data, the system stores the submitted data into the in-memory form instance
(created by a pipelet) and performs validation based on the rules in the form definition.
In the cart page, checkout processing depend on the action button clicked by the consumer,. For example, if the consumer clicks the Update Cart link, the system executes the
updateCart transition.
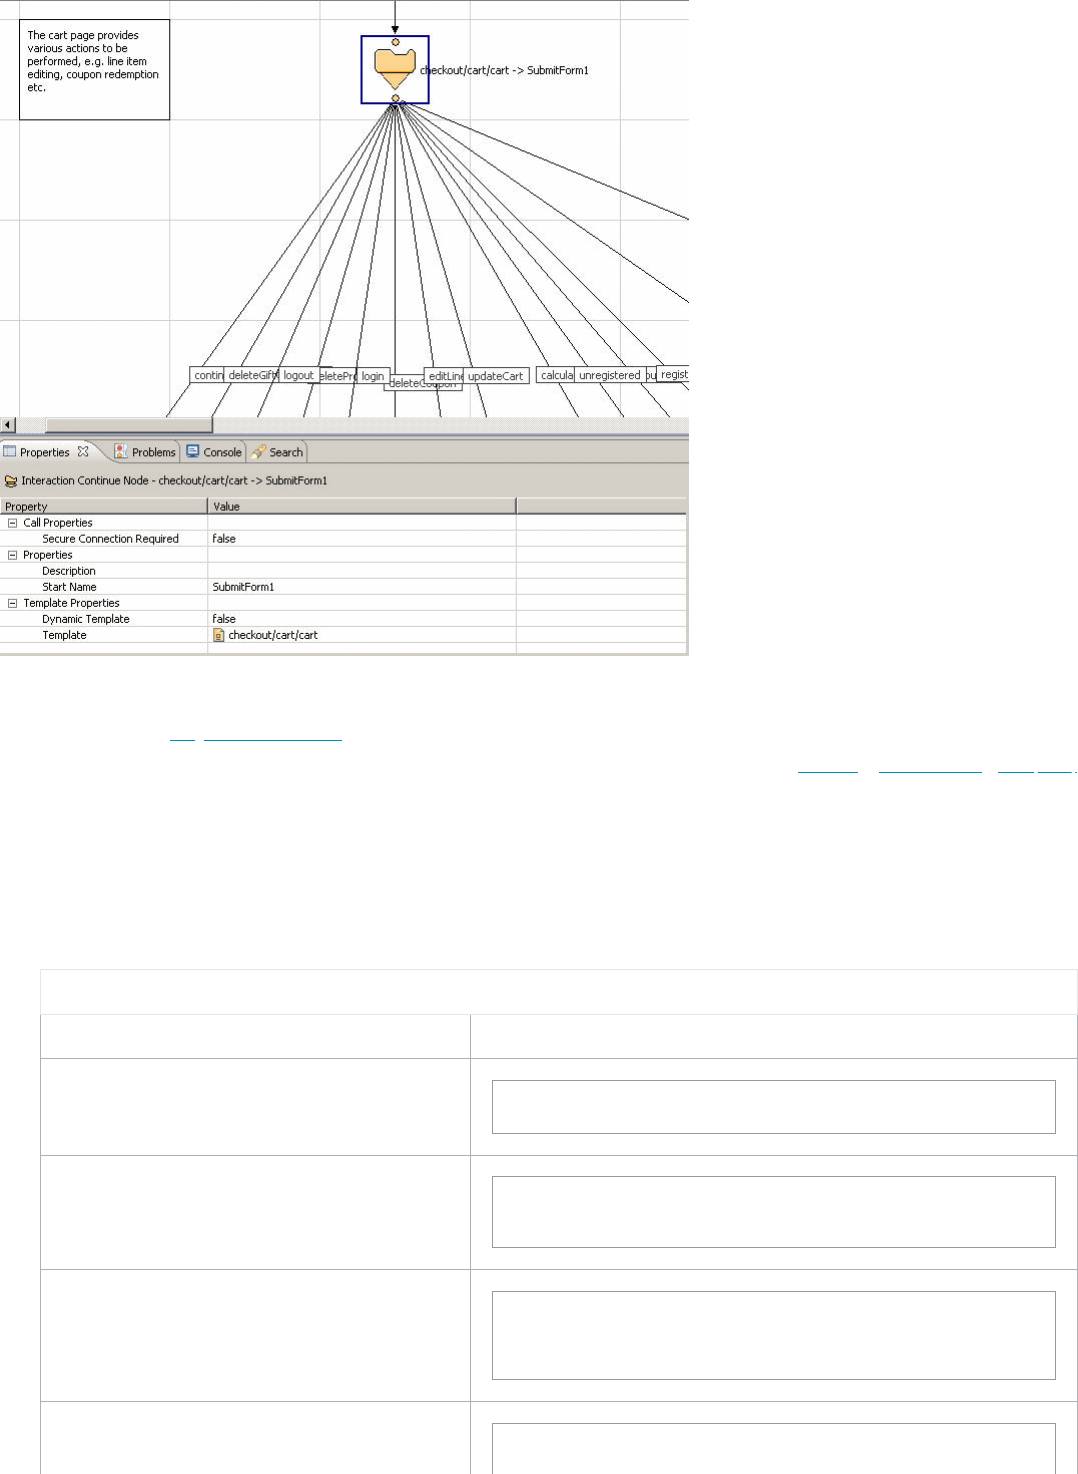
3/16/23, 2:11 PM
Legacy Developer Documentation
https://documentation.b2c.commercecloud.salesforce.com/DOC1/advanced/print.jsp?topic=/com.demandware.dochelp/LegacyDevDoc/LegacyDevDoc.html&cp…
113/158
Note: All action names are case-sensitive.
Continue with this example: Using Transitions with Forms.
© Copyright 2000-2023, Salesforce, Inc. All rights reserved. Various trademarks held by their respective owners. Show URL Submit Feedback Privacy Policy
2.11.9.2.6. Form Components Working Together
This topic provides a quick overview, via an example, of how to use the various Salesforce B2C Commerce forms components to create a simple form. This example uses a form
definition, template and pipeline to receive customer address data from a browser.
1. Create a form definition sendAddress (File > New > File) in the forms directory within your cartridge (Navigator view: Cartridge/forms/default/sendAddress.xml)
using the following elements:
Option Description
For the... Use...
header
<?xml version="1.0"?>
<form>
name
<field formid="name"
label="Name" type="string" mandatory="true"
missing-error="Your Name is Mandatory"/>
email address
<field formid="emailaddress"
label="Email Address" type="string" mandatory="true"
regexp="^[\w-\.]{1,}\@([\da-zA-Z-]{1,}\.){1,}[\da-zA-Z-]{2,3}$"
value-error="Invalid Email Address"/>
message
<field formid="message"
label="Message" type="string"
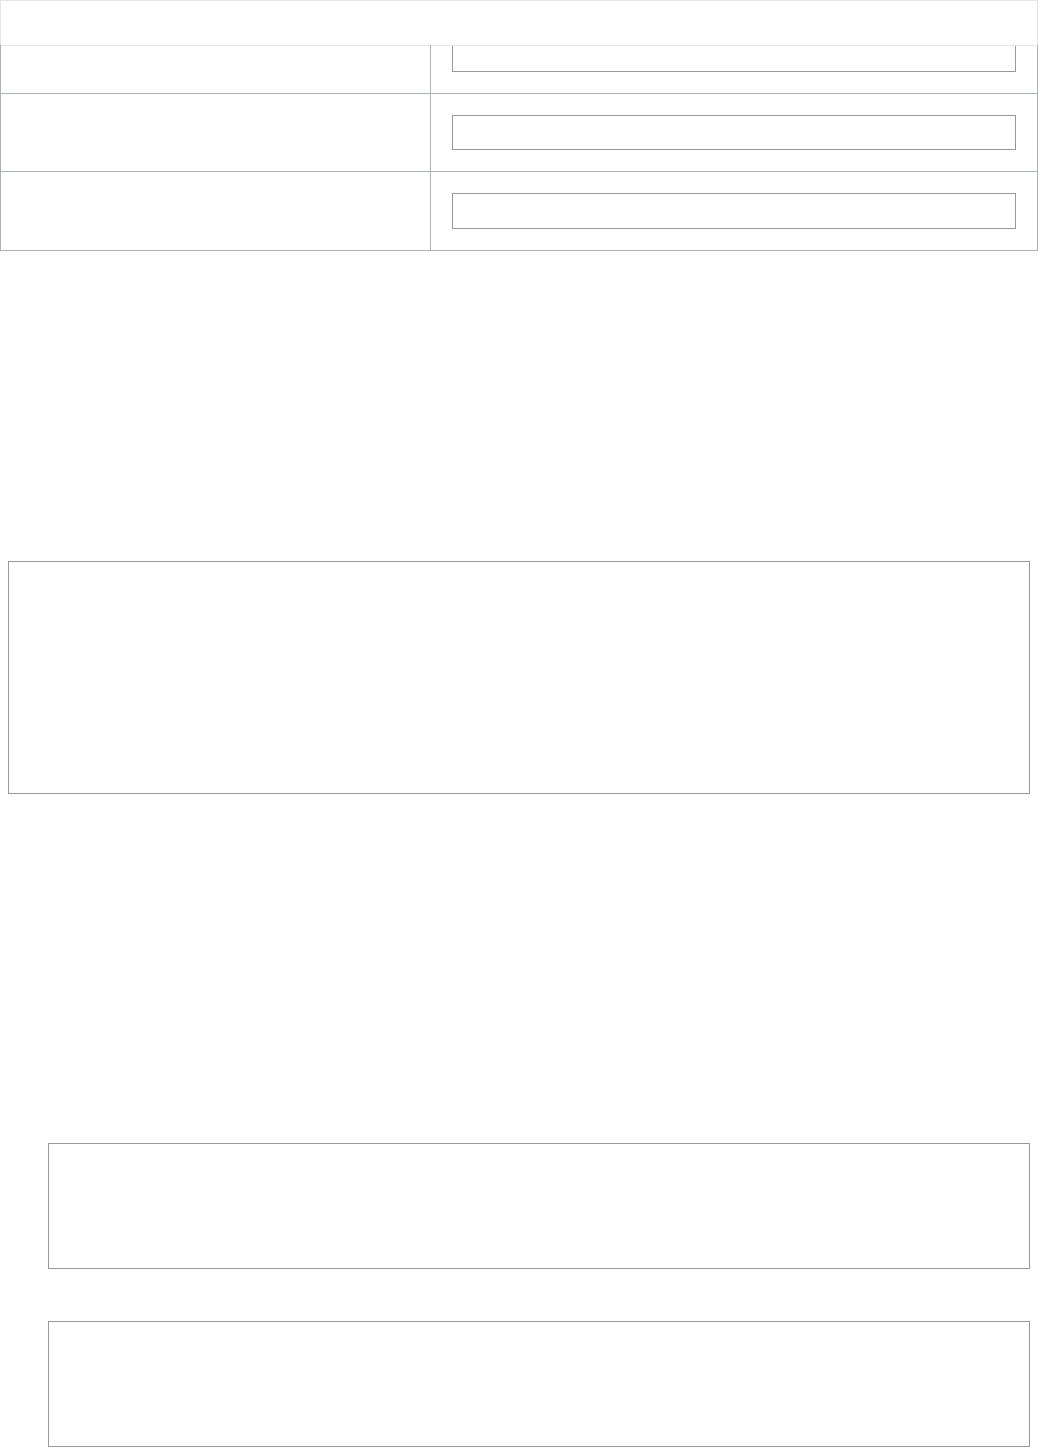
3/16/23, 2:11 PM
Legacy Developer Documentation
https://documentation.b2c.commercecloud.salesforce.com/DOC1/advanced/print.jsp?topic=/com.demandware.dochelp/LegacyDevDoc/LegacyDevDoc.html&cp…
114/158
Option Description
mandatory="true"/>
send (Action)
<action formid="send" valid-form="true"/>
footer
</form>
2. Provide a formid, form labeland type. Specify if the field is mandatory and any error conditions and messages.
3. Any validation you provide in the form definition is performed automatically by the Forms Framework. For example, all the previous fields have the mandatory attribute set to
"true". The namefield includes a defined message if the form is submitted without a name value.
4. Make sure you give the file name an XML extension.
5. Use a regular expression (see the emailaddressfield) to validate a field. If the field doesn't meet the regexp requirements, the form fails validation.
6. An < action> element's formidis the name of the action when the form is submitted. This name is used in the pipeline to determine on which path the processing will
continue. For validation to be performed, you must set it to valid-form="true". If you don't, the Forms Framework lets the form continue with invalid data.
7. Enter (or cut and paste) the following:
<?xml version="1.0"?>
<form>
<field formid="name" label="Name" type="string"
mandatory="true" missing-error="Your Name is Mandatory"/>
<field formid="emailaddress" label="Email Address"
type="string" mandatory="true"
regexp="^[\w-\.]{1,}\@([\da-zA-Z-]{1,}\.){1,}[\da-zA-Z-]{2,3}$"
value-error="Invalid Email Address"/>
<field formid="message" label="Message"
type="string" mandatory="true"/>
<action formid="send" valid-form="true"/>
</form>
This example uses hard-coded strings for the messages, for simplicity and clarity. A more efficient way to do this is to define all messages as resource properties (similar to
using a ResourceBundle in Java). See localization documentation.
8. Create a template sendAddressto render the form (File > New > ISML Template) in the templates directory within your cartridge (Navigator view:
Cartridge/templates/default/sendAddress.isml), as follows:
a. Include the modules template because it processes all input from the < isinputfield> tag.
< isinclude template="util/modules">
b. Access the sendAddressform instance in the Pipeline Dictionary.
< form action="${URLUtils.httpsContinue()}" method="post" id="${pdict.CurrentForms.sendAddress.htmlName}">
c. Start a table.
< table border="0">
d. Define the nameinput field to be stored in the Pipeline Dictionary.
<tr>
<isinputfield
formfield="${pdict.CurrentForms.simpleform.name}"
value="${pdict.CurrentForms.sendAddress.name.htmlValue}"
type="input">
</tr>
e. Create an input field simpleform.emailaddress for browser input.
<tr>
<isinputfield
formfield="${pdict.CurrentForms.simpleform.emailaddress}"
value="${pdict.CurrentForms.sendAddress .emailaddress.htmlValue}"
type="input">
</tr>
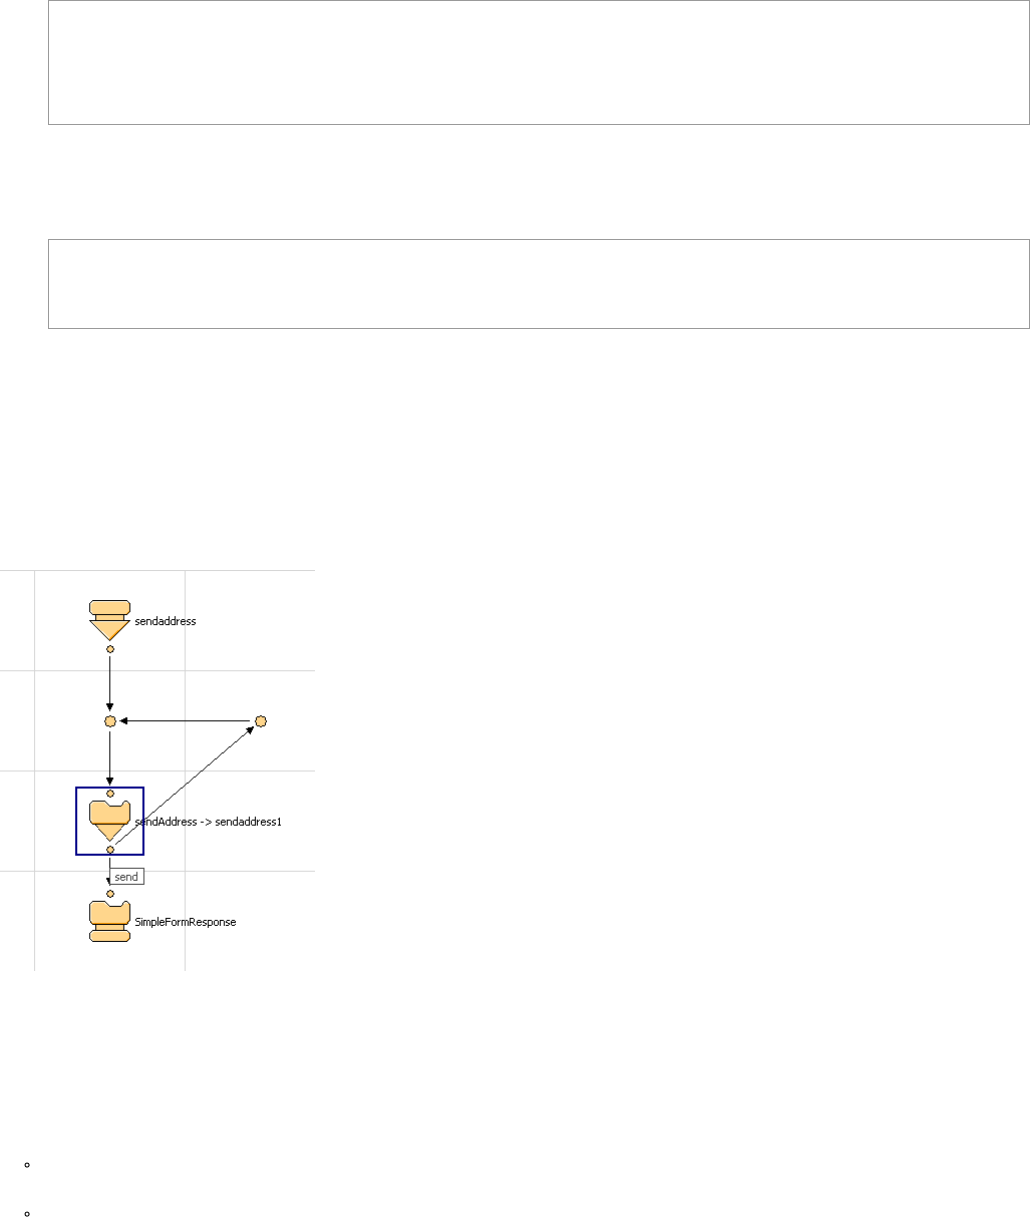
3/16/23, 2:11 PM
Legacy Developer Documentation
https://documentation.b2c.commercecloud.salesforce.com/DOC1/advanced/print.jsp?topic=/com.demandware.dochelp/LegacyDevDoc/LegacyDevDoc.html&cp…
115/158
f. Create an input field simpleform.sendAddress for browser input.
<tr>
<isinputfield
formfield="${pdict.CurrentForms.sendAddress.message}"
type="textarea" attribute1="rows" attribute2="cols"
value1="6" value2="50">
</tr>
g. End the table.
</table>
h. Define the Sendaction for browser input.
<input class="image
imageright" type="image"
src="../topic/com.demandware.dochelp/LegacyDevDoc/${URLUtils.staticURL('/images/cont_bttn.gif')}" value="Send"
name="${pdict.CurrentForms.sendAddress.send.htmlName}" />
i. End the form definition.
< /form>
Make sure you give the file name an ISML extension. Also, make this a valid ISML file by including the previous lines within the < html><body> tags, or include it as part
of an existing template.
The system renders the fields using the < isinputfield>ISML tag; while the Framework handles all the validation and rendering of any messages that are defined in
the form definition file.
9. The template is called by an interaction continue node either in an existing pipeline or a new pipeline or subpipeline. For the previous example, create a new pipeline with a
Start Node, an Interaction Continue Node (to load the template and form definition and process the action) and an Interaction Node to render the response data from the
form, shown in the following graphic.
10. From the interaction continue node to the interaction node you must use a named transition, in this example, send. You will also need a next transition off the interaction
continue node to render error messages if the user doesn't enter data correctly into the fields. In this case, it returns to the interaction continue node.
11. Create a simple template that provides a simple response to click the send button (called SimpleFormResponse).
12. When the customer clicks the send button (the send action that is named in the transition), B2C Commerce performs a validation. The Interaction Continue Node handles
where the actions are routed to, so always use this node when working with forms.
If the form passes the validation configured in the forms definition, the action is set to send, and in the case of this pipeline, another template is rendered, showing the
posted data from the form.
If form validation finds an issue, the action is set to next. The next action causes the form to be reloaded with any error defined messages rendered to the user. For
example, an incorrect email address causes the form validation to fail, and the next action is fired.
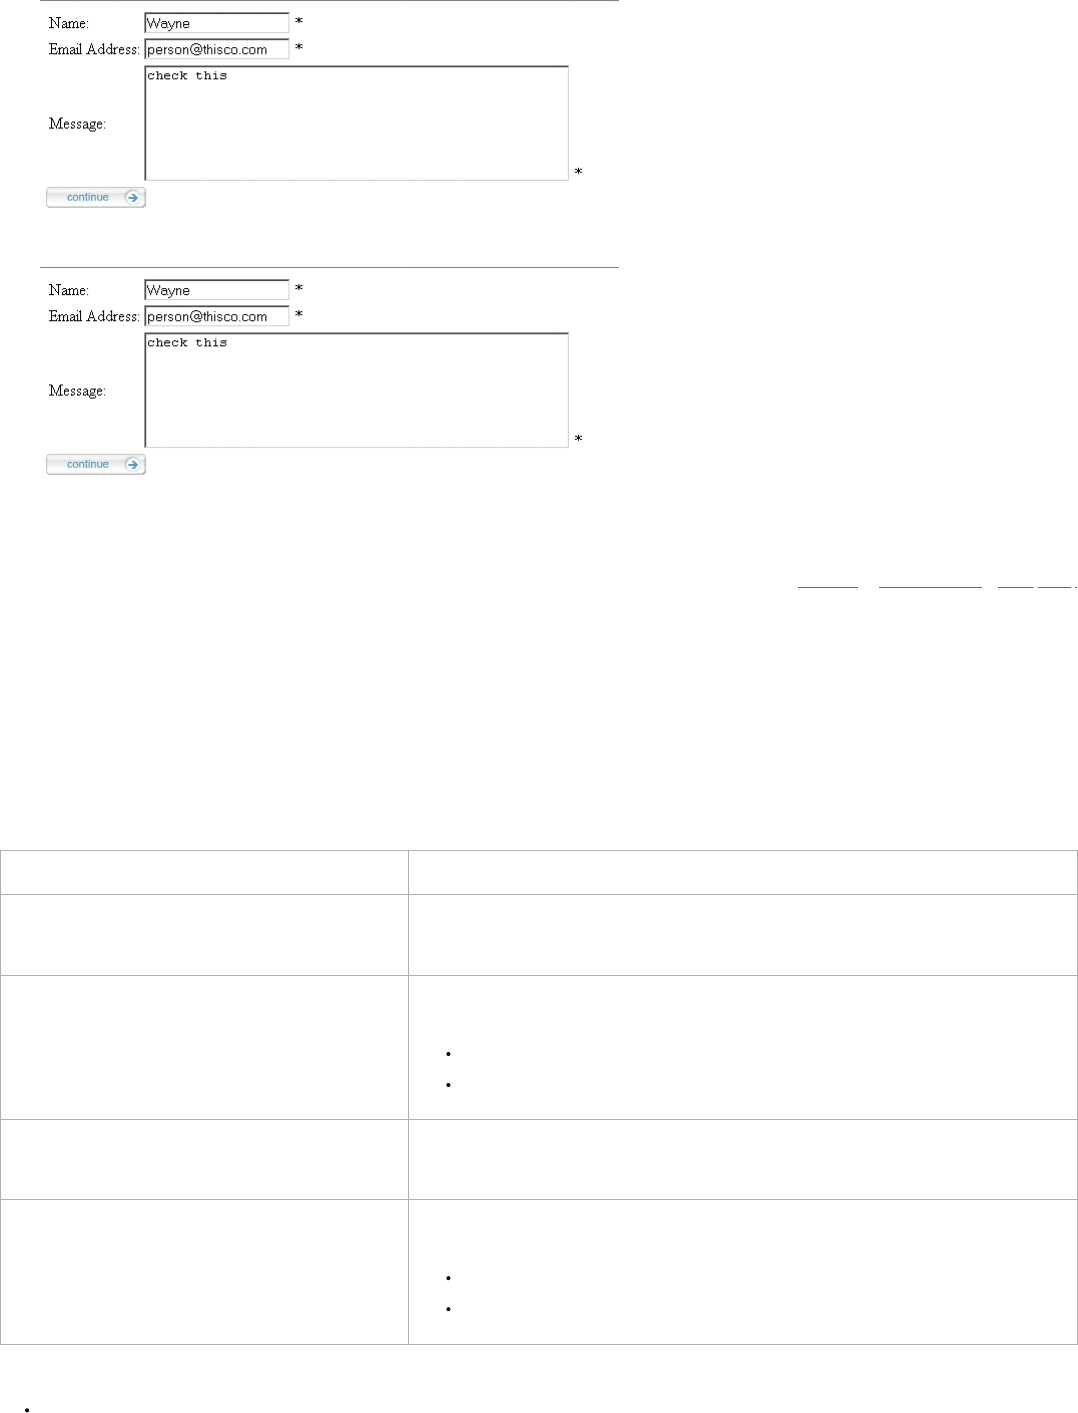
3/16/23, 2:11 PM
Legacy Developer Documentation
https://documentation.b2c.commercecloud.salesforce.com/DOC1/advanced/print.jsp?topic=/com.demandware.dochelp/LegacyDevDoc/LegacyDevDoc.html&cp…
116/158
13. If you create this sample application and either run it alone, or add it (temporarily) to an existing application, you should see the following:
14. When you click the Continuebutton, you should see the following:
If you encounter errors, check if your node names are the same in the pipeline. Each node name must be unique. For example, you can't call both the Start node and the
interaction continue node sendaddress.
Were you able to get your original application running? For example, get the SiteGenesis application running before you attempt this sample application.
© Copyright 2000-2023, Salesforce, Inc. All rights reserved. Various trademarks held by their respective owners. Show URL Submit Feedback Privacy Policy
2.11.9.3. Forms Tutorial
This tutorial is intended to help you practice with the Salesforce B2C Commerce forms so that you can shorten your application's go-live time and enhance your customer's
ecommerce shopping experience.
In this tutorial, you extend the registration process so that customers can specify one or more product groups in which they have the most interest. They can also opt-in to receive an
email newsletter.
To add this capability, you create a series of check-boxes, allowing customers to select one or more groups (for example, Interest in Outerwear or Interest in Footwear) on the My
Account page. You also add a checkbox for them to opt-in to receive the newsletter.
You are performing these general tasks:
Task Files Impacted
Extend the customer profile to allow for product groups in three
boolean attributes (allowing for multi-selection) and a
newsletter attribute
In Business Manager, extend the Profile system object.
Add a sub menu to the My Account page to let users manage
their interests.
In UX Studio:
Extend the account-landing content asset to call the Account-EditInterests subpipeline.
Create the account/user/editinterests.isml templates to process the new Interests menu.
Start the implementation in the account profile editing area. In UX Studio, add the subpipeline Account-EditInterests to the Account pipeline to process the interests
form objects that are defined in the interests.xml form definition via the account/user/editinterests.isml
templates.
Use B2C Commerce Forms to manage/validate the preferences.
In UX Studio:
Create a new form definition file interests.xml.
Create new messages via three properties files for consumer clarification and easier localization.
To do this, you need:
Your own instance, with the proper access (contact Commerce Cloud Support).
3/16/23, 2:11 PM
Legacy Developer Documentation
https://documentation.b2c.commercecloud.salesforce.com/DOC1/advanced/print.jsp?topic=/com.demandware.dochelp/LegacyDevDoc/LegacyDevDoc.html&cp…
117/158
Business Manager with the SiteGenesis application storefront (Sites-Site).
UX Studio installed on your PC that supports your instance. If your Studio and server are incompatible, Studio shows the appropriate message.
The SiteGenesis cartridge downloaded on your PC.
Your new cartridge properly identified within Business Manager on your instance.
See Site Development for more information.
Note: This tutorial relies on the isinputfield and modules templates, located in templates/util directory for the display of input fields, as specified by the forms definitions.
Tutorial Steps
To precede through this tutorial, use the following steps:
Business Manager steps:
1. Extend the Profile system object.
2. Create a Preferences Attribute Group.
Studio/Eclipse steps:
1. Create a Form Definition.
2. Update a Content Asset.
3. Add Templates.
4. Add Localizable Text Messages.
5. Modify the Pipeline.
6. See Your Final Results.
© Copyright 2000-2023, Salesforce, Inc. All rights reserved. Various trademarks held by their respective owners. Show URL Submit Feedback Privacy Policy
2.11.9.3.1. Using Transitions with Forms
The smallest, most often overlooked component used to process browser entry information is the transition from an interaction continue node to the next step. Transitions are a
pipeline development tool, and not specific for forms processing. Transitions occur when a pipeline flow calls a CallNode, off which there are one or more paths (transitions) based on
what the call node returns.
Transitions off an Interaction Continue node let processing exit a template when the named transition is called by an action.
Example
This example references the form definition name for the action (button) in the transition and in the template that calls it.
In the form definition:
<action formid="apply" valid-form="true" />
In the template:
<input
class="image imageright"
type="image"
name="${pdict.CurrentForms.sendstuff.apply.htmlName}"
value="Edit" src="../topic/com.demandware.dochelp/LegacyDevDoc/${URLUtils.staticURL('/images/bttn_apply.gif')}" />
Important: All action names are case-sensitive.
Continue with this example: Form Components Working Together.
© Copyright 2000-2023, Salesforce, Inc. All rights reserved. Various trademarks held by their respective owners. Show URL Submit Feedback Privacy Policy
2.11.9.3.1.1. Transitions with Forms
The smallest, most often overlooked component used to process browser entry information is the transition from an interaction continue node to the next step. Transitions are not
really part of the Forms Framework, but an element of the broader pipeline creation/usage Framework. Transitions occur when a pipeline flow calls a CallNode, off which there are
one or more paths (transitions) based on what the call node returned.
Transitions off an Interaction Continue node let processing exit a template when the named transition is called by an action.
Example
Reference the form definition name for the action (button) in the transition and in the template that calls it.
3/16/23, 2:11 PM
Legacy Developer Documentation
https://documentation.b2c.commercecloud.salesforce.com/DOC1/advanced/print.jsp?topic=/com.demandware.dochelp/LegacyDevDoc/LegacyDevDoc.html&cp…
118/158
In form definition:
<action formid="apply" valid-form="true" />
In template:
<input
class="image
imageright"
type="image"
name="${pdict.CurrentForms.sendstuff.apply.htmlName}"
value="Edit" src="../topic/com.demandware.dochelp/LegacyDevDoc/${URLUtils.staticURL('/images/bttn_apply.gif')}" />
Important: All action names are case-sensitive.
© Copyright 2000-2023, Salesforce, Inc. All rights reserved. Various trademarks held by their respective owners. Show URL Submit Feedback Privacy Policy
2.11.9.3.2. Forms Tutorial: Business Manager
This example starts by:
1. Extending the Profile system object.
2. Creating a Preferences Attribute Group.
© Copyright 2000-2023, Salesforce, Inc. All rights reserved. Various trademarks held by their respective owners. Show URL Submit Feedback Privacy Policy
2.11.9.3.2.1. 1 Forms Tutorial: Extend Profile System Object
You are extending the Profile system object with custom attributes.
1. Select Administration > Site Development > System Object Types.
2. Click the Profile object.
3. Click the Attribute Definitions tab.
4. For each of new attributes, click New, enter the data as shown in this table, and then click Apply. Click the Back button and specify the next attribute.
Option Description
SelectLanguage Default (all)
ID InterestOuterwear, InterestFootwear, newsletter
Display name Interested in outerwear, Interested in Footwear, Newsletter
Help text Are you interested in outerwear?, Are you interested in footwear?, Would you like
to receive our newsletter?
Value type Boolean (all)
Queryable (automatically set) yes (all)
5. The new attributes appear on the Attribute Definitions tab.
Attribute names are case sensitive. For the best results, ensure that you specify the previous ID names as described here or refer to the names that you do use exactly as you
specify them later in this tutorial. A common mistake users make is to refer to a different spelling of these names.
© Copyright 2000-2023, Salesforce, Inc. All rights reserved. Various trademarks held by their respective owners. Show URL Submit Feedback Privacy Policy
2.11.9.3.2.2. 2 Forms Tutorial: Create Preferences Attribute Group
Create a Preferences attribute group.
1. Select Administration > Site Development > System Object Types, click the Profile object.
3/16/23, 2:11 PM
Legacy Developer Documentation
https://documentation.b2c.commercecloud.salesforce.com/DOC1/advanced/print.jsp?topic=/com.demandware.dochelp/LegacyDevDoc/LegacyDevDoc.html&cp…
119/158
2. Click the Attribute Grouping tab.
3. Enter a new ID ("interests") and name ("Interests").
4. Under the Attribute column, click the Edit link beside the new Interests attribute group.
5. Click the Browse button (...).
6. Select the three interest attributes you just created.
7. Click the Select button.
8. Click the Back button.
9. The interests attribute group appears on the Attribute Grouping tab.
© Copyright 2000-2023, Salesforce, Inc. All rights reserved. Various trademarks held by their respective owners. Show URL Submit Feedback Privacy Policy
2.11.9.3.3. Forms Tutorial: UX Studio
Now you change the application by:
1. Creating a Form Definition.
2. Updating a Content Asset.
3. Adding Templates.
4. Adding Localizable Text Messages.
5. Modifying the Pipeline.
6. Seeing Your Final Results.
© Copyright 2000-2023, Salesforce, Inc. All rights reserved. Various trademarks held by their respective owners. Show URL Submit Feedback Privacy Policy
2.11.9.3.3.1. 1 Forms Tutorial: Create Form Definition
Create a form definition that defines the Interests input fields, the Newsletter select box and the Apply button and how they are handled.
1. In UX Studio, from the Navigator view, select the cartridge/forms/default directory in the SiteGenesis Storefront Core cartridge.
2. Click File > New and select File.
3. Enter the file name interests.xml in the New File dialog box and click Finish.
4. Enter the following XML code:
< ?xml version="1.0"?>
< form>
<field formid="outerwear" label="forms.preferences.001" type="boolean" binding="interestOuterwear" />
<field formid="footwear" label="forms.preferences.002" type="boolean" binding="interestFootwear" />
<field formid="newsletter" label="forms.preferences.004" type="boolean" binding="newsletter" />
<action formid="apply" valid-form="true" />
< /form>
5. Click File > Save or the Save icon to save the file.
You reference this file from the editinterests.isml template.
© Copyright 2000-2023, Salesforce, Inc. All rights reserved. Various trademarks held by their respective owners. Show URL Submit Feedback Privacy Policy
2.11.9.3.3.2. 2 Forms Tutorial: Update Content Asset
Update the account-landing content asset to reference the Interests module, then add a new entry to account-landing.
1. Select site > Merchant Tools > Content and open the account-landing content asset.
2. Add the following after the Gift Registries section using the editor. This code references the new subpipeline.
<tr>
<td style="width: 54px;">

3/16/23, 2:11 PM
Legacy Developer Documentation
https://documentation.b2c.commercecloud.salesforce.com/DOC1/advanced/print.jsp?topic=/com.demandware.dochelp/LegacyDevDoc/LegacyDevDoc.html&cp…
120/158
<a title="Show or update your interests" href="../topic/com.demandware.dochelp/LegacyDevDoc/$httpsUrl(Account-EditInterests)$">
<img width="48" height="48" src="../topic/com.demandware.dochelp/LegacyDevDoc/images/roles_ico.gif?$staticlink$" alt="Interests" /
</a></td>
<td>
<h2><a title="Show or update your interests" href="../topic/com.demandware.dochelp/LegacyDevDoc/$httpsUrl(Account-EditInterests)$"
Interests</a></h2>
<p>Show or update your interests</p>
</td>
</tr>
© Copyright 2000-2023, Salesforce, Inc. All rights reserved. Various trademarks held by their respective owners. Show URL Submit Feedback Privacy Policy
2.11.9.3.3.3. 3 Forms Tutorial: Add Templates
You add a new template, user.editinterests.isml, that shows the interest and newsletter choices on the browser.
1. In UX Studio, from the Navigator view, select the cartridge/templates/default/account/user directory.
2. Click File > New and select ISML Template.
3. Select the parent folder (template/account/user).
4. Enter the template name editpreferences.
5. Click Finish.
6. Use the following to create the contents:
<!--- TEMPLATENAME: editpreferences.isml renders fields
on browser --->
<isdecorate template="account/pt_account">
<iscontent type="text/html" charset="UTF-8"
compact="true">
<!-- Start: user/editpreferences -->
<isinclude template="util/modules">
<div id="service">
<h1>${Resource.msg('user.editpreferences.001','user',null)}</h1>
<div class="editprofile">
<h2>${Resource.msg('user.editpreferences.002','user',null)}</h2>
<form action="${URLUtils.httpsContinue()}"
method="post" id="EditProfileForm">
<h3>${Resource.msg('user.editpreferences.003','user',null)}</h3>
<div id="editprofile">
<fieldset>
<table class="simple">
<tr>
<isinputfield formfield="${pdict.CurrentForms.
preferences.outerwear}"
type="checkbox">
</tr>
<tr>
<isinputfield formfield="${pdict.CurrentForms.
preferences.footwear}"
type="checkbox">
</tr>
</table>
</fieldset>
</div>
<h3>${Resource.msg('user.editpreferences.004','user',null)}</h3>
<div id="editprofile">
<fieldset>
<table class="simple">
<tr>
<isinputfield formfield="${pdict.CurrentForms.
preferences.newsletter}"
type="checkbox">
</tr>
3/16/23, 2:11 PM
Legacy Developer Documentation
https://documentation.b2c.commercecloud.salesforce.com/DOC1/advanced/print.jsp?topic=/com.demandware.dochelp/LegacyDevDoc/LegacyDevDoc.html&cp…
121/158
</table>
...
</fieldset>
<fieldset>
<input class="image imageright" type="image"
name="${pdict.CurrentForms.
preferences.apply.htmlName}"
value="Edit" src="../topic/com.demandware.dochelp/LegacyDevDoc/${URLUtils.staticURL('/images/bttn_apply.gif'
/>
</fieldset>
</div>
</form>
</div>
</div>
<!-- End: user/editpreferences -->
</isdecorate>
© Copyright 2000-2023, Salesforce, Inc. All rights reserved. Various trademarks held by their respective owners. Show URL Submit Feedback Privacy Policy
2.11.9.3.3.4. 4 Forms Tutorial: Add Localizable Text Messages
You now need to update these properties files with localizable messages that are referenced as follows:
Properties file Referenced by file
forms.properties form definition form.preferences.xml (see step 1)
account.properties template account.accountoverview.isml (see step 2)
user.properties user.editpreferences.isml (see step 3)
1. Add the following to the forms.properties file after the forms.profile entries:
forms.preferences.001=Outerwear
forms.preferences.002=Footwear
forms.preferences.003=Receive Monthly Newsletter
2. Add the following to the account.properties file after the account.accountoverview entries:
account.accountoverview.104=Show or update your personal preferences
account.accountoverview.105=Personal Preferences
account.accountoverview.106=Show or update your personal preferences
account.accountoverview.107=Personal Preferences
account.accountoverview.108=Show or update your personal preferences
3. Add the following to the user.properties file after the user.profile entries:
user.editpreferences.001=Edit Your Preferences
user.editpreferences.002=your preferences
user.editpreferences.003=What products are you interested in?
user.editpreferences.004=Information Feeds
© Copyright 2000-2023, Salesforce, Inc. All rights reserved. Various trademarks held by their respective owners. Show URL Submit Feedback Privacy Policy
2.11.9.3.3.5. 5 Forms Tutorial: Modify the Pipeline
Now link your new and changed components within the Customer pipeline so that the application can process these fields.
Change the way the pipeline processes the Your Account Page.
Add processing for the preferences data entry.
Link back to the Your Account Page for a smooth customer experience.
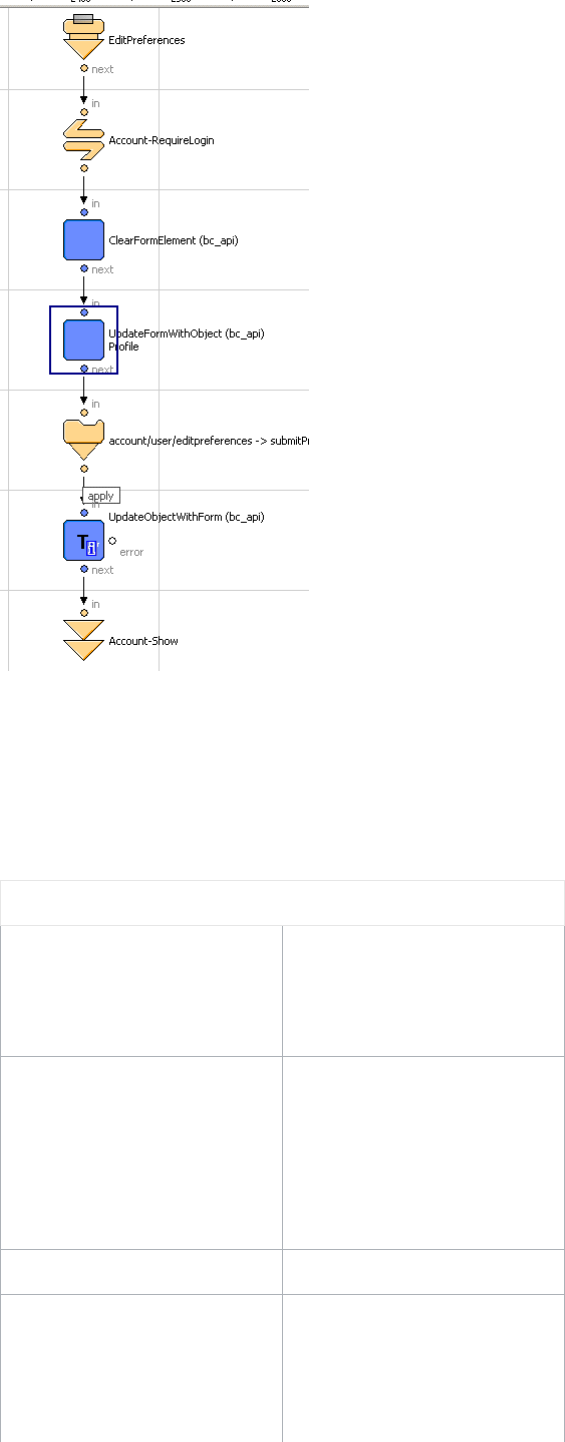
3/16/23, 2:11 PM
Legacy Developer Documentation
https://documentation.b2c.commercecloud.salesforce.com/DOC1/advanced/print.jsp?topic=/com.demandware.dochelp/LegacyDevDoc/LegacyDevDoc.html&cp…
122/158
1. Add a new subpipeline Account-EditPreferences to the Customer pipeline (that you referred to in the accountoverview template), as show in the following graphic.
2. Open the Customer pipeline.
3. Locate a blank area in which to add the subpipeline.
4. Drag a Start node from the palette into the blank area.
5. Add nodes using the parameters in the following table. Add these nodes in the same order as the table except for the jump to Account-EditPreferences node, which should be
beside the UpdateFormWithObject pipelet.
Option Description
Start
Call Mode: "Public"
Secure Connection Required: "false
Name: "EditPreferences"
Call
Dynamic: "false"
Pipeline: "Login-RequireLogin"
Call Mode: "Private"
Name: "RequireLogin"
Secure Connection Required: "false"
Pipelet: ClearFormElement Form element: "CurrentForms.preferences"
Pipelet: UpdateFormWithObject
Clear: "false"
Form: "CurrentForms.preferences"
Object: "CurrentCustomer.profile"
Custom Label: "Profile"
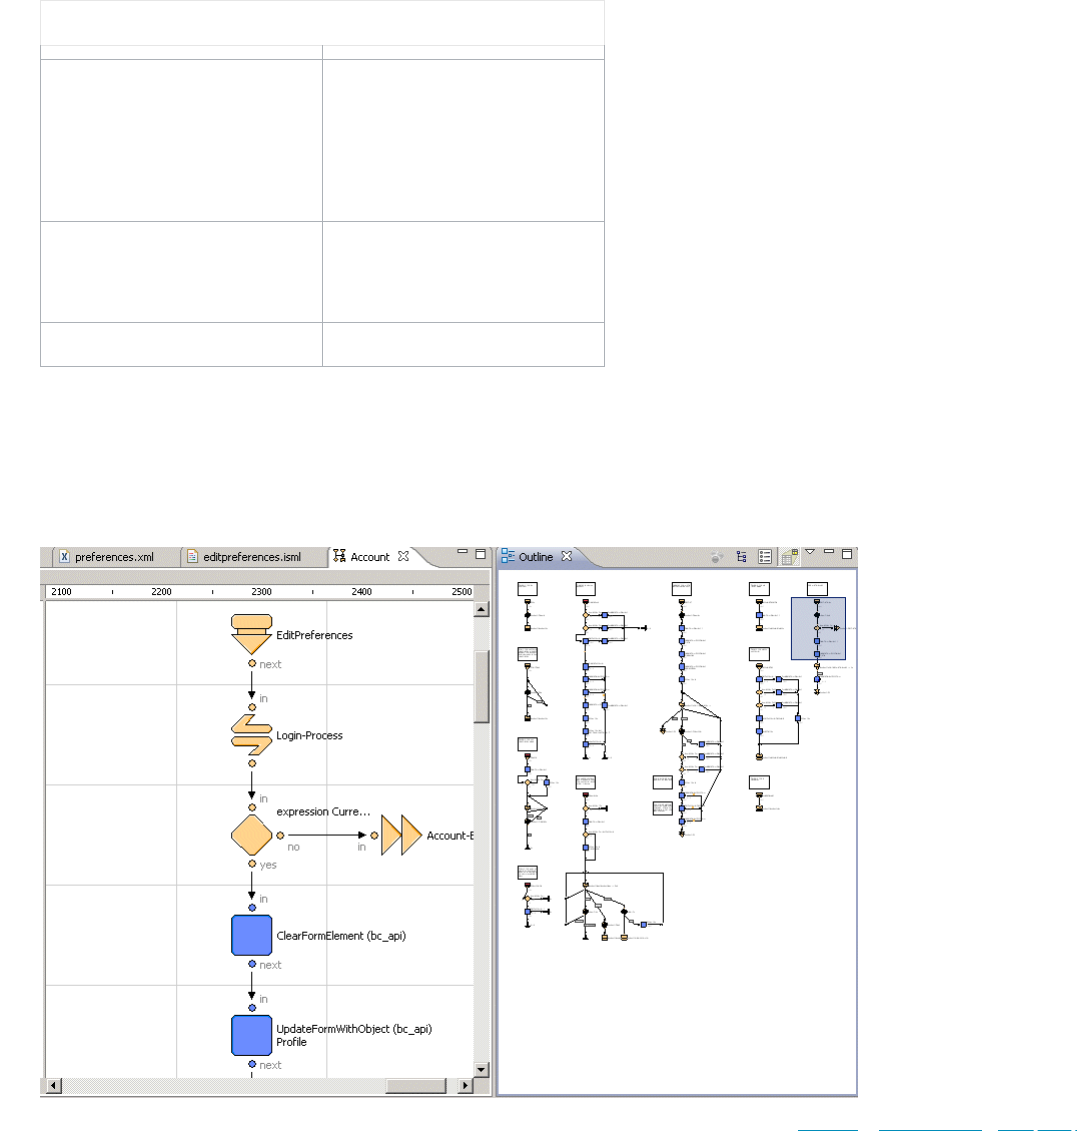
3/16/23, 2:11 PM
Legacy Developer Documentation
https://documentation.b2c.commercecloud.salesforce.com/DOC1/advanced/print.jsp?topic=/com.demandware.dochelp/LegacyDevDoc/LegacyDevDoc.html&cp…
123/158
Option Description
Interaction Continue
Secure Connection Required: "false"
Start name: "submitPreferences"
Dynamic Template: "false"
Template: "account/user/editpreferences"
Pipelet: UpdateObjectWithForm
Form: "CurrentForms.preferences"
Object: "CurrentCustomer.profile"
Jump Pipeline: "Account-Show"
6. Use transitions to link these components to each other as in the previous graphic.
7. For the transition between the Interaction Continue node and the UpdateObjectWithForm pipelet, set the Connector name to apply.
The final Jump node of the Account-EditPreferences subpipeline returns to the Account-Show subpipeline to continue processing the Account-EditPreferences subpipeline
from the accountlanding content asset, which is called by the Account-Show subpipeline.
8. Your pipeline should look as follows:
© Copyright 2000-2023, Salesforce, Inc. All rights reserved. Various trademarks held by their respective owners. Show URL Submit Feedback Privacy Policy
2.11.9.3.3.6. 6 Forms Tutorial: Final Results
Now you need to update the Business Manager settings so that your application uploads and uses the modified cartridge.
1. Set UX Studio to connect and auto-upload.
a. Open UX Studio and in the Navigator view go to your configured Digital Server Connection (which you might have custom named).
b. Right-click and select Properties > Project References from the popup menu. Your storefront cartridge should be checked.
c. Right-click again on the Digital Server Connection name and select Digital. Make sure that Auto-Load is checked. If it is checked, you might want to uncheck and recheck
it to completely refresh all the cartridge files on the server.
2. In the Business Manager, make sure your cartridge is registered.
a. Select Administration > Sites > Manage Sites - [Your Storefront Site].
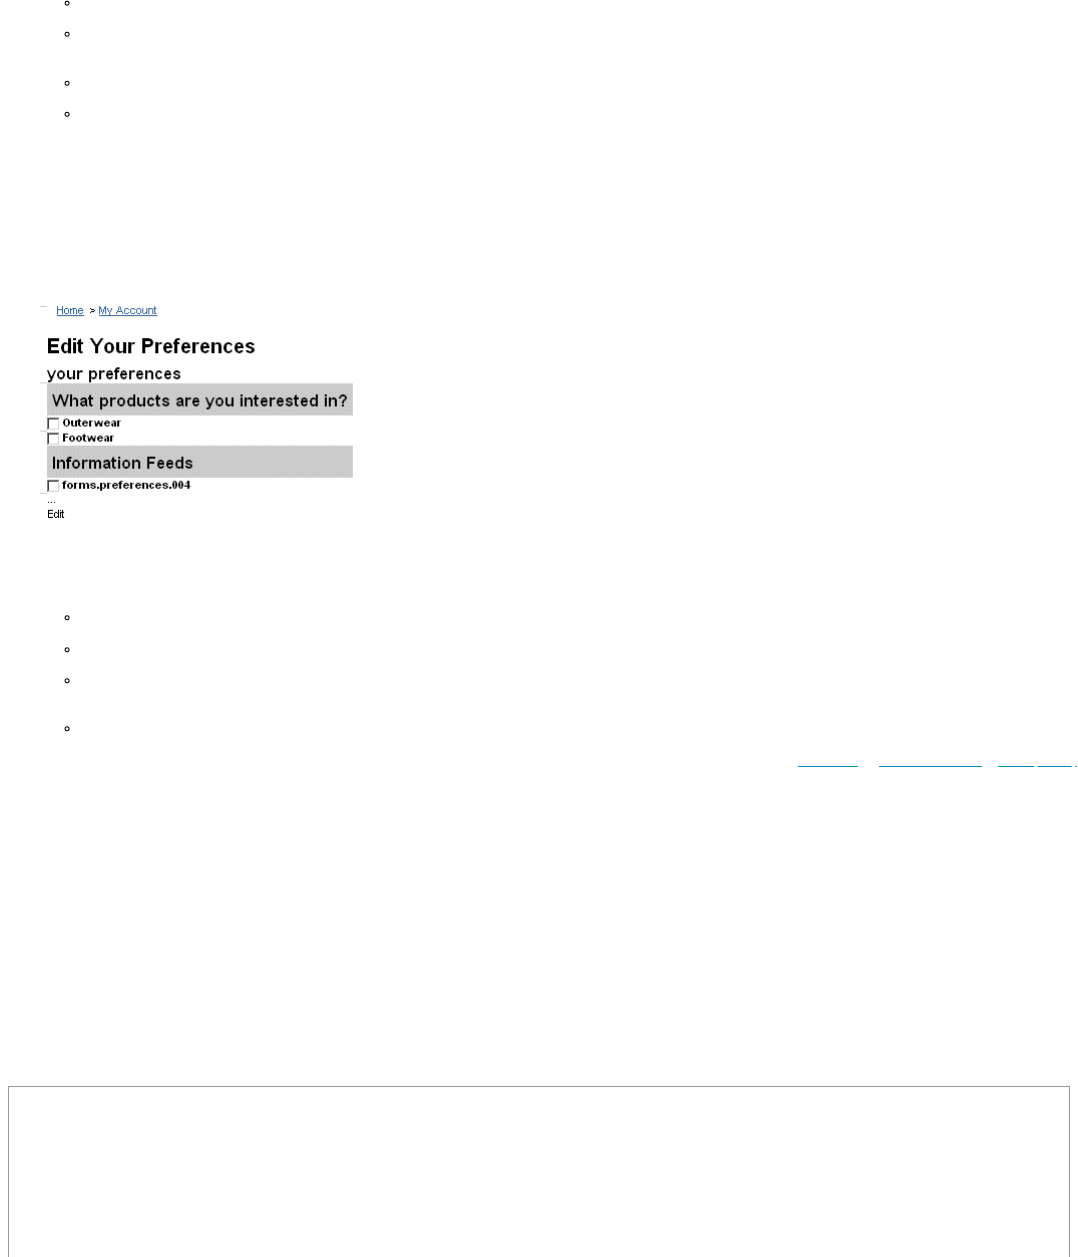
3/16/23, 2:11 PM
Legacy Developer Documentation
https://documentation.b2c.commercecloud.salesforce.com/DOC1/advanced/print.jsp?topic=/com.demandware.dochelp/LegacyDevDoc/LegacyDevDoc.html&cp…
124/158
b. Click the Settings tab. Your storefront cartridge must be in the cartridge path list.
c. Consider your cartridge's position in the path in case of pipeline overloading. Pipelines in cartridges to the left overload pipelines with the same name in cartridges to
the right.
3. Navigate to the storefront (click Site-YourShopHere > Storefront.
The storefront appears.
4. If your storefront doesn't appear and you get an error, check the following:
Did you enter the correct cartridge name into the Business Manager (it's case-sensitive).
Is the Business Manager pointing to the right version (Administration > Site Development > Code Deployment). The version you are using in Studio must match the
Active version.
Is your version of Studio the same as the Sandbox version?
Are you using a new cartridge. If you are, you might need to restart the instance to register the cartridge and pipeline.Do this from the Control Center.
5. Login to the storefront or register as a new user.
6. Navigate to the Your Account page.
7. Click the Personal Preferences link.
You see the following:
8. Troubleshoot as follows if you got error messages:
Did you set the connector name between the interaction continue node and the UpdateObjectWithForm pipelet to apply?
Click the Show Request Log setting from the Storefront Toolkit (see Storefront Toolkit documentation) and review any error messages for clues.
The most common errors are case-sensitive typos, failure to label the transition from an interactive continue node and improper naming or connectivity between the
client and server.
If you still have problems, use the pipeline debugger to trace what is happening.
© Copyright 2000-2023, Salesforce, Inc. All rights reserved. Various trademarks held by their respective owners. Show URL Submit Feedback Privacy Policy
2.12. Working with SGJC Controllers
If you are starting a new storefront implementation, Salesforce recommends using controllers instead of pipelines for your application code.
What are controllers?
Controllers are server-side scripts that handle storefront requests. Controllers manage the flow of control in your application, and create instances of models and views to process
each storefront request and generate an appropriate response. For example, clicking a category menu item or entering a search term triggers a controller that renders a page.
Controllers are written in JavaScript and Salesforce B2C Commerce script. They must conform to the CommonJS module standard.
The file extension of a controller can be either .ds or .js. Controllers must be located in the controllers folder at the top level of the cartridge. Exported methods for controllers
must be explicitly made public to be available to handle storefront requests.
Example: SGJC Controller Hello.Js
/**
* A hello world controller.
*
* @module controllers/Hello
*/
exports.World = function(){
response.getWriter().println('Hello World!');
3/16/23, 2:11 PM
Legacy Developer Documentation
https://documentation.b2c.commercecloud.salesforce.com/DOC1/advanced/print.jsp?topic=/com.demandware.dochelp/LegacyDevDoc/LegacyDevDoc.html&cp…
125/158
};
exports.World.public = true;
Controllers can:
use require to import script modules: Any B2C Commerce script can be made into a CommonJS module and required by a controller.
use require to import B2C Commerce packages, instead of the importPackages method. This is the best practice way of referencing additional functionality from a controller.
You can also use the require method to import a single B2C Commerce class. For example:
var rootFolder = require('dw/content/ContentMgr').getSiteLibrary().root;
While it isn't best practice, controllers can also:
call other controllers. It isn't recommended that controllers call each other, because controller functionality should be self-contained to avoid circular dependencies. In some
cases, however, such as calling non-public controllers during the checkout process, it is unavoidable.
call pipelets: calling pipelets from within a controller is strongly discouraged. It's allowed while there are still pipelets that don't have equivalent B2C Commerce script methods,
but will not be supported in future.
import packages. This is discouraged as it doesn't use standard JavaScript patterns, but is Rhino-specific.
call pipelines that don't end in interaction continue nodes. This is only intended for use with existing link cartridges and is highly discouraged for general development.
Note: It isn't currently possible to call pipelines that end in interaction continue nodes.
Tools
You can use any IDE with a JavaScript editor to develop controllers. However, to upload code, you must either use UX Studio or an upload utility. Upload utilities are available from the
Salesforce Commerce Cloud community repositories in GitHUb.
You can also use any standard JavaScript tools, including linters, static code analysis tools.
Request URLs
A request URL for a controller has the format controller-function. For example, the request URL for the Hello.js controller World function looks like:
https://localhost/on/demandware.store/Sites-SiteGenesis-Site/default/Hello-World
See also: B2C Commerce URL Syntax Without SEO.
Reserved Names for Controllers
B2C Commerce has several system names that are reserved and can't be used for custom controllers and their functions. For a full list, see System Pipelines and Controllers.
Secure Requests
You might need to secure access to the exported functions of the controller. A controller function is only called if it has a public property that is set to true. All other functions that
do not have this property are ignored by B2C Commerce and lead to a security exception if an attempt is made to call them using HTTP or any other external protocol.
Example: accessible controller
exports.World = function() {};
exports.World.public = true;
Guards
For controllers, SiteGenesis uses the concept of guards to wrap controller functions when they are exported. The functions in the guard module act as a request filter and let you
specify multiple levels of access to controller functionality, such as:
require HTTPS
require or forbid a certain HTTP method, like GET, POST,...
require that the current customer is logged in
require that the function might only be executed as remote include, but not as top-level request
A guard is a wrapper function that encapsulates a delegate function and only invokes it if its guard condition is satisfied. The guard conditions represent single preconditions that can
also be combined with each other. The conditions use the B2C Commerce API to determine the properties of the current request and logic to determine whether to continue request
processing or throw an error.
Example: require GET
exports.StartCheckout = guard.ensure(['get'], startCheckout);
Example: require HTTPS and that the customer is logged in.
exports.EditProfile = guard.ensure(['get', 'https', 'loggedIn'], editProfile);
3/16/23, 2:11 PM
Legacy Developer Documentation
https://documentation.b2c.commercecloud.salesforce.com/DOC1/advanced/print.jsp?topic=/com.demandware.dochelp/LegacyDevDoc/LegacyDevDoc.html&cp…
126/158
Note: You can also create custom guards functions, such as "stagingOnly" or "loggedInAsEmployee".
Global Variables
Controllers do not have access to the Pipeline Dictionary, but they do have access to global variables, such as session, via the TopLevel package Global class.
Variable Type Description and example
customer dw.customer.Customer The current customer, either an anonymous customer or an authenticated customer with an account.
request dw.system.Request The current HTTP request
var httpUserAgent = request.httpUserAgent;
response dw.system.Response The current HTTP response
response.redirect(dw.web.URLUtils.https('Account-Show'));
session dw.system.Session The current session.
exports.onSession = function() {
session.custom.device = getDeviceType();
return new Status(Status.OK);
};
Request Parameters and Page Meta Data
Expression Type Description and example
request.httpParameterMap dw.web.HttpParameterMap The replacement for the CurrentHttpParameterMap variable in the Pipeline Dictionary.
request.pageMetaData dw.web.PageMetaData The replacement for the CurrentPageMetaData variable in the Pipeline Dictionary
Scripts can access these variables. For example, the render method of the View.js script, which renders a template, accesses most global variables and request parameters and passes
them to the template, which accesses them via the pdict variable.
render: function (templateName) {
...
this.CurrentForms = session.forms;
this.CurrentHttpParameterMap = request.httpParameterMap;
this.CurrentCustomer = customer;
this.CurrentSession = session;
this.CurrentPageMetaData = request.pageMetaData;
this.CurrentRequest = request;
try {
ISML.renderTemplate(templateName, this);
} catch (e) {
dw.system.Logger.error('Error while rendering template ' + templateName);
throw e;
}
return this;
}});
Back to top.
Debugging
Almost any JavaScript-related error gets logged in the customerror_* log files, including errors from B2C Commerce scripts and controllers. The error_* log files contain Java-
related errors on B2C Commerce, which are probably only useful for B2C Commerce users.
3/16/23, 2:11 PM
Legacy Developer Documentation
https://documentation.b2c.commercecloud.salesforce.com/DOC1/advanced/print.jsp?topic=/com.demandware.dochelp/LegacyDevDoc/LegacyDevDoc.html&cp…
127/158
There's a special controller, conveniently called Error.js, that services uncaught errors. By default, B2C Commerce returns a 410 error, which indicates that the resource is no longer
available. For those who prefer 404, it's fine to use as long as the related ISML template doesn't include <isslot>, <iscomponent>, or <isinclude> tags. For genuine server errors,
it is more truthful to return a 500 error, but most merchants prefer not to send back this level of detail to their customers. When you want to handle these errors explicitly, you can
use try/catch statements to do so.
Best Practices
Performance
Only import modules when you need them, not at the top of a module.
Using Controllers with OCAPI
If you intend to build a mobile or native app in addition to your storefront, you can use hooks to create modules that can be used by both your desktop storefront and mobile app.
Jobs
You cannot create jobs with controllers.
© Copyright 2000-2023, Salesforce, Inc. All rights reserved. Various trademarks held by their respective owners. Show URL Submit Feedback Privacy Policy
2.13. Comparing Pipelines and SGJC Controllers
Controllers have many advantages over pipelines.
If you are migrating a storefront based on a pipeline version of SiteGenesis, see Migrating Your Storefront to Controllers for specific steps to take when migrating. If you want to see
what the controller equivalent of pipeline nodes are, see: Pipeline to Controller Conversion.
If you need to compare:
Pipelines to Controllers
Subpipelines to Exported Methods
Pipeline and Controller URLs and SEO
Pipelets to Salesforce B2C Commerce Script
Cartridge Folders
Pipeline Dictionary to Global Variables
Calling Scripts and Passing Arguments
Global Variables
Request Parameters and Page Meta Data
Using Pipelines and Controllers Together
Public and Private Call Nodes to Guards
Transactions
Forms
Interaction End Nodes and Unbuffered Responses
Error Pipelines to Error Controllers
onRequest and onSession event handler
Rendering ISML
Interaction Continue
Rendering JSON or XML
Rendering Result Pages Via
Direct Responses via the Response
Caching
Jobs and Third-Party Integrations
Pipelines to Controllers
Pipelines are XML files that can be visualized in UX Studio as workflows
Controllers are server-side scripts that handle storefront requests. Controllers orchestrate your storefront’s backend processing, managing the flow of control in your application, and
create instances of models and views to process each storefront request and generate an appropriate response. For example, clicking a category menu item or entering a search term
triggers a controller that renders a page.
Controllers are written in JavaScript and B2C Commerce script. The file extension of a controller can be either .ds or .js. Controllers must be located in the controllers folder at the top
level of the cartridge. Exported methods for controllers must be explicitly made public to be available to handle storefront requests.
Subpipelines to Exported Methods
3/16/23, 2:11 PM
Legacy Developer Documentation
https://documentation.b2c.commercecloud.salesforce.com/DOC1/advanced/print.jsp?topic=/com.demandware.dochelp/LegacyDevDoc/LegacyDevDoc.html&cp…
128/158
p p p
Controllers are mapped to URLs, which have the same format as pipeline URLs, with exported functions treated like subpipelines.
Pipeline-Subpipelines, such as Home-Show, are migrated to CommonJS require module exported functions. See also the CommonJS documentation on modules:
http://wiki.commonjs.org/wiki/Modules/1.1.
Example 1: Home-Show
The following example is a simple controller that replaces the Home-Show pipeline. The Home.js controller defines a show function that is exported as the Show function.
var app = require('~/cartridge/scripts/app');
var guard = require('~/cartridge/scripts/guard');
/**
* Renders the home page.
*/
function show() {
var rootFolder = require('dw/content/ContentMgr').getSiteLibrary().root;
require('~/cartridge/scripts/meta').update(rootFolder);
app.getView().render('content/home/homepage');
}
exports.Show = guard.ensure(['get'], show);
/** @see module:controllers/Home~includeHeader */
Pipeline and Controller URLs and SEO
Pipeline URLs Pipeline-Subpipeline For example: Home-Show
Controller URLs Module-ExportedFunction For example: Home-Show *(identical to pipeline URLS)
Because the URLs are identical in format, SEO features work the same whether you are generating URLs with controllers or pipelines.
Pipelets to B2C Commerce Script Methods
Pipelets can be replaced with equivalent script methods in most cases. However, if a pipelet doesn't have an equivalent script method, you can call the pipelet directly.
Example: calling the SearchRedirectURL pipelet
This example calls the SearchRedirectURL and passes in the parameters it requires as a JSON object. It also uses the status returned by the pipelet to return an error status.
var Pipelet = require('dw/system/Pipelet');
var params = request.httpParameterMap;
var SearchRedirectURLResult = new dw.system.Pipelet('SearchRedirectURL').execute({
SearchPhrase: params.q.value
});
if (SearchRedirectURLResult.result === PIPELET_NEXT) {
return {
error: false
};
}
if (SearchRedirectURLResult.result === PIPELET_ERROR) {
return {
error: true
};
}
Cartridge path lookup of controllers and Pipelines
When a request arrives for a specific URL, B2C Commerce searches the cartridge path for a matching controller. If the controller is found, it's used to handle the request; otherwise
the cartridge path is searched again for a matching pipeline. If the pipeline is found, it's used to handle the request. If a cartridge contains a controller and a pipeline with a matching
name, the controller takes precedence.
When searching the cartridge path, B2C Commerce does not verify whether the controller contains the called function in the requesting URL. Calling a controller function that
doesn't exist causes an error.
Back to top.
Cartridge Folder Structure
Cartridges can contain either controllers and pipelines together or separately. Controllers must be located in a controllers folder in the cartridge, at the same level as the pipelines
folder. If you have controllers and pipelines that have the same name in the same cartridge, B2C Commerce uses the controller and not the pipeline.
Note: If your subpipeline isn't named in accordance with JavaScript method naming conventions, you must rename it to selectively override it. For example, if your subpipeline
start node is named 1start, you must rename it before overriding it with a controller method, because the controller method can't have the same name and be a valid
JavaScript method.
<cartridge>
+-- modules
+-- package.json
+-- cartridge
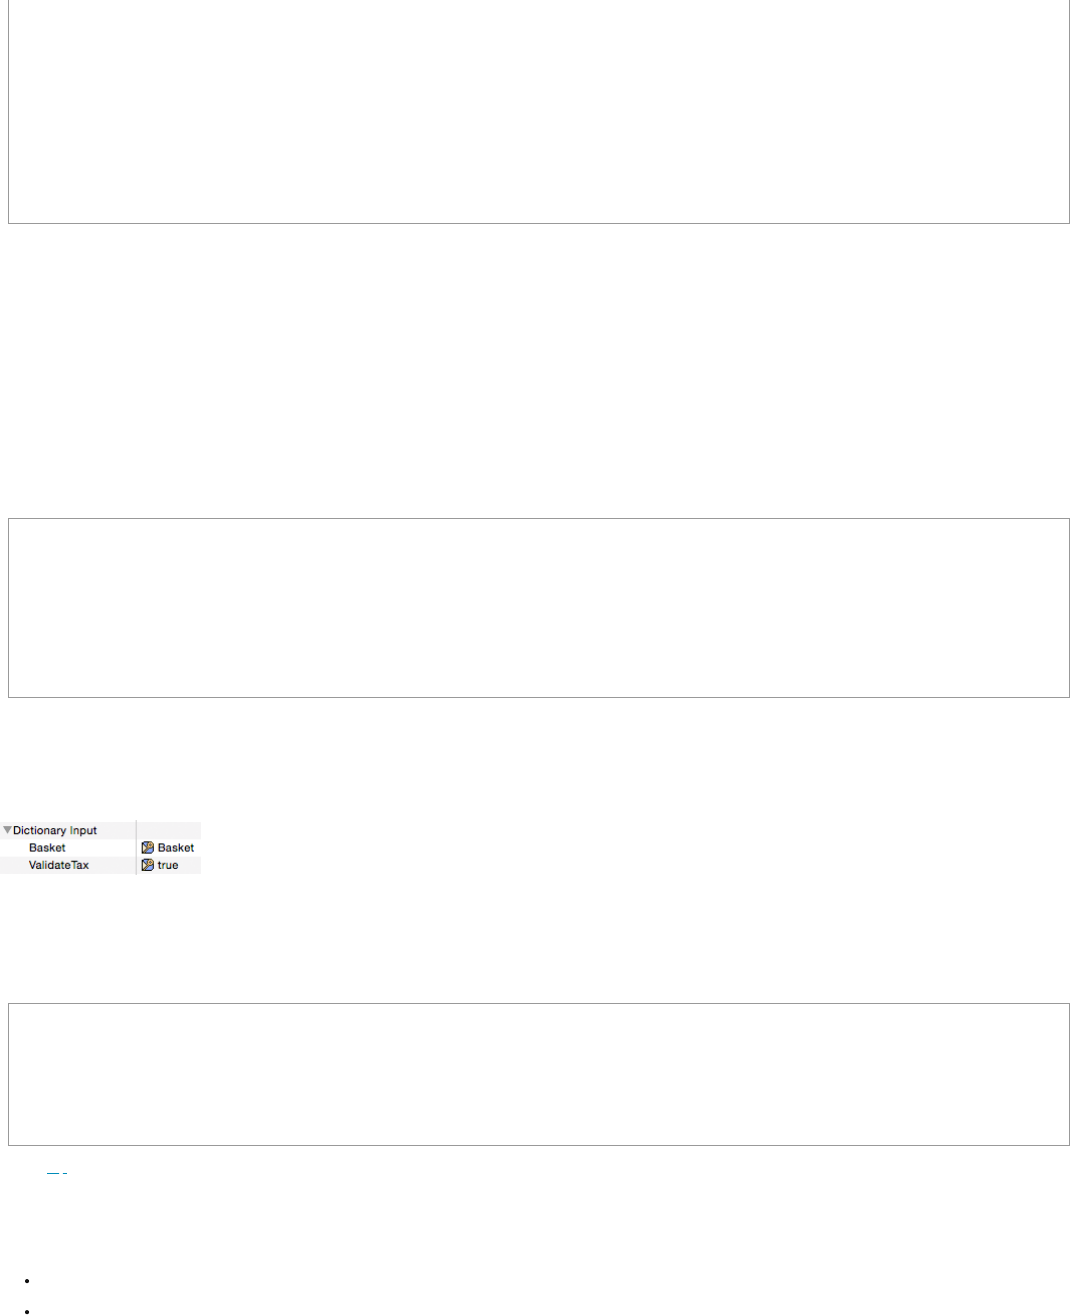
3/16/23, 2:11 PM
Legacy Developer Documentation
https://documentation.b2c.commercecloud.salesforce.com/DOC1/advanced/print.jsp?topic=/com.demandware.dochelp/LegacyDevDoc/LegacyDevDoc.html&cp…
129/158
+-- controllers (the new JavaScript controllers)
+-- forms
+-- pipelines
+-- scripts
+-- hooks.json
+-- models
+-- views
+-- static
+-- templates
+-- webreferences
+-- webreferences2
+-- package.json
The package.json outside the cartridge structure can be used to manage build dependencies. The hooks.json file inside the cartridge structure is used to manage hooks and the
web service registry.
Pipeline Dictionary to Global Variables
Controllers don't have access to the Pipeline Dictionary. Instead, controllers and scripts have access to information through global variables and B2C Commerce script methods. This
information is explicitly passed to scripts previously called in script nodes.
Calling Scripts and Passing Arguments
B2C Commerce scripts define input parameters. Input is passed into the execute function input parameter of the script (usually pict or args). The execute function is always the top-
level function in any B2C Commerce script.
Example 1: the ValidateCartForCheckout.js script
In this example, the script has two input parameters, Basket and ValidateTax. The input is passed into the execute function via the pdict parameter.
* @input Basket : dw.order.Basket
* @input ValidateTax : Boolean
*/
function execute (pdict) {
validate(pdict);
return PIPELET_NEXT;
}
Example 2: passing input to a script in pipelines
In pipelines, input variables are defined in the script node that calls the script.
In this example, a script node in the COPlaceOrder pipeline Start subpipeline calls the ValidateCartForCheckout.js script and passes two input parameters into the execute method:
Example 3: passing input into a script in controllers
In controllers, arguments are passed into scripts as JSON objects. Controllers use the require method to call script functions, if the script is converted into a module.
The COPlaceOrder.js controller creates a CartModel that wraps the current basket and calls the validateForCheckout function (exported as ValidateForCheckout). The
validateForCheckout function calls the ValidateCartForCheckout.js script and passes in the input parameters as a JSON object.
validateForCheckout: function () {
var ValidateCartForCheckout = require('app_storefront_core/cartridge/scripts/cart/ValidateCartForCheckout');
return ValidateCartForCheckout.validate({
Basket: this.object,
ValidateTax: false
});
},
Back to top.
Using Pipelines and Controllers Together
Salesforce recommends:
Not mixing pipelines and controllers in a single cartridge.
Only calling pipelines if they are outside the current cartridge or required for integration of a separate cartridge.
This is recommended because it provides an easier migration path away from pipelines and easier adoption of future features. It also reduces the risk of circular dependencies.
Controller overlay Cartridges
In general, Salesforce recommends creating a separate cartridge for controllers to replace existing pipelines when migrating your site. Controller cartridges are always used in
preference to cartridges that use pipelines, no matter where they are in the cartridge path. This approach lets you incrementally build functionality in your controller cartridge and to
fall back to the pipeline cartridge if you experience problems, by removing the controller from the cartridge or the controller cartridge from the cartridge path.
3/16/23, 2:11 PM
Legacy Developer Documentation
https://documentation.b2c.commercecloud.salesforce.com/DOC1/advanced/print.jsp?topic=/com.demandware.dochelp/LegacyDevDoc/LegacyDevDoc.html&cp…
130/158
Pipelines and Controllers in the same Cartridge
Pipelines and controllers can be included in the same cartridge, if they are located in the correct directories.
If the pipeline-subpipeline names do not collide with those of the controller-function names, they work in parallel. If they share the same name, the controller is used.
A storefront can have some features that use pipelines, while others use controllers. It's also possible to serve remote includes for the same page with controllers or pipelines,
because they are independent requests with separate URLs.
Controllers calling Pipelines
A controller can call a pipeline directly and pass it arguments. The call to the pipeline works like a normal subroutine invocation; the controller execution is continued when it returns.
Note: The exception to this is if a pipeline with an interaction-continue-node is called. After rendering the template in the interaction branch of the pipeline, the call returns
and the calling controller function immediately continues. A follow-up HTTP request for the continue branch directly invokes the pipeline processor and not go through the
controller engine anymore. This means, such a pipeline might not attempt to return to its initial caller (for example, our controller function) with an end node in its continue-
branch, because this return has already happened and there is no mechanism to keep JavaScript scopes across multiple requests (in contrast to pipelines, where the whole
pipeline dictionary including the call stack gets serialized and stored at the session).
Example: Call MyPipeline-Start
This example calls the MyPipeline pipeline Start subpipeline and passes it three arguments.
let Pipeline = require('dw/system/Pipeline');
let pdict = Pipeline.execute('MyPipeline-Start', {
MyArgString: 'someStringValue',
MyArgNumber: 12345,
MyArgBoolean: true
});
let result = pdict.MyReturnValue;
Determining the end node of a pipeline
The dw.system.Pipeline class execute method returns the name of the end node at which the pipeline finished. If the pipeline ended at an end node, its name is provided under the
key EndNodeName in the returned pipeline dictionary result. If the dictionary already contains an entry with such a key, it is preserved.
Pipelines calling Controllers
Pipelines can't call controllers using call or jump nodes. The pipeline must contain a script node with a script that can use the require function to load a controller.
Pipelines can call controllers using script nodes that require the controller as a module. However, this isn't recommended. The controller functions that represent URL handlers are
typically protected by a guard (see Public and Private Call Nodes to Guards). Such functions shouldn't be called from a pipeline. Only local functions that don't represent URLs should
be called. Ideally, such functions would not be contained in the controllers folder at all, but moved into separate modules in the scripts directory. These scripts are not truly
controllers, but regular JavaScript helper modules that can be used by both controllers and pipelines.
Example: Call MyController
/*
* @output Result: Object
*/
importPackage(dw.system);
function execute(pdict: PipelineDictionary): Number
{
let MyController = require('~/cartridge/controllers/MyController');
let result = MyController.myFunction();
pdict.Result = result;
return PIPELET_NEXT;
}
Back to top.
Public and Private Call Mode to Guards
In some cases you need to control access to a unit of functionality. For pipelines, this means securing access to the pipeline Start node. For controllers, it means securing access to the
exported functions of the controller.
For pipelines, pipeline Start nodes let you set the Call Mode property to:
Public - can be called via HTTP and via call or jump nodes
Private - can be called via call or jump nodes only
For controllers, a function is only called if it has a public property that is set to true. All other functions that don't have this property are ignored by B2C Commerce and lead to a
security exception if an attempt is made to call them using HTTP or any other external protocol.
Controllers use functions in the guard.js module to control access to functionality by protocol, HTTP methods, authentication status, and other factors.
Additional information about guards is available in secure request access.
Back to top.
Transactions
3/16/23, 2:11 PM
Legacy Developer Documentation
https://documentation.b2c.commercecloud.salesforce.com/DOC1/advanced/print.jsp?topic=/com.demandware.dochelp/LegacyDevDoc/LegacyDevDoc.html&cp…
131/158
Transactions are defined in pipelines implicitly and explicitly through pipelet attributes. For controllers, transactions are defined through methods.
Implicit Transactions
For pipelines, some pipelets let you create implicit transactions, based on whether the pipelet has a Transactional property that can be set to true.
For controllers, use the B2C Commerce System package Transaction class wrap method to replace implicit transactions.
wrap() – this replaces the implicit transactions created when pipelets were set as transactional. If the function is successfully executed, then it's commited. If there is an
exception the transaction is rolled back.
Example: wrap an implicit transaction
var Transaction = require('dw/system/Transaction');
Transaction.wrap(function() {
couponStatus = cart.addCoupon(couponCode);
});
Back to top.
Explicit Transactions
For pipelines, you define transaction boundaries using the Transaction Control property on a series of nodes to one of four values: Begin Transaction, Commit Transaction, Rollback
Transaction, or Transaction Save Point.
For controllers, use the B2C Commerce System package Transaction methods to create and manage explicit transactions.
begin() – this method marks the beginning of the transaction.
commit() – this method marks where the transaction is committed.
rollback() – this method rolls back the transaction. The rollback method must be placed before the commit and rolls back all code to before the begin() method call. This
method is not required to create a transaction.
A transaction is rolled back at several points.
If an error is caught in a controller after Transaction.begin, but before Transaction.commit is called (for example, if sending an email fails), the transaction is
usually rolled back, unless the error is a pure JavaScript error that doesn't involve any B2C Commerce APIs.
If the transaction can't be committed, then the transaction is rolled back implicitly if the controller does nothing and simply returns.
If the controller exits with an exception and there is still an active transaction, the transaction is rolled back before the error page is shown.
If the Transaction.rollback method is explicitly called, the rollback happens at that point.
Example: create an explicit transaction with a rollback point and additional code after the rollback
var Transaction = require('dw/system/Transaction');
Transaction.begin();
if {
code for the transaction
…
}
else {
Transaction.rollback();
code after the rollback
…
}
}
Transaction.commit();
Back to top.
Forms
Controllers can use the existing form framework for handling requests for web forms. For accessing the forms, the triggered form, and the triggered form action, use the
dw.system.session and dw.system.request B2C Commerce script methods as an alternative to the Pipeline Dictionary objects CurrentForms, TriggeredForm and TriggeredAction.
Expression Type Description
session.forms dw.web.Forms The container for forms. This is a replacement for the CurrentForms variable in the Pipeline Dictionary.
For example:
profileForm = session.forms.profile;
request.triggeredForm dw.web.Form The form triggered by the submit button in the storefront. This is an alternative for the TriggeredForm variable in the
Pipeline Dictionary.
3/16/23, 2:11 PM
Legacy Developer Documentation
https://documentation.b2c.commercecloud.salesforce.com/DOC1/advanced/print.jsp?topic=/com.demandware.dochelp/LegacyDevDoc/LegacyDevDoc.html&cp…
132/158
Expression Type Description
request.triggeredFormAction dw.web.FormAction The form action triggered by the submit button in the storefront. This is an alternative for the TriggeredAction variable
in the Pipeline Dictionary.
Updating B2C Commerce system/custom Objects with Form Data
You can copy data to and from B2C Commerce objects using methods in the dw.web.FormGroup.
Expression Type Description
.copyFrom dw.web.FormGroup Updates the CurrentForm object with information from a system object.
This is a replacement for the UpdateFormWithObject pipelet.
For example:
app.getForm('profile.customer').copyFrom(customer.profile);
.copyTo dw.web.FormGroup Updates a system object with information from a form.
This is a replacement for the UpdateObjectWithForm pipelet.
For example:
app.getForm('billing.billingAddress.addressFields').copyTo(billingAddress);
Note: Don't use the copyFrom() and copyTo() methods to copy values from one custom object to another, since copyTo() works only with submitted forms. Instead, use
Javascript to directly copy the values, as in this example:
let testObject = { name:"default name", subject:"default subject", message:"default message" };
let output = {};
Object.keys( testObject ).forEach( function( key ) {
output[key] = testObject[key];
});
Back to top.
Interaction Continue nodes and preserving values across requests
Because controllers have nothing like the Pipeline Dictionary that is preserved across requests; local variables in forms have to be resolved for each request. However, for templates
that use URLUtils.continueURL() for forms, it's possible to pass a ContinueURL property to the template that is used as a target URL for the form actions. In SiteGenesis, the target URL
is to a controller that contains a form handler with functions to handle the actions of the form. Usually, this is the same controller that originally rendered the page.
The examples in this section show how login form functionality works in the application. Example 1 shows the controller functionality to render the page and handle form actions.
Example 2 shows the template with the form that is rendered and whose actions are handled.
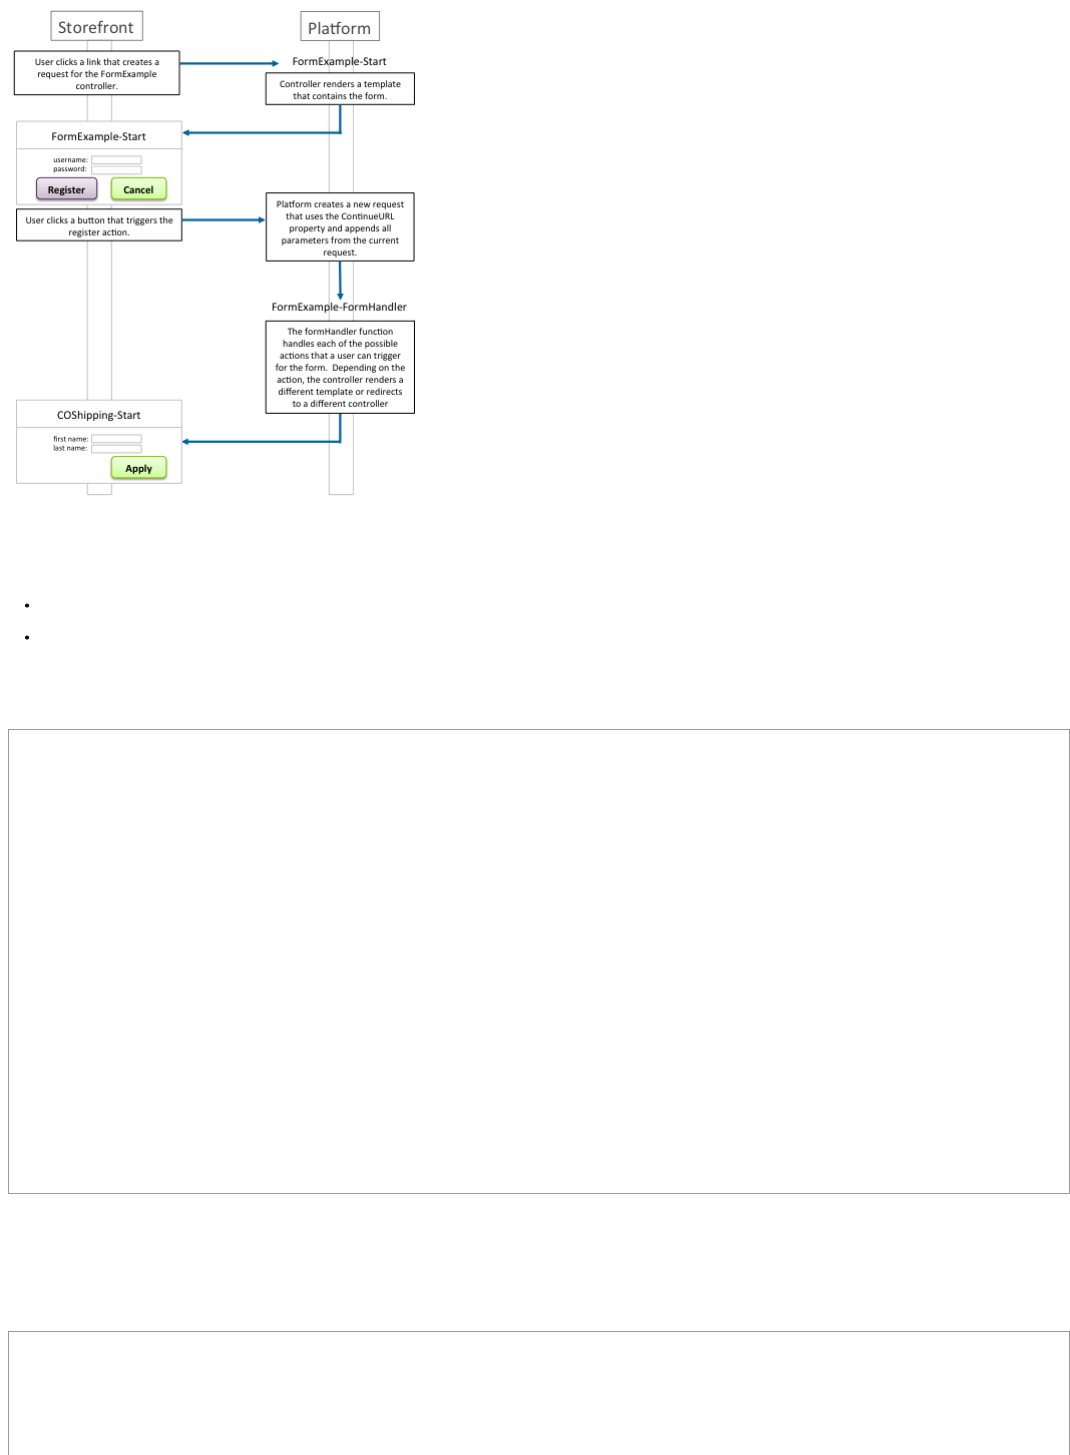
3/16/23, 2:11 PM
Legacy Developer Documentation
https://documentation.b2c.commercecloud.salesforce.com/DOC1/advanced/print.jsp?topic=/com.demandware.dochelp/LegacyDevDoc/LegacyDevDoc.html&cp…
133/158
Example 1: Rendering the login_form template and passing the ContinueURL property.
FormExample.js includes two functions:
start - this is the public entrypoint for the controller and renders the mylogin page, which has a login form.
formHandler - this function is used to handle form actions triggered in the mylogin page. The function uses the app.js getForm function to get a FormModel object that
wraps the login form and then uses the FormModel handleAction function to determine the function to call to handle the triggered action. The formHandler method defines
the functions to call depending on the triggered action and passes them to the handleAction function.
FormExample.js
function start() {
...
app.getView({
ContinueURL: URLUtils.https('FormExample-LoginForm')
}).render('account/mylogin');
}
function formHandler() {
var loginForm = app.getForm('login');
var formResult = loginForm.handleAction({
login: function () {
response.redirect(URLUtils.https('COShipping-Start'));
return;
}
},
register: function () {
response.redirect(URLUtils.https('Account-StartRegister'));
return;
},
}
});
exports.Start = guard.ensure(['https'], start);
FormHandler = guard.ensure(['https', 'post'], formHandler);
Example 2: Setting a URL target for the form action in the ISML template.
The template contains two forms with actions that can be triggered.
The call to URLUtils.httpsContinue() resolves to the value for the ContinueURL property set in the previous example, which is to the form handler function for the form.
login_form.isml
<form action="${URLUtils.httpsContinue()}" method="post" id="register">
...
</form>
<form action="${URLUtils.httpsContinue()}" method="post" id="login">
3/16/23, 2:11 PM
Legacy Developer Documentation
https://documentation.b2c.commercecloud.salesforce.com/DOC1/advanced/print.jsp?topic=/com.demandware.dochelp/LegacyDevDoc/LegacyDevDoc.html&cp…
134/158
...
</form>
Back to top.
Interaction End Nodes and Unbuffered Responses
Responses from a B2C Commerce application server are buffered by default: when rendering an ISML template the resulting output is written into a buffer first. After the template is
rendered without errors, the buffer is written to the HTTP response and sent to the client. In contrast, when no buffering is used, the output from the template will be written
immediately to the HTTP response, so the client is receiving it as it's rendered.
The default buffering behavior is the best choice for the average web page. However, if you need to render a large response as a page without affecting performance because of
increased memory consumption caused by buffering the page, you can change the response mode to streaming.
In pipelines it's possible to set the buffered attribute to false for interaction end nodes. In controllers, use the dw.system.Response class setBuffered(boolean) method for a
response. The default is still buffered mode.
Reasons to enable or disable Buffering
Buffering is enabled by default, and this is the right choice for most situations. Using a response buffer is good for error handling, because in case of problems the whole buffer can
simply be skipped and another response can be rendered instead, for example an error page. In unbuffered streaming mode, this would not work, because parts of the response
might already have been sent to the client.
For very big responses, the response buffer might become very large and consume lots of memory. In such rare cases it's better to switch off buffering. With streaming mode, the
output is sent immediately, which doesn't consume any extra memory. So use streaming if you must generate very large responses.
Methods to enable or disable Buffering
There are two ways to enable or disable buffering:
Pipeline interaction end nodes have a Buffered Output property that can be set to false or true. The property view of the UX Studio pipeline editor must be set to "Show
Advanced Properties" for you to see the property.
Script code can uses the dw.system.Response.setBuffered() method. This method must be called before any content is written to the response, otherwise it has no effect.
Example: "Hello-World" controller that generates a non-buffered response:
exports.World = function(){
response.setBuffered(false);
response.setContentType('text/plain');
var out = response.writer;
for (var i = 0; i < 1000; i++) {
out.println('Hello World!');
}
};
exports.World.public = true;
Detecting Buffering or Streaming
Whether a response was sent in buffered or streaming mode can be seen from the response HTTP headers:
buffered response: contains a Content-Length response header
streamed response: contains a Transfer-Encoding response header
Effects of buffering on the page Cache
Buffered responses can be cached in the page cache, if they specify an expiration time and page caching is enabled for the site. Streamed responses are never cached.
Buffering and remote Includes
Buffered responses can have remote includes. If a page has remote includes, the remote includes are resolved in sequence and then the complete response is assembled from the
pieces and returned to the client. Because they must be resolved and assembled before returning a response, remote includes can't be streamed and must always be buffered.
A streamed response can't have remote includes, as would not be resolved. Streaming can only be used for top-level requests without any remote includes.
Troubleshooting Buffering
There are some situations when the response is sent buffered even if buffering has actually been disabled:
The response is too small
If less than 8000 characters are sent, the response will still be buffered.
The Storefront Toolkit is active
If the Storefront Toolkit is enabled (like on development sandboxes), it post-processes the responses from the application server. This includes parsing them and inserting
additional markup that is needed for the various views of the Storefront Toolkit in the browser. This process deactivates any buffering.
Back to top.
i i
3/16/23, 2:11 PM
Legacy Developer Documentation
https://documentation.b2c.commercecloud.salesforce.com/DOC1/advanced/print.jsp?topic=/com.demandware.dochelp/LegacyDevDoc/LegacyDevDoc.html&cp…
135/158
Error Pipelines to Error Controllers
The Error-Start pipeline is called when the originating pipeline doesn't handle an error. The Error controller has the reserved name of Error.js. It's called whenever another controller or
pipeline throws an unhandled exception or when request processing results in an unhandled exception.
Similar to the Error pipeline, an Error controller has two entry points:
a Start function called on general errors
a Forbidden function called by B2C Commerce for security token problems, such as detected attempts of session hijacking.
The error functions get a JavaScript object as an argument that contains information about the error:
ControllerName: the name of the called controller
ErrorText: the string message of the caught exception
Back to top.
OnRequest and OnSession Event Handler Pipelines to Hooks
The onrequest and onsession pipelines can be replaced with onrequest and onsession hooks. The hook name and extension point are defined in the hooks.json file.
These hooks reference script modules provided in SiteGenesis, in the app_storefront_controllers cartridge, in the /scripts/request folder.
"hooks": [
{
"name": "dw.system.request.onSession",
"script": "./request/OnSession"
},
{
"name": "dw.system.request.onRequest",
"script": "./request/OnRequest"
})
…
Back to top.
Response Rendering
Rendering ISML Templates
Controllers use the ISML class renderTemplate method to render template and pass any required parameters to the template. The argument is accessible in the template as the pdict
variable and its properties can be accessed using pdict.* script expressions. However, this doesn't actually contain a Pipeline Dictionary, as one doesn't exist for controllers.
However, passing the argument explicitly lets existing templates be reused.
Example 1: rendering a template in a controller
This example shows the simplest method of rendering a template in a controller. Usually, a view is used to render a template, because the view adds all the information normally
needed by the template. However, this example is included for the sake of simplicity.
Hello.js
let ISML = require('dw/template/ISML');
function sayHello() {
ISML.renderTemplate('helloworld', {
Message: 'Hello World!'
});
}
Example 2: using the pdict variable in ISML templates
The ${pdict.Message} variable resolves to the string "Hello World" that was passed to it via the renderTemplate method in the previous example.
helloworld.isml
<h1>
<isprint value="${pdict.Message}" />
</h1>
SiteGenesis uses View.js and specialized view scripts, such as CartView.js to get all of the parameters normally included in the Pipeline Dictionary and render an ISML template.
Example 1: controller creates the view.
In this example, the Address controller add function clears the profile form and uses the app.js getView function to get a view that renders the addressdetails template and
passes the Action and ContinueURL parameters to the template. The getView function creates a new instance of the View object exported by the View.js module. The
parameters passed to the getView function are added to the View object when it's initialized.
The controller then calls the render method of the View.js module to render the addressdetails.isml template.
/**
* Clears the profile form and renders the addressdetails template.
*/
3/16/23, 2:11 PM
Legacy Developer Documentation
https://documentation.b2c.commercecloud.salesforce.com/DOC1/advanced/print.jsp?topic=/com.demandware.dochelp/LegacyDevDoc/LegacyDevDoc.html&cp…
136/158
function add() {
app.getForm('profile').clear();
app.getView({
Action: 'add',
ContinueURL: URLUtils.https('Address-Form')
}).render('account/addressbook/addressdetails');
}
Example 2: view renders the template.
In this example, the View.js view script assembles information for template, renders the template, and passes it the information. The View.js script is the main module used to
render templates. Other view modules that render specific templates, such as CartView.js extend the View object exported by View.js.
Note: As of 16.3, the renderTemplate method now automatically passes all of the pdict variables used by templates, such as CurrentSession and CurrentForms. Previous to
16.3, these had to be passed explicitly in the view.
render: function (templateName) {
templateName = templateName || this.template;
// provide reference to View itself
this.View = this;
try {
ISML.renderTemplate(templateName, this);
} catch (e) {
dw.system.Logger.error('Error while rendering template ' + templateName);
throw e;
}
return this;
}});
Example 3: template uses the passed parameters
In this example, there are two lines from the addressdetails.isml template, in which the template uses the Action parameter passed from the Address controller and the
CurrentForms parameter passed from the View.js renderTemplate method as $pdict variables.
...
<isif condition="${pdict.Action == 'add'}">
...
<input type="hidden" name="${pdict.CurrentForms.profile.secureKeyHtmlName}" value="${pdict.CurrentForms.profile.secureKeyValue}"/>
The view renders the passed template and adds any passed parameters to the global variable and request parameters passed to the template.
Back to top.
Rendering JSON
SiteGenesis provides a function to render JSON objects in the Response.js module.
Example 1: rendering a JSON object
function sayHelloJSON() {
let r = require('~/cartridge/scripts/util/Response');
r.renderJSON({
Message: 'Hello World!'
});
}
This returns a response that looks like:
{"Message": "Hello World!"}
Example 2: rendering a more complex JSON object
let r = require('~/cartridge/scripts/util/Response');
r.renderJSON({({
status : couponStatus.code,
message : dw.web.Resource.msgf('cart.' + couponStatus.code, 'checkout', null, couponCode),
success : !couponStatus.error,
baskettotal : cart.object.adjustedMerchandizeTotalGrossPrice.value,
CouponCode : couponCode
});
This method can accept JavaScript objects and object literals.
Back to top.
Rendering Result Pages via Redirects
Controllers that handle forms in POST requests usually end with an HTTP redirect to view a result page instead of directly rendering a response page. This avoids problems with
browser back buttons and multiple submissions of forms after refreshing a page. For sending redirects, use the response.redirect() methods .
3/16/23, 2:11 PM
Legacy Developer Documentation
https://documentation.b2c.commercecloud.salesforce.com/DOC1/advanced/print.jsp?topic=/com.demandware.dochelp/LegacyDevDoc/LegacyDevDoc.html&cp…
137/158
function sayHello() {
// switches to HTTPS if the call is HTTP
if (!request.isHttpSecure()) {
response.redirect(request.getHttpURL().https());
return;
}
response.renderJSON({
Message: 'Hello World!'
});
}
Back to top.
Direct Responses via the Response Object
A controller is able to send responses by directly writing into the output stream of the response object using a Writer method that represents the underlying response buffer.
Note: Anything written into this stream by a controller is not sent immediately to the client, but only after the controller function has returned and no error has occurred.
The response object also enables you to set the content type, HTTP status, character encoding and other relevant information.
Example: direct response
function world() {
response.setContentType('text/html');
response.getWriter().println('<h1>Hello World!</h1>');
}
Back to top.
Caching
You can use a different template cache value with the response.setExpires method, both values are evaluated and the lesser of the two values is used. This is similar to how remote
includes behave.
Caching behavior is set in the following ways:
an <iscache> tag within an ISML template for a remote include.
the response.setExpires() method.
If multiple calls to setExpires() or to the <iscache> tag are done within a request, the shortest caching time of all such calls wins.
function helloCache() {
let Calendar = require('dw/util/Calendar');
// relative cache expiration, cache for 30 minutes from now
let c = new Calendar();
c.add(Calendar.Minute, 30);
response.setExpires(c.getTime());
response.setContentType('text/html');
response.getWriter().println('<h1>Hello World!</h1>');
Back to top.
Jobs and Third-Party Integrations
Both jobs and third-party integrations are peripheral to storefront code.
Jobs
Job pipelets don't have script equivalents. For this reason, jobs can't be migrated to controllers. Any job you create must use pipelines.
Third-Party Integrations
If you are using a custom or partner cartridge to integrate additional functionality, you have two choices in migrating your integration:
convert the cartridge to use controllers.
integrate the pipeline cartridge with your storefront. For more information, see the LINK JavaScript Controller FAQ.
Back to top.
© Copyright 2000-2023, Salesforce, Inc. All rights reserved. Various trademarks held by their respective owners. Show URL Submit Feedback Privacy Policy
2.14. Debugging Scripts
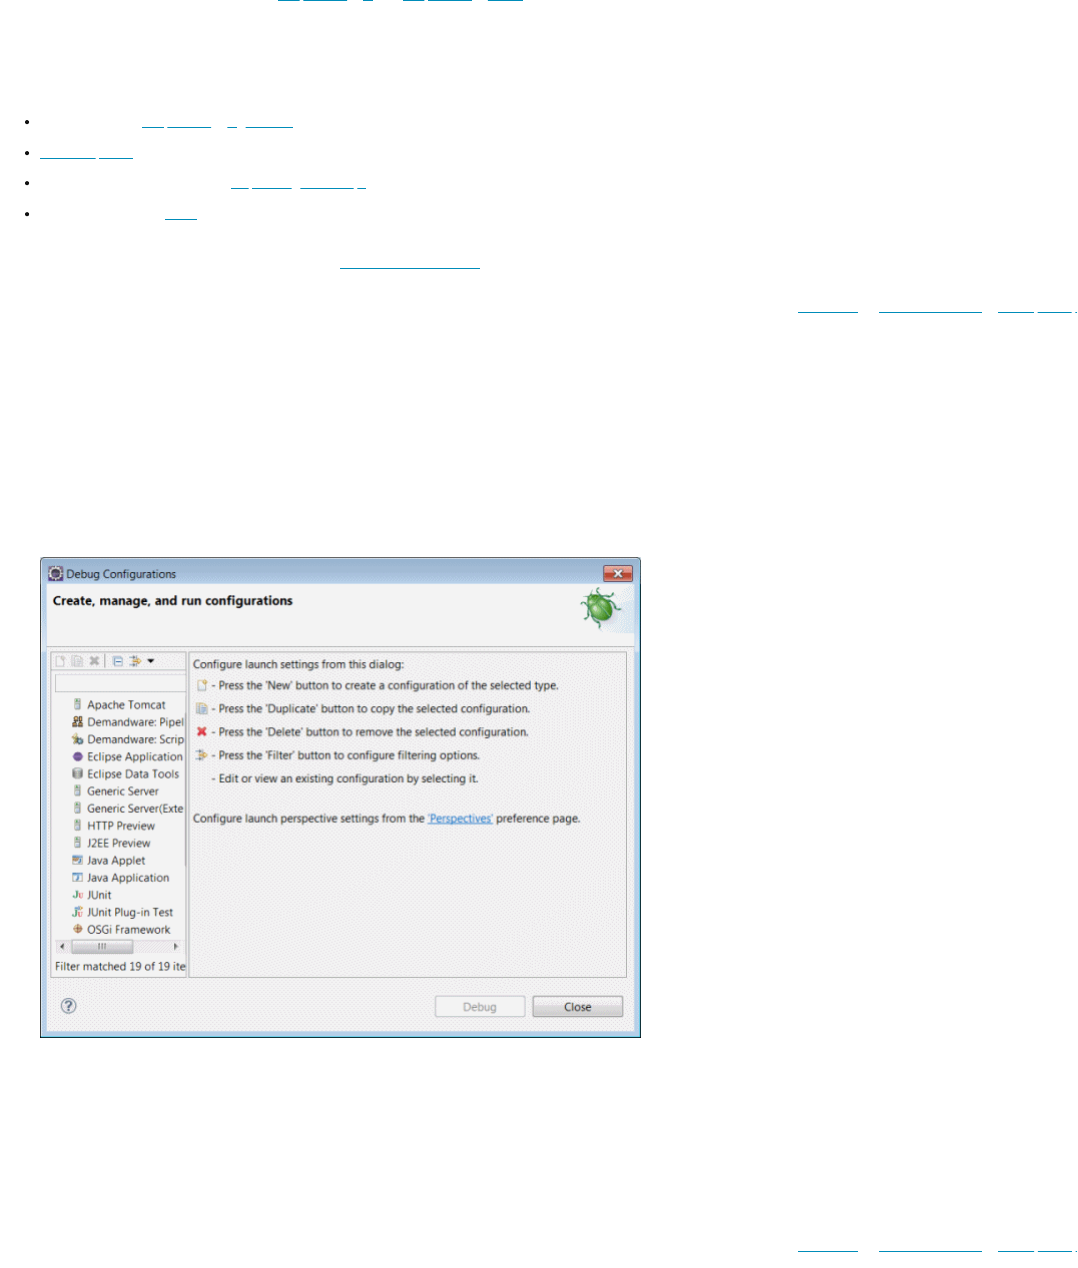
3/16/23, 2:11 PM
Legacy Developer Documentation
https://documentation.b2c.commercecloud.salesforce.com/DOC1/advanced/print.jsp?topic=/com.demandware.dochelp/LegacyDevDoc/LegacyDevDoc.html&cp…
138/158
UX Studio lets you debug Salesforce B2C Commerce scripts (.js extension) and JavaScript (.js extension) running on your instance. In B2C Commerce 15.4 and later, you can
debug scripts using the B2C Commerce plugin Script Debugger, the Script Debugger API, or the JSDT (JavaScript Development Tools editor available for Eclipse.
Note: Script debugging is disabled on Production instances to ensure data security.
The debugger lets you:
Create a Remote Script Debugging Session
Set Breakpoints in scripts which cause the script execution engine to suspend the script when the breakpoint is reached
Use Script Debugger controls to step through the script
Use Script Debugger views to evaluate script variables and expressions
It's important to understand that script debugging impacts script execution performance. When you launch a script debugging session, the server must evaluate the script's current
position to determine when a breakpoint is reached. Use Custom Code Timeouts to control how long a script can run.
© Copyright 2000-2023, Salesforce, Inc. All rights reserved. Various trademarks held by their respective owners. Show URL Submit Feedback Privacy Policy
2.14.1. Configuring a Script Debugging Session
Before you can configure a script debugging session, you must create a Salesforce B2C Commerce server connection project. Without the server connection information, you can't
define your debug launch configuration. This is true whether you are using the B2C Commerce plugin editor script debugger or the Eclipse JavaScript editor debugger.
This topic describes how to configure a script debugging session for the B2C Commerce script debugger. For information about the Eclipse JavaScript editor, consult the relevant
documentation for the editor.
1. From the Eclipse/Studio main menu, select Run > Debug Configurations. The Debug Configurations page opens.
2. Double-click UX Studio: Script Debugger. A new configuration appears in the configuration list, and the Remote Server configuration tab appears.
3. For the Name, enter a name for the session. It's recommended that you include server and site information in the name. For example, mysandbox-mysite-debug.
4. For the Server Configuration, select the server connection for the site containing the script you want to debug.
5. For the Site to Debug, click Select to select a site based on the server connection you specified. For example: Sites-SiteGenesis-Site.
6. Click Apply to finish the configuration.
© Copyright 2000-2023, Salesforce, Inc. All rights reserved. Various trademarks held by their respective owners. Show URL Submit Feedback Privacy Policy
2.14.2. Setting Breakpoints
You can set breakpoints before or after you launch a debug session and you can remove breakpoints while a debug session is in process.
1. Open a script file with a .js or .ds extension to debug in the Studio Commerce Cloud Script Editor or the JSDT editor (which is the default JavaScript editor for Eclipse).You
can modify your Eclipse preferences to make the Commerce Cloud Script Editor you default JavaScript editor if you want to use the auto complete feature for the Salesforce
B2C Commerce Script API.
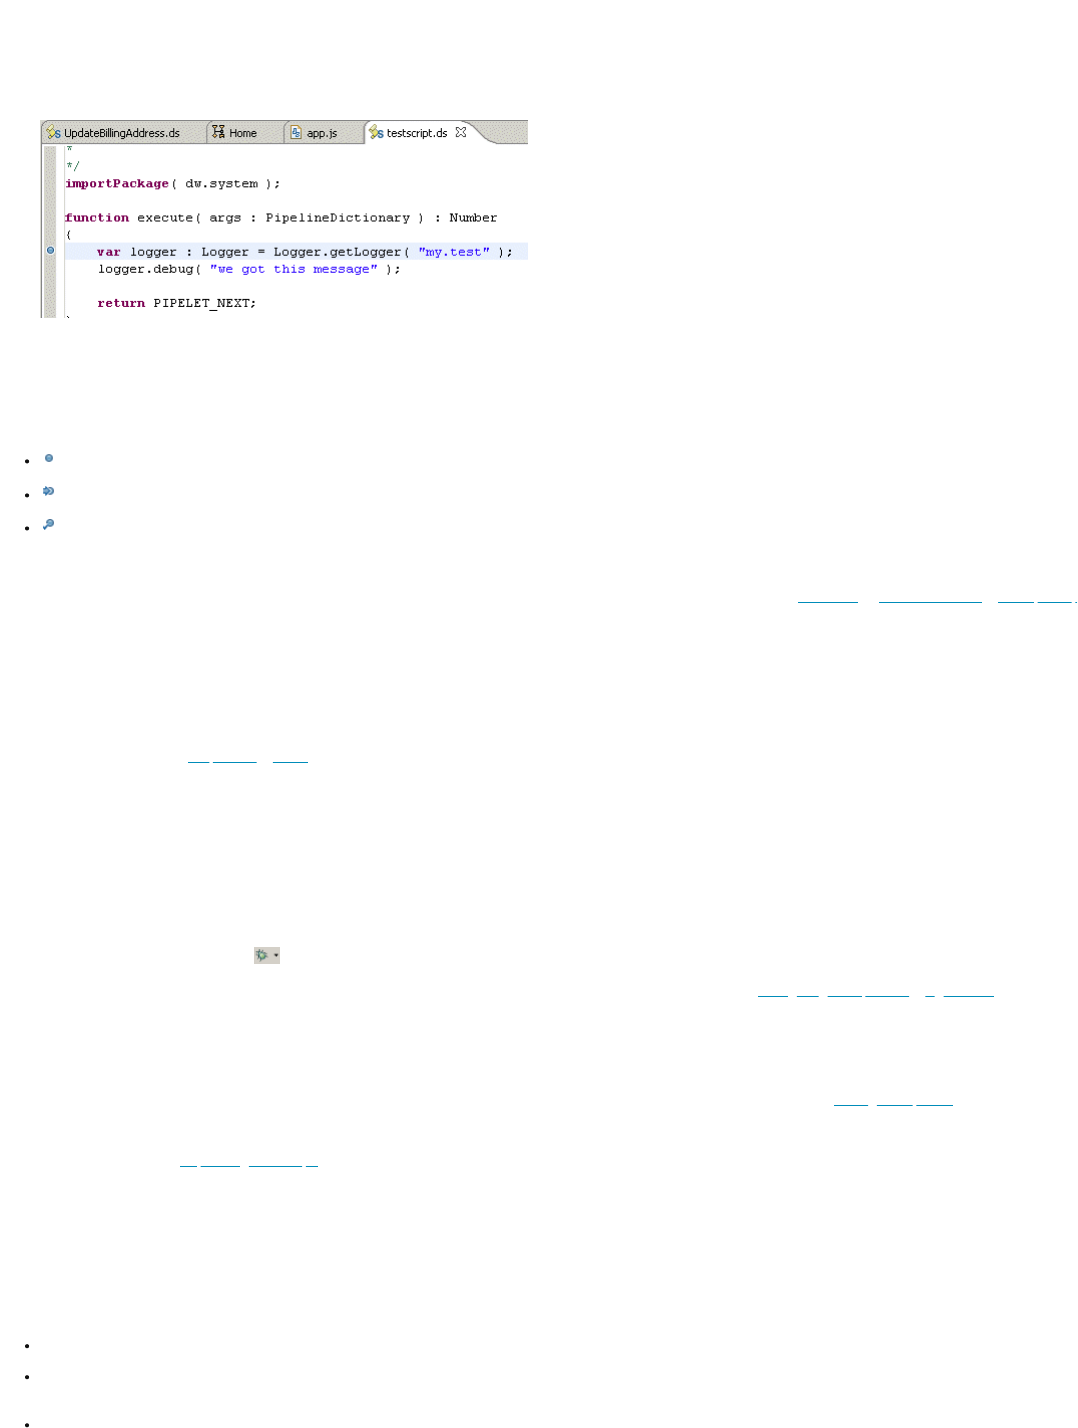
3/16/23, 2:11 PM
Legacy Developer Documentation
https://documentation.b2c.commercecloud.salesforce.com/DOC1/advanced/print.jsp?topic=/com.demandware.dochelp/LegacyDevDoc/LegacyDevDoc.html&cp…
139/158
Note: Starting in 17.3, UX Studio enables you to set breakpoints in script files regardless of the location of the script file relative to the cartridge path. Previously, the
script's cartridge had to be on the Site's cartridge path for the breakpoint to be registered with the script engine.
2. Double-click in the white column to the left of the code where you want to set your breakpoint. A break point appears as a blue circle next to the closest appropriate place for a
break. For example, if you click next to a curly brace, the breakpoint is inserted after the brace.
Note: The overlay to a breakpoint image indicates that it's installed in the remote server. If the overlay icon is not there, then either the script debugger isn't running, or
the script is not in the server's cartridge path.
Breakpoints appear in three states:
- a breakpoint when initially set.
- a breakpoint when the script is stopped at the breakpoint
- a breakpoint when it's successfully registered with the debugger. When you start the debugger, all breakpoints should have a check mark. If a breakpoint isn't successfully
registered, usually because the debugger can't locate the script, the breakpoint appears as initially set. If the script completes and one or more breakpoints appear as initially
set, then there is an issue with the communication with the server or the cartridge isn't in the server's path.
© Copyright 2000-2023, Salesforce, Inc. All rights reserved. Various trademarks held by their respective owners. Show URL Submit Feedback Privacy Policy
2.14.3. Running the Script Debugger
You can debug a script in the Salesforce B2C Commerce plugin script debugger or set breakpoints in the Eclipse JavaScript editor. This topic describes how to debug in the B2C
Commerce plugin script debugger.
Note: You can also use the Script Debugger API.
Script debugging impacts script execution performance. When you launch a script debugging session, the server must evaluate the script's current position to determine if a
breakpoint is reached. Salesforce doesn't recommend script debugging on Production servers unless absolutely necessary.
When debugging a pipeline or script that is executed in the context of the job and for a particular site, the cartridge must be in both the Business Manager site so that the Job can
find the pipeline, and the cartridge must be in the cartridge path of the site for the debugger to resolve. If you do not include the cartridge in the site's path, the debugger will not
resolve the breakpoint.
1. Switch to the Debug perspective. You can do this from the main menu by selecting Window > Open Perspective > Other > Debug. The Debug perspective appears.
2. Click the arrow next to the bug icon beneath the Run menu option.
3. From the menu, select a script debugging configuration. If you have not created any script debugging configurations, see Configuring a Script Debugging Session.
Note: A pipeline debugging configuration will not work with the script debugger.
4. Add a breakpoint to your code by clicking in the margin to the left of your code. For more information about creating breakpoints, see Setting Breakpoints.
5. Open your storefront in a browser and perform the action that triggers the script. The Debugger launches and stops at the first breakpoint. At this point the breakpoint toolbar
is enabled and you can step through the script.
Troubleshooting the Debugger
Log files are available in your UX Studio installation at Studio\workspace\.metadata\.log
Launching The Debugger for the First Time
If you can't get the debugger to launch, make sure that:
your cartridge is in the active cartridge path
you have not added your cartridge after creating the current code deployment version. If you have added your cartridge after creating the version, create a new version in
Business Manager and switch between the new version and the existing version, to trigger the server to update the cartridges in the active cartridge path.
you launched a script debugger configuration instead of a pipeline debugger configuration
Relaunching the Debugger
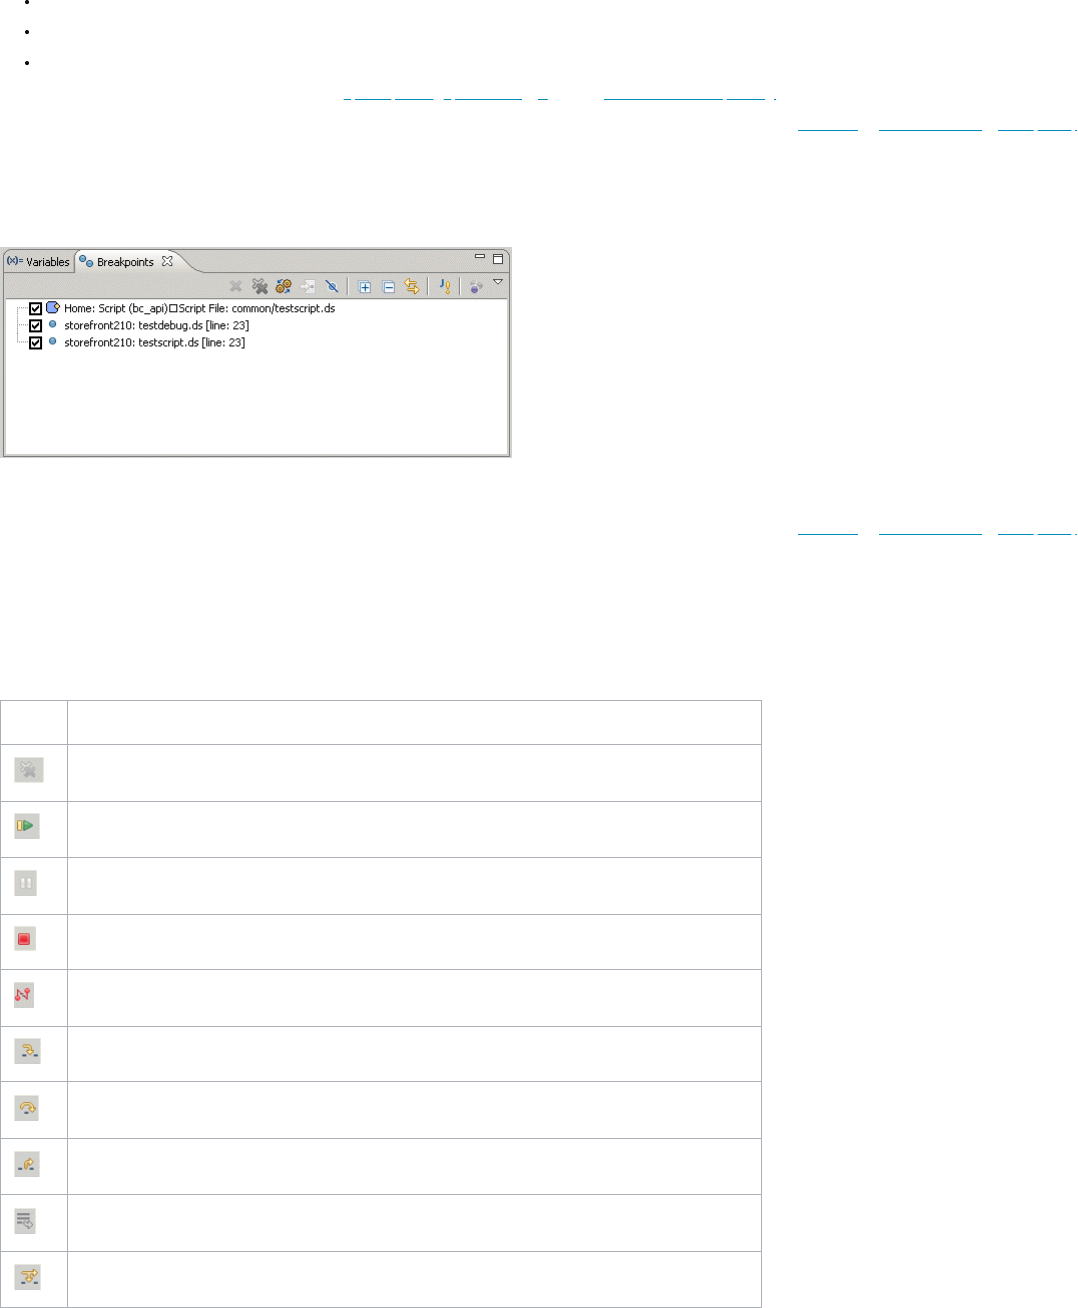
3/16/23, 2:11 PM
Legacy Developer Documentation
https://documentation.b2c.commercecloud.salesforce.com/DOC1/advanced/print.jsp?topic=/com.demandware.dochelp/LegacyDevDoc/LegacyDevDoc.html&cp…
140/158
If you are using the script debugger successfully and have difficulty getting it to relaunch after terminating a session, take the following troubleshooting steps:
Check to make sure your session is still connected
Restart Studio
Ask Customer Support to restart your instance. This returns the script debugger to a good state.
You might also find the following debugging tools useful: pipeline profiler, pipeline debugger, and the storefront toolkit request log.
© Copyright 2000-2023, Salesforce, Inc. All rights reserved. Various trademarks held by their respective owners. Show URL Submit Feedback Privacy Policy
2.14.4. Using the Breakpoints View
The Breakpoints View is available by default in the Debug perspective. It can also be accessed from any other perspective.
You can double-click a breakpoint to show its location in the editor. You can also enable, disable, or delete breakpoints.
© Copyright 2000-2023, Salesforce, Inc. All rights reserved. Various trademarks held by their respective owners. Show URL Submit Feedback Privacy Policy
2.14.5. Stepping Through a Script
Use the script debugger toolbar to step through your script. To use the toolbar, you must have already launched a script debugging session and triggered the script through your
browser.
The toolbar has the following buttons:
Button Description
Remove All Terminated Launches - clears the Debug window of any failed or terminated debug session launches.
Resume - resumes running the script from the current breakpoint.
Suspend - suspends the script.
Terminate - terminates the debugging session.
Disconnect - disconnects the debugging session.
Step Into - steps into the script at the current breakpoint.
Step Over - steps over the current breakpoint.
Step Return - to return from a method which was stepped into.
Drop to Frame - Not used in the Script Debugger.
Use Step Filters - Not used in the Script Debugger.
When a script hits a breakpoint, the script execution is suspended and doesn't resume until you direct it to do so. In the Debug Perspective, a Script Thread node appears under the
session node. The Script Thread contains a stack frame representing the execution path. The following image depicts a halted Script Thread and stack frame:
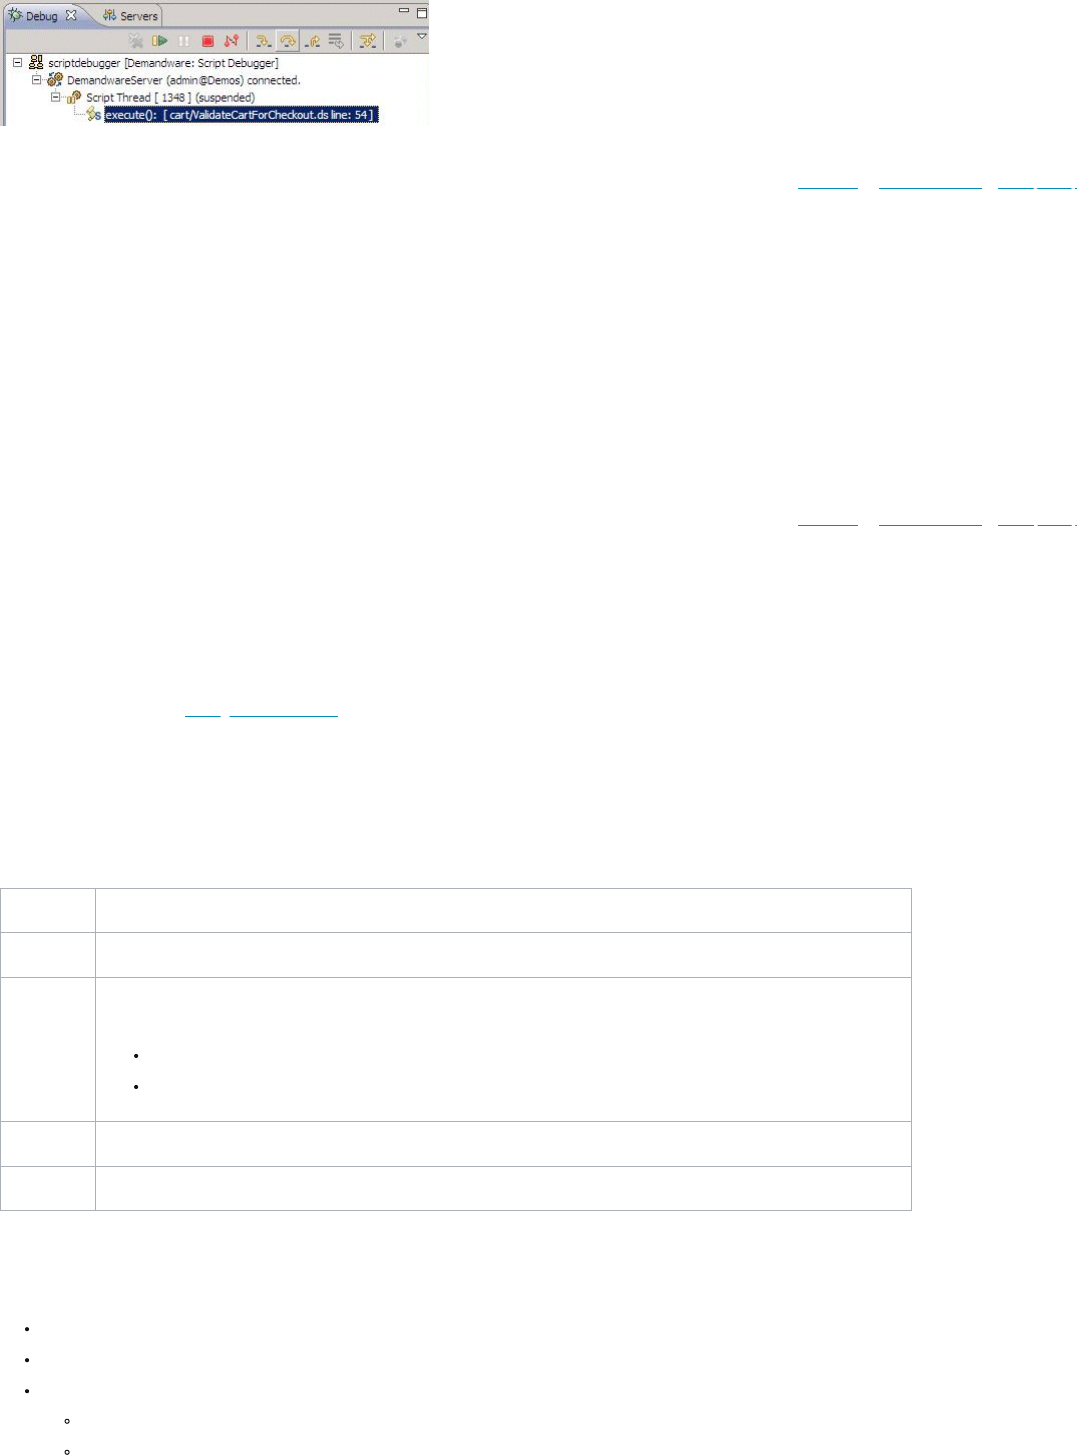
3/16/23, 2:11 PM
Legacy Developer Documentation
https://documentation.b2c.commercecloud.salesforce.com/DOC1/advanced/print.jsp?topic=/com.demandware.dochelp/LegacyDevDoc/LegacyDevDoc.html&cp…
141/158
To resume the halted script, click the Resume button or use one of the stepping commands to continue the script execution.
© Copyright 2000-2023, Salesforce, Inc. All rights reserved. Various trademarks held by their respective owners. Show URL Submit Feedback Privacy Policy
2.14.6. Using Other Views with Script Debugger
Because the script debugger is based on Eclipse, there are a number of views available to use with debugger. For more information on these views, consult the Eclipse
documentation.
However, there are two views that might be of particular interest.
Variables View
You can use the variables view to view the variables and their values in the stack frame. The Variables view appears by default in the Debug perspective.
Expressions View
You can use the expression view to evaluate expressions in the context of the current stack frame.
© Copyright 2000-2023, Salesforce, Inc. All rights reserved. Various trademarks held by their respective owners. Show URL Submit Feedback Privacy Policy
3. Pipelines
Pipelines predated controllers and are similar in terms of functionality they provide.
Note:
If you're creating a new site, we recommend controllers instead of pipelines. We also recommend using Storefront Reference Architecture (SFRA) as the basis of your storefront.
For more information, see Getting Started with SFRA.
When you create a pipeline, you can specify a group. For example, you could create a Cart group and add pipelines to the group.
In UX Studio, the Cartridge view shows a pipeline group as a folder that contains the pipelines assigned to the group.
Pipeline Properties
Each pipeline has several properties:
Property Description
Name Unique identifier.
Type
Viewing or process:
Use viewing pipelines to create an output via an interaction node. They should contain public start nodes.
Use process pipelines to perform processes. They should terminate only with end nodes.
Description Optional text.
Group A string representing a functional category. For example, you can organize pipelines for customer, checkout, or other functional areas.
Note: Although you might see the backoffice and job pipeline types, these are legacy types that are deprecated in the current version of Studio.
Pipelines can include:
Script nodes
Pipelets
Elements that interact with subpipelines
Call node
Jump node
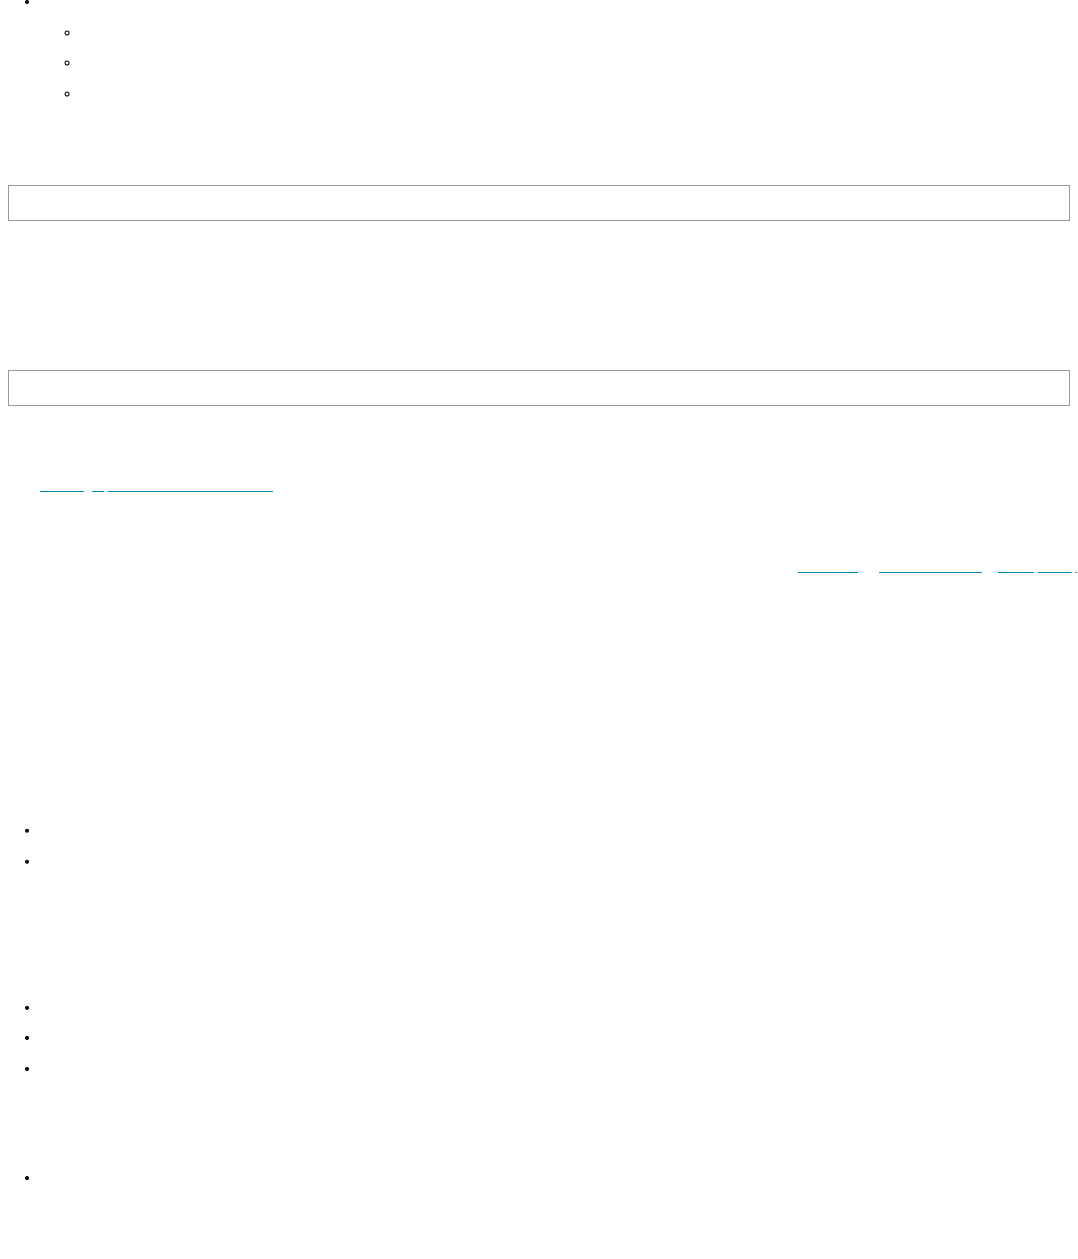
3/16/23, 2:11 PM
Legacy Developer Documentation
https://documentation.b2c.commercecloud.salesforce.com/DOC1/advanced/print.jsp?topic=/com.demandware.dochelp/LegacyDevDoc/LegacyDevDoc.html&cp…
142/158
Elements that facilitate flow control
Decision
Join
Loop
File Location
Pipelines are stored in XML files in the file system, both locally on your PC and on the server. Pipelines are defined and stored within the context of a cartridge.
\<cartridgename>\cartridge\pipelines
Pipelines within a cartridge are available to all sites that have been configured to use that cartridge.
When the storefront application attempts to reference a pipeline in a cartridge, it searches for the pipeline in the cartridge's path and uses the first one it finds in the cartridge.
Therefore, it's best to use unique pipeline names to ensure that the framework locates the correct pipeline.
The application tries to match the pipeline in each cartridge configured for the site, and uses the first one located.
For example, assume you have the following effective cartridge path configured:
mycartridge:storefront_richUI:storefront:bc_api:core
If you have a Product-Show pipeline in both the mycartridge and the storefront cartridge, the application uses the mycartridge pipeline, because it's the first one found in the
path.
Excluding Pipelines from Permission Checks
A login and permission check is always performed for Business Manager pipelines. If you need to exclude a pipeline from a permission check, create a custom Business Manager module with ID
NoPermissionCheck and assign the pipeline to this module. Only one custom Business Manager module with ID NoPermissionCheck is allowed per server instance.
© Copyright 2000-2023, Salesforce, Inc. All rights reserved. Various trademarks held by their respective owners. Show URL Submit Feedback Privacy Policy
3.1. System Pipelines and Controllers
The SiteGenesis JavaScript Controllers (SGJC) application includes system pipelines or controllers that are not called by a URL or another pipeline but directly by Salesforce B2C
Commerce. Their names can't be changed.
Default
These controllers are in the app_storefront_controllers cartridge in the controllers folder.
These pipelines are in the app_storefront_core cartridge in the Application group.
Default-Start: called when no pipeline name is provided. Although you can't change the node name, you can customize its contents.
Default-Offline: called when a site is offline. Although you can't change the node name, you can customize its contents.
Error Handling
These controllers are in the app_storefront_controllers cartridge in the controllers folder.
These pipelines are in the app_storefront_core cartridge in the Application group.
Error-Start: called as a general error page.
Error-Forbidden: called if a secure cookie has an unexpected value.
OnSession-Do: called when a new session starts. The pipeline prepares promotions or price books based on source codes or affiliate information in the initial URL.
Important: For performance reasons, keep this pipeline short.
OnRequest-Do: called for each page request on the storefront. This pipeline is called both for cached and non-cached pages. For performance reasons, keep this pipeline
short.
Important: For performance reasons, keep this pipeline short.
For controllers, you can also use standard JavaScript error handing.
For pipeilnes, you can also use an Error node that points to a custom subpipeline if you want to take a specific action when an error occurs.
SEO
These controllers are in the app_storefront_controllers cartridge in the controllers folder.
These pipelines are in the app_storefront_core cartridge in the Application group.

3/16/23, 2:11 PM
Legacy Developer Documentation
https://documentation.b2c.commercecloud.salesforce.com/DOC1/advanced/print.jsp?topic=/com.demandware.dochelp/LegacyDevDoc/LegacyDevDoc.html&cp…
143/158
RedirectURL-Start: called for redirects to a new URL.
SiteMap-Google: called to download site map for a standard home page.
Rendering Pipelines with SEO Support:
These controllers are in the app_storefront_controllers cartridge in the controllers folder.
These pipelines are in the app_storefront_core cartridge in the Catalog group.
Search-Show: renders a full featured product search result page. If the http parameter format is set to ajax, only the product grid is rendered instead of the full page.
Product-Show: renders a full product detail page. If the http parameter format is set to json the product details are rendered as JSON response.
Product-ShowInCategory: renders the product detail page within the context of a category.
This pipeline, in the Content group, is in the SiteGenesis Storefront Core cartridge.
Page-Show: renders a content page based on the rendering template configured for the page or a default rendering template.
Link pipeline (Deprecated):
This pipeline, which forwards calls to other pipelines, supports legacy code where content assets link to specific pipelines. For new code, link to the respective pipeline directly (for
example, Search-Show or Product-Show). You can also create links within content assets directly in Business Manager.
These pipelines, in the Application group, are in the core SiteGenesis cartridge.
Link-Category: links to a category page from within a content asset.
Link-CategoryProduct: links to the product detail page for a specific category from within a content asset. Use this if a product is assigned to multiple categories, for example, a
standard and a sales category.
Link-Page: links to a page from within a content asset.
Link-Product: links to a product detail page from within a content asset.
Reserved
These names can't be used for custom pipelines or controllers.
directURL-Hostname: called by B2C Commerce to handle URL mappings, such as static mappings and mapping rules, which are configured in Business Manager. This pipeline
is critical to site performance, because it's frequently called in case of exploit scans. The input for the pipeline is the original URL to redirect the user from.
Note: Salesforce strongly recommends that you follow these rules when using this pipeline:
Use no or only a few database calls
Use simple (static) template response
cache the result page
SourceCodeRedirect-Start: is the pipeline hook for a source code redirect.
PowerReviews-XmlProductDescription: renders the product XML description based on the given ID. Input: pid (required) - product ID
Internal Pipelines
These pipelines are used internally by B2C Commerce and not the SiteGenesis application. They can't be edited. You can't view them in Studio or any other development tool even
though they appear in the Page Cache Information tool or other debugging tools.
__SYSTEM__Slot-Render: internal pipeline called when a content slot is rendered.
__SYSTEM__Slot-Request: internal pipeline called when the content for a content slot is requested.
© Copyright 2000-2023, Salesforce, Inc. All rights reserved. Various trademarks held by their respective owners. Show URL Submit Feedback Privacy Policy
3.2. Pipeline Scripting Quick Start Example
The following example demonstrates in a step-by-step approach the necessary tasks to run a simple JavaScript script in a Salesforce B2C Commerce pipeline. The example prints
"Hello B2C Commerce!" via a script into an HTML page.
Note: This example creates a module
1. Create a Custom Cartridge.
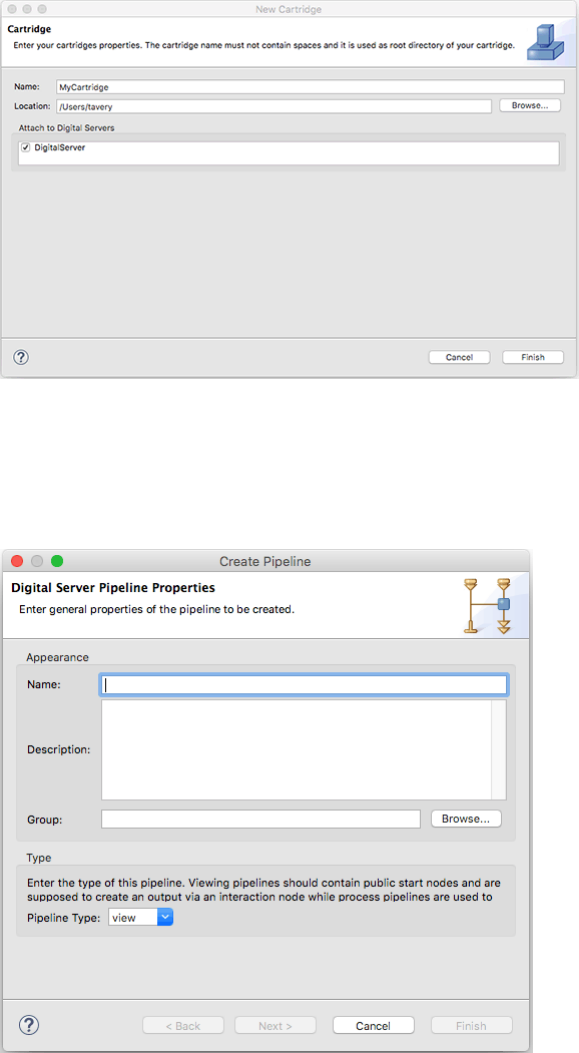
3/16/23, 2:11 PM
Legacy Developer Documentation
https://documentation.b2c.commercecloud.salesforce.com/DOC1/advanced/print.jsp?topic=/com.demandware.dochelp/LegacyDevDoc/LegacyDevDoc.html&cp…
144/158
a. From the Studio menu, click File > New > Cartridge.
The Cartridge dialog box opens.
b. Enter the name of your new cartridge (for example, MyCartridge).
c. In the Attach to B2C Commerce Servers section, select one or more B2C Commerce Servers and click Finish.
2. Create a new Pipeline.
a. Expand your cartridge in the Cartridge Explorer. Right-click Pipelines and select New > Pipeline.
b. Enter the pipeline name: MyScript.
c. Add a Start node by dragging it from the palette.
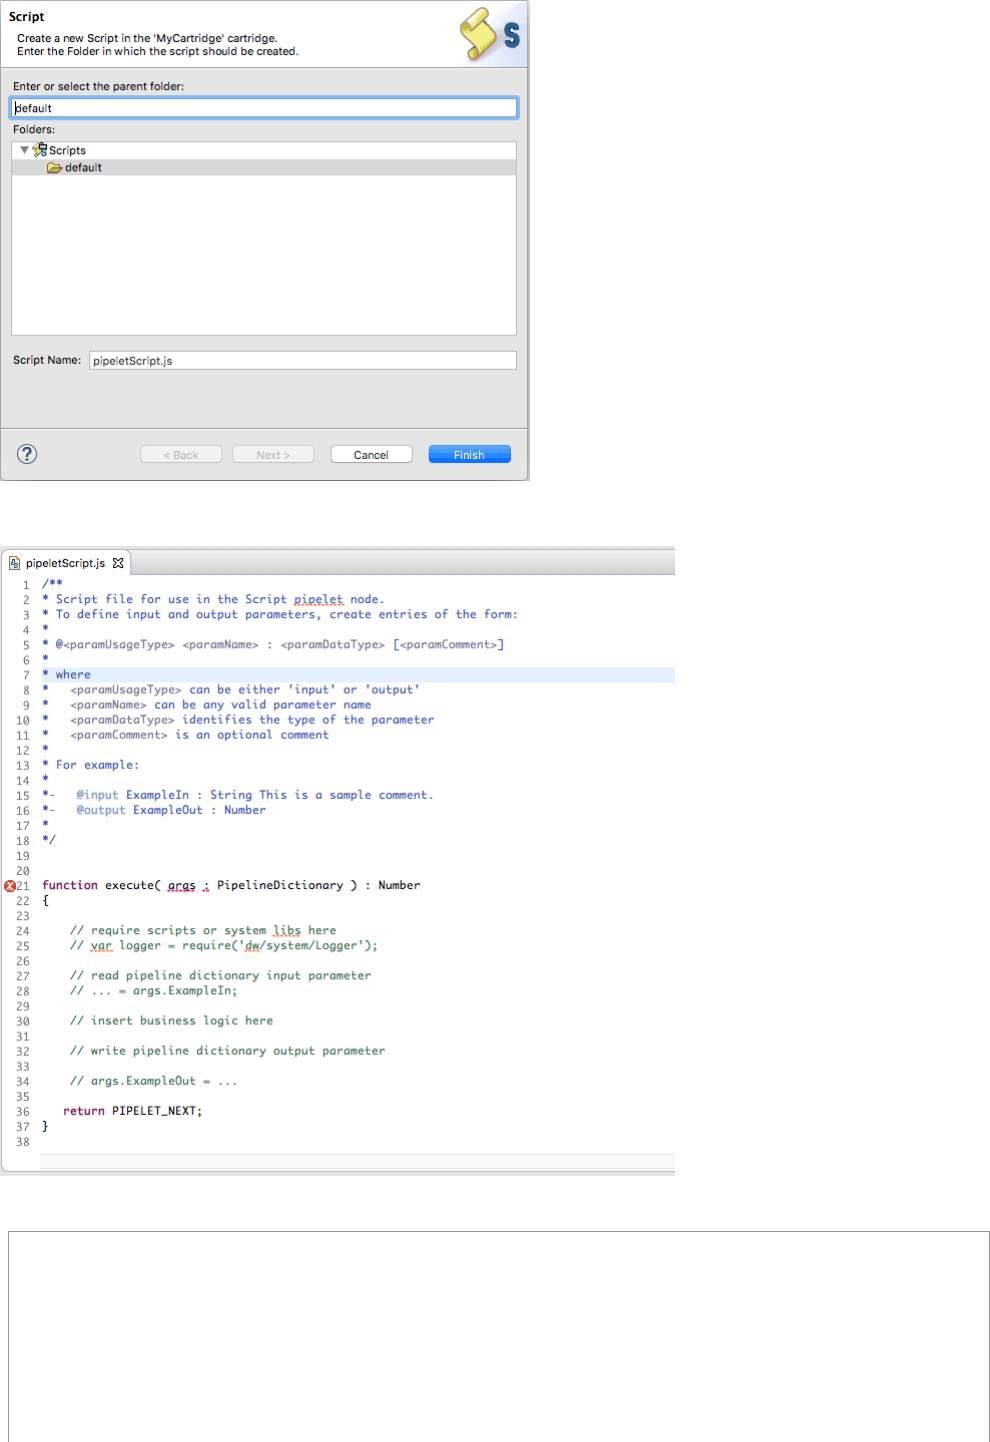
3/16/23, 2:11 PM
Legacy Developer Documentation
https://documentation.b2c.commercecloud.salesforce.com/DOC1/advanced/print.jsp?topic=/com.demandware.dochelp/LegacyDevDoc/LegacyDevDoc.html&cp…
145/158
d. Create a scripting pipelet called pipeletScript by dragging a Script Node from the palette.
You can select a script file or enter a name to create a new file.
e. Enter the script name: pipeletScript.ds and click OK. The script will open in the editor.
f. Modify the script to look as follows (and as shown above):
/**
* B2C Commerce script File
* To define input and output parameters, create entries of the form:
*
* @<paramUsageType> <paramName> : <paramDataType> [<paramComment>]
*
* where
* <paramUsageType> can be either 'input' or 'output'
* <paramName> can be any valid parameter name
* <paramDataType> identifies the type of the parameter
* <paramComment> is an optional comment
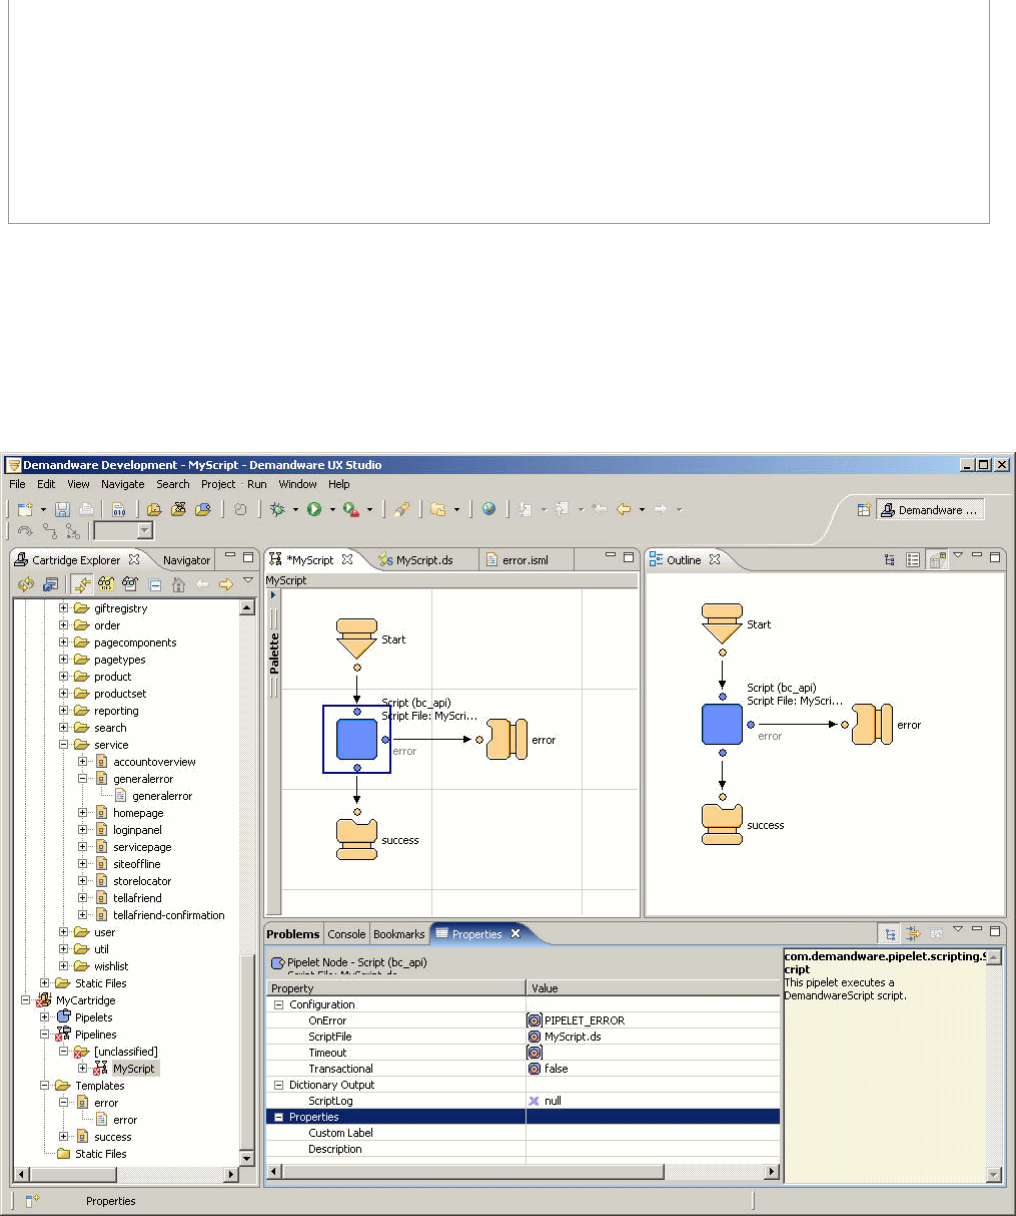
3/16/23, 2:11 PM
Legacy Developer Documentation
https://documentation.b2c.commercecloud.salesforce.com/DOC1/advanced/print.jsp?topic=/com.demandware.dochelp/LegacyDevDoc/LegacyDevDoc.html&cp…
146/158
*
* @output Output1 : String the greeting to display
*/
importPackage( dw.system );
importPackage( dw.customer );
function execute( pdict : PipelineDictionary ) : Number
{
// write pipeline dictionary output parameter
var output1 : String = "Hello B2C Commerce!";
pdict.Output1 = output1;
return PIPELET_NEXT;
}
g. Save your changes and return to the MyScript pipeline in the editor.
h. Select the pipelet you just created and In the Properties view, set the pipelet alias to the Output1 value (In Dictionary Output set Output1 to Output1). The default is
null, meaning that the value isn't written to the Pipeline Dictionary..
i. Add an Interaction node to the pipeline by dragging it from the palette, to beneath the script node. Drag a transition from the palette to connect the script node to the
interaction node.
j. Add an Interaction node to the pipeline by dragging it from the palette, to beside the script node. Drag a transition node from the palette to connect the script node to
the interaction node, which will rotate to adjust to the transition. The Pipeline should look like this:
3. Now we will add two new templates for error processing: success.isml and error.isml.
a. In the Navigator view, select templates > defaultfor your cartridge.
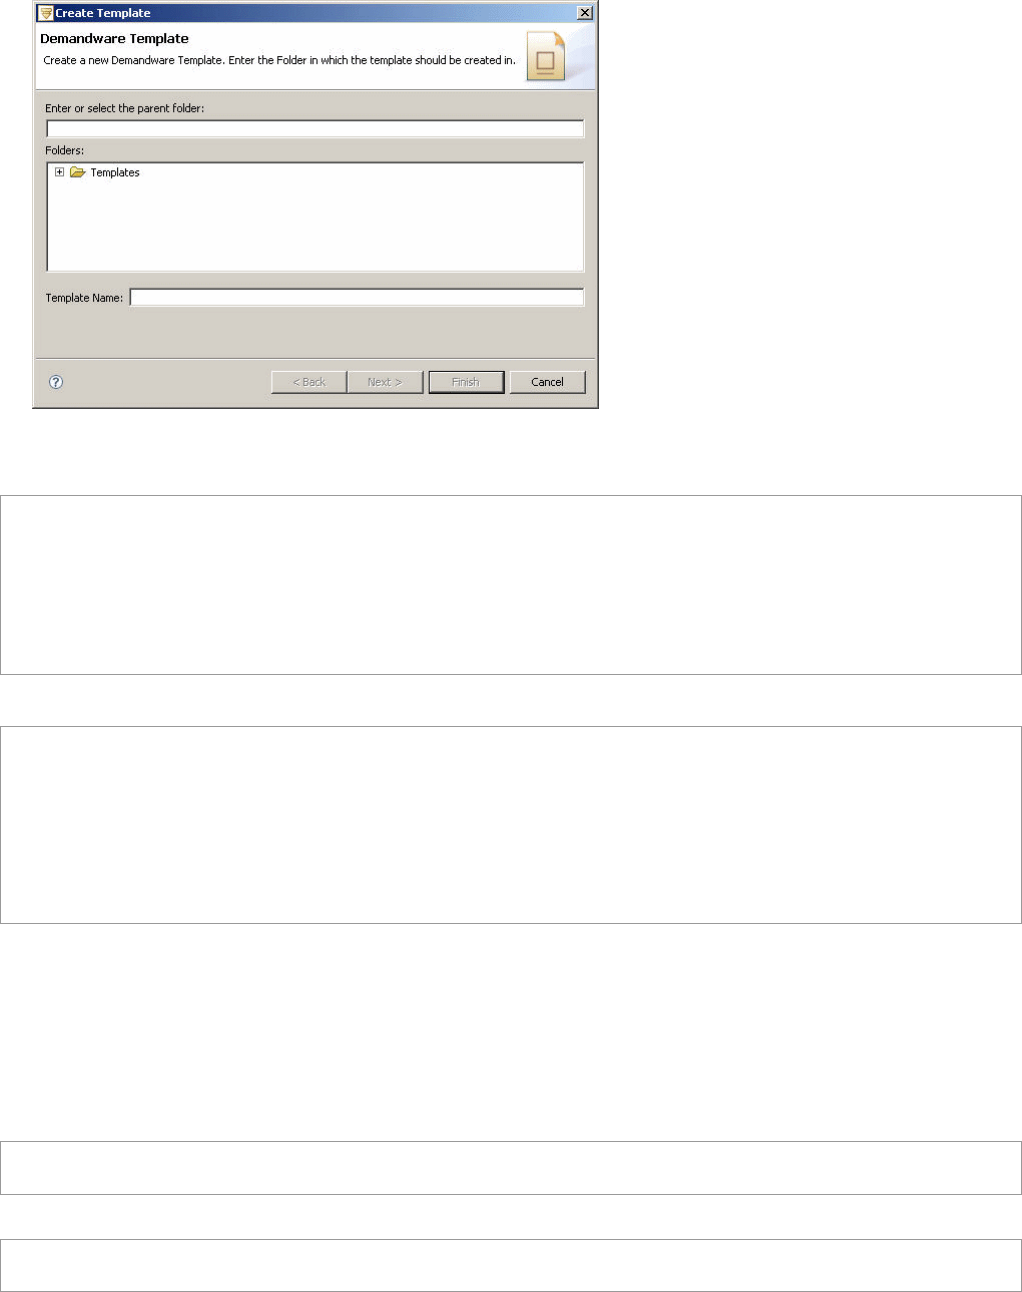
3/16/23, 2:11 PM
Legacy Developer Documentation
https://documentation.b2c.commercecloud.salesforce.com/DOC1/advanced/print.jsp?topic=/com.demandware.dochelp/LegacyDevDoc/LegacyDevDoc.html&cp…
147/158
b. Right-click New > Template. The Create Template dialog box appears (for each template creation).
c. Select the parent folder: Template and Create two files, one at a time in the default directory: success and error (the .isml extension will be added automatically).
4. Open the file "success.isml" and enter the following ISML code:
<html>
<head>
</head>
<body>
<h1>Success - hey it works!</h1>
${pdict.Output1}
<isprint value="${Output1}">
</body>
</html>
5. Open the file "error.isml" and enter the following ISML code:
<html>
<head>
</head>
<body>
<h1>Error in Script</h1>
<pre>
<isprint value="${ScriptLog}">
</pre>
</body>
</html>
6. We now can configure the pipeline and refer to the script file and the ISML files.
a. Open the pipeline MyScript that you just created.
b. Select the Interaction node. Within the Properties view, click the template element. Browse to find the success template. Click OK.
c. Select the Interaction Continue node. Within the Properties view, click the template element. Browse to find the error template. Click OK.
If you configured your cartridge correctly, your cartridge, pipeline, templates and script should be uploaded to the server.
7. In the browser, specify the following URL to call your new pipeline:
http://<your demandware ip>
/on/demandware.store/Sites-YourShopHere-Site/default/MyScript-Start
For example:
http://name.eval.dw.demandware.net/on/
demandware.store/Sites-Mycartridge-Site/default/MyScript-Start
The first time you call the pipeline, it might take a while because the server needs to preprocess and cache the new files.
You see Success - hey it works! and then Hello B2C Commerce! in the browser window.
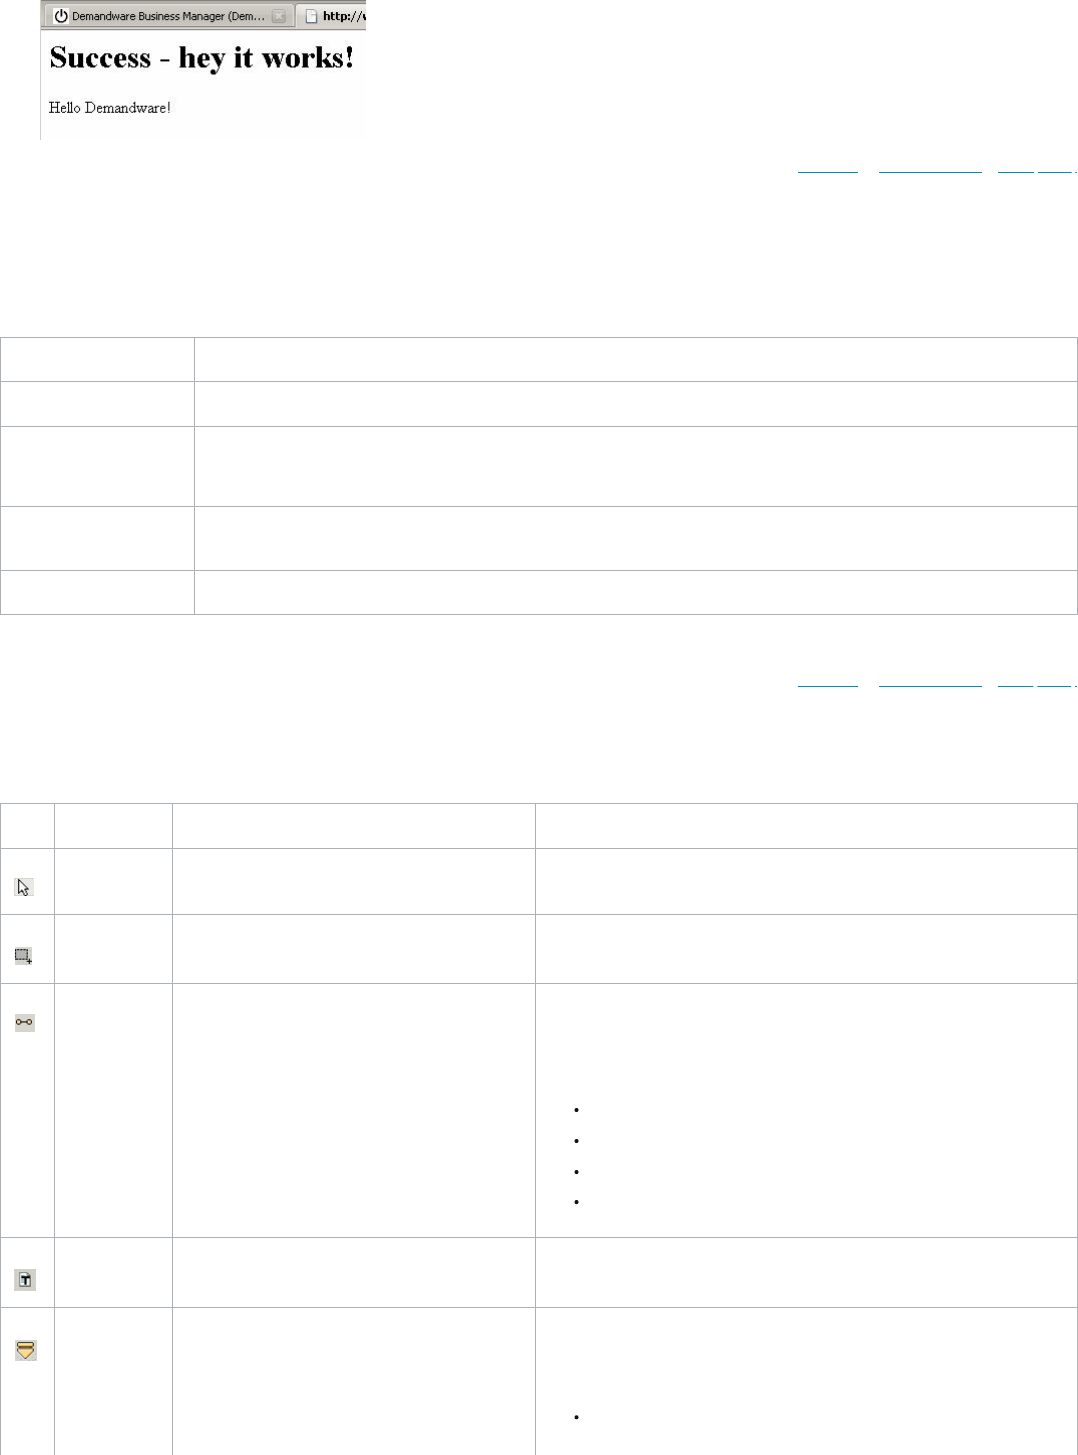
3/16/23, 2:11 PM
Legacy Developer Documentation
https://documentation.b2c.commercecloud.salesforce.com/DOC1/advanced/print.jsp?topic=/com.demandware.dochelp/LegacyDevDoc/LegacyDevDoc.html&cp…
148/158
© Copyright 2000-2023, Salesforce, Inc. All rights reserved. Various trademarks held by their respective owners. Show URL Submit Feedback Privacy Policy
3.3. Pipeline Elements
Each pipeline file (xml) contains one or more subpipeline workflows; each of which begins with a start node and terminates with an interaction node, interaction continue node or
end node.
A pipeline consists of a combination of four different element types:
Element Description
Pipelet Node Triggers the execution of the referenced pipelet. This includes the Script, Eval and Assign nodes and the Pipelet Placeholder.
Control Node Modifies the execution path of a pipeline. For example, in creating loops, calling other pipelines or creating alternative pipeline branches whose
execution depends on certain conditions. Control nodes include start nodes (where the execution path starts) and end nodes (where the
execution path ends).
Interaction Node and
Interaction Continue node
Generates responses to requests or interacts with the client. Interaction nodes call templates to generate the response sent back to the client.
Transition Connects pipelet, control and interaction nodes.
Start nodes and transitions determine the execution path of a workflow; that is, the order in which the nodes within the workflow are processed.
© Copyright 2000-2023, Salesforce, Inc. All rights reserved. Various trademarks held by their respective owners. Show URL Submit Feedback Privacy Policy
3.3.1. Pipeline Building Blocks
There are pipeline building blocks that are available in the pipeline editor in Eclipse/Studio.
Icon Component Description Configuration Properties
Select Enables you to select a component in the pipeline editor None
Marquee Enables you to select a specific node or group of nodes None
Transition Creates a transition between two nodes
Description: description for other developers using the pipeline.
Transaction Control: determines whether the transition starts, ends, or saves a
transaction.
Begin Transaction: marks the set of nodes that make up a transaction
Commit Transaction: commits the transaction to the database
Rollback Transaction: rolls back the previous transaction
Transaction Save Point: saves the transaction
Text Tool Enables you to add text inside pipeline that are visible in
the pipeline editor
Description: this is the text shown in Studio.
Start Node A pipeline can have multiple start nodes. Each start
node begins a different logic branch and must have a
unique name.
Call Properties:
Call Mode: accessibility of the start node
Public: can be called via HTTP and via call or jump nodes
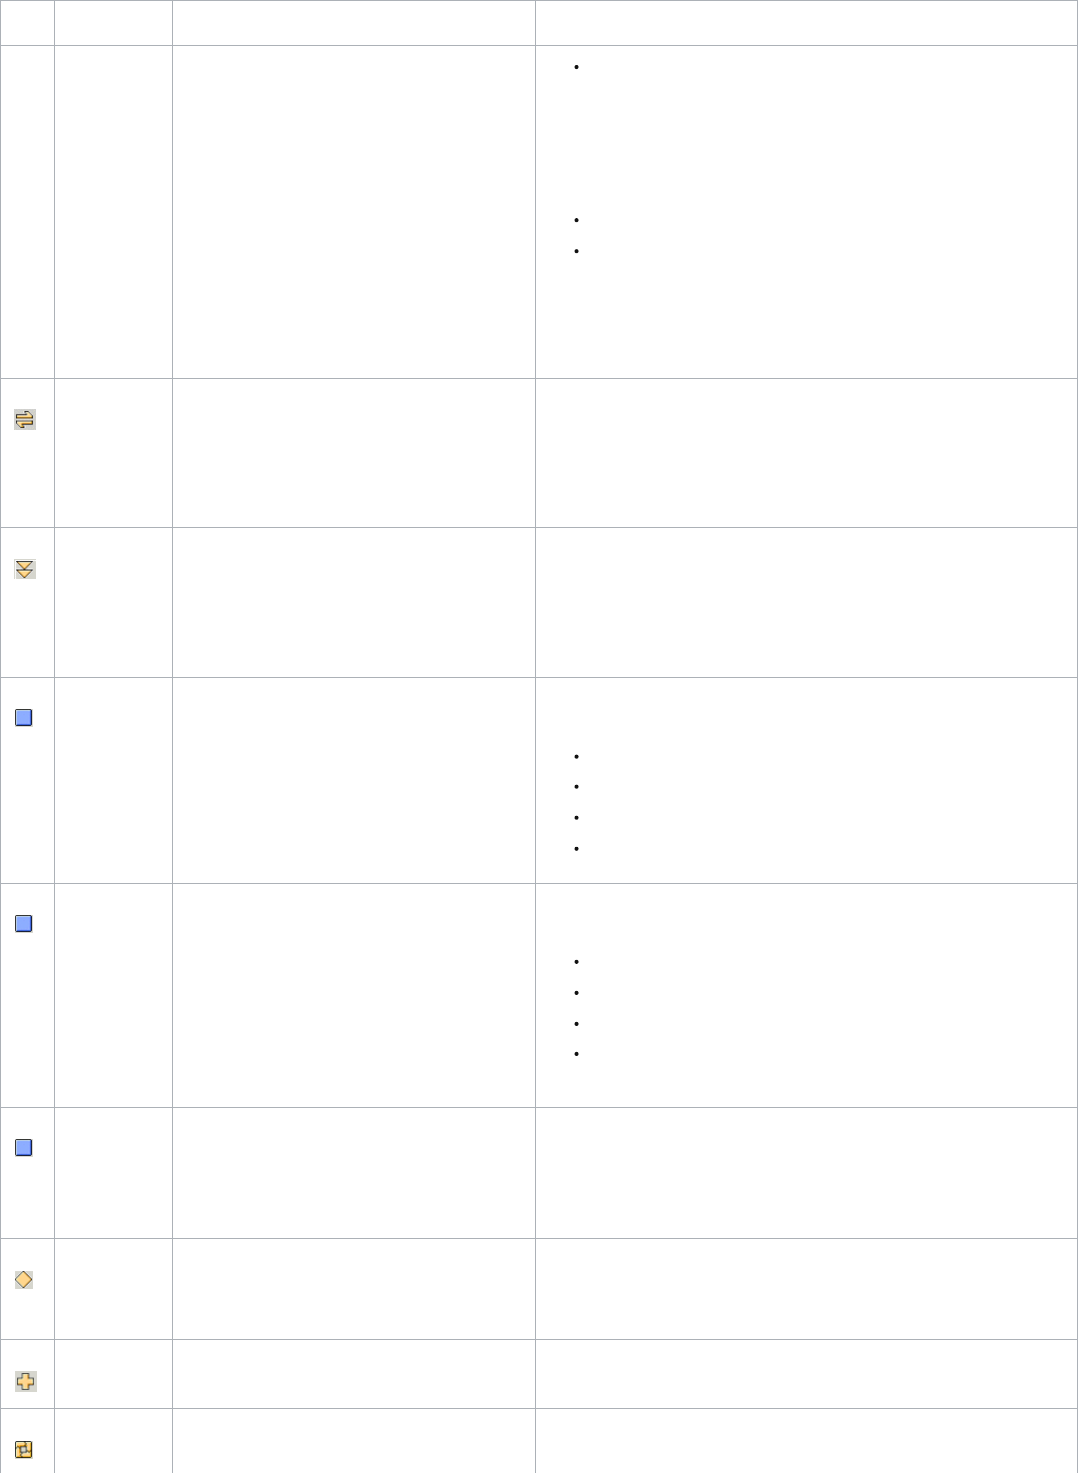
3/16/23, 2:11 PM
Legacy Developer Documentation
https://documentation.b2c.commercecloud.salesforce.com/DOC1/advanced/print.jsp?topic=/com.demandware.dochelp/LegacyDevDoc/LegacyDevDoc.html&cp…
149/158
Icon Component Description Configuration Properties
Private: can be called via call or jump nodes only
Parameters: Pipeline Dictionary parameters that this start node expects to be passed
in.
Name: used in pipeline calls
Secure Connection required:
true: incoming request must be https.
false: incoming request can be http.
Properties:
Description: description for other developers using the pipeline.
Name: name used to execute the pipeline.
Call Node Makes a call to a pipeline workflow and returns to the
current workflow.
Description: description for other developers using the pipeline.
Dynamic: select false to specify a pipeline directly or true to specify a dictionary item
containing the pipeline.
Pipeline: pipeline name or Pipeline Dictionary item name
Jump Node Jumps to a specified pipeline and doesn't return to the
current workflow.
Description: description for other developers using the pipeline.
Dynamic: select false to specify a pipeline directly or true to specify a dictionary item
containing the pipeline.
Pipeline: pipeline name or Pipeline Dictionary item name
Script Node Calls a custom script
Configuration: specify how you want a script node to behave.
OnError: PIPELET_ERROR or exception
Script File: the Salesforce B2C Commerce script file to execute
Timeout: timeout in seconds. The default is 10 seconds
Transactional: true or false
Eval Node Evaluates an expression, resulting in an error, exception
or Dictionary output
Configuration:
Expression: valid expression to evaluate.
Result: the output of the evaluation.
OnError: null or exception
Transactional: true or false. Set to true if you need to update B2C Commerce
database.
Assign Node Used to assign values to new or existing Pipeline
Dictionary entries, using up to 10 configured pairs of
dictionary-input and dictionary-output values
Configuration: transactional (true or false)
Properties: custom label: label name
For example, to assign an existing dictionary entry "wishlist" to "productlist":
Decision Node Provides conditional branch in workflow
Comparison operator: comparison operator (for example, expression)
Decision Key: the Pipeline key to compare, typically to determine if its content is null.
Join Node Provides convergence point for multiple branches in
workflow
None
Loop Node Provides for an iterative process
Iterator Definition:
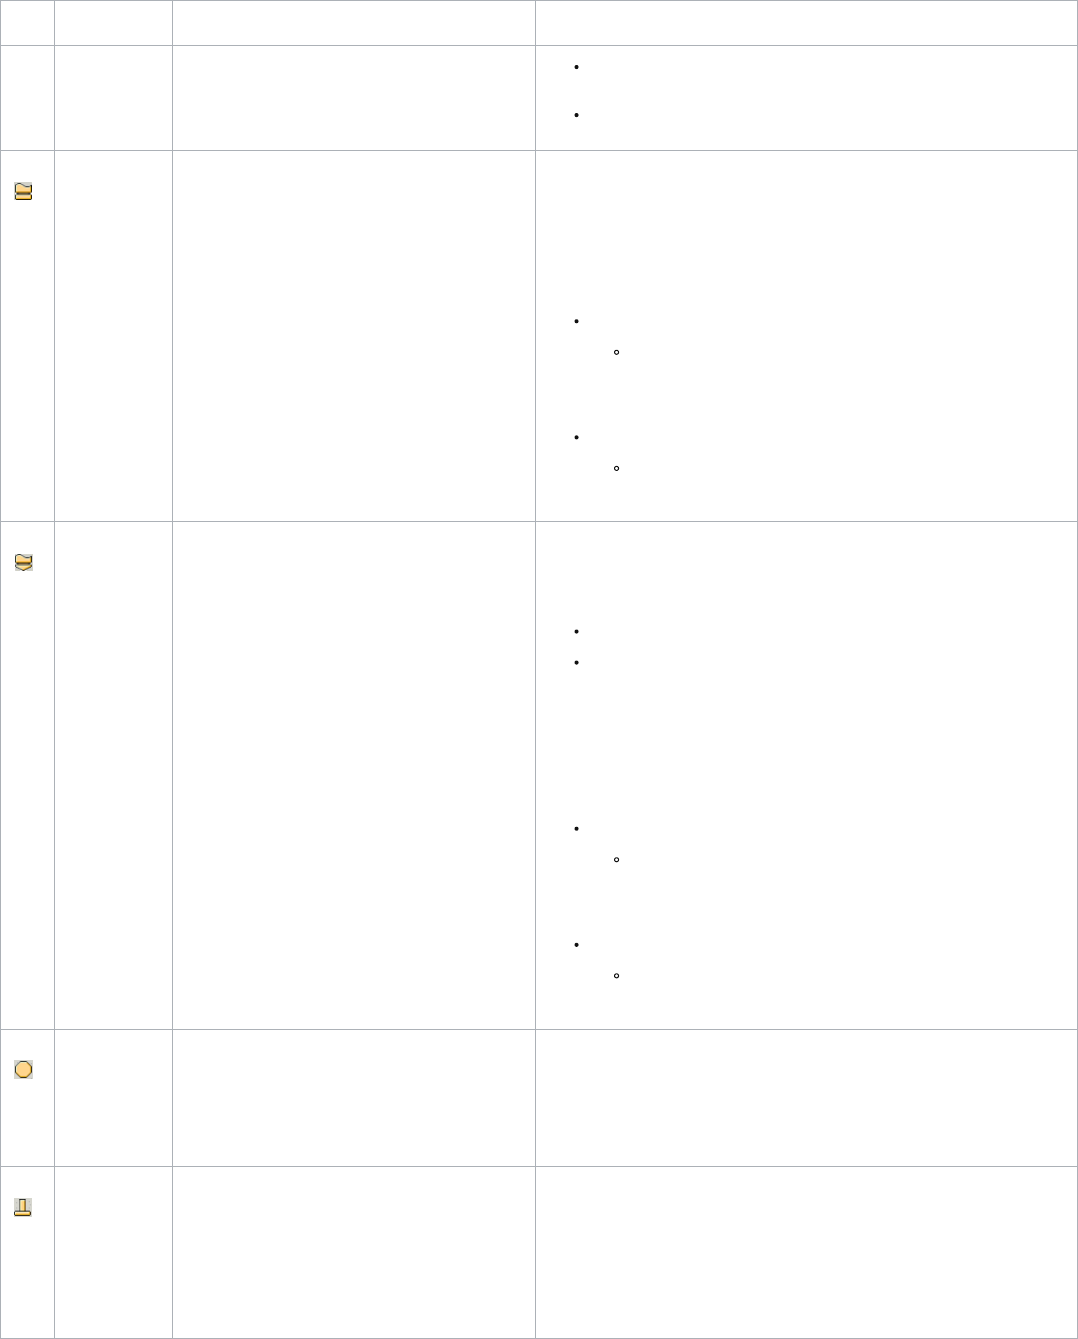
3/16/23, 2:11 PM
Legacy Developer Documentation
https://documentation.b2c.commercecloud.salesforce.com/DOC1/advanced/print.jsp?topic=/com.demandware.dochelp/LegacyDevDoc/LegacyDevDoc.html&cp…
150/158
Icon Component Description Configuration Properties
Element Key: name of the Pipeline Dictionary item that will hold the current
element
Iterator Key: name of the Pipeline Dictionary item to be used as the iterator
Interaction
Node
Specifies the page template used to show resulting
information
Properties:
Description: description for other developers using the pipeline.
Template Properties:
Dynamic Template:
true - the template to use is determined by the template expression
Template expression: identifies a dynamic template to use. For example:
Product.template, where Product is an object in the Pipeline
Dictionary. This lets you assign different templates for different product
types, for example.
false - template is determined by the template name
Template name: templates identifier. For example
account/login/accountlogin
Interaction
Continue Node
Processes a template based on user action via a browser
The template must reference a form definition that
defines storefront entry fields and buttons.
Call Properties:
Secure Connection required:
true: incoming request must be https.
false: incoming request can be http.
Properties:
Description: description for other developers using the pipeline.
Start Name: name for the interaction continue node
Dynamic Template:.
true - the template to use is determined by the template expression
Template expression: identifies a dynamic template to use. For example:
Product.template, where Product is an object in the Pipeline
Dictionary. This lets you assign different templates for different product
types, for example.
false - template is determined by the template name
Template name: templates identifier. For example
account/login/accountlogin
Stop Node
Functions as an emergency break, comparable with an
exception within pipelets.
If you want to stop all pipelines, use a stop node. This
should rarely be used in production.
Name: external name
End Node
Finishes the execution of the current pipeline
If the current pipeline was called from another pipeline
and you only want to stop the current pipeline, use an
end node, not a stop node. The calling pipeline will be
continued Only if called from a call node; not from a
jump node.
Name: must be unique within the pipeline. Can be used by the calling pipeline to
dispatch flow after a call.
The value of the name property is returned to the calling node. If there is a transition
off the calling node of the same name, that transition is followed. End node names
can be evaluated at the call node to implement error handling.
Example
The cart pipeline executes the CalculateCart script. If the basket is null, a new basket is created using GetBasket. This pipeline includes a private start node (Calculate), a call node
(Cart-GetExistingBasket), two pipelets (Assign and Script) and two end nodes. The Script pipelet executes the CalculateCart.ds script file.
Transition Names and Flow Control
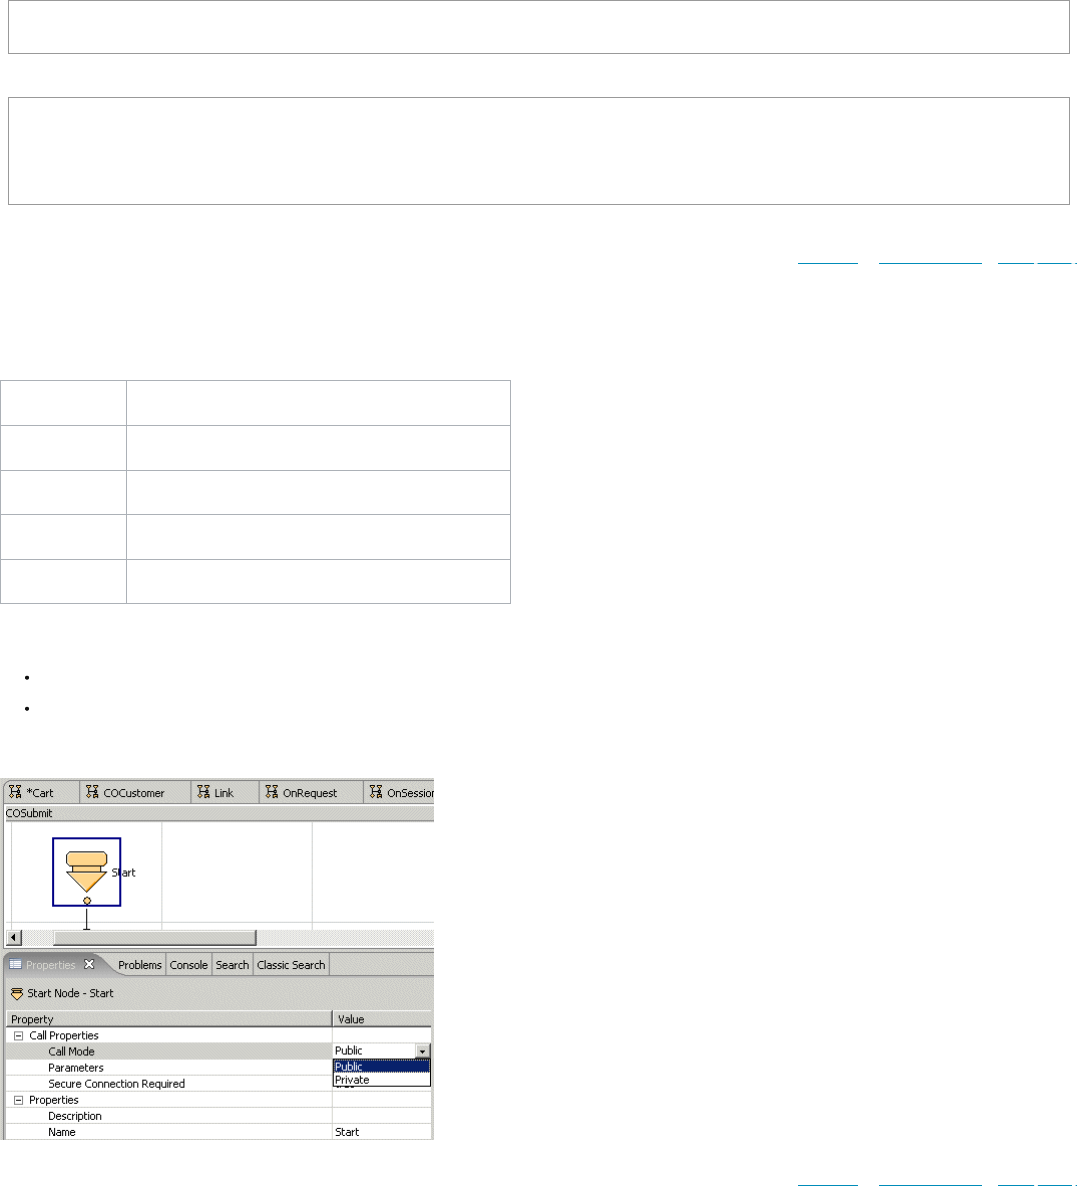
3/16/23, 2:11 PM
Legacy Developer Documentation
https://documentation.b2c.commercecloud.salesforce.com/DOC1/advanced/print.jsp?topic=/com.demandware.dochelp/LegacyDevDoc/LegacyDevDoc.html&cp…
151/158
When using an Interaction Continue node, such as with the SiteGenesis application's cart pipeline, it is essential for flow control to name each transition. This is because the template
that is called by the Interaction Continue node can reference this name as the next step in the process, as one of many possibilities.
The Interaction Continue node calls a template, which derives data entry validation from a form definition. The form definition includes information on both entry fields and action
requests such as buttons.
For example, the cart template in the SiteGenesis application references the cart.coupon form definition, as follows, using the CurrentForms element to validate the Remove Coupon
button:
<isloop items="${pdict.CurrentForms.cart.coupons}"
var="FormCoupon" status="loopstateCoupons">
When the customer clicks the Remove Coupon button, the workflow branches to the deleteCoupon transition, as follows:
<button class="textbutton" type="submit"
value="${Resource.msg('global.remove','locale',null)}"
name="${FormCoupon.deleteCoupon.htmlName}">
${Resource.msg('global.remove','locale',null)}
</button>
deleteCoupon is also the name of the transition.
© Copyright 2000-2023, Salesforce, Inc. All rights reserved. Various trademarks held by their respective owners. Show URL Submit Feedback Privacy Policy
3.3.2. Start and End Nodes
Each pipeline must have at least one start node and terminate with one of four elements.
Element Use...
Interaction node When a request requires a page as response.
Jump node When the pipeline forwards the request to another pipeline.
End node To terminate a subpipeline.
Stop node To terminate a subpipeline and calling pipelines.
Public/Private Start Nodes
Public pipelines are indicated by a yellow start node. They can be called directly from a browser.
Private start nodes (colored red) can't be called directly from a browser.
Set a start node to public or private from the Property view, as follows:
© Copyright 2000-2023, Salesforce, Inc. All rights reserved. Various trademarks held by their respective owners. Show URL Submit Feedback Privacy Policy
3.3.3. Subpipelines
When a portion of business logic applies to multiple pipelines, you can configure it as a subpipeline that is invoked by a call or a jump node.
Subpipelines are terminated with any of the following:
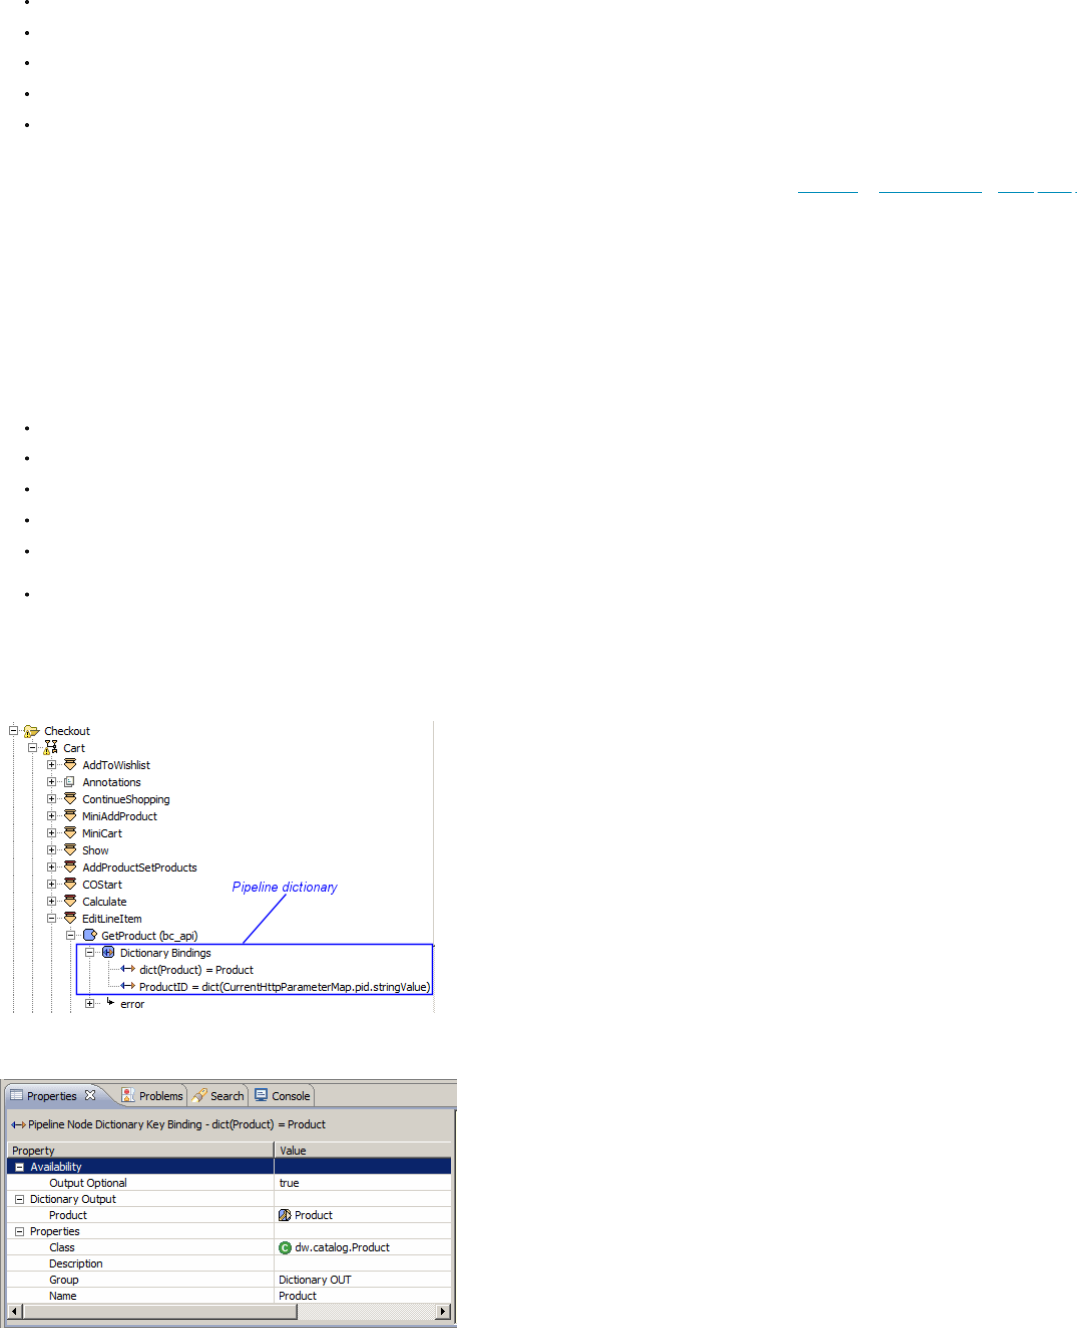
3/16/23, 2:11 PM
Legacy Developer Documentation
https://documentation.b2c.commercecloud.salesforce.com/DOC1/advanced/print.jsp?topic=/com.demandware.dochelp/LegacyDevDoc/LegacyDevDoc.html&cp…
152/158
End nodes
Stop nodes (except error templates)
Join nodes
Call nodes
Jump nodes
Pipelines can contain multiple named end or stop nodes.
© Copyright 2000-2023, Salesforce, Inc. All rights reserved. Various trademarks held by their respective owners. Show URL Submit Feedback Privacy Policy
3.4. The Pipeline Dictionary
The Pipeline Dictionary transports data in the pipeline flow and keeps track of all parameters and values processed by the pipeline. You pass values to the Pipeline Dictionary via
explicitly naming them in the pipelet or by calling them in a script.
The Pipeline Dictionary is created and initialized when a pipeline execution begins. Its scope is the duration of the pipeline execution. Its structure is a hash table of key/value pairs.
Pipelets have read/write access, while templates have read access.
The default keys are:
CurrentSession
CurrentRequest
CurrentHttpParameterMap
CurrentForms
CurrentCustomer
CurrentPageMetadata
Example
This example uses the Cartridge Explorer view to see the Pipeline Dictionary entries for the Cart pipeline. The pipeline gets a product added to the cart via the GetProduct pipelet.
This involves a call to the Pipeline Dictionary to obtain the product name and ID.
The first Pipeline Dictionary entry is dict(Product), which outputs Product. Click dict(Product) in Cartridge Explorer to see the following in the Properties tab.
The second Pipeline Dictionary entry is for ProductID, which inputs from the Pipeline Dictionary CurrentHttpParameterMap.pid.stringValue. This is the product ID in the URL.
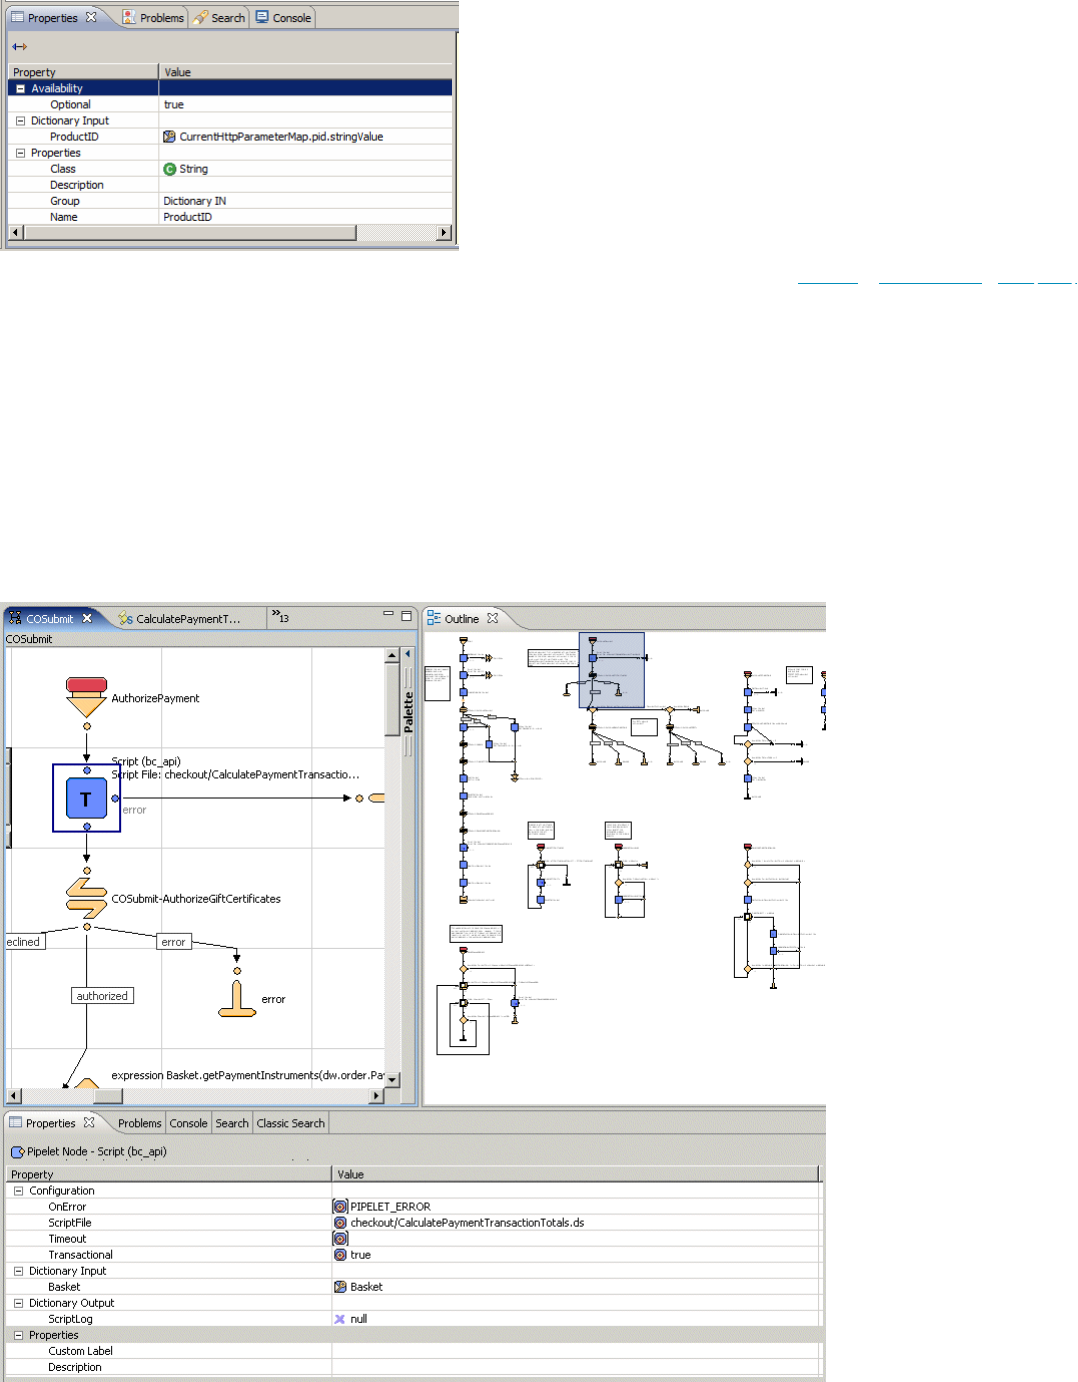
3/16/23, 2:11 PM
Legacy Developer Documentation
https://documentation.b2c.commercecloud.salesforce.com/DOC1/advanced/print.jsp?topic=/com.demandware.dochelp/LegacyDevDoc/LegacyDevDoc.html&cp…
153/158
© Copyright 2000-2023, Salesforce, Inc. All rights reserved. Various trademarks held by their respective owners. Show URL Submit Feedback Privacy Policy
3.5. Database Transaction Handling
Salesforce B2C Commerce can handle database transactions via a pipeline, either implicitly or explicitly. An implicit transaction is automatically controlled by the Pipeline Processor,
while an explicit transaction is defined by a developer.
Implicit Transactions
Developers can't define whether a pipelet is transactional, because it's defined by B2C Commerce internally as either transactional or not. The exception to this is the Script and Eval
nodes. If the script/eval statement must update the database, they must be configured as transactional.
When the transaction is reached during pipeline processing, a database transaction is automatically started and implicitly committed at the end of the pipelet execution (or rolled
back in case of error).
To set the node to transactional, select the Transactional field in the Property view, then select true.
Explicit Transactions
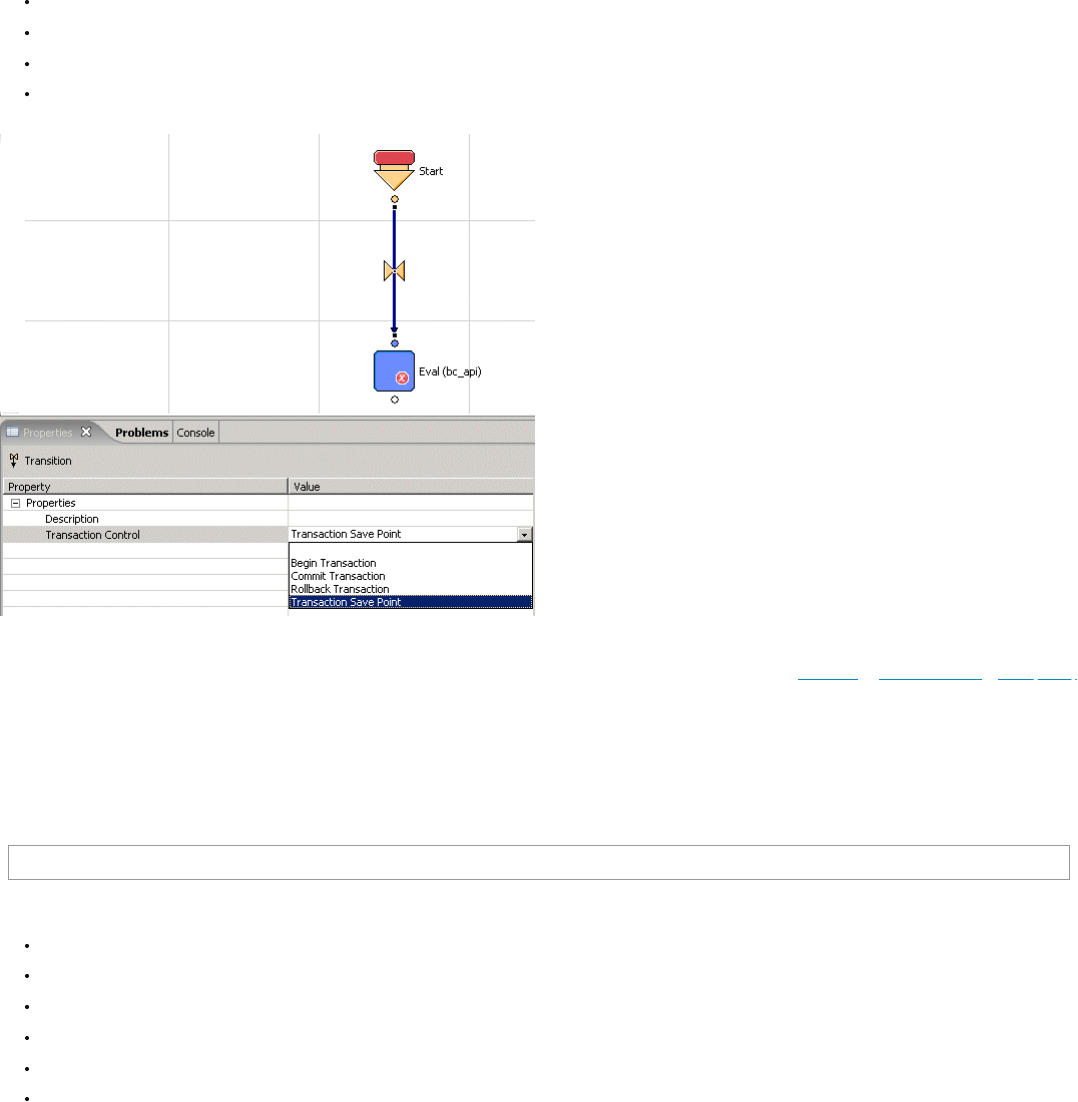
3/16/23, 2:11 PM
Legacy Developer Documentation
https://documentation.b2c.commercecloud.salesforce.com/DOC1/advanced/print.jsp?topic=/com.demandware.dochelp/LegacyDevDoc/LegacyDevDoc.html&cp…
154/158
You can also perform a database transaction explicitly within a pipeline. You usually create explicit transactions if you want multiple pipelets to succeed or fail together. For example,
if you want to rollback several execution steps in the pipeline, if the final step doesn't succeed.
You can:
Begin the transaction
Commit the transaction
Rollback the transaction
Set transaction save points
Use this method when the specifics of a database transaction need to be more controlled within a pipeline.
© Copyright 2000-2023, Salesforce, Inc. All rights reserved. Various trademarks held by their respective owners. Show URL Submit Feedback Privacy Policy
3.6. Pipeline Execution Steps
To understand how a pipeline is processed, consider the steps involved in processing a hypothetical AddToBasket pipeline and the exchange of data between a pipelet and the
Pipeline Dictionary.
Assume the URL triggering this pipeline is:
http://<host>/on/demandware.store/<Site>/default/USD/AddToBasket-Add?UserID=123&ProductID=456
Where:
<host>/on/demandware.store/<Site> is the storefront URL
default is the locale
USD is the directory that contains the pipeline
AddToBasket is the name of the pipeline
Add is the start node
UserID=123, ProductID=456 are parameters with their respective values.
Assuming that the request handler servlet has appropriately analyzed the request (identifying which pipeline needs to be triggered), the pipeline behaves as follows:
1. The Pipeline Processor initializes the Pipeline Dictionary.
Any parameters passed to the start of the pipeline by the current request are stored as key-value pairs in the Pipeline Dictionary. The parameter name is the key and has an
associated value. The data are maintained in the Pipeline Dictionary until the pipeline ends and clears the dictionary.
(In this example, UserID is a key and "123" is its value. ProductID is a key and "456" is its value.)
2. The Pipeline Processor executes each pipelet and flow control action in sequential order.
a. Pipelets are executed by calling a method of each pipelet class and passing the Pipeline Dictionary as an argument.
Each pipelet might require a key-value pair (or pairs) to be available in the Pipeline Dictionary.
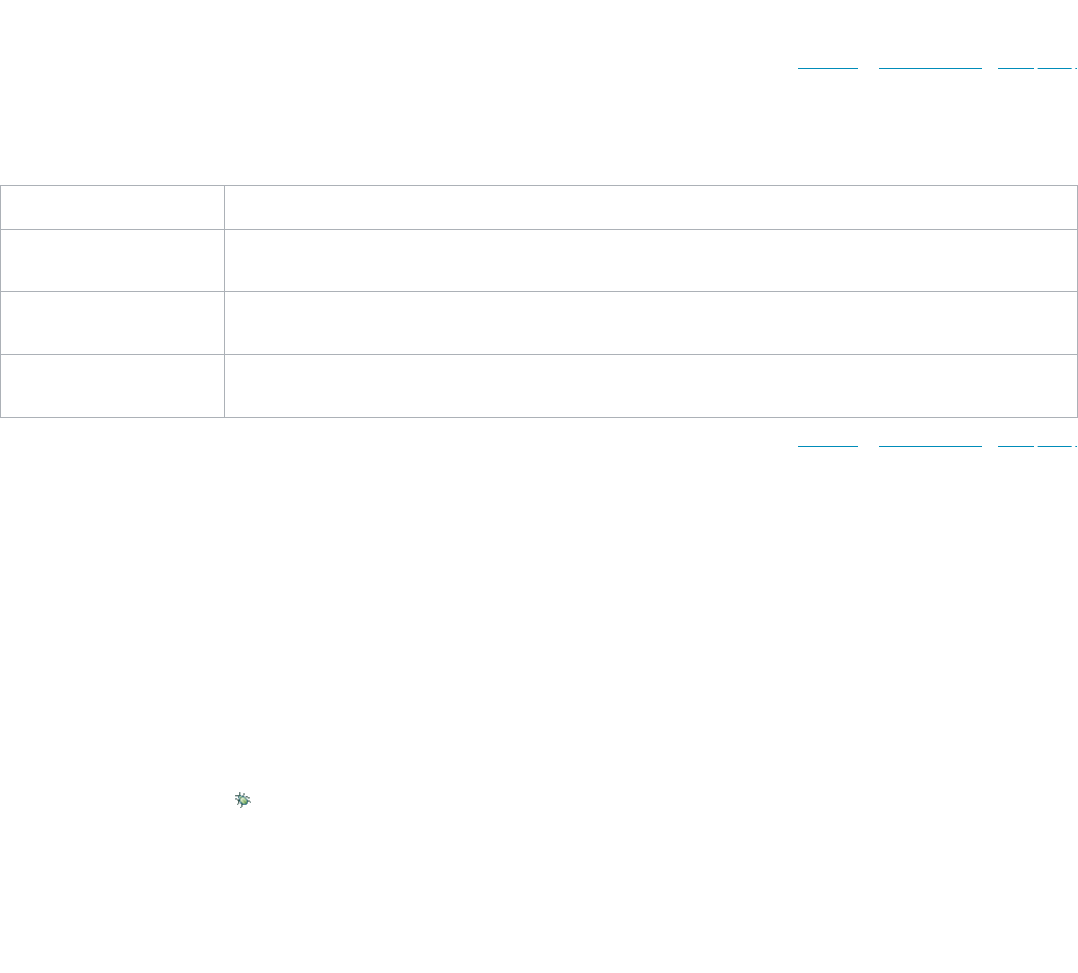
3/16/23, 2:11 PM
Legacy Developer Documentation
https://documentation.b2c.commercecloud.salesforce.com/DOC1/advanced/print.jsp?topic=/com.demandware.dochelp/LegacyDevDoc/LegacyDevDoc.html&cp…
155/158
b. The pipelet checks the Pipeline Dictionary. If it finds the necessary keys, it executes its business function.
c. As a result of executing, the pipelet might add other key-value pairs to the Pipeline Dictionary.
The Pipeline Dictionary cumulatively stores all key-value pairs from all preceding pipelet activity until it reaches an end point. The Pipeline Dictionary reference is passed
to any subpipeline called, and is returned to the calling pipeline after the subpipeline has executed.
3. The pipeline processes the interaction end node, calling a template.
Using data stored in the Pipeline Dictionary, a response is generated from the template to be sent back to the client as an HTML page. Serving a request might include more
than one pipeline. Due to the separation of presentation and processing pipelines, it typically includes subpipelines that are called into a process with a call node.
Note: Many pipelines, in particular processing pipelines, do not terminate in an interaction node.
© Copyright 2000-2023, Salesforce, Inc. All rights reserved. Various trademarks held by their respective owners. Show URL Submit Feedback Privacy Policy
3.7. Error Handling
You can handle errors during a pipeline execution.
Method Description
Pipelet-specific error handling Use the pipelet Error exit or a decision node to implement handling that is specific to the error condition. Use this method for business
errors such as "product not found" or for technical errors, such as "product import could not acquire lock".
Pipeline-specific error handling
using a subpipeline
Create a subpipeline with a start node Error in the top level pipeline and implement pipeline-specific error handling. This subpipeline will
be called when an unresolved error occurs in the pipeline or a calling subpipeline.
Site-specific error pipeline A site-specific error pipeline is called when an error isn't caught by the originating pipeline. This pipeline, called Error-Start, shows a site-
specific general error page. A custom implementation can be provided.
© Copyright 2000-2023, Salesforce, Inc. All rights reserved. Various trademarks held by their respective owners. Show URL Submit Feedback Privacy Policy
3.8. Debugging Pipelines
The Pipeline Debugger enables you to track the execution of a pipeline step-by-step within UX Studio to help you identify errors. Using the Pipeline Debugger, you can easily check
the storefront behavior of pipelines, track specific pipeline sections, and monitor the status of the Pipeline Dictionary at each step using a special watch window. The Pipeline
Debugger, unlike standard programming language debuggers, operates on the graphical representation of the pipeline rather than at the source code level.
When you run the Pipeline Debugger and interrogate variables or expressions, the variables and expressions are evaluated in the context of the current storefront session. Most often,
the pipeline under scrutiny is triggered by an action in the storefront. It's also possible to trigger a pipeline directly, using the browser URL input box. However, such an isolated action
might leave out certain session dictionary keys that the pipeline expects.
Note: Pipeline debugging is disabled on Production instances to prevent interceptions of credit card data.
1. Select a site, and click Storefront. The storefront opens in a new tab in your browser.
2. Open UX Studio.
3. Click the down arrow beside the button and select Debug configurations from the popup menu.
Note:
If you click the button instead of the down arrow, the debugger produces the following message:
The selection can't be launched and there are no recent launches.
Be sure to click the down arrow to get the popup menu.
The Debug Configurations dialog box opens.
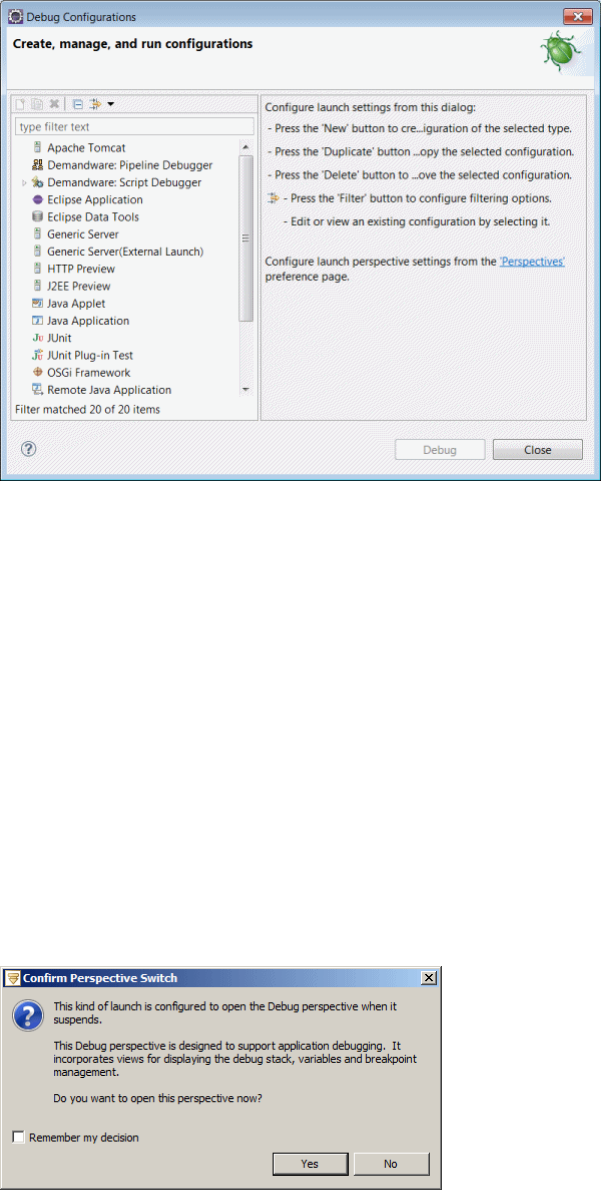
3/16/23, 2:11 PM
Legacy Developer Documentation
https://documentation.b2c.commercecloud.salesforce.com/DOC1/advanced/print.jsp?topic=/com.demandware.dochelp/LegacyDevDoc/LegacyDevDoc.html&cp…
156/158
4. In the Configurations window, double-click Salesforce B2C Commerce: Pipeline Debugger.
5. Enter the debug session name.
6. Enter the Site to Debug.
For example, Sites-SiteGenesis-Site.
7. Click Debug.
8. Navigate to the pipeline you want to debug.
For example: Cart.xml
9. Right-click the node in the pipeline where you want to start debugging.
For example: Cart-PrepareView.
10. Select Add/Remove Pipeline Node Breakpoint (or click the icon in the toolbar).
11. Return to your storefront application.
12. Navigate to the location you want to investigate. Process until the debugger returns to Studio, indicating that the breakpoint has been reached.
For example, add an item to the cart, and click View Cart in the cart quick view.
13. Studio prompts you with the following message:
14. Click Yes.
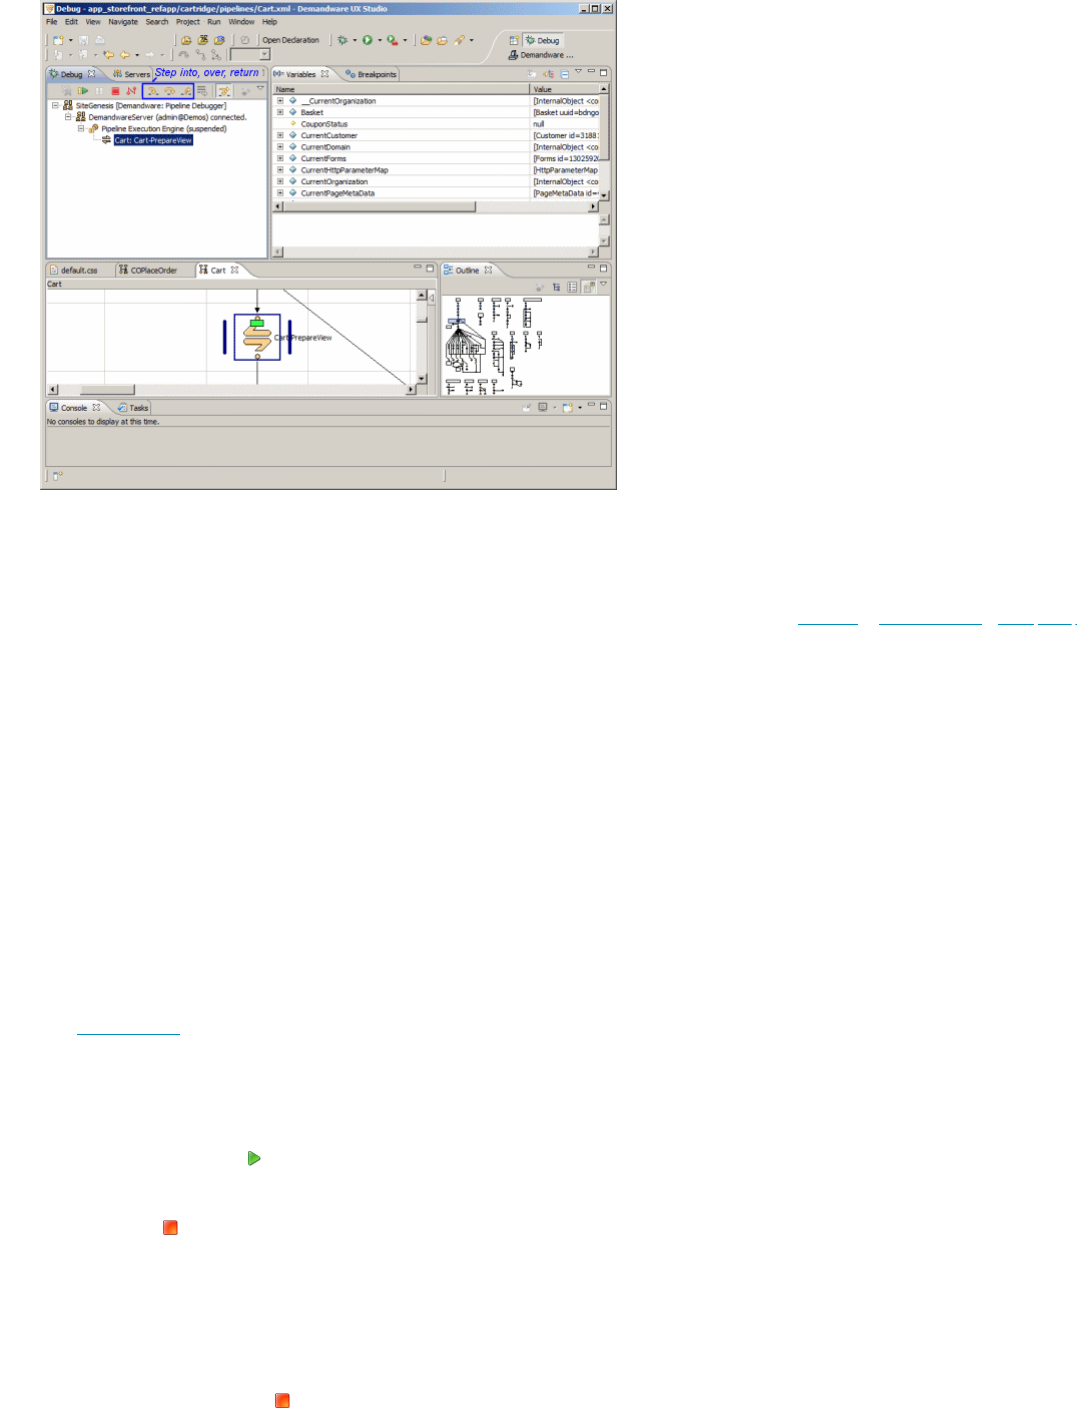
3/16/23, 2:11 PM
Legacy Developer Documentation
https://documentation.b2c.commercecloud.salesforce.com/DOC1/advanced/print.jsp?topic=/com.demandware.dochelp/LegacyDevDoc/LegacyDevDoc.html&cp…
157/158
15. The debugging perspective opens.
16. Use the Step (Into, Over and Return) buttons to step through the pipeline to identify problem causes.
Note: Because you can define multiple server connections, you can also define multiple remote server configurations. Therefore, when defining a debug session, you can select
the remote server configuration for that debug session.
© Copyright 2000-2023, Salesforce, Inc. All rights reserved. Various trademarks held by their respective owners. Show URL Submit Feedback Privacy Policy
3.9. Analyze Performance with Pipeline Profiler
Use the Pipeline Profiler to tune the performance of scripts and pipelines during development and testing. The Pipeline Profiler collects and aggregates pipeline run times for each
node and script in a pipeline. You must trigger the pipeline in the storefront so that the Pipeline Profiler can analyze its performance. You can use this information to identify problem
areas of code.
We recommend that you use the Pipeline Profiler during both development and load testing. The performance of a pipeline depends on the tasks it's intended to accomplish. As a
general rule, a pipeline shouldn't take more than three seconds to execute when it includes non-cached components and no more than 250 milliseconds when it includes cached
components. These guidelines assume that there might be additional performance costs to constructing a page in addition to the pipeline, for example, executing JavaScript or
retrieving rich content, such as flash content. Generally, you can expect that performance load testing might also be required to judge the performance of a page on a live site. The
Pipeline Profiler is a useful tool for examining pipelines during this phase of testing.
Note: We recommend that you use the Pipeline Profiler on production to find performance bottlenecks, but only for about 15 minutes.
Important: When you activate the Pipeline Profiler from Business Manager, it is activated only for the application server that is serving that Business Manager session. A user
logged in to a Business Manager session served by a different application server can't see the activated Pipeline Profiler. The Pipeline Profiler collects data only for pipelines
processed by the application server where it was activated.
Refer also to Use Code Profiler for information about analyzing run-time performance.
1. Open the storefront for the site containing the pipeline you want to examine.
2. Select Administration > Operations > Pipeline Profiler.
3. On the Pipeline Profiler page, click to activate the profile.
If you have not opened the storefront, the site name does not appear in the Browse Captured Data section of the page. At least one site must appear here for data to be
collected.
The icon changes to and the profiler starts to capture data.
4. In the storefront, trigger the pipelines or scripts you want to test. We recommend that you trigger the scripts several times to allow for meaningful averages in performance
statistics.
Your performance times might vary depending on whether a template is cached, site traffic volume, or for other reasons. We recommend that you trigger a pipeline multiple
times for a good average. We also recommend that you use the Pipeline Profiler during load testing to understand the effect of traffic on pipeline performance.
If a script is triggered, you see the data on the Pipeline Profiler page.
5. To deactivate the Pipeline Profiler, click . Deactivating the profiler prevents additional data from being collected and can make the data easier to interpret.
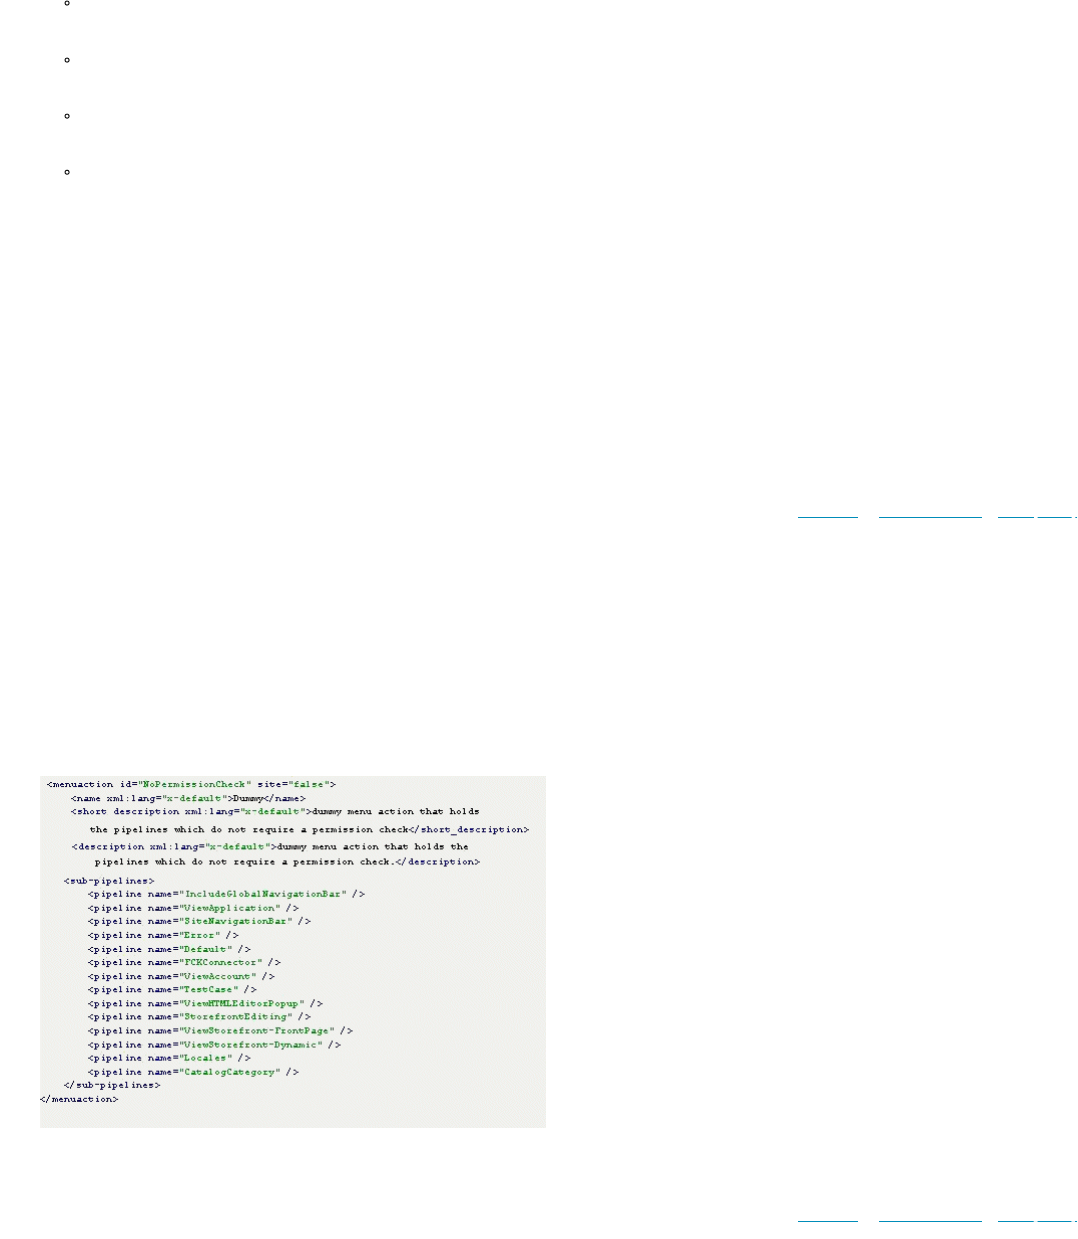
3/16/23, 2:11 PM
Legacy Developer Documentation
https://documentation.b2c.commercecloud.salesforce.com/DOC1/advanced/print.jsp?topic=/com.demandware.dochelp/LegacyDevDoc/LegacyDevDoc.html&cp…
158/158
6. To examine the captured data for scripts on the Pipeline Profiler page, click Script Data.
The Script Data page displays the results of the performance profiling of script processing.
Own Time: Time spent within the function (time spent within functions called by that function is not included).
Total Time: Time spent within all other function calls.
Average Own Time: Average time for one call of the function.
Average Total Time: Average time for all other function calls.
7. To examine pipeline performance, click the site name in the Browse Captured Data section of the page. This page makes it easy to see if a node or script is called frequently
and is therefore a good candidate for optimization.
The Profiler - Pipeline Performance page opens.
To sort results by Start Node Name, Hits, Total Time, Average Time, Minimum Time, or Maximum Time, click any of the column names.
8. To view detailed performance information for a pipeline, click the pipeline name. This page is useful for determining whether a template, script, or node is costing the most
time.
9. On the Pipeline Performance Detail page:
a. To sort results by Start Node Name, Pipelet Node ID, Interaction Node ID, Hits, Total Time, Average Time, Minimum Time, or Maximum Time, click any of the column
names.
b. To see how templates and included templates perform, click any template name.
© Copyright 2000-2023, Salesforce, Inc. All rights reserved. Various trademarks held by their respective owners. Show URL Submit Feedback Privacy Policy
3.10. Excluding Pipelines from Permission Checks
A login and permission check is always performed for Business Manager pipelines. If you need to exclude a pipeline from a permission check, create a custom Business Manager
module with ID NoPermissionCheck and assign the pipeline to this module. Only one custom Business Manager module with ID NoPermissionCheck is allowed per server
instance.
1. Add a custom menu action with the ID NoPermissionCheck to the bm_extensions.xml file of your customization cartridge.
2. Add the pipelines you want to exclude from permission check to the <subpipelines> section.
For example:
Pipelines excluded from permission check can be executed by any user logged into Business Manager. The pipeline can be executed, even though the user has no permission on any
Business Manager menu action.
© Copyright 2000-2023, Salesforce, Inc. All rights reserved. Various trademarks held by their respective owners. Show URL Submit Feedback Privacy Policy
